18.Linux磁盘管理
1.磁盘分区工具fdisk
1. 添加一块小于2TB的磁盘进行使用,步骤如下:
- 给虚拟机添加一块新的硬盘
- 使用fdisk进行分区
- 使用mkfs进行格式化
- 使用mount进行挂载
PS: 生产分区建议,如无特殊需求直接使用整个磁盘即可,无需分区。
PS: 学习分区建议: 1P+1E(3L) 2P+1E(2L) 3P+1E(1L) (仅适用于练习)
[root@yinwucheng ~]# lsblk

NAME   MAJ:MIN RM  SIZE RO TYPE MOUNTPOINT

sda      8:0    0   40G  0 disk

├─sda1   8:1    0    1G  0 part /boot

├─sda2   8:2    0    1G  0 part [SWAP]

└─sda3   8:3    0   38G  0 part /

sdb      8:16   0  300G  0 disk

sdc      8:32   0  300G  0 disk

sr0     11:0    1  4.3G  0 rom

[root@yinwucheng ~]# fdisk /dev/sdb

Welcome to fdisk (util-linux 2.23.2).

Changes will remain in memory only, until you decide to write them.

Be careful before using the write command.

Device does not contain a recognized partition table

Building a new DOS disklabel with disk identifier 0x271d3013.

Command (m for help): m

Command action

   a   toggle a bootable flag               #切换分区启动标记

   b   edit bsd disklabel                   #编辑sdb磁盘标签

   c   toggle the dos compatibility flag    #切换dos兼容模式

   d   delete a partition                   #删除分区

   l   list known partition types           #显示分区类型

   m   print this menu                       #显示帮助菜单

   n   add a new partition                  #新建分区

   o   create a new empty DOS partition table   #创建新的空白分区表

   p   print the partition table            #显示分区表的信息

   q   quit without saving changes          #不保存退出

   s   create a new empty Sun disklabel     #创建新的Sun磁盘标签

   t   change a partitions system id       #修改分区ID,可以通过l查看id

   u   change display/entry units           #修改容量单位,磁柱或扇区

   v   verify the partition table           #检验分区表

   w   write table to disk and exit         #保存退出

   x   extra functionality (experts only)   #拓展功能
1.创建主分区
   Command (m for help): n

Partition type:

   p   primary (0 primary, 0 extended, 4 free)

   e   extended      #扩展分区

Select (default p): p      #选择创建主分区

Partition number (1-4, default 1):      #默认创建第一个主分区

First sector (2048-629145599, default 2048):     #默认扇区-->回车即可

Using default value 2048

Last sector, +sectors or +size{K,M,G} (2048-629145599, default 629145599): +150G    #分配150G

Partition 1 of type Linux and of size 150 GiB is set
2.fdisk创建扩展分区
Command (m for help): n     #新建分区

Partition type:

   p   primary (1 primary, 0 extended, 3 free)

   e   extended

Select (default p): e    #创建扩展分区

Partition number (2-4, default 2):

First sector (314574848-629145599, default 314574848):

Using default value 314574848

Last sector, +sectors or +size{K,M,G} (314574848-629145599, default 629145599):    #剩余容量都给到扩展分区

Using default value 629145599

Partition 2 of type Extended and of size 150 GiB is set
3.fdisk创建逻辑分区
Command (m for help): n   #新建分区

Partition type:

   p   primary (1 primary, 1 extended, 2 free)

   l   logical (numbered from 5)

Select (default p): l     #创建逻辑分区

Adding logical partition 5

First sector (314576896-629145599, default 314576896):

Using default value 314576896

Last sector, +sectors or +size{K,M,G} (314576896-629145599, default 629145599): +50G     #分配50G容量

Partition 5 of type Linux and of size 50 GiB is set
4.fdisk查看分区情况,并保存
Command (m for help): p    #查看创建的分区

Disk /dev/sdb: 322.1 GB, 322122547200 bytes, 629145600 sectors

Units = sectors of 1 * 512 = 512 bytes

Sector size (logical/physical): 512 bytes / 512 bytes

I/O size (minimum/optimal): 512 bytes / 512 bytes

Disk label type: dos

Disk identifier: 0x271d3013

   Device Boot      Start         End      Blocks   Id  System

/dev/sdb1            2048   314574847   157286400   83  Linux

/dev/sdb2       314574848   629145599   157285376    5  Extended

/dev/sdb5       314576896   419434495    52428800   83  Linux

#保存分区信息

Command (m for help): w

The partition table has been altered!

Calling ioctl() to re-read partition table.

Syncing disks.

#检查磁盘是否是MBR格式

[root@yinwucheng ~]# fdisk /dev/sdb -l |grep type

Disk label type: dos

#安装parted, 刷新内核立即生效,无需重启

[root@yinwucheng ~]# yum install parted -y

[root@yinwucheng ~]# partprobe /dev/sdb
5.格式化磁盘
mkfs格式化磁盘,实质创建文件系统,文件系统类似于将房子装修成3室一厅,还是2室一厅。
#选项:

 -b  设定数据区块占用空间大小,目前支持1024、2048、4096 bytes每个块。

 -t  用来指定什么类型的文件系统,可以是ext4, xfs

 -i  设定inode的大小

 -N  设定inode数量,防止Inode数量不够导致磁盘不足

#1.格式化整个磁盘

[root@yinwucheng ~]# mkfs.ext4 /dev/sdb

mke2fs 1.42.9 (28-Dec-2013)

/dev/sdb is entire device, not just one partition!

Proceed anyway? (y,n) y

Filesystem label=

OS type: Linux

Block size=4096 (log=2)

Fragment size=4096 (log=2)

Stride=0 blocks, Stripe width=0 blocks

19660800 inodes, 78643200 blocks

3932160 blocks (5.00%) reserved for the super user

First data block=0

Maximum filesystem blocks=2227175424

2400 block groups

32768 blocks per group, 32768 fragments per group

8192 inodes per group

Superblock backups stored on blocks:

	32768, 98304, 163840, 229376, 294912, 819200, 884736, 1605632, 2654208,

	4096000, 7962624, 11239424, 20480000, 23887872, 71663616

Allocating group tables: done

Writing inode tables: done

Creating journal (32768 blocks): done

Writing superblocks and filesystem accounting information: done

#2.格式化磁盘的某个分区

[root@yinwucheng ~]# mkfs.xfs /dev/sdb1

meta-data=/dev/sdb1              isize=512    agcount=4, agsize=9830400 blks

         =                       sectsz=512   attr=2, projid32bit=1

         =                       crc=1        finobt=0, sparse=0

data     =                       bsize=4096   blocks=39321600, imaxpct=25

         =                       sunit=0      swidth=0 blks

naming   =version 2              bsize=4096   ascii-ci=0 ftype=1

log      =internal log           bsize=4096   blocks=19200, version=2

         =                       sectsz=512   sunit=0 blks, lazy-count=1

realtime =none                   extsz=4096   blocks=0, rtextents=0
6.使用mount挂载并使用
如果需要使用该磁盘的空间,需要准备一个空的目录作为挂载点,与该设备进行关联。

7.磁盘的基本分区Gdisk
前面我们已经了解到fdisk分区,但fdisk不支持给高于2TB的磁盘进行分区。如果有单块盘高于2TB,建议使用Gdisk进行分区。
1.使用gdisk进行磁盘分区
#1.安装gdisk分区工具

[root@yinwucheng ~]# yum install gdisk -y

#2.创建一个新分区,大小500MB

[root@yinwucheng ~]# gdisk /dev/sdc

GPT fdisk (gdisk) version 0.8.10

Partition table scan:

  MBR: not present

  BSD: not present

  APM: not present

  GPT: not present

Creating new GPT entries.

Command (? for help): n

Partition number (1-128, default 1):

First sector (34-629145566, default = 2048) or {+-}size{KMGTP}:

Last sector (2048-629145566, default = 629145566) or {+-}size{KMGTP}: +500M

Current type is 'Linux filesystem'

Hex code or GUID (L to show codes, Enter = 8300):

Changed type of partition to 'Linux filesystem'

Command (? for help): p

Disk /dev/sdc: 629145600 sectors, 300.0 GiB

Logical sector size: 512 bytes

Disk identifier (GUID): 0FE3F4A5-FBC9-4515-8C25-F24BB0553830

Partition table holds up to 128 entries

First usable sector is 34, last usable sector is 629145566

Partitions will be aligned on 2048-sector boundaries

Total free space is 628121533 sectors (299.5 GiB)

Number  Start (sector)    End (sector)  Size       Code  Name

   1            2048         1026047   500.0 MiB   8300  Linux filesystem

Command (? for help): w   #保存分区

Final checks complete. About to write GPT data. THIS WILL OVERWRITE EXISTING

PARTITIONS!!

Do you want to proceed? (Y/N): Y

OK; writing new GUID partition table (GPT) to /dev/sdc.

The operation has completed successfully.

#3.创建完成后,可以尝试检查磁盘是否为gpt格式

[root@yinwucheng ~]# fdisk /dev/sdc -l |grep type

WARNING: fdisk GPT support is currently new, and therefore in an experimental phase. Use at your own discretion.

Disk label type: gpt

#4.安装parted, 刷新内核立即生效,无需重启

[root@yinwucheng ~]# yum install parted -y

[root@yinwucheng ~]# partprobe /dev/sdc
2.使用mkfs进行格式化磁盘。前面已经介绍过,此处不反复介绍。
[root@yinwucheng ~]# mkfs.xfs /dev/sdc1
3.使用mount命令将某个目录挂载该分区,进行使用。
[root@yinwucheng ~]# mkdir /data2

[root@yinwucheng ~]# mount /dev/sdc1 /data2
4.磁盘挂载方式Mount
前面我们已经提到过,如果需要使用磁盘的空间,需要准备一个空的目录作为挂载点,与该设备进行关联。mount主要是为文件系统指定一个访问入口。
PS: 类似我的商场没有门,那么就无法进入购买商品,此时通过mount命令可以创建一个入口。给超市安装一个门。如图:
1.通过mount进行挂载,但重启将会失效。我们称为临时生效。
 选项:

      -t指定文件系统挂载分区

      -a 挂载/etc/fstab中的配置文件

      -o 指定挂载参数

挂载/dev/sdb1至db1目录

[root@yinwucheng ~]# mkdir /db1

[root@yinwucheng ~]# mount -t xfs /dev/sdb1 /db1/
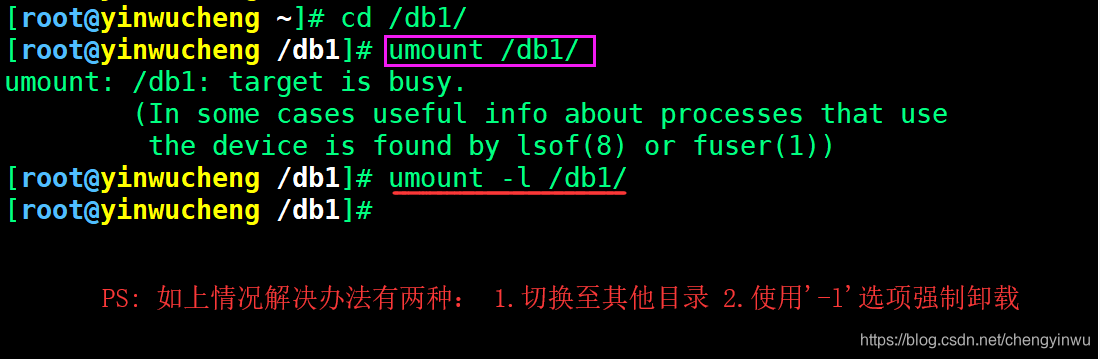
2.挂载的磁盘,如果不想使用可以使用umount进行卸载。
#选项: -l 强制卸载

#1.卸载目录方式

[root@yinwucheng ~]# umount /db1/

#2.卸载设备方式

[root@yinwucheng ~]# umount /dev/sdb1
3.umount不能卸载的情况
4.如果需要实现永久挂载则需要将挂载信息写入/etc/fstab配置文件中实现。
#1.使用blkid命令获取各设备的UUID

[root@yinwucheng ~]# blkid |grep 'sdb1'

/dev/sdb1: UUID="01353c25-0bde-49b6-a026-f805fc0de265" TYPE="xfs"

#2.使用UUID挂载磁盘sdb1分区至于db1, 测试挂载

[root@yinwucheng ~]# mount UUID="01353c25-0bde-49b6-a026-f805fc0de265" /db1

#3.写入/etc/fstab中,实现开机自动挂载

[root@yinwucheng ~]# vim /etc/fstab

UUID=01353c25-0bde-49b6-a026-f805fc0de265 /db1 xfs  defaults 0  0

#4.加载fstab配置文件, 同时检测语法是否有错误

[root@yinwucheng ~]# mount -a
5./etc/fstab配置文件编写格式
| 要挂载的设备 | 挂载点(入口) | 文件系统类型 | 挂载参数 | 是否备份 | 是否检查 |
|---|---|---|---|---|---|
| /dev/sdb1 | /db1 | xfs | defaults | 0 | 0 |
第四列:挂载参数。挂载参数有很多,在这块我们了解即可,不必深究
| 参数 | 含义 |
|---|---|
| async/sync | 是否为同步方式运行。默认async |
| user/nouser | 是否允许普通用户使用mount命令挂载。默认nouser |
| exec/noexe | 是否允许可执行文件执行。默认exec |
| suid/nosuid | 是否允许存在suid属性的文件。默认suid |
| auto/noauto | 执行mount -a 命令时,此文件系统是否被主动挂载。默认auto |
| rw/ro | 是否以只读或者读写模式进行挂载。默认rw |
| default | 具有rw,suid,dev,exec,auto,nouser,async等默认参数的设定 |
第五列:是否进行备份。通常这个参数的值为0或者1
| 选项 | 含义 |
|---|---|
| 0 | 代表不做备份 |
| 1 | 代表要每天进行备份操作 |
| 2 | 代表不定日期的进行备份操作 |
第六列:是否检验扇区:开机的过程中,系统默认会以fsck检验我们系统是否为完整
| 选项 | 含义 |
|---|---|
| 0 | 不要检验磁盘是否有坏道 |
| 1 | 检验 |
| 2 | 校验 (当1级别检验完成之后进行2级别检验) |
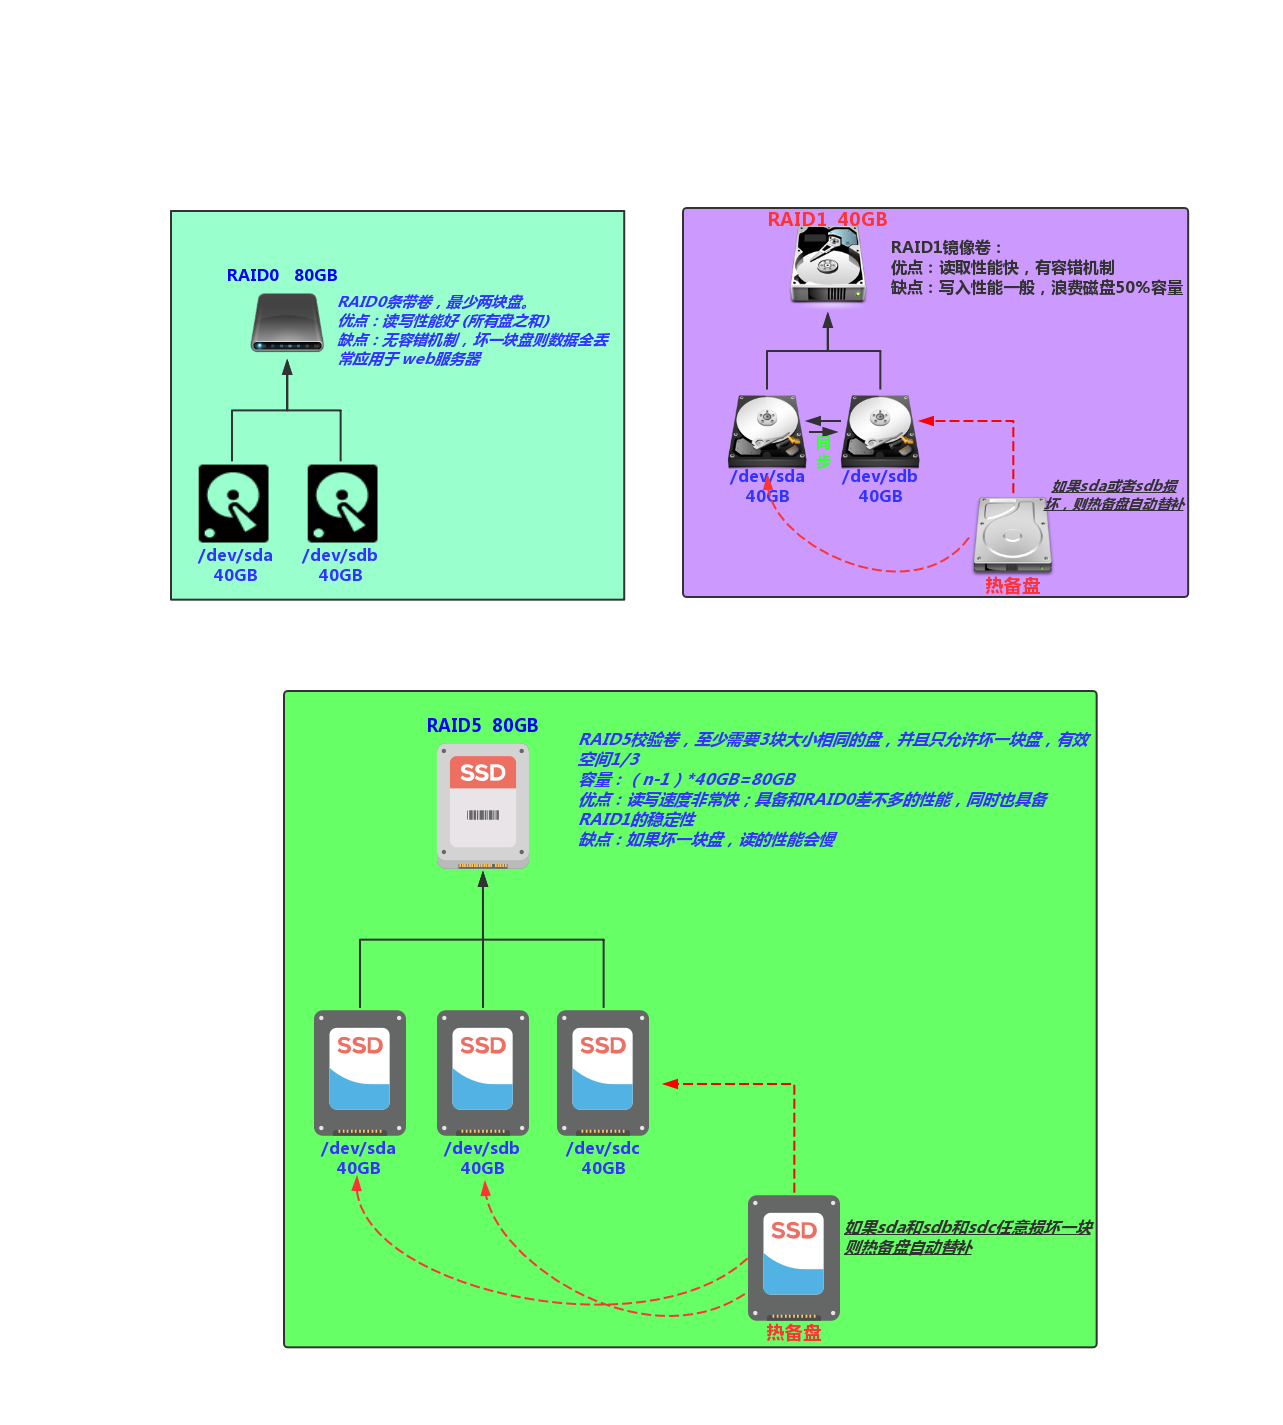
6.虚拟磁盘介绍SWAP
Swap分区在系统的物理内存不够时,将硬盘空间中的一部分空间释放出来,以供当前运行的程序使用。
PS: 当物理内存不够时会随机kill占用内存的进程,从而产生oom,临时使用swap可以解决。
1.创建分区,并格式化为swap分区。
[root@yinwucheng ~]# fdisk /dev/sdc   ##大小分1G

[root@yinwucheng ~]# mkswap /dev/sdc2   ##格式化为swap

Setting up swapspace version 1, size = 1048572 KiB

no label, UUID=f31cae8d-7bc8-4950-985f-94682b1a3718
2.查看当前swap分区大小,然后进行扩展和缩小
[root@yinwucheng ~]# free -m

              total        used        free      shared  buff/cache   available

Mem:           3931         109        3489          11         332        3574

Swap:          1023           0        1023

#1.扩展swap分区大小

[root@yinwucheng ~]# swapon /dev/sdc2

[root@yinwucheng ~]# free -m

              total        used        free      shared  buff/cache   available

Mem:           3931         110        3488          11         332        3574

Swap:          2047           0        2047

[root@yinwucheng ~]# swapon -a     ##代表激活所有的swap

#2.缩小swap分区大小

[root@yinwucheng ~]# swapoff /dev/sdc2

[root@yinwucheng ~]# free -m

              total        used        free      shared  buff/cache   available

Mem:           3931         110        3489          11         332        3574

Swap:          1023           0        1023

[root@yinwucheng ~]# swapoff -a    ##代表关闭所有的swap
3.检查当前swap分区有哪些设备
[root@yinwucheng ~]# swapon -s

Filename				Type		Size	Used	Priority

/dev/sda2                              	partition	1048572	0	-2

/dev/sdc2                              	partition	1048572	0	-3
4.如果磁盘没有过多的分区可用,也可以通过文件增加SWAP空间,本质上还是磁盘
[root@yinwucheng ~]# dd if=/dev/zero of=/opt/swap_file bs=1M count=500

[root@yinwucheng ~]# chmod 0600 /opt/swap_file

[root@yinwucheng ~]# mkswap -f /opt/swap_file

[root@yinwucheng ~]# swapon /opt/swap_file

[root@yinwucheng ~]# free -m
18.Linux磁盘管理的更多相关文章
- Linux 磁盘管理
Linux磁盘管理好坏管理直接关系到整个系统的性能问题. Linux磁盘管理常用三个命令为df.du和fdisk. df:列出文件系统的整体磁盘使用量 du:检查磁盘空间使用量 fdisk:用于磁盘分 ...
- df、du、fdisk:Linux磁盘管理三板斧的使用心得(转载)
From:http://os.51cto.com/art/201012/240726_all.htm 作者介绍:李洋(博客),博士毕业于中科院计算所.10多年来一直从事计算机网络信息安全研发工作,曾主 ...
- linux 磁盘管理学习笔记
磁盘管理命令:fdisk df du fdisk #查看硬盘分区表 df #查看分区使用情况 du #查看文件占用空间情况lvdisplay #逻辑分区 [1] 李洋.df.du.fdisk:Linu ...
- linux磁盘管理系列-软RAID的实现
1 什么是RAID RAID全称是独立磁盘冗余阵列(Redundant Array of Independent Disks),基本思想是把多个磁盘组合起来,组合一个磁盘阵列组,使得性能大幅提高. R ...
- linux磁盘管理系列-LVM的使用
LVM是什么 LVM是Linux操作系统的逻辑卷管理器. 现在有两个Linux版本的LVM,分别是 LVM1,LVM2.LVM1是一种已经被认为稳定了几年的成熟产品,LVM2 是最新最好的LVM版本. ...
- linux磁盘管理系列三:LVM的使用
磁盘管理系列 linux磁盘管理系列一:磁盘配额管理 http://www.cnblogs.com/zhaojiedi1992/p/zhaojiedi_linux_040_quota.html l ...
- linux磁盘管理系列二:软RAID的实现
磁盘管理系列 linux磁盘管理系列一:磁盘配额管理 http://www.cnblogs.com/zhaojiedi1992/p/zhaojiedi_linux_040_quota.html l ...
- linux磁盘管理系列一:磁盘配额管理
磁盘管理系列 linux磁盘管理系列一:磁盘配额管理 http://www.cnblogs.com/zhaojiedi1992/p/zhaojiedi_linux_040_quota.html l ...
- Linux磁盘管理,vi编辑器以及包管理器
一.Linux磁盘管理 Linux磁盘管理常用的三个命令为df,du,fdisk df:列出文件系统的整体磁盘使用量,利用这个命令来获取磁盘被占用了多少空间,,目前还剩下多少空间用法:df [-ahi ...
随机推荐
- centos7 supervisor管理redis
centos7 supervisor管理redis 标签(空格分隔): linux,redis 概念 Supervisor 相当强大,提供了很丰富的功能,不过我们可能只需要用到其中一小部分 super ...
- C# 反射基础用法
1.引用命名空间 using System.Reflection; 2.object[] parameters = { 参数 }; 调用方法的参数数组 3.Type t = Type.GetType( ...
- 【面试题】Java常见面试题
集合与数组? 数组:(可以存储基本数据类型)是用来存储对象的一种容器,但是数组的长度固定,不适合在对象数量未知的情况下使用 集合:(只能存储对象,对象类型可以不一样)集合的长度可变,可在多数情况下使用 ...
- React + TypeScript 实现泛型组件
泛型类型 TypeScript 中,类型(interface, type)是可以声明成泛型的,这很常见. interface Props<T> { content: T; } 这表明 Pr ...
- 性能测试:Jmeter-Beanshell请求加密实例
进行性能测试时,有可能遇到一种场景:接口请求由于安全问题,需要进行加密发送. 这种场景下,使用Jmeter实现性能测试,则也需要使用同样的加密规则发送请求报文. 要实现此类性能测试有几种策略: 直接去 ...
- 基于Python协同过滤算法的认识
Contents 1. 协同过滤的简介 2. 协同过滤的核心 3. 协同过滤的实现 4. 协同过滤的应用 1. 协同过滤的简介 关于协同过滤的一个最经典的例子就是看电影,有时候 ...
- Shell之变量
目录 Shell之变量 参考 变量命名规则 变量语法规范 四种变量类型 系统变量 特殊变量 变量的使用 变量内容的删除和替换 Shell之变量
- wordpress访问速度慢
可能是google字体的原因 1.找到wordpress目录下wp-includes/script-loader.php这个文件 2.查找open_sans_font_url这个字段,把后面的font ...
- v-text和v-html的区别
一.v-text 用于渲染普通文本,无论何时,绑定的数据对象上 msg属性发生了改变,插值处的内容都会更新. <span v-text="message"></s ...
- springcloud --- spring cloud sleuth和zipkin日志管理(spring boot 2.18)
前言 在spring cloud分布式架构中,系统被拆分成了许多个服务单元,业务复杂性提高.如果出现了异常情况,很难定位到错误位置,所以需要实现分布式链路追踪,跟进一个请求有哪些服务参与,参与的顺序如 ...