Podman and Buildah for Docker users
转自:https://developers.redhat.com/blog/2019/02/21/podman-and-buildah-for-docker-users/
I was asked recently on Twitter to better explain Podman and Buildah for someone familiar with Docker. Though there are many blogs and tutorials out there, which I will list later, we in the community have not centralized an explanation of how Docker users move from Docker to Podman and Buildah. Also what role does Buildah play? Is Podman deficient in some way that we need both Podman and Buildah to replace Docker?
This article answers those questions and shows how to migrate to Podman.
How does Docker work?
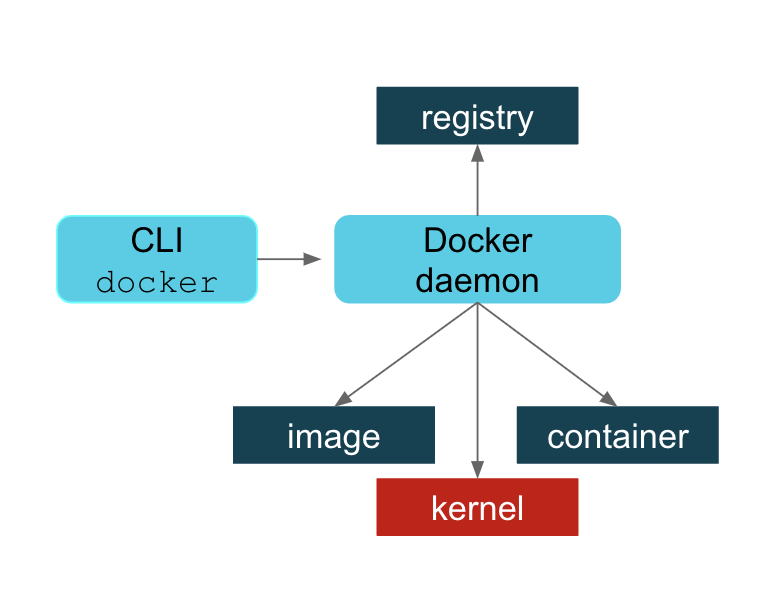
First, let’s be clear about how Docker works; that will help us to understand the motivation for Podman and also for Buildah. If you are a Docker user, you understand that there is a daemon process that must be run to service all of your Docker commands. I can’t claim to understand the motivation behind this but I imagine it seemed like a great idea, at the time, to do all the cool things that Docker does in one place and also provide a useful API to that process for future evolution. In the diagram below, we can see that the Docker daemon provides all the functionality needed to:
- Pull and push images from an image registry
- Make copies of images in a local container storage and to add layers to those containers
- Commit containers and remove local container images from the host repository
- Ask the kernel to run a container with the right namespace and cgroup, etc.
Essentially the Docker daemon does all the work with registries, images, containers, and the kernel. The Docker command-line interface (CLI) asks the daemon to do this on your behalf.
This article does not get into the detailed pros and cons of the Docker daemon process. There is much to be said in favor of this approach and I can see why, in the early days of Docker, it made a lot of sense. Suffice it to say that there were several reasons why Docker users were concerned about this approach as usage went up. To list a few:
- A single process could be a single point of failure.
- This process owned all the child processes (the running containers).
- If a failure occurred, then there were orphaned processes.
- Building containers led to security vulnerabilities.
- All Docker operations had to be conducted by a user (or users) with the same full root authority.
There are probably more. Whether these issues have been fixed or you disagree with this characterization is not something this article is going to debate. We in the community believe that Podman has addressed many of these problems. If you want to take advantage of Podman’s improvements, then this article is for you.
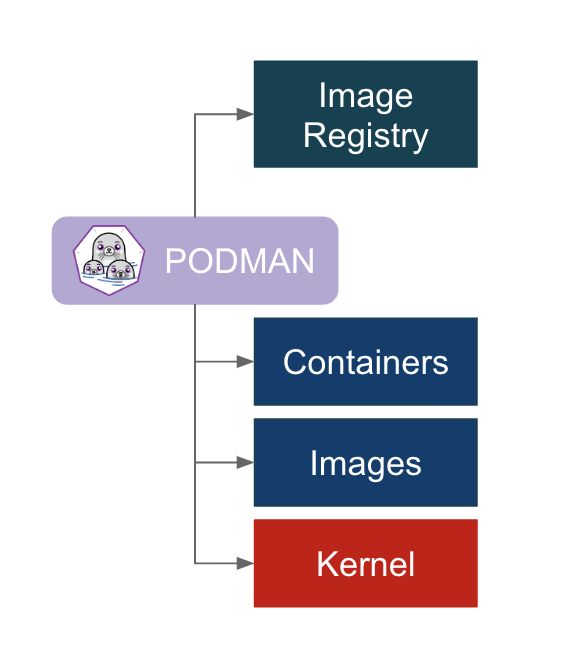
The Podman approach is simply to directly interact with the image registry, with the container and image storage, and with the Linux kernel through the runC container runtime process (not a daemon).
Now that we’ve discussed some of the motivation it’s time to discuss what that means for the user migrating to Podman. There are a few things to unpack here and we’ll get into each one separately:
- You install Podman instead of Docker. You do not need to start or manage a daemon process like the Docker daemon.
- The commands you are familiar with in Docker work the same for Podman.
- Podman stores its containers and images in a different place than Docker.
- Podman and Docker images are compatible.
- Podman does more than Docker for Kubernetesenvironments.
- What is Buildah and why might I need it?
Installing Podman
If you are using Docker today, you can remove it when you decide to make the switch. However, you may wish to keep Docker around while you try out Podman. There are some useful tutorials and an awesome demonstration that you may wish to run through first so you can understand the transition more. One example in the demonstration requires Docker in order to show compatibility.
To install Podman on Red Hat Enterprise Linux 7.6 or later, use the following; if you are using Fedora, then replace yumwith dnf:
# yum -y install podman
Podman commands are the same as Docker’s
When building Podman, the goal was to make sure that Docker users could easily adapt. So all the commands you are familiar with also exist with Podman. In fact, the claim is made that if you have existing scripts that run Docker you can create a docker alias for podman and all your scripts should work (alias docker=podman). Try it. Of course, you should stop Docker first (systemctl stop docker). There is a package you can install called podman-dockerthat does this for conversion for you. It drops a script at /usr/bin/docker that executes Podman with the same arguments.
The commands you are familiar with—pull, push, build, run, commit, tag, etc.—all exist with Podman. See the manual pages for Podman for more information. One notable difference is that Podman has added some convenience flags to some commands. For example, Podman has added --all(-a) flags for podman rm and podman rmi. Many users will find that very helpful.
You can also run Podman from your normal non-root user in Podman 1.0 on Fedora. RHEL support is aimed for version 7.7 and 8.1 onwards. Enhancements in userspace security have made this possible. Running Podman as a normal user means that Podman will, by default, store images and containers in the user’s home directory. This is explained in the next section. For more information on how Podman runs as a non-root user, please check out Dan Walsh’s article: How does rootless Podman work?
Podman and container images
When you first type podman images, you might be surprised that you don’t see any of the Docker images you’ve already pulled down. This is because Podman’s local repository is in /var/lib/containers instead of /var/lib/docker. This isn’t an arbitrary change; this new storage structure is based on the Open Containers Initiative (OCI) standards.
In 2015, Docker, Red Hat, CoreOS, SUSE, Google, and other leaders in the Linux containers industry created the Open Container Initiative in order to provide an independent body to manage the standard specifications for defining container images and the runtime. In order to maintain that independence, the containers/image and containers/storageprojects were created on GitHub.
Since you can run podman without being root, there needs to be a separate place where podman can write images. Podman uses a repository in the user’s home directory: ~/.local/share/containers. This avoids making /var/lib/containers world-writeable or other practices that might lead to potential security problems. This also ensures that every user has separate sets of containers and images and all can use Podman concurrently on the same host without stepping on each other. When users are finished with their work, they can push to a common registry to share their image with others.
Docker users coming to Podman find that knowing these locations is useful for debugging and for the important rm -rf /var/lib/containers, when you just want to start over. However, once you start using Podman, you’ll probably start using the new -all option to podman rm and podman rmi instead.
Container images are compatible between Podman and other runtimes
Despite the new locations for the local repositories, the images created by Docker or Podman are compatible with the OCI standard. Podman can push to and pull from popular container registries like Quay.io and Docker hub, as well as private registries. For example, you can pull the latest Fedora image from the Docker hub and run it using Podman. Not specifying a registry means Podman will default to searching through registries listed in the registries.conf file, in the order in which they are listed. An unmodified registries.conf file means it will look in the Docker hub first.
$ podman pull fedora:latest

$ podman run -it fedora bash
Images pushed to an image registry by Docker can be pulled down and run by Podman. For example, an image (myfedora) I created using Docker and pushed to my Quay.io repository(ipbabble) using Docker can be pulled and run with Podman as follows:
$ podman pull quay.io/ipbabble/myfedora:latest

$ podman run -it myfedora bash
Podman provides capabilities in its command-line push and pull commands to gracefully move images from /var/lib/docker to /var/lib/containers and vice versa. For example:
$ podman push myfedora docker-daemon:myfedora:latest
Obviously, leaving out the docker-daemon above will default to pushing to the Docker hub. Using quay.io/myquayid/myfedora will push the image to the Quay.io registry (where myquayid below is your personal Quay.io account):
$ podman push myfedora quay.io/myquayid/myfedora:latest
If you are ready to remove Docker, you should shut down the daemon and then remove the Docker package using your package manager. But first, if you have images you created with Docker that you wish to keep, you should make sure those images are pushed to a registry so that you can pull them down later. Or you can use Podman to pull each image (for example, fedora) from the host’s Docker repository into Podman’s OCI-based repository. With RHEL you can run the following:
# systemctl stop docker

# podman pull docker-daemon:fedora:latest

# yum -y remove docker  # optional
Podman helps users move to Kubernetes
Podman provides some extra features that help developers and operators in Kubernetes environments. There are extra commands provided by Podman that are not available in Docker. If you are familiar with Docker and are considering using Kubernetes/OpenShift as your container platform, then Podman can help you.
Podman can generate a Kubernetes YAML file based on a running container using podman generate kube. The command podman pod can be used to help debug running Kubernetes pods along with the standard container commands. For more details on how Podman can help you transition to Kubernetes, see the following article by Brent Baude: Podman can now ease the transition to Kubernetes and CRI-O.
What is Buildah and why would I use it?
Buildah actually came first. And maybe that’s why some Docker users get a bit confused. Why do these Podman evangelists also talk about Buildah? Does Podman not do builds?
Podman does do builds and for those familiar with Docker, the build process is the same. You can either build using a Dockerfile using podman build or you can run a container and make lots of changes and then commit those changes to a new image tag. Buildah can be described as a superset of commands related to creating and managing container images and, therefore, it has much finer-grained control over images. Podman’s build command contains a subset of the Buildah functionality. It uses the same code as Buildah for building.
The most powerful way to use Buildah is to write Bash scripts for creating your images—in a similar way that you would write a Dockerfile.
I like to think of the evolution in the following way. When Kubernetes moved to CRI-O based on the OCI runtime specification, there was no need to run a Docker daemon and, therefore, no need to install Docker on any host in the Kubernetes cluster for running pods and containers. Kubernetes could call CRI-O and it could call runC directly. This, in turn, starts the container processes. However, if we want to use the same Kubernetes cluster to do builds, as in the case of OpenShift clusters, then we needed a new tool to perform builds that would not require the Docker daemon and subsequently require that Docker be installed. Such a tool, based on the containers/storage and containers/image projects, would also eliminate the security risk of the open Docker daemon socket during builds, which concerned many users.
Buildah (named for fun because of Dan Walsh’s Boston accent when pronouncing “builder”) fit this bill. For more information on Buildah, see buildah.io and specifically see the blogs and tutorials sections.
There are a couple of extra things practitioners need to understand about Buildah:
- It allows for finer control of creating image layers. This is a feature that many container users have been asking for for a long time. Committing many changes to a single layer is desirable.
- Buildah’s
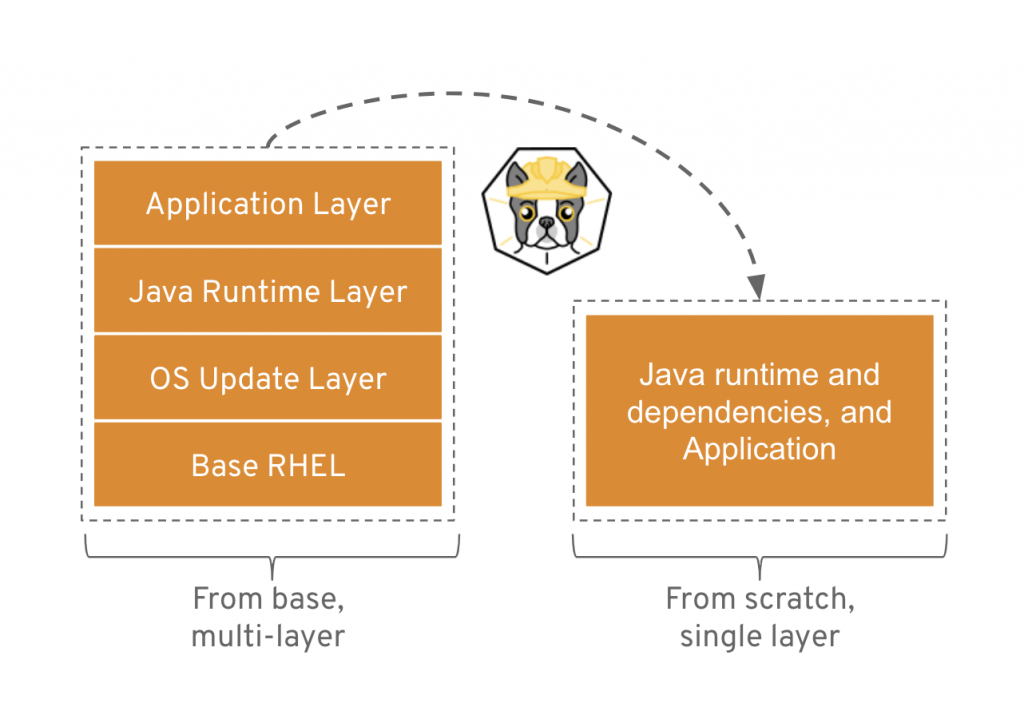
runcommand is not the same as Podman’sruncommand. Because Buildah is for building images, theruncommand is essentially the same as the DockerfileRUNcommand. In fact, I remember the week this was made explicit. I was foolishly complaining that some port or mount that I was trying wasn’t working as I expected it to. Dan (@rhatdan) weighed in and said that Buildah should not be supporting running containers in that way. No port mapping. No volume mounting. Those flags were removed. Insteadbuildah runis for running specific commands in order to help build a container image, for example,buildah run dnf -y install nginx. - Buildah can build images from scratch, that is, images with nothing in them at all. Nothing. In fact, looking at the container storage created as a result of a
buildah from scratchcommand yields an empty directory. This is useful for creating very lightweight images that contain only the packages needed in order to run your application.
A good example use case for a scratch build is to consider the development images versus staging or production images of a Java application. During development, a Java application container image may require the Java compiler and Maven and other tools. But in production, you may only require the Java runtime and your packages. And, by the way, you also do not require a package manager such as DNF/YUM or even Bash. Buildah is a powerful CLI for this use case. See the diagram below. For more information, see Building a Buildah Container Image for Kubernetes and also this Buildah introduction demo.
Getting back to the evolution story…Now that we had solved the Kubernetes runtime issue with CRI-O and runC, and we had solved the build problem with Buildah, there was still one reason why Docker was still needed on a Kubernetes host: debugging. How can we debug container issues on a host if we don’t have the tools to do it? We would need to install Docker, and then we are back where we started with the Docker daemon on the host. Podman solves this problem.
Podman becomes a tool that solves two problems. It allows operators to examine containers and images with commands they are familiar with using. And it also provides developers with the same tools. So Docker users, developers, or operators, can move to Podman, do all the fun tasks that they are familiar with from using Docker, and do much more.
Conclusion
I hope this article has been useful and will help you migrate to using Podman (and Buildah) confidently and successfully.
For more information:
- Podman.io and Buildah.io project web sites
- github.com/containersprojects (get involved, get the source, see what’s being developed):
Related Articles
- Containers without daemons: Podman and Buildah available in RHEL 7.6 and RHEL 8 Beta
- Podman: Managing pods and containers in a local container runtime
- Managing containerized system services with Podman (Use systemd to manage your podman containers)
- Building a Buildah Container Image for Kubernetes
- Podman can now ease the transition to Kubernetes and CRI-O
- Security Considerations for Container Runtimes (Video of Dan Walsh’s talk from KubeCon 2018)
- IoT edge development and deployment with containers through OpenShift: Part 1 (Building and testing ARM64 containers on OpenShift using podman, qemu, binfmt_misc, and Ansible)
Podman and Buildah for Docker users的更多相关文章
- docker的平替--podman
前言 我们都知道,docker这个东西,是CaaS(Container as a Service,容器即服务)的通常解法.我们使用docker来管理容器的生命周期,比如镜像的生成.容器的管理和定制(D ...
- 下一代容器架构已出,Docker何去何处?看看这里的6问6答!!
我猜很多人一看这个标题已经感觉很懵逼了,什么?下一代容器都出来了,我还没学Docker呢!!! 咳咳~~在这里我给大家做一个保证,下一代容器目前也只是各个公司在测试阶段,Github上面也有很多Iss ...
- 再见 Docker,是时候拥抱下一代容器工具了
本文首发于:微信公众号「运维之美」,公众号 ID:Hi-Linux. 「运维之美」是一个有情怀.有态度,专注于 Linux 运维相关技术文章分享的公众号.公众号致力于为广大运维工作者分享各类技术文章和 ...
- 下一代容器技术podman简介
PODMAN主要由红帽发起和推动,是下一代的容器技术,包括如下三个模块:Podman,Skopeo和Buildah这三个工具都是符合OCI计划下的工具(github/containers).主要是由R ...
- 向Docker告别的时候到了
在容器的远古时期(大约4年前),Docker是容器游戏中仅有的参与者.但是现在情况不一样了,Docker不再是唯一的一个了,只是另一个容器引擎而已.Docker允许我们构建,运行,拉取,上传,查看容器 ...
- 7.Docker容器使用辅助工具汇总
原文地址: 点击直达 more information: https://docs.docker.com/engine/security/security/#docker-daemon-attack- ...
- docker安装并设置开机启动(CentOS7/8)
CentOS7.2 docker分为CE和EE版本,EE版本收费,一般我们使用CE版本就满足要求了 docker安装及启动 docker安装很简单,直接使用如下命令安装即可,安装后的docker版本即 ...
- 关于使用docker volume挂载的注意事项
Content 在用Docker进行持久化的存储的时候,有两种方式: 使用数据卷(volume) -v 容器绝对路径 或者 -v 已经创建的volume名称:容器绝对路径 2. 使用挂载点(共享宿主目 ...
- 12.第十一篇 安装docker引擎
文章转载自:https://mp.weixin.qq.com/s?__biz=MzI1MDgwNzQ1MQ==&mid=2247483838&idx=1&sn=5a13aed5 ...
随机推荐
- Android四大组件之Service --- 活动与服务的绑定
Acticity与Service进行通信如何在活动中指挥service去做事情? 这里就借助onBind()方法了比如说,目前我们希望在MyService里提供一个下载功能,然后在活动中可以决定何时开 ...
- Oracle分析函数及常用函数: over(),rank()over()作用及用法--分区(分组)求和& 不连续/连续排名
(1) 函数: over()的作用及用法: -- 分区(分组)求和. sum() over( partition by column1 order by column2 )主要用来对某个字 ...
- java多线程中的调度策略
两种线程的调度模式: 抢占式调度: 抢占式调度指的是每条线程执行的时间.线程的切换都由系统控制,系统控制指的是在系统某种运行机制下,可能每条线程都分同样的执行时间片,也可能是某些线程执行的时间片较长, ...
- Python机器学习(基础篇---监督学习(支持向量机))
支持向量机(分类) 支持向量机分类器根据训练样本的分布,搜索所有可能的线性分类器中最佳的那个.我们会发现决定其直线位置的样本并不是所有训练数据,而是其中的两个空间间隔最小的两个不同类别的数据点,而我们 ...
- dubbo入门学习笔记之环境准备
粗略的学完springcloud后由于公司的项目有用到一点dubbo,刚好手头上又有dubbo的学习资料,于是趁机相对系统的学了下duboo框架,今天开始记录下我的所学所悟;说来惭愧,今年之前,作为一 ...
- PCF学习知识
1. 去PCF官网注册一个免费账号,地址是: https://login.run.pivotal.io/login 2.安装PCF的命名,cf cli. 地址https://pivotal.io/pl ...
- docker info 警告"WARNING: No swap limit support"
vim/etc/default/grub 找到 GRUB_CMDLINE_LINUX="" 在双引号里面输入cgroup_enable=memory swapaccount=1 然 ...
- JS 删除Array对象中的元素。
var idTemp=new Array(); var nameTemp = new Array(); nameTemp.splice($.inArray(“1”, nameTemp),1); idT ...
- spring 集成redis客户端jedis(java)
spring集成jedis简单实例 jedis是redis的java客户端,spring将redis连接池作为一个bean配置. “redis.clients.jedis.JedisPool”,这 ...
- EmptyBeanUtil
package com.rscode.credits.util; import java.util.List; /** * * 判断实体是否为空 * @author tn * */ public cl ...