
Spring 中的接口知识整理
本想每个小知识一篇随笔,但是那样,看起来有些单薄,所以,就放在一片文章里了。而且,以后还会慢慢在最后不断的追加。
目录:
FactoryBean
BeanPostProcessor
1.FactoryBean
FactoryBean接口,它在Spring框架源码内部,被大量使用,如使用AOP创建bean的代理时,使用了ProxyFactoryBean;从JNDI中查找对象时,使用了JndiObjectFactoryBean。
它在框架外,很少使用。但是为了学习,也得研究研究,您说是不?
它怎么使用?首先看看构造。
 public interface FactoryBean<T> {

 // 返回的是这个工厂管理的对象的实例

 T getObject() throws Exception;


 // 返回的是工厂创建的对象的类型

 Class<?> getObjectType();

 boolean isSingleton();

 }
上个例子,看具体东西。
 public class Tool {

     private int id;

     public Tool(int id) {

         this.id = id;

     }

     public int getId() {

         return id;

     }

     public void setId(int id) {

         this.id = id;

     }

 }
 public class ToolFactory implements FactoryBean<Tool> {

     private int factoryId;

     private int toolId;


    // 创建的是Tool的对象

     @Override

     public Tool getObject() throws Exception {

 8         return new Tool(toolId);

 9     }

     @Override

     public Class<?> getObjectType() {

13         return Tool.class;

14     }

     @Override

     public boolean isSingleton() {

         return false;

     }

     public int getFactoryId() {

         return factoryId;

     }

     public int getToolId() {

         return toolId;

     }

     public void setFactoryId(int factoryId) {

         this.factoryId = factoryId;

     }

     public void setToolId(int toolId) {

         this.toolId = toolId;

     }

 }
 public class Test {

     public static void main(String[] args) {

         @SuppressWarnings("resource")

         ApplicationContext context = new ClassPathXmlApplicationContext("beaFactoryTest.xml");

         Tool tool = (Tool) context.getBean("tool");
       // 在名字前面加 & 表示要得到工厂类的bean

         ToolFactory tool2 = (ToolFactory) context.getBean("&tool");

         System.out.println("Tool Id is " + tool.getId());

         System.out.println("ToolFactory Id is " + tool2.getFactoryId());

     }

 }
     <bean id="tool" class="com.lee.demo.beanfactory.ToolFactory">

         <property name="factoryId" value="9090"/>

         <property name="toolId" value="108"/>

     </bean>
最后执行结果:
Tool Id is 108
ToolFactory Id is 9090
2.BeanPostProcessor
它叫bean后处理器,也就是处理bean,它针对所有的bean,在初始化前后,对bean进行操作。主要内容我会在例子中描述。
例子:
 public class HelloWorld {

     private String message;

     public void setMessage(String message) {

         this.message = message;

     }

     public void getMessage() {

         System.out.println("Your Message : " + message);

     }


       // 加上init方法和destory方法,是为了在后面验证他们和postProcessBeforeInitialization  postProcessAfterInitialization 执行的先后顺序

     public void init() {

         System.out.println("Bean is going through init.");

     }

     public void destroy() {

         System.out.println("Bean will destroy now.");

     }

 }
 public class InitHelloWorld implements BeanPostProcessor {


    // BeanPostProcessor 接口中主要是下面两个方法 初始化前的后处理 初始化后的后处理

     @Override

     public Object postProcessBeforeInitialization(Object bean, String beanName) throws BeansException {

         System.out.println("BeforeInitialization : " + beanName);

         return bean; // you can return any other object as well

     }

     @Override

     public Object postProcessAfterInitialization(Object bean, String beanName) throws BeansException {

         System.out.println("AfterInitialization : " + beanName);

         return bean; // you can return any other object as well

     }

 }
Test.java
 public class Test {

     public static void main(String[] args) {

         @SuppressWarnings("resource")

         AbstractApplicationContext  context = new ClassPathXmlApplicationContext("beaFactoryTest.xml");

         HelloWorld obj = (HelloWorld) context.getBean("helloWorld");

         obj.getMessage();
       // 注册钩子方法

         context.registerShutdownHook();

     }

 }
查看源码:
 @Override
    // 在JVM运行期间,注册一个钩子关闭方法,关闭掉这个context。实际的关闭程序的操作,被代理给doClose方法。

     public void registerShutdownHook() {

         if (this.shutdownHook == null) {

             // No shutdown hook registered yet.

             this.shutdownHook = new Thread() {

                 @Override

                 public void run() {

                     doClose();

                 }

             };

             Runtime.getRuntime().addShutdownHook(this.shutdownHook);

         }

     }
xml文件
     <bean id = "helloWorld" class = "com.lee.demo.beanfactory.HelloWorld"

       init-method = "init" destroy-method = "destroy">

       <property name = "message" value = "Hello World!"/>

    </bean>

    <bean class = "com.lee.demo.beanfactory.InitHelloWorld" />
执行结果:
 BeforeInitialization : helloWorld

 Bean is going through init.

 AfterInitialization : helloWorld

 Your Message : Hello World!

 [org.springframework.context.support.ClassPathXmlApplicationContext] - Closing org.springframework.context.support.ClassPathXmlApplicationContext@6ae40994: startup date [Thu May 17 23:31:53 JST 2018]; root of context hierarchy

 Bean will destroy now.
在这里大致说一下Spring的实例化过程:
实例化Bean对象→设置对象属性→检查Aware相关接口并设置相关依赖→BeanPostProcessor前置处理→检查是否是InitializingBean以决定是否调用afterPropertiesSet方法→
检查是否配置有自定义的init-method方法→BeanPostProcessor后置处理→是否实现DisposableBean接口→是否配置有自定义的destroy方法
3.Aware接口
它是干什么用的呢?作用就是通过上下文(Context)可以获得当前环境。看看它的接口:
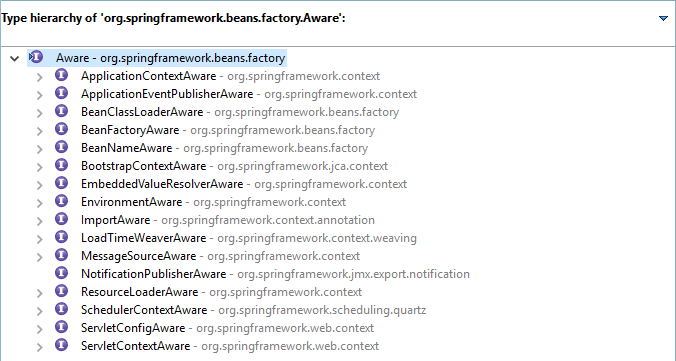
我们拿BeanNameAware来举个例子。
 public class User implements GetNameAware {

     private String id;

     private String name;

     private String address;

 6     @Override

 7     public void setBeanName(String name) {

 8         this.id = name;

 9     }

     public String getId() {

         return id;

     }

     public String getName() {

         return name;

     }

     public String getAddress() {

         return address;

     }

     public void setId(String id) {

         this.id = id;

     }

     public void setName(String name) {

         this.name = name;

     }

     public void setAddress(String address) {

         this.address = address;

     }

 }
 public class User2 {

     private String id;

     private String name;

     private String address;

     public String getId() {

         return id;

     }

     public String getName() {

         return name;

     }

     public String getAddress() {

         return address;

     }

     public void setId(String id) {

         this.id = id;

     }

     public void setName(String name) {

         this.name = name;

     }

     public void setAddress(String address) {

         this.address = address;

     }

 }
 public interface GetNameAware extends BeanNameAware {

 }
 public class Test {

     public static void main(String[] args) {

         ApplicationContext ctx = new ClassPathXmlApplicationContext("beaFactoryTest.xml");

         User user = (User) ctx.getBean("user1");

         User2 user2 = (User2) ctx.getBean("user2");

         System.out.println("user id " + user.getId() + " user name " + user.getName() + " user address " + user.getAddress());

         System.out.println("========================================");

         System.out.println("user2 id " + user2.getId() + " user2 name " + user2.getName() + " user2 address " + user2.getAddress());

     }

 }
     <bean id="user1" class="com.lee.demo.aware.User">

         <property name="name" value="lee"/>

         <property name="address" value="China"/>

     </bean>

     <bean id="user2" class="com.lee.demo.aware.User2">

         <property name="name" value="lin"/>

         <property name="address" value="Tokyo"/>

     </bean>
执行结果(user id 因为继承了GetNameAware接口,对BeanName进行了设置):
 user id user1 user name lee user address China

 ========================================

 user2 id null user2 name lin user2 address Tokyo
Spring 中的接口知识整理的更多相关文章
- Spring中Ordered接口简介
目录 前言 Ordered接口介绍 Ordered接口在Spring中的使用 总结 前言 Spring中提供了一个Ordered接口.Ordered接口,顾名思义,就是用来排序的. Spring是一个 ...
- 转:spring中InitailizingBean接口的简单理解
转自:https://www.cnblogs.com/wxgblogs/p/6849782.html spring中InitializingBean接口使用理解 InitializingBean接 ...
- spring中InitializingBean接口使用理解
InitializingBean接口为bean提供了初始化方法的方式,它只包括afterPropertiesSet方法,凡是继承该接口的类,在初始化bean的时候会执行该方法. 测试程序如下: imp ...
- spring中ApplicationContextAware接口描述
项目中使用了大量的工厂类,采用了简单工厂模式: 通过该工厂类可以获取指定的处理器bean,这些处理器bean我们是从spring容器中获取的,如何获取,是通过实现ApplicationContextA ...
- spring中InitializingBean接口使用理解(转)
InitializingBean接口为bean提供了初始化方法的方式,它只包括afterPropertiesSet方法,凡是继承该接口的类,在初始化bean的时候会执行该方法. 测试程序如下: imp ...
- spring(五):spring中Aware接口的使用
spring中自定义组件需要使用spring的底层组件时,可以通过自定义组件实现相关XxxAware接口,重写其中的方法进而实现 例如:自定义一个组件,该组件中需要使用ApplicationConte ...
- Spring中ApplicationContextAware接口的用法
1.为什么使用AppplicationContextAware? ApplicationContext的BeanFactory 的子类, 拥有更强大的功能,ApplicationContext可以在服 ...
- Spring中的接口BeanFactory和FactoryBean的学习
BeanFactory: 相当于对象工厂,可以获取对象的实例以及相应的属性.BeanFactory定义了IOC容器的最基本形式,并提供了IOC容器应遵守的的最基本的接口,也就是Spring IOC所遵 ...
- spring中ApplicationContextAware接口使用理解
一.这个接口有什么用?当一个类实现了这个接口(ApplicationContextAware)之后,这个类就可以方便获得ApplicationContext中的所有bean.换句话说,就是这个类可以直 ...
随机推荐
- owin启动事项
在上下文中找不到 owin.Environment 项 owin没有启动. 尝试加载应用时出现了以下错误.- 找不到包含 OwinStartupAttribute 的程序集 startup类不是通过v ...
- vue组件通信方式总结
对于vue来说,组件之间的消息传递是非常重要的,下面是我对组件之间消息传递的各种方式的总结,总共有8种方式. 1. props和$emit 父组件向子组件传递数据是通过prop传递的,子组件传递数据给 ...
- 为什么IT运维工程师要学习Linux系统
不论你是否知道,其实你每天都在使用Linux.每次你访问微博.百度甚至是一些小电影网站,你的客户端(浏览器)都在与运行在Linux系统上的服务端程序进行通讯,大多数的电子设备,例如数位录像机.飞机.自 ...
- nginx配置文件详解(三)
nginx配置文件详细解析 nginx安装目录: /usr/local/nginx 配置文件: /usr/local/nginx/conf 目录下的 nginx.conf文件 nginx优化方法1 ...
- postman工具测试接口
本篇文章主要介绍怎么在postman工具中进行接口的测试? 从以下几个方面进行介绍: 1.先介绍下接口测试 2.不同类型的接口请求方式如何在postman中进行测试 1.1 接口 什么是接口? 接口一 ...
- position:sticky粘性布局
新的布局方式,专门用于 tab栏悬浮效果: 当tab栏在可视区域时,正常滚动, tab栏不再可视区域时,悬浮置顶. position:-webkit-sticky; position:sticky; ...
- 20165326 java第四周学习笔记
第四周学习笔记 ch5 子类和父类 子类只能有一个父类 使用关键字extendsyclass 子类 extends 父类 系统默认的祖先类Object(java.lang包中) 继承:子类继承父类的方 ...
- day 37-8 关于mysql 的增 删 改 查 及联合列表
1 VARCHAR : 字符串的意思 (括号内的数字代表尾数) 输入的字符串在这个范围内都行 CHAR :字符串的意思(区别就有几位数字 必须写几位) INT 整数(位数) 输入的数字 ...
- python列举django中间件的5个请求方法
process——request:请求进来时,权限认证. process——view:路由匹配之后,能够得到试图的试图函数. process——exceptions:异常是执行. process——t ...
- Python 静态方法
class Person: @staticmethod # 静态方法 def yue(): print("fsadf") # 静态方法可以使用对象访问. 也可以使用类名访问. 但是 ...