Linux服务器---邮件服务openwebmail安装
安装openwebmail
openwebmail提供了可视化的邮件管理系统,它运行在Apache环境下。
1、安装必备软件
|
|
2、在官网(http://openwebmail.org/openwebmail/download/release/)下载openwebmail,解压
|
|
3、解压后得到两个目录“cgi-bin”和“data”,而且这两个目录下都会包含一个“openwebmail”目录。其中cgi-bin是要执行的程序,而data是数据部分。因此在后面我们要改的地方都集中在cgi-bin目录下的openwebmail
1)将cgi-bin下的openwebmail移动到网页cgi默认目录下
|
|
2)将data复制到“/var/www”
|
|
3)将data下的openwebmail移动到”/var/www/html/“
|
|
4、修改cgi-bin下的openwebmail权限
|
|
5、修改suidperl的权限
|
|
6、修改配置文件openwebmail.conf,改变参数ow_cgidir、ow_htmldir,它们一个是网页默认目录,一个是数据默认目录
|
|
7、修改身份认证文件,这个文件需要从defaults目录拷贝,然后修改两个参数“passwdfile_enctypted“和”passwdmkdb“
|
|
8、修改dbm文件,首先从defaults目录下拷贝,然后改变参数“dbmopen_ext“和”dbmopen_haslock“
|
|
9、初始化openwebmail服务
|
|
10、重启Apache
|
|
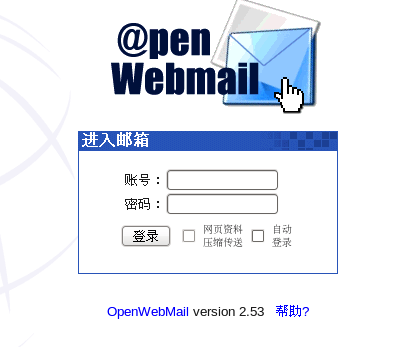
11、在浏览器输入“127.0.0.1/cgi-bin/openwebmail/openwebmail.pl“,可以看到下面的登录窗口
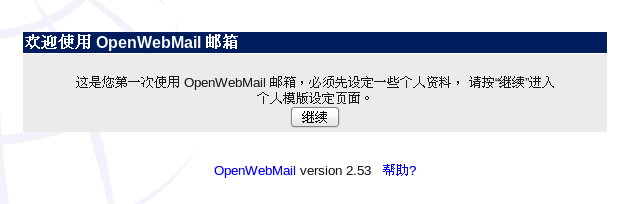
12、在登录窗口输入一个已经存在的用户名和密码,由于是第一次登录,我们需要做一些设置
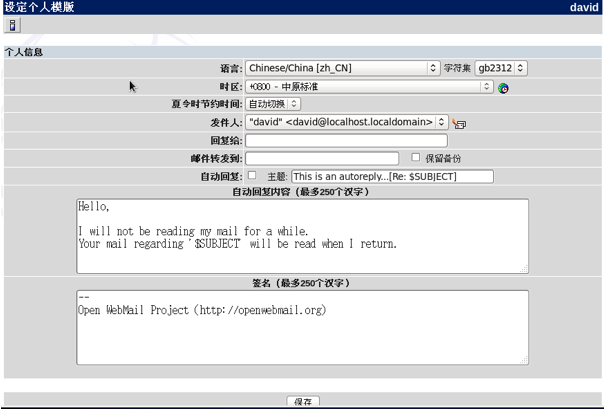
13、设置个人模板
Linux服务器---邮件服务openwebmail安装的更多相关文章
- Linux服务器---邮件服务postfix安装
安装postfix postfix是一个快速.易于管理.安全性高的邮件发送服务,可以配合dovecot实现一个完美的邮箱服务器. 1.安装postfix [root@localhost ~]# rpm ...
- Linux服务器---邮件服务openwebmail配置
配置openwebmail 通过修改配置文件openwebmail.conf,实现个性化邮箱定制.用户可以自由的更改邮箱logo.域名.容量 .签名等信息. 1.重定向index,快速打开邮箱.将下面 ...
- Linux服务器---邮件服务spam
安装spam spam(SpamAssassin)利用perl来进行文字分析,他会检测邮件的标题.内容.送信人,这样就可以过滤出垃圾邮件 1.安装spam.由于spam的依赖太多,用户一定要使用yum ...
- netcore一键部署到linux服务器以服务方式后台运行
@font-face { font-family: octicons-link; src: url("data:font/woff;charset=utf-8;base64,d09GRgAB ...
- Linux服务器命令行模式安装Matlab2014a
Linux服务器命令行模式安装Matlab2014a,有需要的朋友可以参考下. 0.下载安装包 下载Matlab2014a for Linux安装包的ISO镜像文件(感谢万能的度娘)以及破解包(下载地 ...
- Linux服务器,服务管理--systemctl命令详解,设置开机自启动
Linux服务器,服务管理--systemctl命令详解,设置开机自启动 syetemclt就是service和chkconfig这两个命令的整合,在CentOS 7就开始被使用了. 摘要: syst ...
- 使用Linux服务器来通过网络安装和激活Windows 7 —— 一些基本原理
使用Linux服务器来通过网络安装和激活Windows 7 -- 一些基本原理 https://www.pufengdu.org/blog/?p=372
- postfix 邮件服务的安装及详解
该实验系统:cetnos 6.5 sendmail:性能好,设置复杂,适合老手 qmail:体积小260+k ,模块化.需要做二次开发,适合对邮件性能有要求的 postfix:前身是sendmail, ...
- Linux服务器---邮件服务器dovecot
安装dovecot Dovecot是CentOS系统中著名的POP3/IMAP服务器实现.POP3/IMAP是从邮件服务器中读取邮件时使用的协议,POP3将邮件全部从服务器中拖取下来:IMAP则每次从 ...
随机推荐
- LeetCode-860. Lemonade Change
At a lemonade stand, each lemonade costs $5. Customers are standing in a queue to buy from you, and ...
- nessus的安装
nessus安装 .下载地址 http://www.tenable.com/products/nessus/select-your-operating-system .获取注册码 www.nessus ...
- 报错解决——make: *** No targets specified and no makefile found. Stop
wget http://ftp.gnu.org/pub/gnu/ncurses/ncurses-5.6.tar.gz tar zxvf ncurses-5.6.tar.gz #切换目录到ncurses ...
- timeUtil
/** * 字符串的日期 格式 yyyy-MM-dd * 转入参数,添加或减去它的天数,在返回字符串 */ public static String addOrDelRq(String rq,int ...
- 58A
#include <stdio.h> #include <string.h> int main() { char hel[6]="hello"; char ...
- 118A
#include <iostream> #include <cctype> #include <string> using namespace std; int m ...
- Django 框架 django的请求生命周期
概述 首先我们知道HTTP请求及服务端响应中传输的所有数据都是字符串,同时http请求是无状态的,可以通过session和cookie来辅助. 浏览器通过ip和端口及路由方式访问服务端. 在Djang ...
- go build -ldflags
http://studygolang.com/articles/2052 ldflags 用法:[路径,非必需,除非你有目录层次]包名.变量 [path]packege.value go build ...
- css3--之backface-visibility
使用CSS3 backface-visibility属性制作翻转动画效果: http://www.htmleaf.com/ziliaoku/qianduanjiaocheng/201504151 ...
- 转 EasyUi日期控件datebox设置,只显示年月,也只能选择年月
1.引入Jquery和easyui,注低版本的Jquery和easy不能使用,这里使用的Jquery是1.8.2easyui是1.6.1.1.easyui下载地址:http://www.jeasyui ...