
Spring 02: Spring接管下的三层项目架构
业务背景
- 需求:使用三层架构开发,将用户信息导入到数据库中
- 目标:初步熟悉三层架构开发
- 核心操作:开发两套项目,对比Spring接管下的三层项目构建和传统三层项目构建的区别
- 注意:本例中的数据访问层,先不连接数据库,只是进行简单数据模拟
非Spring接管下的三层项目构建
实体类 + 各访问层
- 实体类:com.example.pojo
- User 实体类
- User实体类默认含有:无参构造方法 + 全属性的(有参构造方法 + getter,setter方法 + toString方法)
- 数据访问层:com.example.dao
- UserMapper.java(接口)
- UserMapperImpl.java (实现类)
- 业务逻辑层:com.example.service
- UserService.java (接口)
- UserServiceImpl.java (实现类)
- 界面层:com.example.controller
- UserController.java
项目结构
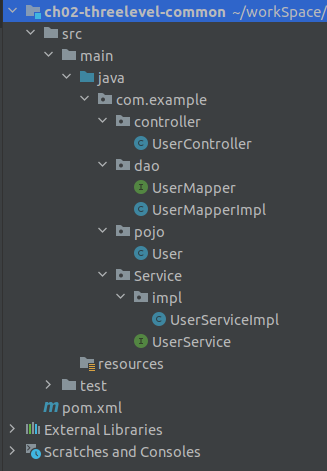
实体类
package com.example.pojo;

public class User {

    private String name;

    private int age;

    private String address;

}
数据访问层
- 接口
package com.example.dao;

import com.example.pojo.User;

/**

 * 数据访问层接口

 */

public interface UserMapper {

    //导入用户信息

    int insertUser(User user);

}
- 实现类
package com.example.dao;

import com.example.pojo.User;

/**

 * 数据访问层的实现类

 */

public class UserMapperImpl implements UserMapper{

    //模拟用户信息导入

    @Override

    public int insertUser(User user) {

        System.out.println("用户: " + user.getName() + ", 导入成功!");

        return 1;

    }

}
业务逻辑层
- 接口
package com.example.Service;

import com.example.pojo.User;

/**

 * 业务逻辑层接口

 */

public interface UserService {

    //导入用户数据的功能

    int insertUser(User user);

}
- 实现类
package com.example.Service.impl;

import com.example.Service.UserService;

import com.example.dao.UserMapper;

import com.example.dao.UserMapperImpl;

import com.example.pojo.User;

/**

 * 业务逻辑层实现类

 */

public class UserServiceImpl implements UserService {

    //数据访问层接口指向数据访问层实现类

    UserMapper userMapper = new UserMapperImpl();

    @Override

    public int insertUser(User user) {

        return userMapper.insertUser(user);

    }

}
界面层
package com.example.controller;

import com.example.Service.UserService;

import com.example.Service.impl.UserServiceImpl;

import com.example.pojo.User;

/**

 * 界面层

 */

public class UserController {

    //业务逻辑层接口指向业务逻辑层实现类

    UserService userService = new UserServiceImpl();

    public int insertUser(User user){

        return userService.insertUser(user);

    }

}
测试
package com.example.test;

import com.example.controller.UserController;

import com.example.pojo.User;

import org.junit.Test;

public class TestInsert {

    //测试非Spring框架的简单三层架构

    @Test

    public void testInsertUser(){

        UserController userController = new UserController();

        int num  = userController.insertUser(new User("荷包蛋", 20, "黑河"));

        if(num == 1){

            System.out.println("非Spring框架的简单三层架构,运行成功!");

        }else{

            System.out.println("非Spring框架的简单三层架构,运行失败!");

        }

    }

}
输出结果
用户: 荷包蛋, 导入成功!

Spring接管下的简单三层架构,运行成功!

Process finished with exit code 0
测试分析
- 测试执行流程示意图
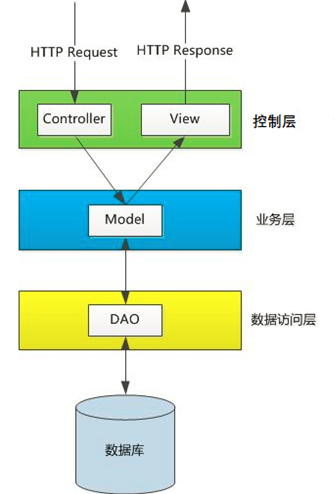
测试分析
层级变化:界面层 --> 业务逻辑层 --> 数据访问层 --> 业务逻辑层 --> 界面层
对象访问的变化:界面层对象 --> 业务逻辑层接口指向业务逻辑层实现类 --> 数据访问层接口指向数据访问层实现类 --> 数据访问层实现类完成对数据的操作
方法调用变化:界面层对象的insertUser(User u) --> 业务逻辑层实现类的insertUser(User u) --> 数据访问层实现类的insertUser(User u)
Spring接管下的三层项目构建
对传统三层项目构建的修改:由上述测试分析中"对象访问的变化可知",需要用到的实现类有:UserController,UserServiceImpl,UserMapperImpl
在Spring接管下,需要在bean工厂中,注册上述实体类的对象,将原先需要程序员手动创建管理的对象交给Spring框架去接手管理
- 在maven项目中添加Spring依赖和applicationContext.xml的操作不再赘述,可参考spring博客集中Spring 01的博客
业务逻辑层
- 实现类修改为
//此时的业务逻辑层实现类:不再手动创建数据访问层的对象,交给Spring容器来管理,新增:setter方法和无参构造函数

package com.example.Service.impl;

import com.example.Service.UserService;

import com.example.dao.UserMapper;

import com.example.pojo.User;

/**

 * 业务逻辑层实现类

 */

public class UserServiceImpl implements UserService {

    //数据访问层接口指向数据访问层实现类

    public UserMapper userMapper;

    public void setUserMapper(UserMapper userMapper) {

        this.userMapper = userMapper;

    }

    public UserServiceImpl() {

    }

    @Override

    public int insertUser(User user) {

        return userMapper.insertUser(user);

    }

}
界面层
- 所做修改与对业务逻辑层的实现类的修改类似
package com.example.controller;

import com.example.Service.UserService;

import com.example.pojo.User;

/**

 * 界面层

 */

public class UserController {

    //业务逻辑层接口指向业务逻辑层实现类

    UserService userService;

    public void setUserService(UserService userService) {

        this.userService = userService;

    }

    public UserController() {

    }

    public int insertUser(User user){

        return userService.insertUser(user);

    }

}
applicationContext.xml
<?xml version="1.0" encoding="UTF-8"?>

<!-- bean工厂 -->

<beans xmlns="http://www.springframework.org/schema/beans"

       xmlns:xsi="http://www.w3.org/2001/XMLSchema-instance"

       xsi:schemaLocation="http://www.springframework.org/schema/beans http://www.springframework.org/schema/beans/spring-beans.xsd">

    <!-- 注册UserMapper实现类对象-->

    <bean id="uMapperImpl" class="com.example.dao.UserMapperImpl">

    </bean>

    <!-- 注册UserService实现类对象-->

    <bean id="uServiceImpl" class="com.example.Service.impl.UserServiceImpl">

        <property name="userMapper" ref="uMapperImpl"/>

    </bean>

    <!-- 注册UserController对象-->

    <bean id="uController" class="com.example.controller.UserController">

        <property name="userService" ref="uServiceImpl"/>

    </bean>

</beans>
测试
package com.example.test;

import com.example.controller.UserController;

import com.example.pojo.User;

import org.junit.Test;

import org.springframework.context.ApplicationContext;

import org.springframework.context.support.ClassPathXmlApplicationContext;

public class TestInsert {

    //测试Spring接管下的简单三层架构

    @Test

    public void testInsertUser(){

        //创建Spring容器

        ApplicationContext applicationContext = new ClassPathXmlApplicationContext("applicationContext.xml");

        //取出界面层对象

        UserController uController = (UserController) applicationContext.getBean("uController");

        //调用界面层对象方法

        int num = uController.insertUser(new User("荷包蛋", 20, "黑河"));

        if(num == 1){

            System.out.println("Spring接管下的简单三层架构,运行成功!");

        }else{

            System.out.println("Spring接管下的简单三层架构,运行失败!");

        }

    }

}
输出结果
用户: 荷包蛋, 导入成功!

Spring接管下的简单三层架构,运行成功!

Process finished with exit code 0
Spring 02: Spring接管下的三层项目架构的更多相关文章
- Spring 05: 用DI(依赖注入)优化Spring接管下的三层项目架构
背景 用注解改造前面Spring博客集里(指 Spring 02)Spring接管下的三层项目架构 对前面Spring博客集里(指 Spring 04)@Controller + @Service + ...
- Spring Boot -- Idea搭建下搭建web项目
最近公司准备使用Spring Boot框架,让小瑾先来学习一下,为了表示小瑾的办事效率,小瑾直接先学习用Idea搭建一个Spring Boot项目,哈哈哈,坐等领导夸. 废话不多说了,先来总结一下用I ...
- IDEA下创建Maven项目,并整合使用Spring、Spring MVC、Mybatis框架
项目创建 本项目使用的是IDEA 2016创建. 首先电脑安装Maven,接着打开IDEA新建一个project,选择Maven,选择图中所选项,下一步. 填写好GroupId和ArtifactId, ...
- spring原理案例-基本项目搭建 02 spring jar包详解 spring jar包的用途
Spring4 Jar包详解 SpringJava Spring AOP: Spring的面向切面编程,提供AOP(面向切面编程)的实现 Spring Aspects: Spring提供的对Aspec ...
- 【从0到1,搭建Spring Boot+RESTful API+Shiro+Mybatis+SQLServer权限系统】02、创建新的SpringBoot项目
1.创建项目 得到项目架构 2.测试项目Web功能 默认端口为8080,运行后,输入localhost:8080/index即可访问到网页 到这里,项目构建成功!
- Spring Boot 学习(一) 快速搭建SpringBoot 项目
快速搭建一个 Spring Boot 项目 部分参考于<深入实践Spring Boot>.<Spring实战 第四版>与程序猿DD的有关博客. 参考(嘟嘟独立博客):http: ...
- Mybatis与Spring整合,使用了maven管理项目,作为初学者觉得不错,转载下来
转载自:http://www.cnblogs.com/xdp-gacl/p/4271627.html 一.搭建开发环境 1.1.使用Maven创建Web项目 执行如下命令: mvn archetype ...
- 在Spring tools suite中使用git 共享项目
我们都在eclipse 和 myeclipse中使用过cvs 和 svn 版本控制工具进行团队开发,今天我学习了另外一种版本控制工具git,下面我演示如何在Spring tools suite中使用g ...
- freemarker + spring mvc + spring + mybatis + mysql + maven项目搭建
今天说说搭建项目,使用freemarker + spring mvc + spring + mybatis + mysql + maven搭建web项目. 先假设您已经配置好eclipse的maven ...
随机推荐
- CabloyJS v3.1.0支持集群及更多 🎉
在抗疫期间,CabloyJS v3.1.0设计并开发了大量特性,并且所有相关文档已集齐.强烈建议大家试用,拍砖 特性 - 后端核心 集群: 集群现在已经成为CabloyJS的一等公民.也就是说,Cab ...
- Eureka服务下线太慢,电话被告警打爆了
某年某月的某一天,就像一张破碎的脸... 错了,重来. 某天,忽然发现大量的告警,经过多番调查研究考察(此处省略3000字),发现是由于 Eureka 服务下线太慢,而仍然有大量的请求打进来导致的报错 ...
- 2020 CSP-J 初赛游记
估分 预估 85 分,一是怕选错,而是最后真的错了一些 考点 排列组合:论临时抱佛脚的作用 靠前看了一下捆绑法和插板法,果然考了. 2.算法常识,和复杂度分析 冒泡排序最小交换次数 = n-1 , G ...
- VmWare安装Centos8注意事项
VmWare安装Centos8注意事项 1.需选择稍后安装操作系统 2.选择操作系统版本 3.修改虚拟机配置 4.配置完成点击开启虚拟机(注意要将鼠标放在屏幕中央,点击一下后才能使用上下键进行选择) ...
- Markdown的使用指南
# Markdown学习 ------ 以下符号均是英文输入法下的 ## 1.标题 几级标题就写 几个#号 加 空格 加 标题内容 就可以 例如: ###加空格加三级标题效果如下 ### 三级标题 # ...
- LVGL库入门教程03-布局方式
LVGL布局方式 LVGL的布局 上一节介绍了如何在 LVGL 中创建控件.如果在创建控件时不给控件安排布局,那么控件默认会被放在父容器的左上角. 可以使用 lv_obj_set_pos(obj, x ...
- C语言学习之我见-strcpy()字符串复制函数
strcpy()函数,用于两个字符串值的复制. (1)函数原型 char * strcpy(char * _Dest,const char * _Source); (2)头文件 string.h (3 ...
- JS:eval
定义和用法: eval() 函数计算 JavaScript 字符串,并把它作为脚本代码来执行.eval()函数并不会创建一个新的作用域,并且它的作用域就是它所在的作用域. 如果参数是一个表达式,eva ...
- Pytorch实现波阻抗反演
Pytorch实现波阻抗反演 1 引言 地震波阻抗反演是在勘探与开发期间进行储层预测的一项关键技术.地震波阻抗反演可消除子波影响,仅留下反射系数,再通过反射系数计算出能表征地层物性变化的物理参数.常用 ...
- 在C#开发中使用第三方组件LambdaParser、DynamicExpresso、Z.Expressions,实现动态解析/求值字符串表达式
在进行项目开发的时候,刚好需要用到对字符串表达式进行求值的处理场景,因此寻找了几个符合要求的第三方组件LambdaParser.DynamicExpresso.Z.Expressions,它们各自功能 ...