Spring 源码(8)Spring BeanPostProcessor的注册、国际化及事件发布机制
上一篇文章https://www.cnblogs.com/redwinter/p/16198942.html介绍了Spring的注解的解析过程以及Spring Boot自动装配的原理,大概回顾下:Spring 解析注解是通过BeanFactoryPostProcessor的子接口BeanDefinitionRegistryPostProcessor的实现类ConfigurationClassPostProcessor进行实现的,主要解析了@Componenet、@ComponentScans、@ComponentScan、@PropertySources、@PropertySource、@Import、@ImportResource、@Bean,并且是按照这个顺序进行解析的,由于Spring是基于注解开发,比如@Configuration、@Service、@Controller等注解都是在@Component注解之上定义的,因此这些注解也是在这里解析的,然后就是Spring Boot 自动装配,他是通过@Import注解解析ImportSelector接口的selectorImports方法进行BeanDefinition的解析的,并且在这个方法中,Spring 默认扫描META-INF/spring.factories文件,key为@AutoEnableConfiguration注解,value为需要注入的类,最终经过过滤去重得到真正需要注入的类的全类名数组,最终通过loadBeanDefinitions注册到Spring容器中。
接下来继续解读AbstractApplicationContext#refresh方法对BeanPostProcessor的注册。
registerBeanPostProcessors 注册BPP
上源码:
protected void registerBeanPostProcessors(ConfigurableListableBeanFactory beanFactory) {

  PostProcessorRegistrationDelegate.registerBeanPostProcessors(beanFactory, this);

}

public static void registerBeanPostProcessors(

  ConfigurableListableBeanFactory beanFactory, AbstractApplicationContext applicationContext) {

  // 通过类型获取beanNames

  String[] postProcessorNames = beanFactory.getBeanNamesForType(BeanPostProcessor.class, true, false);

  // Register BeanPostProcessorChecker that logs an info message when

  // a bean is created during BeanPostProcessor instantiation, i.e. when

  // a bean is not eligible for getting processed by all BeanPostProcessors.

  // 计算beanProcessor的数量

  int beanProcessorTargetCount = beanFactory.getBeanPostProcessorCount() + 1 + postProcessorNames.length;

  // 添加一个BeanPostProcessor,所有上面+1了

  beanFactory.addBeanPostProcessor(new BeanPostProcessorChecker(beanFactory, beanProcessorTargetCount));

  // Separate between BeanPostProcessors that implement PriorityOrdered,

  // Ordered, and the rest.

  // PriorityOrdered的bpp

  List<BeanPostProcessor> priorityOrderedPostProcessors = new ArrayList<>();

  // 内部的bpp

  List<BeanPostProcessor> internalPostProcessors = new ArrayList<>();

  // Ordered的BPP

  List<String> orderedPostProcessorNames = new ArrayList<>();

  // 没有排序的Bpp

  List<String> nonOrderedPostProcessorNames = new ArrayList<>();

  for (String ppName : postProcessorNames) {

    // 匹配是否是PriorityOrdered类型的bpp,是就加入进去

    if (beanFactory.isTypeMatch(ppName, PriorityOrdered.class)) {

      BeanPostProcessor pp = beanFactory.getBean(ppName, BeanPostProcessor.class);

      priorityOrderedPostProcessors.add(pp);

      // 判断是否是合并的mbdpp,这个类有点类似于BFPP的子类bdrpp

      if (pp instanceof MergedBeanDefinitionPostProcessor) {

        internalPostProcessors.add(pp);

      }

    }

    // 匹配是否是Ordered的bpp

    else if (beanFactory.isTypeMatch(ppName, Ordered.class)) {

      orderedPostProcessorNames.add(ppName);

    }

    else {

      // 没有排序的bpp

      nonOrderedPostProcessorNames.add(ppName);

    }

  }

  // First, register the BeanPostProcessors that implement PriorityOrdered.

  // 排序

  sortPostProcessors(priorityOrderedPostProcessors, beanFactory);

  // 注册bpp

  registerBeanPostProcessors(beanFactory, priorityOrderedPostProcessors);

  // Next, register the BeanPostProcessors that implement Ordered.

  // 将beanName转换为BPP对象存放在list中

  List<BeanPostProcessor> orderedPostProcessors = new ArrayList<>(orderedPostProcessorNames.size());

  for (String ppName : orderedPostProcessorNames) {

    BeanPostProcessor pp = beanFactory.getBean(ppName, BeanPostProcessor.class);

    orderedPostProcessors.add(pp);

    if (pp instanceof MergedBeanDefinitionPostProcessor) {

      internalPostProcessors.add(pp);

    }

  }

  // 排序

  sortPostProcessors(orderedPostProcessors, beanFactory);

  // 注册到容器中

  registerBeanPostProcessors(beanFactory, orderedPostProcessors);

  // Now, register all regular BeanPostProcessors.

  // 处理没有排序的bpp

  List<BeanPostProcessor> nonOrderedPostProcessors = new ArrayList<>(nonOrderedPostProcessorNames.size());

  for (String ppName : nonOrderedPostProcessorNames) {

    BeanPostProcessor pp = beanFactory.getBean(ppName, BeanPostProcessor.class);

    nonOrderedPostProcessors.add(pp);

    if (pp instanceof MergedBeanDefinitionPostProcessor) {

      internalPostProcessors.add(pp);

    }

  }

  // 注册到容器

  registerBeanPostProcessors(beanFactory, nonOrderedPostProcessors);

  // Finally, re-register all internal BeanPostProcessors.

  // 对内部的bpp进行排序

  sortPostProcessors(internalPostProcessors, beanFactory);

  // 注册内部的bpp

  registerBeanPostProcessors(beanFactory, internalPostProcessors);

  // Re-register post-processor for detecting inner beans as ApplicationListeners,

  // moving it to the end of the processor chain (for picking up proxies etc).

  // 重新注册ApplicationListenerDetector 的bpp,把它放在了链表的尾部

  // 因为在准备BeanFactory时已经添加过这个bpp

  beanFactory.addBeanPostProcessor(new ApplicationListenerDetector(applicationContext));

}
前面的文章:https://www.cnblogs.com/redwinter/p/16196359.html BeanFactoryPostProcessor的执行和解析的话,这里就很相似了,基本套路都是一样的。
- 通过
getBeanNamesByType获取BPP的数组 - 设置集合存储
BPP - 解析
PriorityOrdered的BPP,排序,注册,中间加入解析内部的BPP - 解析
Orderd的BPP,排序,注册 - 解析没有排序的,注册,,中间加入解析内部的
BPP - 最后注册内部的BPP
- 将
ApplicationListenerDetector注册到容器的后面,这个类是之前添加过的(这里:prepareBeanFactory),这里移到了最后
注册BPP都是调用的这个方法遍历处理的:
private static void registerBeanPostProcessors(

  ConfigurableListableBeanFactory beanFactory, List<BeanPostProcessor> postProcessors) {

  for (BeanPostProcessor postProcessor : postProcessors) {

    // 加入到容器中

    beanFactory.addBeanPostProcessor(postProcessor);

  }

}
与BFPP 不同的是,BPP只是进行了注册并没有进行执行,BFPP是注册并执行。
BeanPostProcessor 基本上就做了这些事,相对比较简单,接下来解读下AbstractApplicationContext#refresh中对国际化、事件多播器、事件监听器的处理。
初始化国际化
在单纯的Spring中设置国际化实际上是体现不出来的,需要用到Spring MVC 才能有所体现,我们看看Spring是怎么初始化的,上源码:
protected void initMessageSource() {

  // 获取beanFactory

  ConfigurableListableBeanFactory beanFactory = getBeanFactory();

  // 如果工厂中已经有这个bean,那就获取出来设置到messageSource上

  if (beanFactory.containsLocalBean(MESSAGE_SOURCE_BEAN_NAME)) {

    this.messageSource = beanFactory.getBean(MESSAGE_SOURCE_BEAN_NAME, MessageSource.class);

    // Make MessageSource aware of parent MessageSource.

    // 判断父类是否存在,如果存在则将判断父类是否设置了消息源,没有设置就设置给他

    if (this.parent != null && this.messageSource instanceof HierarchicalMessageSource) {

      HierarchicalMessageSource hms = (HierarchicalMessageSource) this.messageSource;

      if (hms.getParentMessageSource() == null) {

        // Only set parent context as parent MessageSource if no parent MessageSource

        // registered already.

        hms.setParentMessageSource(getInternalParentMessageSource());

      }

    }

    if (logger.isTraceEnabled()) {

      logger.trace("Using MessageSource [" + this.messageSource + "]");

    }

  }

  else {

    // Use empty MessageSource to be able to accept getMessage calls.

    // 如果容器中没有注册bean,那么new一个

    DelegatingMessageSource dms = new DelegatingMessageSource();

    dms.setParentMessageSource(getInternalParentMessageSource());

    this.messageSource = dms;

    // 注册到容器中

    beanFactory.registerSingleton(MESSAGE_SOURCE_BEAN_NAME, this.messageSource);

    if (logger.isTraceEnabled()) {

      logger.trace("No '" + MESSAGE_SOURCE_BEAN_NAME + "' bean, using [" + this.messageSource + "]");

    }

  }

}
逻辑很简单,首先是从容器中获取MessageSource接口的实现,如果存在则直接赋值给AbstractApplicationContext的messageSource属性,用于解析国际化和参数化。如果没有就直接new一个委派的实现类,然后赋值给messageSource属性,并注册到容器中。
在Spring中提供了两个默认的实现:ResourceBundleMessageSource 和 ReloadableResourceBundleMessageSource
初始化多播器、刷新容器、注册监听器
initApplicationEventMulticaster初始化多播器,上源码:
protected void initApplicationEventMulticaster() {

  // 获取beanFactory

  ConfigurableListableBeanFactory beanFactory = getBeanFactory();

  // 从容器中获取bean,如果就拿出来

  if (beanFactory.containsLocalBean(APPLICATION_EVENT_MULTICASTER_BEAN_NAME)) {

    this.applicationEventMulticaster =

      beanFactory.getBean(APPLICATION_EVENT_MULTICASTER_BEAN_NAME, ApplicationEventMulticaster.class);

    if (logger.isTraceEnabled()) {

      logger.trace("Using ApplicationEventMulticaster [" + this.applicationEventMulticaster + "]");

    }

  }

  else {

    // 没有事件多播器就new一个,多播器会创建一个监听器的集合,用于存放监听器

    this.applicationEventMulticaster = new SimpleApplicationEventMulticaster(beanFactory);

    // 注册到容器中

    beanFactory.registerSingleton(APPLICATION_EVENT_MULTICASTER_BEAN_NAME, this.applicationEventMulticaster);

    if (logger.isTraceEnabled()) {

      logger.trace("No '" + APPLICATION_EVENT_MULTICASTER_BEAN_NAME + "' bean, using " +

                   "[" + this.applicationEventMulticaster.getClass().getSimpleName() + "]");

    }

  }

}
源码跟国际化的代码基本逻辑一直,如果容器中有就拿出来赋值,没有就创建一个SimpleApplicationEventMulticaster类作为默认的多播器。
onRefresh刷新蓉器这个方法是一个空方法,由子类实现,这里直接跳过了。
registerListeners注册监听器,上源码:
protected void registerListeners() {

		// Register statically specified listeners first.

		// 注册静态指定的监听器

		for (ApplicationListener<?> listener : getApplicationListeners()) {

			getApplicationEventMulticaster().addApplicationListener(listener);

		}

		// Do not initialize FactoryBeans here: We need to leave all regular beans

		// uninitialized to let post-processors apply to them!

		// 根据类型获取监听器的beanName

		String[] listenerBeanNames = getBeanNamesForType(ApplicationListener.class, true, false);

		// 遍历bean,并加入到监听器bean集合中

		for (String listenerBeanName : listenerBeanNames) {

			getApplicationEventMulticaster().addApplicationListenerBean(listenerBeanName);

		}

		// Publish early application events now that we finally have a multicaster...

		// 获取早期的事件,这个事件是在准备刷新阶段(第一个阶段前戏阶段)设置进来的,是一个空的集合

		Set<ApplicationEvent> earlyEventsToProcess = this.earlyApplicationEvents;

		this.earlyApplicationEvents = null;

		if (!CollectionUtils.isEmpty(earlyEventsToProcess)) {

			for (ApplicationEvent earlyEvent : earlyEventsToProcess) {

				getApplicationEventMulticaster().multicastEvent(earlyEvent);

			}

		}

	}
这里的逻辑也是比较简单的:
先获取静态的监听器,这里实际上就是在定制化
BeanFactory时可以手动添加的监听器,如果有就添加到多播器的监听器集合中@Override
protected void customizeBeanFactory(DefaultListableBeanFactory beanFactory) {
// 扩展点 设置不去处理循环依赖或者beanDefinition覆盖
super.setAllowBeanDefinitionOverriding(true);
super.setAllowCircularReferences(true);
super.customizeBeanFactory(beanFactory);
// 添加一个自定义的属性编辑器的注册器
beanFactory.addPropertyEditorRegistrar(new AddressPropertyEditorRegistrar());
super.addBeanFactoryPostProcessor(new MyBeanDefinitionRegistryPostProcessor("new 创建的"));
// 添加一个自定义的BeanPostProcessorr
// beanFactory.addBeanPostProcessor(null);
// 添加一个监听器
super.addApplicationListener(new CustomApplicationListener());
}
获取定义为Bean的ApplicationListener,比如xml配置的,如果有就添加到多播器的监听器集合中
获取早期的事件,这里获取到的是一个空集合
Spring的事件发布是如何设计的?
Spring的事件机制实际上是使用了观察者模式进行设计的,观察者模式分为两大角色,观察者和被观察者,只是Spring更加的抽象,在Spring中分为事件ApplicationEvent、监听器ApplicationListener、事件发布者ApplicationEventPublisher、事件的多播器ApplicationEventMulticaster。AbstractApplicationContext这个Spring 的BeanFactory容器就是实现了ApplicationEventPublisher,可以对事件进行发布。在Spring中内置了很多的事件,比如:ContextClosedEvent、ContextRefreshedEvent、ContextStartedEvent、ContextStopedEvent,而监听器的话Spring内置不多,Spring还提供了注解方式的配置监听器,注解为@EventListener。
观察者模式与Spring事件驱动的对比:

在Spring 中如何使用事件,我们可以直接到官网 https://docs.spring.io/spring-framework/docs/current/reference/html/core.html#context-functionality-events 可以找到事件的使用案例,
想了解的朋友可以直接点击链接去查看,官网提供了两种配置监听器的方式,一种是实现ApplicationListener接口,一种是使用@EventLister注解配置,基于注解还可以配置异步的,排序的。
在自定义的事件发布时需要实现ApplicationEventPublisherAware 接口获取到ApplicationEventPublisher 进行发布事件。
上代码:
代码是Spring官网提供的,功能就是如果邮箱被拉黑,那么就不发送消息给邮箱,而是发布一个事件进行其他处理
定义一个事件源发布者:用来处理黑名单的邮箱
/**

 * @author <a href="https://www.cnblogs.com/redwinter/">redwinter</a>

 * @since 1.0

 **/

public class EmailService implements ApplicationEventPublisherAware {

  private List<String> blackList;

  public List<String> getBlackList() {

    return blackList;

  }

  public void setBlackList(List<String> blackList) {

    this.blackList = blackList;

  }

  private ApplicationEventPublisher applicationEventPublisher;

  @Override

  public void setApplicationEventPublisher(ApplicationEventPublisher applicationEventPublisher) {

    this.applicationEventPublisher = applicationEventPublisher;

  }

  public void sendEmail(String address,String context){

    if (blackList.contains(address)){

      // 在黑名单中,那么发布一个事件,但是不发送消息到邮箱

      applicationEventPublisher.publishEvent(new MyEvent(this,address,context));

      return;

    }

    System.out.println("......发送邮箱........");

  }

}
定义事件
/**

 * @author <a href="https://www.cnblogs.com/redwinter/">redwinter</a>

 * @since 1.0

 **/

public class MyEvent extends ApplicationEvent {

	private final String address;

	private final String context;

	/**

	 * Create a new {@code ApplicationEvent}.

	 *

	 * @param source the object on which the event initially occurred or with

	 *               which the event is associated (never {@code null})

	 */

	public MyEvent(Object source,String address,String context) {

		super(source);

		this.address = address;

		this.context = context;

	}

	@Override

	public String toString() {

		return "MyEvent{" +

				"address='" + address + '\'' +

				", context='" + context + '\'' +

				'}';

	}

}
定义监听器:
/**

 * @author <a href="https://www.cnblogs.com/redwinter/">redwinter</a>

 * @since 1.0

 **/

public class MyApplicationListener implements ApplicationListener<MyEvent> {

	private String notifyAddress;

	public String getNotifyAddress() {

		return notifyAddress;

	}

	public void setNotifyAddress(String notifyAddress) {

		this.notifyAddress = notifyAddress;

	}

	@Override

	public void onApplicationEvent(MyEvent event) {

		System.out.println("收到事件,开始发布");

		System.out.println("发送消息给" + notifyAddress + event.toString());

	}

}
配置xml:
<?xml version="1.0" encoding="UTF-8"?>

<beans xmlns="http://www.springframework.org/schema/beans"

	   xmlns:xsi="http://www.w3.org/2001/XMLSchema-instance" xmlns:mvc="http://www.springframework.org/schema/mvc"

	   xmlns:context="http://www.springframework.org/schema/context"

	   xmlns:redwinter="http://www.redwinter.com/schema/redwinter"

	   xsi:schemaLocation="http://www.springframework.org/schema/mvc https://www.springframework.org/schema/mvc/spring-mvc-3.1.xsd

		http://www.springframework.org/schema/beans https://www.springframework.org/schema/beans/spring-beans-3.1.xsd

		http://www.springframework.org/schema/context https://www.springframework.org/schema/context/spring-context.xsd

		http://www.redwinter.com/schema/redwinter  http://www.redwinter.com/schema/redwinter.xsd

		">

<!--配置事件监听-->

	<bean class="com.redwinter.test.EmailService">

		<property name="blackList">

			<list>

				<value>12345@qq.com</value>

				<value>123@qq.com</value>

				<value>456@qq.com</value>

			</list>

		</property>

	</bean>

	<bean class="com.redwinter.test.MyApplicationListener">

		<property name="notifyAddress" value="789@qq.com"/>

	</bean>

</beans>
客户端:
ClassPathXmlApplicationContext context = new MyClassPathXmlApplicationContext("classpath:spring-test.xml");

EmailService emailService = context.getBean(EmailService.class);

emailService.sendEmail("123@qq.com","Spring源码学习中!");
我这里发送的邮箱在拉黑的配置文件中,所以就会触发事件的发布并且将拉黑的邮箱信息发送给789@qq.com这个通知邮箱,如果设置成其他的邮箱,那么就能正常进行发送消息。
输出:
收到事件,开始发布

发送消息给789@.comMyEvent{address='123@qq.com', context='你好啊,Spring源码!'}
当然可有使用注解@EventListener进行配置:
/**

 * @author <a href="https://www.cnblogs.com/redwinter/">redwinter</a>

 * @since 1.0

 **/

public class MyNotifier {

	private String notifyAddress;

	public String getNotifyAddress() {

		return notifyAddress;

	}

	public void setNotifyAddress(String notifyAddress) {

		this.notifyAddress = notifyAddress;

	}

	@EventListener

	public void processMessage(MyEvent event){

		System.out.println("收到事件,开始发布");

		System.out.println("发送消息给" + notifyAddress + event.toString());

	}

}
xml增加一项配置:开启扫描和新增一个Bean的配置
<?xml version="1.0" encoding="UTF-8"?>

<beans xmlns="http://www.springframework.org/schema/beans"

	   xmlns:xsi="http://www.w3.org/2001/XMLSchema-instance" xmlns:mvc="http://www.springframework.org/schema/mvc"

	   xmlns:context="http://www.springframework.org/schema/context"

	   xmlns:redwinter="http://www.redwinter.com/schema/redwinter"

	   xsi:schemaLocation="http://www.springframework.org/schema/mvc https://www.springframework.org/schema/mvc/spring-mvc-3.1.xsd

		http://www.springframework.org/schema/beans https://www.springframework.org/schema/beans/spring-beans-3.1.xsd

		http://www.springframework.org/schema/context https://www.springframework.org/schema/context/spring-context.xsd

		http://www.redwinter.com/schema/redwinter  http://www.redwinter.com/schema/redwinter.xsd

		">

  <context:component-scan base-package="com.redwinter.test"/>

<!--配置事件监听-->

	<bean class="com.redwinter.test.selfevent.EmailService">

		<property name="blackList">

			<list>

				<value>12345@qq.com</value>

				<value>123@qq.com</value>

				<value>456@qq.com</value>

			</list>

		</property>

	</bean>

	<bean class="com.redwinter.test.selfevent.MyApplicationListener">

		<property name="notifyAddress" value="789@.com"/>

	</bean>

	<bean class="com.redwinter.test.selfevent.MyNotifier">

		<property name="notifyAddress" value="7888@.com"/>

	</bean>

  </beans>
输出:
收到事件,开始发布

发送消息给7888@.comMyEvent{address='123@qq.com', context='你好啊,Spring源码!'}

收到事件,开始发布

发送消息给789@.comMyEvent{address='123@qq.com', context='你好啊,Spring源码!'}
说明生效了,那么@EventListenter是如何解析的呢?
@EventListener注解如何解析的?
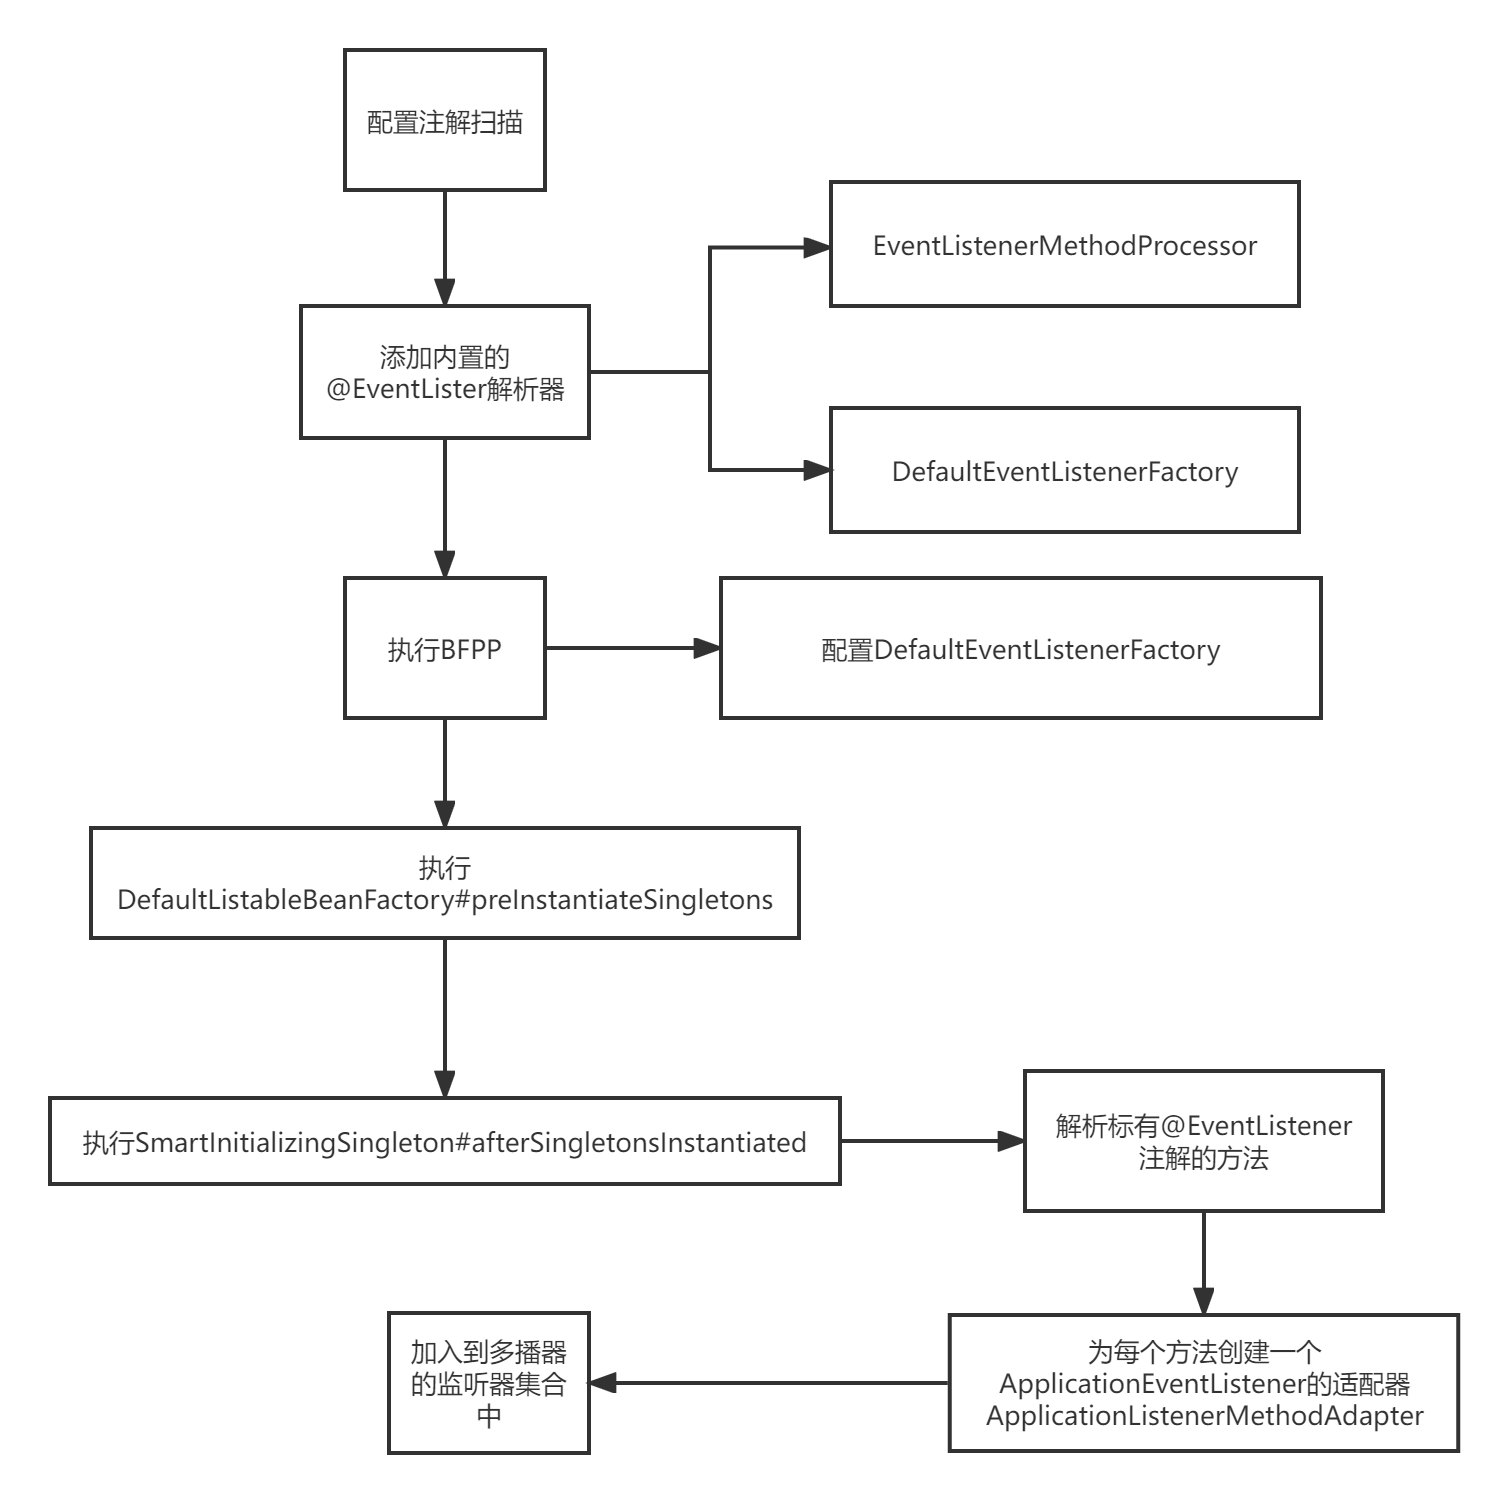
实际上在分析BFPP https://www.cnblogs.com/redwinter/p/16198942.html的时候,我们分析了Spring对注解的解析,提到了如果开启了Spring的注解扫描,那么Spring默认会在容器中添加几个内置的Bean,并且以internal开头的Bean对象,这些Bean都是在AnnotationConfigUtils这个类中设置的:
//... 省略代码....

// 创建一个 EventListenerMethodProcessor 的BeanDefinition

if (!registry.containsBeanDefinition(EVENT_LISTENER_PROCESSOR_BEAN_NAME)) {

  RootBeanDefinition def = new RootBeanDefinition(EventListenerMethodProcessor.class);

  def.setSource(source);

  beanDefs.add(registerPostProcessor(registry, def, EVENT_LISTENER_PROCESSOR_BEAN_NAME));

}

// 创建一个 DefaultEventListenerFactory 的BeanDefinition

if (!registry.containsBeanDefinition(EVENT_LISTENER_FACTORY_BEAN_NAME)) {

  RootBeanDefinition def = new RootBeanDefinition(DefaultEventListenerFactory.class);

  def.setSource(source);

  beanDefs.add(registerPostProcessor(registry, def, EVENT_LISTENER_FACTORY_BEAN_NAME));

}

//... 省略代码....
可以看到设置了一个EventListenerMethodProcessor类还有一个DefaultEventListenerFactory,这两个类分别用来解析@EvenListener和创建ApplicationListener接口的适配器。
EventListenerMethodProcessor 实现了BeanFactoryPostProcessor接口、SmartInitializingSingleton接口和ApplicationContextAware接口,BeanFactoryPostProcessor接口是用来对BeanDefinition进行个性化设置解析等操作,SmartInitializingSingleton接口是在初始化所有的单例Bean之后触发的,也就是在preInstantiateSingletons方法中初始化Bean之后调用,ApplicationContextAware是用来获取ApplicationContext的。
截取EventListenerMethodProcessor类中的的部分代码:
// ... 省略代码....

// 遍历所有标有@EventListener注解的方法

for (Method method : annotatedMethods.keySet()) {

  for (EventListenerFactory factory : factories) {

    if (factory.supportsMethod(method)) {

      Method methodToUse = AopUtils.selectInvocableMethod(method, context.getType(beanName));

      // 使用工厂创建一个监听器,实际上创建的就是一个ApplicationListenerMethodAdapter

      ApplicationListener<?> applicationListener =

        factory.createApplicationListener(beanName, targetType, methodToUse);

      if (applicationListener instanceof ApplicationListenerMethodAdapter) {

        ((ApplicationListenerMethodAdapter) applicationListener).init(context, this.evaluator);

      }

      // 添加到容器中,如果多播器不为空,则添加到多播器的监听器集合中

      context.addApplicationListener(applicationListener);

      break;

    }

  }

}

// ... 省略代码....

public ApplicationListener<?> createApplicationListener(String beanName, Class<?> type, Method method) {

  return new ApplicationListenerMethodAdapter(beanName, type, method);

}
到这里Spring的AbstractApplicationContext#refresh方法中的10多个方法已经分析了10个了,接下来分析Bean的创建过程,应该是Spring源码中最重要的过程了。
Spring 源码(8)Spring BeanPostProcessor的注册、国际化及事件发布机制的更多相关文章
- [spring源码学习]五-BeanPostProcessor的使用
一.接口描述 spring提供了一个接口类-BeanPostProcessor,我们叫他:bean的加工器,应该是在bean的实例化过程中对bean做一些包装处理,里边提供两个方法 public in ...
- Spring源码分析(十)注册解析的BeanDefinition
摘要:本文结合<Spring源码深度解析>来分析Spring 5.0.6版本的源代码.若有描述错误之处,欢迎指正. 对配置文件解析完成后,获取的beanDefiniton已经可以进行使用了 ...
- Spring源码解读Spring IOC原理
一.什么是Ioc/DI? IoC 容器:最主要是完成了完成对象的创建和依赖的管理注入等等. 先从我们自己设计这样一个视角来考虑: 所谓控制反转,就是把原先我们代码里面需要实现的对象创建.依赖的代码,反 ...
- 初探Spring源码之Spring Bean的生命周期
写在前面的话: 学无止境,写博客纯粹是一种乐趣而已,把自己理解的东西分享出去,不意味全是对的,欢迎指正! Spring 容器初始化过程做了什么? AnnotationConfigApplication ...
- Spring源码阅读-spring启动
web.xml web.xml中的spring容器配置 <listener> <listener-class>org.springframework.web.context.C ...
- 【Spring 源码】Spring 加载资源并装配对象的过程(XmlBeanDefinitionReader)
Spring 加载资源并装配对象过程 在Spring中对XML配置文件的解析从3.1版本开始不再推荐使用XmlBeanFactory而是使用XmlBeanDefinitionReader. Class ...
- spring源码解析——spring源码导入eclipse
一.前言 众所周知,spring的强大之处.几乎所有的企业级开发中,都使用了spring了.在日常的开发中,我们是否只知道spring的配置,以及简单的使用场景.对其实现的代码没有进行深入的了 ...
- spring源码系列(一)sring源码编译 spring源码下载 spring源码阅读
想对spring框架进行深入的学习一下,看看源代码,提升和沉淀下自己,工欲善其事必先利其器,还是先搭建环境吧. 环境搭建 sping源码之前是svn管理,现在已经迁移到了github中了,新版本基于g ...
- Spring源码:Spring IoC容器加载过程(2)
Spring源码版本:4.3.23.RELEASE 一.加载XML配置 通过XML配置创建Spring,创建入口是使用org.springframework.context.support.Class ...
随机推荐
- 解释Spring框架中bean的生命周期?
Spring容器 从XML 文件中读取bean的定义,并实例化bean. Spring根据bean的定义填充所有的属性. 如果bean实现了BeanNameAware 接口,Spring 传递bean ...
- 用maven建立一个工程4
在命令行里面输入cd C:\Users\admin\Documents\hello 然后按回车 再输入这行代码 mvn archetype:generate -DgroupId=com.liyongz ...
- 学习MFS(五)
########################################################## mfs master 安装 建议 cp eth0 eth0:0 ifup eth ...
- Mybatis-Plus 如何实现一对多关系 举例 用户与角色
Mybatis-Plus 一对多Mybatis-Plus 不写一句sql语句实现一对多 首先来看效果 Mysql数据库 用户表 角色表 用户与角色的中间表 中间表如下 将三张表通过Mybatis Pl ...
- 编译器警告c4996
由于编译器的原因(我用的是vs 2012),我们写程序时有时候会遇到编译器给出的警告,如: warning C4996: 'fopen': This function or variable may ...
- Altium_Designer PCB文件的绘制(上:PCB基础和布局)
PCB设计基础知识 PCB面板 在PCB设计中,最重要的一个面板就是"PCB面板".该面板的功能主要是对电路板中的各个对象进行精确定位,并以特定的效果显示出来.该面板还可以对各种对 ...
- EDM响应式邮件框架:MJML
概述 新课题研究:响应式邮件框架MJML(MJML官网:https://mjml.io/)姐妹篇: EDM响应式邮件框架:Formerly Ink 介绍 MJML是一种标记语言,设计用于轻松实现一个响 ...
- H5的audio在ios系统的微信上不能自动播放的问题
前几天有个需求,要在H5页面中添加背景音乐,本以为很easy,却也踩了一些坑,废话不多说,进入正题: 撸完代码测试的时候才发现在安卓手机上背景音乐可以正常播放,但在iphone里的微信和safari中 ...
- 【uniapp 开发】校验工具类 CheckUtil
校验手机号格式 /** * 验证是否为电话号码(座机) * * @param {} * source */ function isTelephone(source) { var regex = /^( ...
- 【001】学习前提——安装linux虚拟机,搭建docker
1. 配置linux 1.1 修改配置 安装virtualbox的过程略过. 进入cd /etc/sysconfig/network-scripts,编辑:vi ifcfg-enp0s3 1>将 ...