搭建本地yum源和局域网yum源
搭建本地yum源和局域网yum源
由于很多客户环境是专网,不允许连网,无法使用网上的各种yum源,来回拷贝rpm包安装麻烦,还得解决依赖问题。所以想着搭建个本地/局域网YUM源,方便安装软件。
1 搭建本地YUM源
环境:第一台VM IP:192.168.10.81
第二台VM IP:192.168.10.82
1.1 准备rpm包
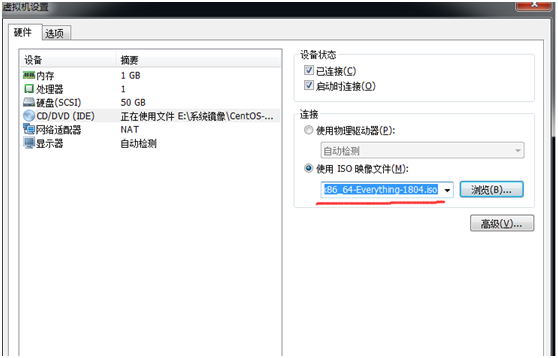
虚拟机挂载镜像包CentOS-7-x86_64-Everything-1511.iso 开机启动

挂载镜像:
[root@centos7-81 ~]# mount /dev/sr0 /mnt/
mount: /dev/sr0 is write-protected, mounting read-only
[root@centos7-81 ~]# mkdir -p /yum/yum-iso #新建本地路径/yum/yum-iso
把挂载的镜像里面所有文件都拷贝到本地目录/yum/yum-iso
[root@centos7-81 ~]# cp -r /mnt/* /yum/yum-iso/

1.2 备份并移除其他repo
[root@centos7-81 ~]# cd /etc/yum.repos.d/
[root@centos7-81 yum.repos.d]# tar czvf repo-bk.tar.gz CentOS-*
CentOS-Base.repo
CentOS-CR.repo
CentOS-Debuginfo.repo
CentOS-fasttrack.repo
CentOS-Media.repo
CentOS-Sources.repo
CentOS-Vault.repo
[root@centos7-81 yum.repos.d]# rm -rf *.repo
1.3 配置本地repo
[root@centos7-81 yum.repos.d]# vi CentOS-Media.repo
[c7-media]
name=CentOS-$releasever-Media
baseurl=file:///yum/yum-iso/
gpgcheck=0
enabled=1
gpgkey=file:///etc/pki/rpm-gpg/RPM-GPG-KEY-CentOS-7
注:配置repo路径、关闭gbp校验、启用这个repo
1.4 制作cache
[root@centos7-81 yum.repos.d]# yum clean all
Loaded plugins: fastestmirror
Cleaning repos: c7-media
Cleaning up everything
Cleaning up list of fastest mirrors
[root@centos7-81 yum.repos.d]# yum makecache
Loaded plugins: fastestmirror
c7-media | 3.6 kB 00:00:00
(1/4): c7-media/group_gz | 3.5 kB 00:00:00
(2/4): c7-media/primary_db | 679 kB 00:00:00
(3/4): c7-media/other_db | 174 kB 00:00:00
(4/4): c7-media/filelists_db | 258 kB 00:00:00
Determining fastest mirrors
Metadata Cache Created
[root@centos7-81 yum.repos.d]#
这样就可以使用yum安装软件了
[root@centos7-81 ~]# yum install -y tree
Loaded plugins: fastestmirror
Loading mirror speeds from cached hostfile
Resolving Dependencies
--> Running transaction check
---> Package tree.x86_64 0:1.6.0-10.el7 will be installed
--> Finished Dependency Resolution
Dependencies Resolved
==============================================================================================================================
Package Arch Version Repository Size
==============================================================================================================================
Installing:
tree x86_64 1.6.0-10.el7 c7-media 46 k
Transaction Summary
==============================================================================================================================
Install 1 Package
Total download size: 46 k
Installed size: 87 k
Downloading packages:
Running transaction check
Running transaction test
Transaction test succeeded
Running transaction
Warning: RPMDB altered outside of yum.
Installing : tree-1.6.0-10.el7.x86_64 1/1
Verifying : tree-1.6.0-10.el7.x86_64 1/1
Installed:
tree.x86_64 0:1.6.0-10.el7
Complete!
[root@centos7-81 ~]#
安装createrepo
[root@centos7-81 ~]# yum install createrepo -y
准备RPM包
自己确定rpm包,目录,这里使用tree做演示
[root@centos7-81 ~]# mkdir -p /yum/yum-custom/packages
[root@centos7-81 ~]# cp /yum/yum-iso/Packages/tree-1.6.0-10.el7.x86_64.rpm /yum/yum-custom/packages/
[root@centos7-81 ~]# createrepo -u -d /yum/yum-custom/
Spawning worker 0 with 1 pkgs
Workers Finished
Saving Primary metadata
Saving file lists metadata
Saving other metadata
Generating sqlite DBs
Sqlite DBs complete
[root@centos7-81 ~]# ll /yum/yum-custom/
total 4
drwxr-xr-x 2 root root 42 Oct 20 23:46 packages
drwxr-xr-x 2 root root 4096 Oct 20 23:46 repodata
配置自定义repo
[root@centos7-81 ~]# vi /etc/yum.repos.d/CentOS-Media.repo
[c7-media]
name=CentOS-$releasever-Media
baseurl=file:///yum/yum-custom/
gpgcheck=0
enabled=1
gpgkey=file:///etc/pki/rpm-gpg/RPM-GPG-KEY-CentOS-7
2 配置局域网yum源
将repo文件改为
[root@centos7-81 ~]# cat /etc/yum.repos.d/CentOS-Media.repo
[c7-media]
name=CentOS-$releasever-Media
baseurl=file:///yum/yum-iso/
gpgcheck=0
enabled=1
gpgkey=file:///etc/pki/rpm-gpg/RPM-GPG-KEY-CentOS-7
重新生成缓存
[root@centos7-81 ~]# yum clean all
[root@centos7-81 ~]# yum makecache
安装vsftp
[root@centos7-81 ~]# yum install vsftpd -y
关闭selinux和防火墙
[root@centos7-81 ~]# getenforce
Disabled
[root@centos7-81 ~]# cat /etc/selinux/config
# This file controls the state of SELinux on the system.
# SELINUX= can take one of these three values:
# enforcing - SELinux security policy is enforced.
# permissive - SELinux prints warnings instead of enforcing.
# disabled - No SELinux policy is loaded.
SELINUX=disabled
# SELINUXTYPE= can take one of three two values:
# targeted - Targeted processes are protected,
# minimum - Modification of targeted policy. Only selected processes are protected.
# mls - Multi Level Security protection.
SELINUXTYPE=targeted
[root@centos7-81 ~]# systemctl stop firewalld
[root@centos7-81 ~]# systemctl disable firewalld
Removed symlink /etc/systemd/system/dbus-org.fedoraproject.FirewallD1.service.
Removed symlink /etc/systemd/system/basic.target.wants/firewalld.service.
修改vsftp配置文件
[root@centos7-81 ~]# vi /etc/vsftpd/vsftpd.conf
在最末尾加上
anon_root=/yum/yum-custom/
启动vsftp并设置开机启动
[root@centos7-81 ~]# systemctl start vsftpd
[root@centos7-81 ~]# systemctl enable vsftpd
本地电脑访问ftp://192.168.10.81

关键步骤:
生成repodata目录,自动创建索引信息
[root@centos7-81 yum]# createrepo -pdo /yum/yum-custom/ /yum/yum-custom/
否则安装tree的时候会出现报错:
Error downloading packages:
tree-1.6.0-10.el7.x86_64: failed to retrieve packages/tree-1.6.0-10.el7.x86_64.rpm from c7-media
error was [Errno 2] Local file does not exist: /etc/yum.repos.d/-d/packages/tree-1.6.0-10.el7.x86_64.rpm
[root@centos7-82 yum.repos.d]# yum clean all
[root@centos7-82 yum.repos.d]# yun makecache
在另一台VM上设置repo文件
[root@centos7-82 ~]# cd /etc/yum.repos.d/
[root@centos7-82 yum.repos.d]# rm -rf *
从第一台VM上将repo文件传到第二台VM上
[root@centos7-81 ~]# scp /etc/yum.repos.d/CentOS-Media.repo root@192.168.10.82:/etc/yum.repos.d/
The authenticity of host '192.168.10.82 (192.168.10.82)' can't be established.
ECDSA key fingerprint is 32:c1:45:16:b2:a8:b2:25:22:58:02:11:a2:a3:54:90.
Are you sure you want to continue connecting (yes/no)? yes
Warning: Permanently added '192.168.10.82' (ECDSA) to the list of known hosts.
root@192.168.10.82's password:
CentOS-Media.repo 100% 143 0.1KB/s 00:00
[root@centos7-81 ~]#
在第二台VM上修改repo文件
[c7-media]
name=CentOS-$releasever-Media
#baseurl=file:///yum/yum-iso/
baseurl=ftp://192.168.10.81
gpgcheck=0
enabled=1
gpgkey=file:///etc/pki/rpm-gpg/RPM-GPG-KEY-CentOS-7
[root@centos7-82 yum.repos.d]# yum install -y tree
Loaded plugins: fastestmirror
Loading mirror speeds from cached hostfile
Resolving Dependencies
--> Running transaction check
---> Package tree.x86_64 0:1.6.0-10.el7 will be installed
--> Finished Dependency Resolution
Dependencies Resolved
==============================================================================================================================
Package Arch Version Repository Size
==============================================================================================================================
Installing:
tree x86_64 1.6.0-10.el7 c7-media 46 k
Transaction Summary
==============================================================================================================================
Install 1 Package
Total download size: 46 k
Installed size: 87 k
Downloading packages:
tree-1.6.0-10.el7.x86_64.rpm | 46 kB 00:00:00
Running transaction check
Running transaction test
Transaction test succeeded
Running transaction
Installing : tree-1.6.0-10.el7.x86_64 1/1
Verifying : tree-1.6.0-10.el7.x86_64 1/1
Installed:
tree.x86_64 0:1.6.0-10.el7
Complete!
就可以使用了
搭建本地yum源和局域网yum源的更多相关文章
- CentOS 7搭建本地yum源和局域网yum源
这两天在部署公司的测试环境,在安装各种中间件的时候,发现各种依赖都没有:后来一检查,发现安装的操作系统是CentOS Mini版,好吧,我认了:为了完成测试环境的搭建,我就搭建了一个局域网的yum源. ...
- CentOS7.2 创建本地YUM源和局域网YUM源
1背景 由于开发环境只有局域网,没法使用网上的各种YUM源,来回拷贝rpm包安装麻烦,还得解决依赖问题. 想着搭建个本地/局域网YUM源,方便自己跟同事安装软件. 2环境 [root@min-base ...
- RHEL7.2系统下的软件管理(yum)、本地yum源和网络yum源的搭建
在Liunx系统中,rpm和yum都可以安装软件,但rpm存在安装软件的依赖性,yum安装软件需要yum源 1.yum yum install softwarename ##安装 yum repoli ...
- 如何手工搭建本地Yum仓库
如何手工搭建本地Yum仓库(重点推荐) https://www.linuxidc.com/Linux/2016-09/135480.htm CentOS7.2 创建本地YUM源和局域网YUM源: h ...
- Linux搭建局域网yum源和后期在yum源中更新rpm包方法
在内网中搭建自己的yum源,可以方便在内网中使用,下面简单介绍搭建局域网yum源的方法和后期更新yum源rpm包的方法. 一.搭建局域网yum源 1.需要在局域网访问,首先需要一个web服务器,比如a ...
- Centos 7 局域网 yum 源搭建
一.需求及实现方式介绍: 需求:现在各个软件版本更新迭代很快,在我们部署一套集群(比如:openstack)后,如果过一段时间想扩展集群时发现软件版本早已迭代更新,安装后导致和现有环境或多或少不兼容, ...
- 在linux上搭建本地yum源
准备yum仓库的光盘镜像IOS文件: 设置光驱加载本地磁盘的yum仓库的光盘镜像文件: 在linux的命令行输入setup命令打开设置窗口,选择"System Service": ...
- 搭建本地yum源并定时同步
在生产中内网的机器都是不能访问外网,所以需要搭建本地yum源.以中国科学科技大学的yum源为基准.http://mirrors.ustc.edu.cn/ 有些模块会同步失败,可以wget下载至指定位置 ...
- 使用光盘搭建本地yum源
刚装好的系统,想安装一些常用软件和一些包组的时候,就可以使用安装光盘搭建本地yum 第一步:挂载安装光盘 mount /dev/cdrom /mnt 第二步:编辑repo yum源文件 [root@l ...
随机推荐
- [转载]剥析surging的架构思想
1.前言 2.通信机制 2.1 简介 在单体应用中,模块之间的调用通信通过引用加载方法或者函数来实现,但是单体应用最终都会因为团队壮大,项目模块的扩展和部署等出现难以维护的问题.随着业务需求 ...
- Uncaught SyntaxError: Unexpected end of input 解决办法
Unexpected end of input 的英文意思是"意外的终止输入" 他通常表示我们浏览器在读取我们的js代码时,碰到了不可预知的错误,导致浏览器 无语进行下面的读取 ...
- [GraphQL] Add an Interface to a GraphQL Schema
As we start building out more complex GraphQL schemas, certain fields start to repeat across differe ...
- arm-linux内存管理学习笔记(1)-内存页表的硬件原理
linux kernel集中了世界顶尖程序猿们的编程智慧,犹记操作系统课上老师讲操作系统的四大功能:进程调度 内存管理 设备驱动 网络.从事嵌入式软件开发工作,对设备驱动和网络接触的比較多. 而进程调 ...
- js如何操作表格(常用属性方法汇总)
js如何操作表格(常用属性方法汇总) 一.总结 一句话总结: 二.表格相关的属性和方法 1.1 Table 对象集合 cells[] 返回包含表格中所有单元格的一个数组. 语法:tableObject ...
- 课堂随笔03--for循环及两个循环中断关键字
for (int i = 1; i <= 8;i++) {} for循环可嵌套,执行指定次数,可用作计数. 用两个for循环嵌套,可以方便控制行列的输出. break:中断循环 continu ...
- Java循环输出一个菱形与阶乘倒数
package javafirst; public class HomeWork { public static void main(String[] args){ System.out.printl ...
- spring 技巧集锦
SpringBoot四大神器之Actuator actuator是spring boot提供的对应用系统的自省和监控的集成功能,可以对应用系统进行配置查看.相关功能统计等. <dependenc ...
- TensorFlow 学习(七) — 常用函数 api、tf.nn 库
0. 四则运算 平方:tf.square(),开方:tf.sqrt() tf.add().tf.sub().tf.mul().tf.div().tf.mod().tf.abs().tf.neg() 1 ...
- IWXAPI的使用,发布分享和支付
今天看代码,看到以前项目的微信支付功能,想做一下记录 首先是在application类里面定义 public static IWXAPI MSGAPI; public static final Str ...
