
第19章 Redis的一些常用技术
19.1 Redis的基础事务
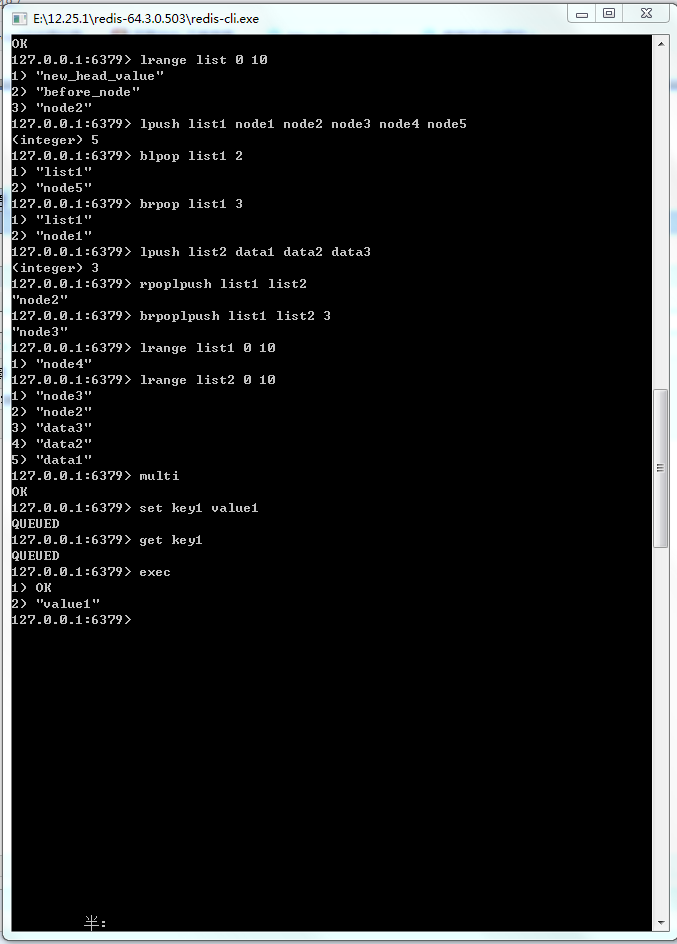
图19-1 Redis命令执行事务的过程
19-1:在Spring中使用Redis事务命令
 public static void testTransaction(){

        ApplicationContext applicationContext = new ClassPathXmlApplicationContext("applicationContext.xml");

        RedisTemplate redisTemplate = applicationContext.getBean(RedisTemplate.class);

        SessionCallback callBack = (SessionCallback)(RedisOperations ops) -> {

            ops.multi();

            ops.boundValueOps("key1").set("value1");

            // 注意由于命令只是进入队列,而没有被执行,所以此处采用get命令,而value却返回为null

            String value = (String) ops.boundValueOps("key1").get();

            System.out.println("事务执行过程中,命令入队列,而没有被执行,所以value为空:value=" + value);

            // 此时list会保存之前进入队列的所有命令的结果

            ops.exec();// 执行事务

            // 事务结束后,获取value1

            value = (String) redisTemplate.opsForValue().get("key1");

            return value;

        };

        // 执行Redis的命令

        String value = (String) redisTemplate.execute(callBack);

        System.out.println(value);

    }
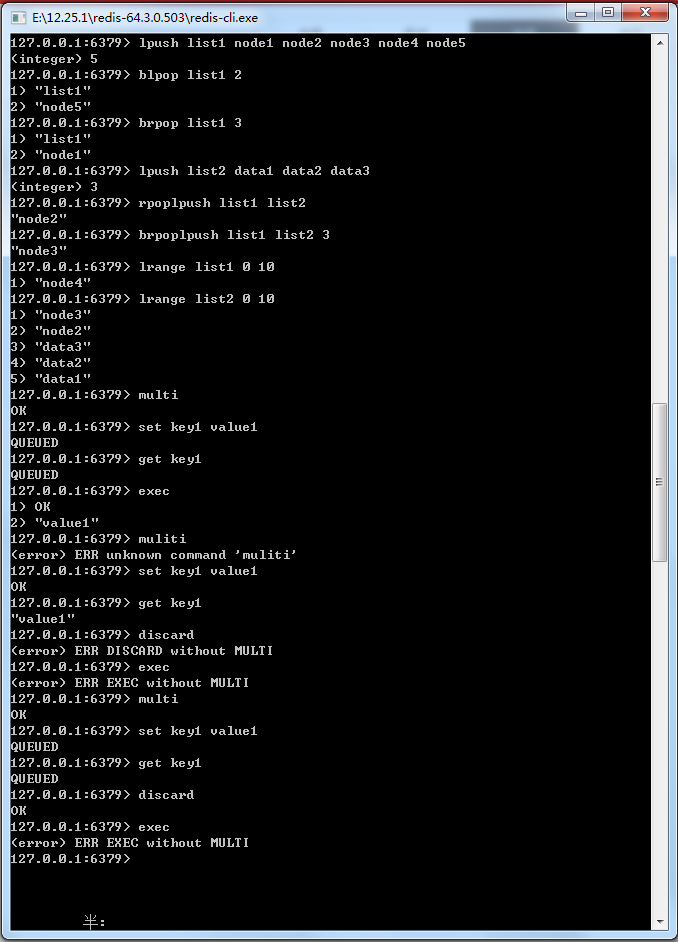
图19-2 使用discard命令取消事务
19.2 探索Redis事务回滚
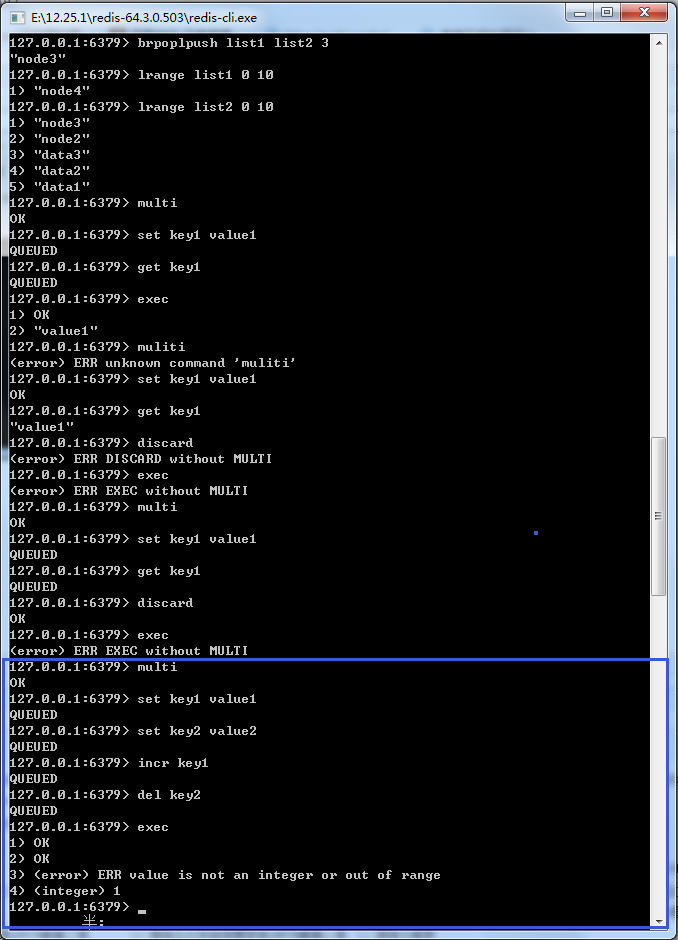
图19-3 Redis事务遇到命令格式正确而数据类型不符合
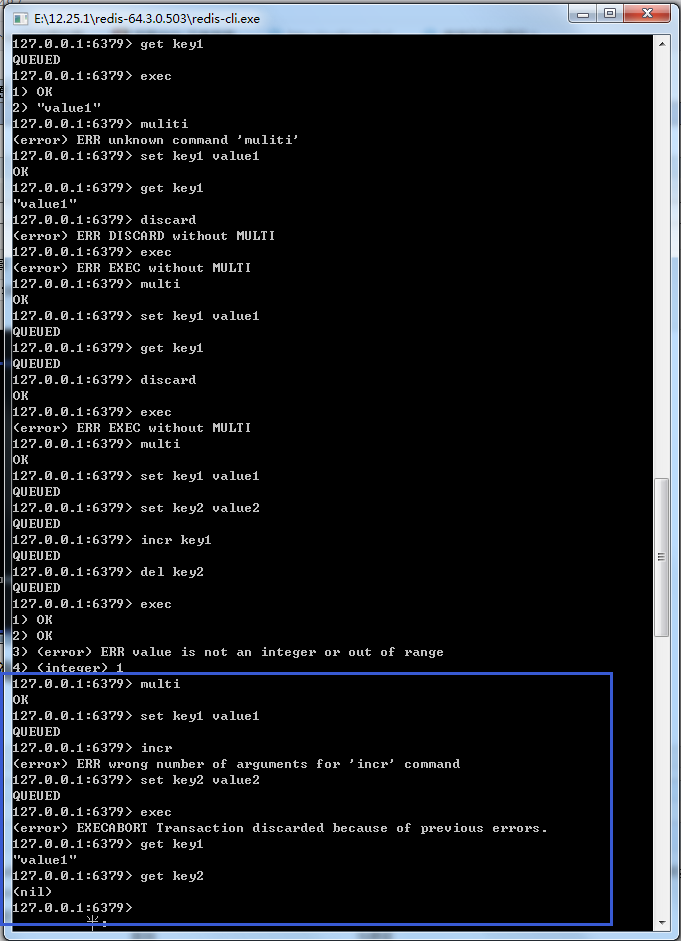
图19-4 Redis事务遇到命令格式错误的
19.3 使用watch命令监控事务
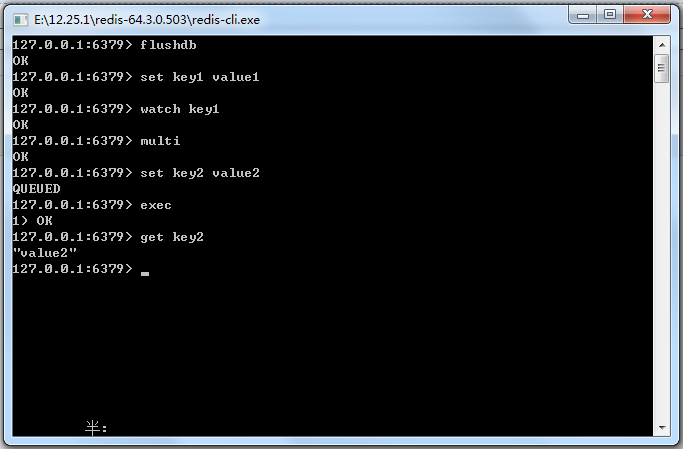
图19-6 Redis执行事务


图19-7 测试Redis事务回滚
19.4 流水线(pipelined)
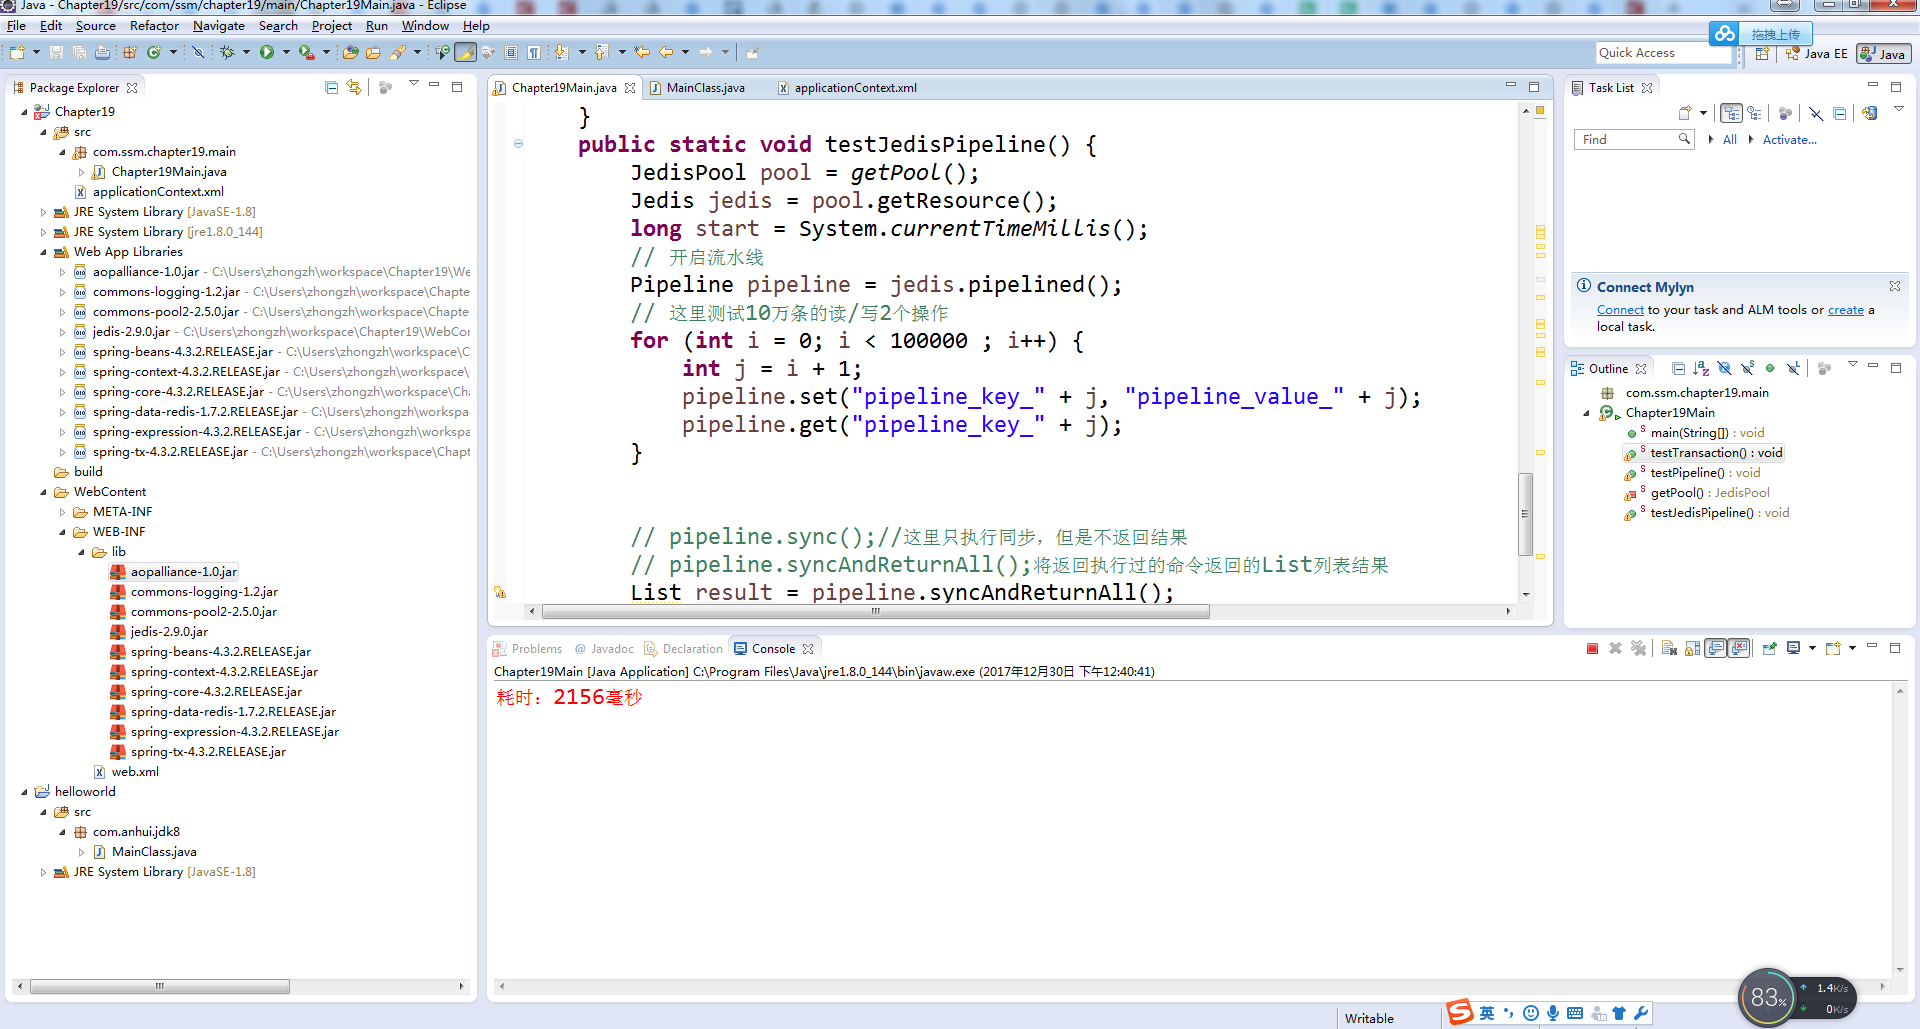
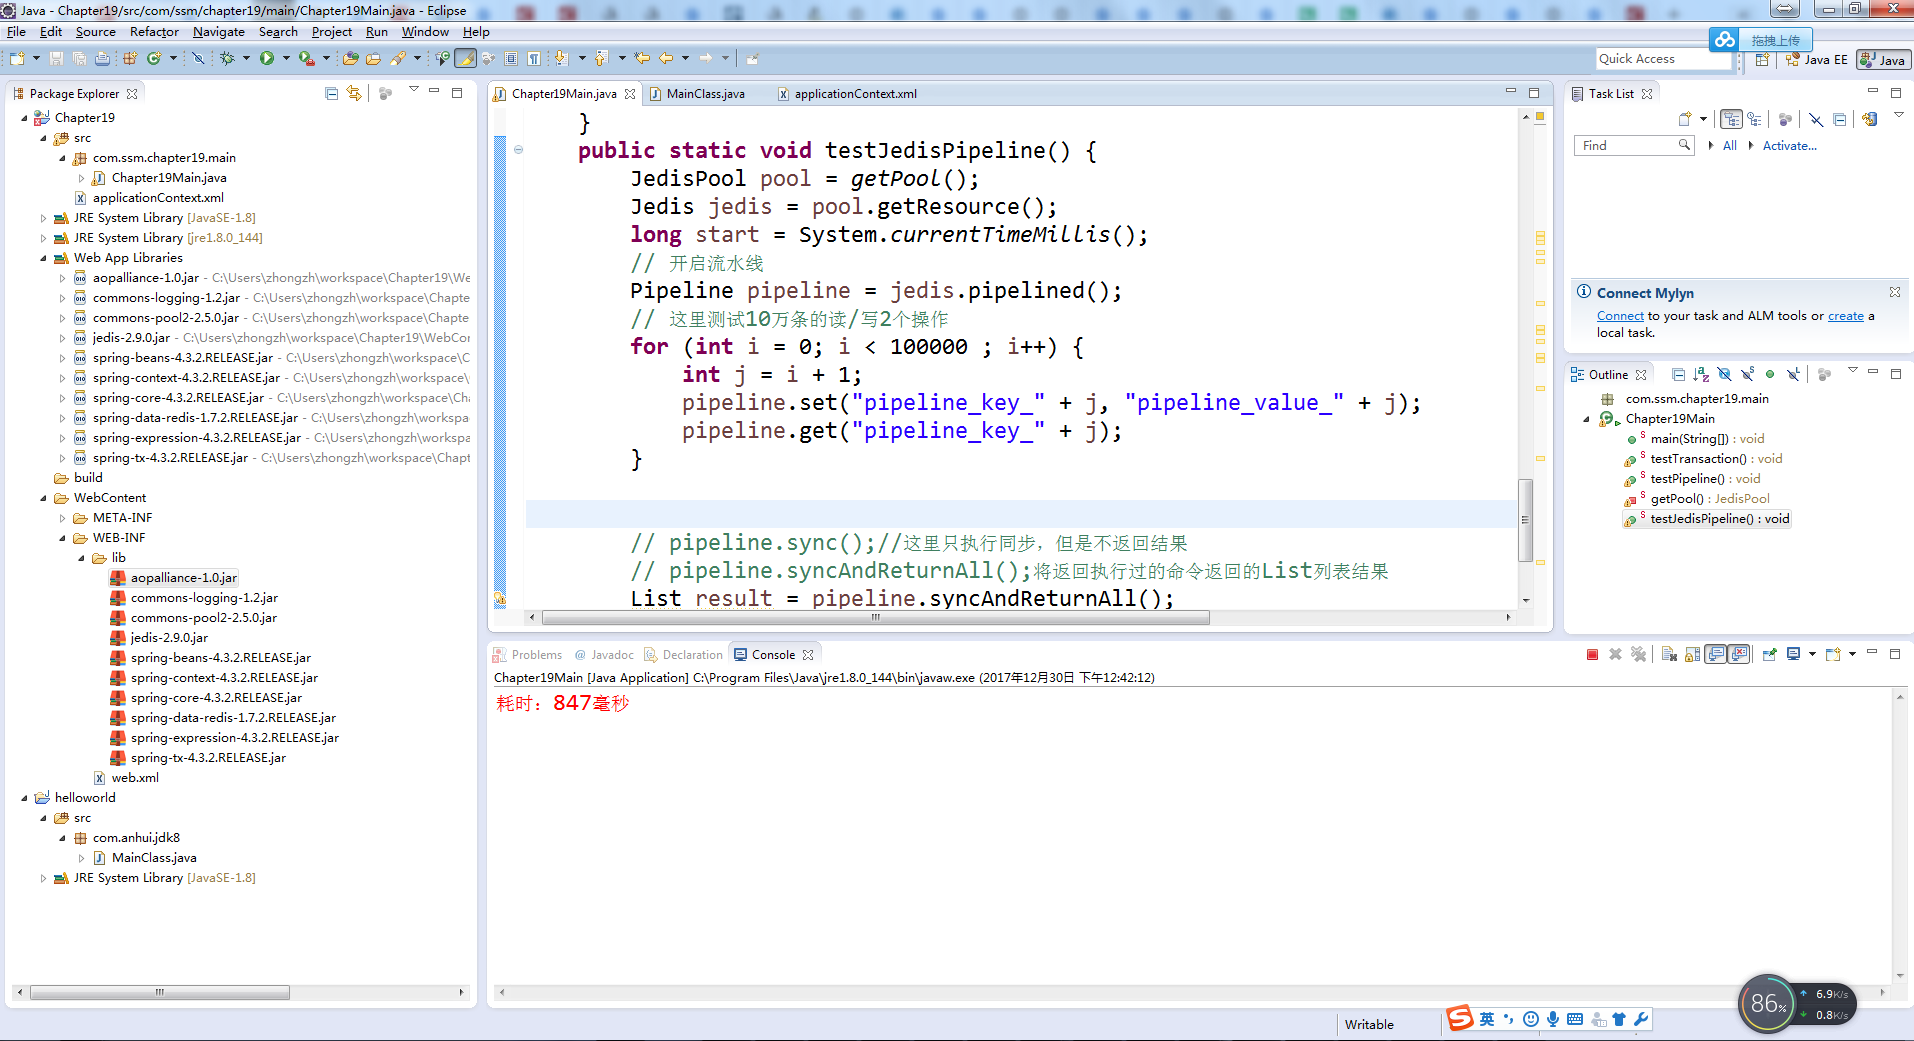
19-2:使用流水线操作Redis命令
    public static void testJedisPipeline() {

        JedisPool pool = getPool();

        Jedis jedis = pool.getResource();

        long start = System.currentTimeMillis();

        // 开启流水线

        Pipeline pipeline = jedis.pipelined();

        // 这里测试10万条的读/写2个操作

        for (int i = 0; i < 100000 ; i++) {

            int j = i + 1;

            pipeline.set("pipeline_key_" + j, "pipeline_value_" + j);

            pipeline.get("pipeline_key_" + j);

        }

        // pipeline.sync();//这里只执行同步,但是不返回结果

        // pipeline.syncAndReturnAll();将返回执行过的命令返回的List列表结果

        List result = pipeline.syncAndReturnAll();

        long end = System.currentTimeMillis();

        // 计算耗时

        System.err.println("耗时:" + (end - start) + "毫秒");

    }
19-3:使用Spring操作Redis流水线
 public static void testPipeline(){

        ApplicationContext applicationContext = new ClassPathXmlApplicationContext("applicationContext.xml");

        RedisTemplate redisTemplate = applicationContext.getBean(RedisTemplate.class);

        // 使用Java8的Lambda表达式

        SessionCallback callBack = (SessionCallback) (RedisOperations ops) -> {

            for(int i = 0; i < 100000; i++){

                int j = i + 1;

                ops.boundValueOps("pipeline_key_" + j).set("pipeline_value_" + j);

                ops.boundValueOps("pipeline_key_" + j).get();

            }

            return null;

        };

        long start = System.currentTimeMillis();

        // 执行Redis的流水线命令

        List resultList = redisTemplate.executePipelined(callBack);

        long end = System.currentTimeMillis();

        System.err.println(end-start);

    }
19-5 发布订阅



图19-10 Redis的发布订阅过程
代码清单19-4:Redis发布订阅监听类
package com.ssm.chapter19.redis.listener;

import org.springframework.data.redis.connection.Message;

import org.springframework.data.redis.connection.MessageListener;

import org.springframework.data.redis.core.RedisTemplate;

import org.springframework.data.redis.serializer.SerializationException;

/*** imports ***/

public class RedisMessageListener implements MessageListener{

    private RedisTemplate redisTemplate;

    /*** 此处省略redisTemplate的setter和getter方法 ***/

    @Override

    public void onMessage(Message message, byte[] bytes) {

        // TODO Auto-generated method stub

        // 获取消息

        byte[] body = message.getBody();

        // 使用值序列化器转换

        String msgBody;

        String channelStr = null;

        try {

            msgBody = (String)

               getRedisTemplate().getValueSerializer().deserialize(body);

        System.err.println(msgBody);

        // 获取channel

        byte[] channel = message.getChannel();

        // 使用字符串序列化器转换

        channelStr = (String)

                getRedisTemplate().getStringSerializer().deserialize(channel);

        } catch (SerializationException e) {

            // TODO Auto-generated catch block

            e.printStackTrace();

        }

        System.err.println(channelStr);

        // 渠道名称转换

        String bytesStr = new String(bytes);

        System.err.println(bytesStr);

    }

    public RedisTemplate getRedisTemplate() {

        return redisTemplate;

    }

    public void setRedisTemplate(RedisTemplate redisTemplate) {

        this.redisTemplate = redisTemplate;

    }

}
<?xml version='1.0' encoding='UTF-8' ?>

<!-- was: <?xml version="1.0" encoding="UTF-8"?> -->

<beans xmlns="http://www.springframework.org/schema/beans"

    xmlns:xsi="http://www.w3.org/2001/XMLSchema-instance" xmlns:p="http://www.springframework.org/schema/p"

    xmlns:aop="http://www.springframework.org/schema/aop" xmlns:tx="http://www.springframework.org/schema/tx"

    xmlns:context="http://www.springframework.org/schema/context"

    xsi:schemaLocation="http://www.springframework.org/schema/beans

       http://www.springframework.org/schema/beans/spring-beans-4.0.xsd

       http://www.springframework.org/schema/aop

       http://www.springframework.org/schema/aop/spring-aop-4.0.xsd

       http://www.springframework.org/schema/tx

       http://www.springframework.org/schema/tx/spring-tx-4.0.xsd

       http://www.springframework.org/schema/context

       http://www.springframework.org/schema/context/spring-context-4.0.xsd">

    <bean id="poolConfig" class="redis.clients.jedis.JedisPoolConfig">

        <property name="maxIdle" value="50" />

        <property name="maxTotal" value="100" />

        <property name="maxWaitMillis" value="20000" />

    </bean>

    <bean id="stringRedisSerializer"

        class="org.springframework.data.redis.serializer.StringRedisSerializer" />

    <bean id="connectionFactory"

        class="org.springframework.data.redis.connection.jedis.JedisConnectionFactory">

        <property name="hostName" value="localhost" />

        <property name="port" value="6379" />

        <property name="poolConfig" ref="poolConfig" />

    </bean>

    <bean id="redisTemplate" class="org.springframework.data.redis.core.RedisTemplate">

        <property name="connectionFactory" ref="connectionFactory" />

        <property name="defaultSerializer" ref="stringRedisSerializer" />

        <property name="keySerializer" ref="stringRedisSerializer" />

        <property name="valueSerializer" ref="stringRedisSerializer" />

    </bean>

    <bean id="redisMsgListener"

        class="com.ssm.chapter19.redis.listener.RedisMessageListener">

        <property name="redisTemplate" ref="redisTemplate" />

    </bean>

    <bean id="topicContainer"

        class="org.springframework.data.redis.listener.RedisMessageListenerContainer"

        destroy-method="destroy">

        <!--Redis连接工厂 -->

        <property name="connectionFactory" ref="connectionFactory" />

        <!--连接池,这里只要线程池生存,才能继续监听 -->

        <property name="taskExecutor">

            <bean

                class="org.springframework.scheduling.concurrent.ThreadPoolTaskScheduler">

                <property name="poolSize" value="2" />

            </bean>

        </property>

        <!--消息监听Map -->

        <property name="messageListeners">

            <map>

                <!--配置监听者,key-ref和bean id定义一致 -->

                <entry key-ref="redisMsgListener">

                    <!--监听类 -->

                    <bean class="org.springframework.data.redis.listener.ChannelTopic">

                        <constructor-arg value="chat" />

                    </bean>

                </entry>

            </map>

        </property>

    </bean>

</beans>
代码清单19-5:测试Redis发布订阅
package com.ssm.chapter19.main;

import org.springframework.context.ApplicationContext;

import org.springframework.context.support.ClassPathXmlApplicationContext;

import org.springframework.data.redis.core.RedisTemplate;

public class Chapter19Main {

   public static void main(String[] args) {

        ApplicationContext applicationContext

           = new ClassPathXmlApplicationContext("applicationContext.xml");

        RedisTemplate redisTemplate = applicationContext.getBean(RedisTemplate.class);

        String channel = "chat";

        redisTemplate.convertAndSend(channel, "I am lazy!!");

   }

}
    public static void testPubSub(){

         ApplicationContext applicationContext

           = new ClassPathXmlApplicationContext("applicationContext.xml");

        RedisTemplate redisTemplate = applicationContext.getBean(RedisTemplate.class);

        String channel = "chat";

        redisTemplate.convertAndSend(channel, "I am lazy!!");

    }
   public static void main(String[] args) {

       /* ApplicationContext applicationContext

           = new ClassPathXmlApplicationContext("applicationContext.xml");

        RedisTemplate redisTemplate = applicationContext.getBean(RedisTemplate.class);

        String channel = "chat";

        redisTemplate.convertAndSend(channel, "I am lazy!!");*/

       testPubSub();

   }

19.6 超时命令
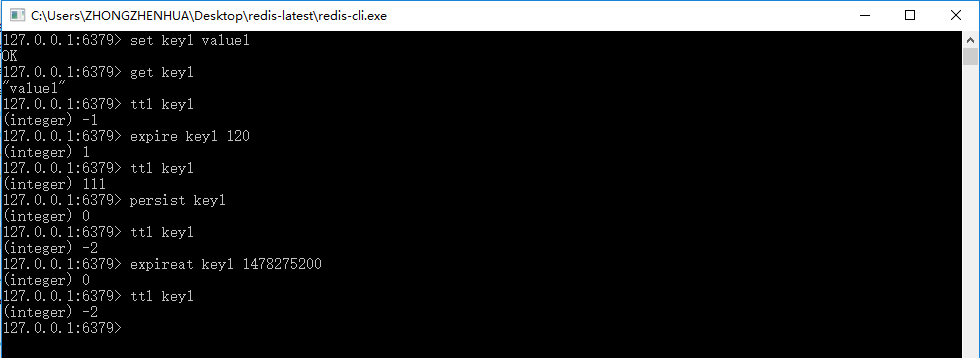
图19-11 Redis超时命令

代码清单19-6:使用Spring操作Redis超时命令
 public static void testExpire() {

       ApplicationContext applicationContext = new ClassPathXmlApplicationContext("applicationContext.xml");

       RedisTemplate redisTemplate = applicationContext.getBean(RedisTemplate.class);

       redisTemplate.execute((RedisOperations ops) -> {

           ops.boundValueOps("key1").set("value1");

           String keyValue = (String) ops.boundValueOps("key1").get();

           Long expSecond = ops.getExpire("key1");

           System.err.println(expSecond);

           boolean b = false;

           b = ops.expire("key1", 120L, TimeUnit.SECONDS);

           b = ops.persist("key1");

           Long l = 0L;

           l = ops.getExpire("key1");

           Long now = System.currentTimeMillis();

           Date date = new Date();

           date.setTime(now + 120000);

           ops.expireAt("key", date);

           return null;

       });

       }
   public static void main(String[] args) {

       /* ApplicationContext applicationContext

           = new ClassPathXmlApplicationContext("applicationContext.xml");

        RedisTemplate redisTemplate = applicationContext.getBean(RedisTemplate.class);

        String channel = "chat";

        redisTemplate.convertAndSend(channel, "I am lazy!!");*/

       //testPubSub();

       testExpire();

   }
19.7 使用Lua语言
19.7.1 执行输入Lua程序代码
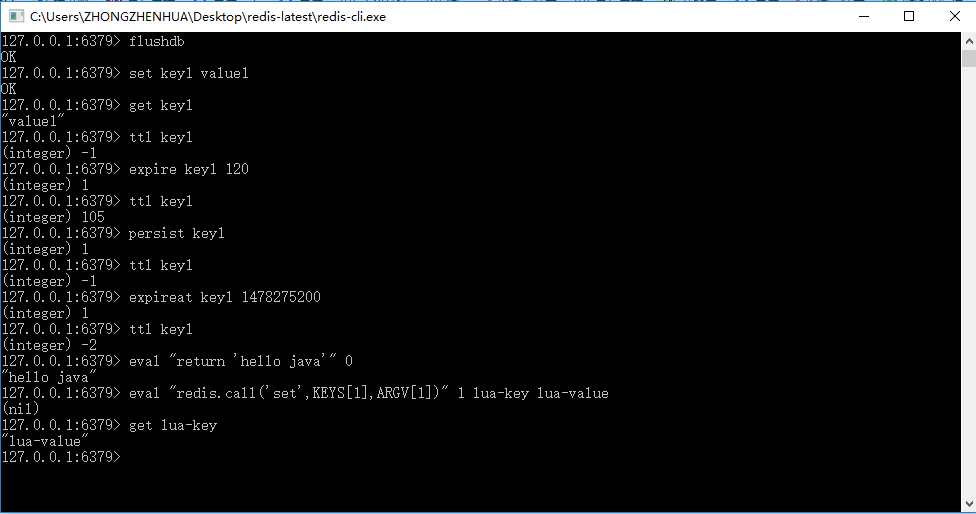
图19-12 Redis执行Lua语言脚本

图19-13 使用签名运行Lua脚本
代码清单19-7:在Java中使用Lua脚本
    public static void testLuaScript(){

        // 如果是简单的对象,使用原来的封装会简易些

        ApplicationContext applicationContext = new ClassPathXmlApplicationContext("applicationContext.xml");

        RedisTemplate redisTemplate = applicationContext.getBean(RedisTemplate.class);

        // 如果是简单的操作,使用原来的Jedis会简易些

        Jedis jedis = (Jedis) redisTemplate.getConnectionFactory().getConnection().getNativeConnection();

        // 执行简单的脚本

        String helloJava = (String) jedis.eval("return 'hello java'");

        System.out.println(helloJava);

        // 执行带参数的脚本

        jedis.eval("redis.call('set',KEYS[1],ARGV[1])",1,"lua-key","lua-value");

        String luaKey = (String) jedis.get("lua-key");

        System.out.println(luaKey);

        // 缓存脚本,返回sha1签名标识

        String sha1 = jedis.scriptLoad("redis.call('set',KEYS[1],ARGV[1])");

        // 通过标识执行脚本

        jedis.evalsha(sha1, 1, new String[]{ "sha-key", "sha-val"});

        // 获取执行脚本后的数据

        String shaVal = jedis.get("sha-key");

        System.out.println(shaVal);

        // 关闭连接

        jedis.close();

    }
代码清单19-8:可序列化的Role对象
public class Role implements Serializable{

    /**

     *

     */

    private static final long serialVersionUID = 5334128099542779325L;

    private Long id;

    private String roleName;

    private String note;

    public Long getId() {

        return id;

    }

    public void setId(Long id) {

        this.id = id;

    }

    public String getRoleName() {

        return roleName;

    }

    public void setRoleName(String roleName) {

        this.roleName = roleName;

    }

    public String getNote() {

        return note;

    }

    public void setNote(String note) {

        this.note = note;

    }

}
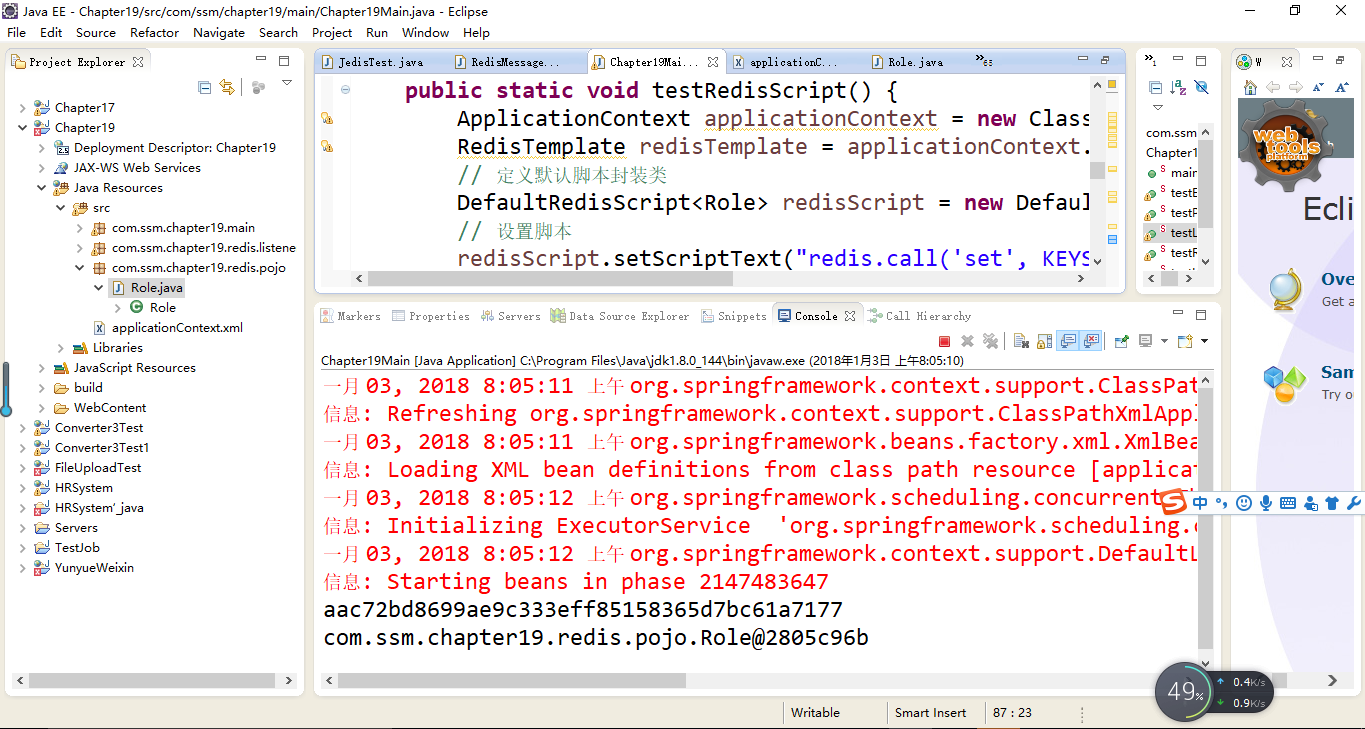
代码清单19-9:使用RedisScript接口对象通过Lua脚本操作对象
    public static void testRedisScript() {

        ApplicationContext applicationContext = new ClassPathXmlApplicationContext("applicationContext.xml");

        RedisTemplate redisTemplate = applicationContext.getBean(RedisTemplate.class);

        // 定义默认脚本封装类

        DefaultRedisScript<Role> redisScript = new DefaultRedisScript<Role>();

        // 设置脚本

        redisScript.setScriptText("redis.call('set', KEYS[1], ARGV[1]) return redis.call('get', KEYS[1])");

        // 定义操作的key列表

        List<String> keyList = new ArrayList<String>();

        keyList.add("role1");

        // 需要序列化保存和读取的对象

        Role role = new Role();

        role.setId(1L);

        role.setRoleName("role_name_1");

        role.setNote("note_1");

        // 获得标识字符串

        String sha1 = redisScript.getSha1();

        System.out.println(sha1);

        // 设置返回结果类型,如果没有这句话,结果返回为空

        redisScript.setResultType(Role.class);

        // 定义序列化器

        JdkSerializationRedisSerializer serializer = new JdkSerializationRedisSerializer();

        // 执行脚本

        // 第一个是RedisScript接口对象,第二个是参数序列化器

        // 第三个是结果序列化器,第四个是Redis的key列表,最后是参数列表

        Role obj = (Role) redisTemplate.execute(redisScript, serializer, serializer, keyList, role);

        // 打印结果

        System.out.println(obj);

    }
19.7.2 执行Lua文件
代码清单19-10:test.lua
redis.call('set', KEYS[], ARGV[])

redis.call('set', KEYS[], ARGV[])

local n1 = tonumber(redis.call('get' ,KEYS[]))

local n2 = tonumber(redis.call('get' ,KEYS[]))

if n1 > n2 then

   return

end

if n1 == n2 then

   return

end

if n1 < n2  then

   return

end

图19-14 redis-cli的命令执行
代码清单19-11:使用Java执行Redis脚本
 public static void testLuaFile(){

        ApplicationContext applicationContext = new ClassPathXmlApplicationContext("applicationContext.xml");

        RedisTemplate redisTemplate = applicationContext.getBean(RedisTemplate.class);

        // 读入文件流

        File file = new File("C:\\Users\\ZHONGZHENHUA\\Desktop\\redis-latest\\test.lua");

        byte[] bytes = getFileToByte(file);

        Jedis jedis = (Jedis) redisTemplate.getConnectionFactory().getConnection().getNativeConnection();

        // 发送文件二进制给Redis,这样Redis就会返回sha1标识

        byte[] sha1 = jedis.scriptLoad(bytes);

        // 使用返回的标识执行,其中第二个参数2,表示使用2个键

        // 而后面的字符串都转化为了二进制字节进行传输

        Object obj = jedis.evalsha(sha1, 2, "key1".getBytes(),"key2".getBytes(),"2".getBytes(),"4".getBytes());

        System.out.println(obj);

    }

    /**

     * 把文件转化为二进制数组

     *

     * @param file

     *            文件

     * @return 二进制数组

     *

     */

    public static byte[] getFileToByte(File file) {

        byte[] by = new byte[(int) file.length()];

        try {

            InputStream is = new FileInputStream(file);

            ByteArrayOutputStream bytestream = new ByteArrayOutputStream();

            byte[] bb = new byte[2048];

            int ch;

            ch = is.read(bb);

            while(ch != -1) {

                bytestream.write(bb, 0, ch);

                ch = is.read(bb);

            }

            by = bytestream.toByteArray();

        } catch (FileNotFoundException e) {

            // TODO Auto-generated catch block

            e.printStackTrace();

        } catch (IOException e) {

            // TODO Auto-generated catch block

            e.printStackTrace();

        }

        return by;

    }
第19章 Redis的一些常用技术的更多相关文章
- Redis | 第5章 Redis 中的持久化技术《Redis设计与实现》
目录 前言 1. RDB 持久化 1.1 RDB 文件的创建与载入 1.2 自动间隔性保存 1.2.1 设置保存条件 1.2.2 dirty 计数器和 lastsave 属性 1.2.3 检查保存条件 ...
- Redis(十五)Redis 的一些常用技术(Spring 环境下)
一.Redis 事务与锁机制 1.Redis的基础事务 在Redis中开启事务的命令是 multi 命令, 而执行事务的命令是 exec 命令.multi 到 exec 命令之间的 Redis 命令将 ...
- 第19章 通讯的基本概念—零死角玩转STM32-F429系列
第19章 通讯的基本概念 全套200集视频教程和1000页PDF教程请到秉火论坛下载:www.firebbs.cn 野火视频教程优酷观看网址:http://i.youku.com/firege ...
- 第19章 集合框架(3)-Map接口
第19章 集合框架(3)-Map接口 1.Map接口概述 Map是一种映射关系,那么什么是映射关系呢? 映射的数学解释 设A,B是两个非空集合,如果存在一个法则,使得对A中的每一个元素a,按法则f,在 ...
- 第19章 queue队列容器
/* 第19章 queue队列容器 19.1 queue技术原理 19.2 queue应用基础 19.3 本章小结 */ // 第19章 queue队列容器 // 19.1 queue技术原理 // ...
- Linux就这个范儿 第19章 团结就是力量 LSB是Linux标准化基地(Linux Standards Base)的简称
Linux就这个范儿 第19章 团结就是力量 LSB是Linux标准化基地(Linux Standards Base)的简称 这个图片好可爱,它是LSB组织的图标.你肯定会问:“图标这么设计一定有说 ...
- OC中另外的一个常用技术:通知(Notification)
OC中另外的一个常用技术:通知(Nofitication)其实这里的通知和之前说到的KVO功能很想,也是用于监听操作的,但是和KVO不同的是,KVO只用来监听属性值的变化,这个发送监听的操作是系统控制 ...
- $.ajax()方法详解 ajax之async属性 【原创】详细案例解剖——浅谈Redis缓存的常用5种方式(String,Hash,List,set,SetSorted )
$.ajax()方法详解 jquery中的ajax方法参数总是记不住,这里记录一下. 1.url: 要求为String类型的参数,(默认为当前页地址)发送请求的地址. 2.type: 要求为Str ...
- redis实战笔记(3)-第3章 Redis命令
第3章 Redis命令 本章主要内容 字符串命令. 列表命令和集合命令 散列命令和有序集合命令 发布命令与订阅命令 其他命令 在每个不同的数据类型的章节里, 展示的都是该数据类型所独有的. 最 ...
随机推荐
- 【转载】JavaScript中同名标识符优先级-Snandy
一,局部变量先使用后声明,不影响外部同名变量 var x = 1; // --> 外部变量x function fn(){ alert(x); // --> undefined 局部变量x ...
- Android开发圆形ImageView实现
效果图如下 1.自定义属性,在value文件夹下新建attrs文件,声明如下属性 <declare-styleable name="CircleImageView"> ...
- WEB笔记-3、盒子模型+定位+显示
3.1 盒子模型 边距控制 margin/padding:上 右 下 左: padding:内容和边距之间的空间 margin:”盒子“外撑开的空间,两个相邻标签外边距会出现重叠和累加的现象, ...
- SAP computer之RAM
RAM The RAM is a 16 X 8 static TTL RAM. We can program the RAM by means of the address and data swit ...
- OpenCV中IplImage/CvMat/Mat转化关系
原文链接:http://www.cnblogs.com/summerRQ/articles/2406109.html 如对内容和版权有何疑问,请拜访原作者或者通知本人. opencv中常见的与图像操作 ...
- CorelDRAW关于使用鼠标的5个技巧分享
CorelDRAW重度依赖者对快捷键和技巧性的操作爱不释手.本文我们介绍使用CorelDRAW关于鼠标操作的5个技巧,这是五种超快,非常有效,特别实用的技巧,如果每天的工作结合这些技巧的使用,效率会大 ...
- node mysql es6/es7改造
本文js代码采取了ES6/ES7的写法,而不是commonJs的写法.支持一波JS的新语法.node版本的mysql驱动,通过npm i mysql安装.官网地址:https://github.com ...
- Can't find variable: SockJS vue项目
用的vue-cli(webpack-simple模板),在开发环境运行(npm run dev),一直都没有问题,突然在ios的safari中调试,出现报错:Can't find variable: ...
- 团体程序设计天梯赛-练习集-L1-040. 最佳情侣身高差
L1-040. 最佳情侣身高差 专家通过多组情侣研究数据发现,最佳的情侣身高差遵循着一个公式:(女方的身高)×1.09=(男方的身高).如果符合,你俩的身高差不管是牵手.拥抱.接吻,都是最和谐的差度. ...
- luogu P2422 良好的感觉 单调栈
Code: #include<bits/stdc++.h> #define maxn 1000000 #define ll long long using namespace std; v ...