TensorFlow技术解析与实战学习笔记(15)-----MNIST识别(LSTM)
一、任务:采用基本的LSTM识别MNIST图片,将其分类成10个数字。
为了使用RNN来分类图片,将每张图片的行看成一个像素序列,因为MNIST图片的大小是28*28像素,所以我们把每一个图像样本看成一行行的序列。因此,共有(28个元素的序列)×(28行),然后每一步输入的序列长度是28,输入的步数是28步。
二、LSTM模型:
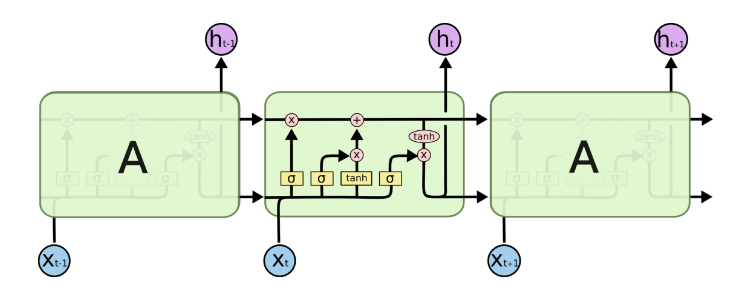
输入:x(t-1)的大小为一个28维的向量。……x(t-1),x(t)、x(t+1)……有28个。【将一张图片拆成28*28】
隐藏层大小:128
输出:10
U:28*128
V:128*10
三、LSTM代码:
加载数据:
import tensorflow as tf

from tensorflow.examples.tutorials.mnist import input_data

mnist = input_data.read_data_sets('MNIST_data',one_hot = True)
构建模型:
#定义RNN模型:

def RNN(X,w,b,input_size,unit,batch_size):

    ################################

    #输入层,先处理x的shape

    #将输入的x转换成(128 batch * 28 time_steps,28 input_size)

    X = tf.reshape(X,[-1,input_size])

    #####################################

    #隐藏层

    #输入的大小转换:

    # x_in的大小:(128 batch * 28 time_steps ,128 unit)

    X_in = tf.matmul(X,w['in']) + b['in']

    #将x_in转换成:(128 batch , 28 input_size,128 unit),因为要将其转成张量才能输入LSTM的结构中

    X_in = tf.reshape(X_in,[-1,input_size,unit])

    #隐藏层模型结构:

    #BasicLSTMCell 是最简单的LSTMCell.

    with tf.variable_scope('lstm',reuse=tf.AUTO_REUSE):

        lstm = tf.contrib.rnn.BasicLSTMCell(num_units = unit , forget_bias= 1.0 ,state_is_tuple= True)

    #初始化状态:lstm单元由两个部分组成:(c_state,h_state)状态值和输出值

        init_state = lstm.zero_state(batch_size , dtype = tf.float32)

    #dynamic_rnn接收张量(batch , steps , inputs) 或者(steps,batch,inputs)作为X_in,其需要输入、隐藏层结构【遗忘门】以及细胞状态

        outputs , final_state = tf.nn.dynamic_rnn(lstm , X_in,initial_state = init_state , time_major = False)

    #########################################################

    #输出层

    results = tf.matmul(final_state[1],w['out']) + b['out']

    return results
训练模型:
1、设置参数(超参数、神经网络参数)
2、前向传播(构建RNN模型)【即构建模型的过程】
3、后向传播(求损失函数、设置优化器)
4、设置会话、训练模型。
def train(mnist):
#设置参数

########################

    #设置训练的超参数,学习率、训练次数和每轮训练大小

    lr = 0.001

    training_iters = 100000

    batch_size = 128

    #设置神经网络的参数

    input_size = 28 #一个输入的向量大小

    time_steps = 28 #序列长度

    unit = 128 #隐藏层的神经元个数

    output_size = 10 #输出

    #定义输入数据以及权重

    x = tf.placeholder(tf.float32,[None,time_steps,input_size])

    y = tf.placeholder(tf.float32,[None,output_size])

#     with tf.variable_scope("canshu", reuse=True):

    #in大小:(28*128),out大小:(128*10)。

    w = {

        'in':tf.Variable(tf.random_normal([input_size,unit])),

        'out':tf.Variable(tf.random_normal([unit,output_size]))

    }

    b = {

        'in':tf.Variable(tf.constant(0.1,shape = [unit])),

        'out':tf.Variable(tf.constant(0.1,shape = [output_size]))

    }

    #################################

    ##构建模型,定义损失函数和优化器,优化器采用AdamOptimizer

    with tf.variable_scope('train_op',reuse=tf.AUTO_REUSE):

        pred = RNN(x,w,b,input_size,unit,batch_size)

        loss = tf.reduce_mean(tf.nn.softmax_cross_entropy_with_logits(logits = pred , labels = y))

        train_op = tf.train.AdamOptimizer(lr).minimize(loss)

    ####################################

    #计算模型预测结果以及准确率计算方法

    correct_pred = tf.equal(tf.argmax(pred,1),tf.argmax(y,1))

    acc = tf.reduce_mean(tf.cast(correct_pred,tf.float32))

    ######################################

    #训练数据及评估模型

    with tf.Session() as sess:

        sess.run(tf.global_variables_initializer())

        step = 0

        while step * batch_size < training_iters:

            batch_xs , batch_ys = mnist.train.next_batch(batch_size)

            batch_xs = batch_xs.reshape([batch_size,time_steps,input_size])

            sess.run([train_op],feed_dict = {

                x:batch_xs,

                y:batch_ys,

            })

            if step % 20 == 0:

                print(sess.run(acc,feed_dict = {

                    x:batch_xs,

                    y:batch_ys,

                }))

            step += 1
原本代码中没有加红的两句,然后报错:
Variable basic/rnn/basic_lstm_cell/weights does not exist, or was not created with tf.get_variable(). Did you mean to set reuse=None in VarScope?
原因:是因为在BasicRNNCell 使用到了get_variable操作,第一次的时候创建新的variable,第二次调用的时候检测到命名冲突,报错。
加上以下代码:
with tf.variable_scope('lstm',reuse=tf.AUTO_REUSE):
with tf.variable_scope('train_op',reuse=tf.AUTO_REUSE):
四、MultiLSTM代码:比普通的LSTM多了两行红色的代码
加载数据:
import tensorflow as tf

import numpy as np

from tensorflow.examples.tutorials.mnist import input_data

mnist = input_data.read_data_sets('MNIST_data',one_hot = True)
构建模型:
def mLSTM(X,w,b,input_size,unit,batch_size,layer_num):

    ################################

    #输入层,先处理x的shape

    #将输入的x转换成(128 batch * 28 time_steps,28 input_size)

    X = tf.reshape(X,[-1,input_size])

    #####################################

    #隐藏层

    #输入的大小转换:

    # x_in的大小:(128 batch * 28 time_steps ,128 unit)

    X_in = tf.matmul(X,w['in']) + b['in']

    #将x_in转换成:(128 batch , 28 input_size,128 unit),因为要将其转成张量才能输入LSTM的结构中

    X_in = tf.reshape(X_in,[-1,input_size,unit])


    #隐藏层模型结构:

    #BasicLSTMCell 是最简单的LSTMCell.

    #state_is_tuple 官方建议设置为True。此时,输入和输出的states为c(cell状态)和h(输出)的二元组

    #forget_bias遗忘门的初始值设为 1,一开始不能遗忘

    #num_units:num_units这个参数的大小就是LSTM输出结果的维度。例如num_units=128, 那么LSTM网络最后输出就是一个128维的向量。

    with tf.variable_scope('lstm',reuse=tf.AUTO_REUSE):

        lstm = tf.contrib.rnn.BasicLSTMCell(num_units = unit , forget_bias= 1.0 ,state_is_tuple= True)

        lstm = tf.nn.rnn_cell.DropoutWrapper(lstm,0.5)

        mlstm = tf.nn.rnn_cell.MultiRNNCell([lstm for i in range(layer_num)])

        init_state = mlstm.zero_state(batch_size,dtype = tf.float32)

        outputs , final_state = tf.nn.dynamic_rnn(mlstm,X_in,initial_state = init_state,time_major=False)

    #初始化状态:lstm单元由两个部分组成:(c_state,h_state)状态值和输出值

#         init_state = lstm.zero_state(batch_size , dtype = tf.float32)

    #dynamic_rnn接收张量(batch , steps , inputs) 或者(steps,batch,inputs)作为X_in,其需要输入、隐藏层结构【遗忘门】以及细胞状态

#         outputs , final_state = tf.nn.dynamic_rnn(lstm , X_in,initial_state = init_state , time_major = False)

    #########################################################33333

    #输出层
#final_state的【【维度(128,128)的张量】,【维度为(128,128)的张量】】,因为两层的LSTM。

    print(final_state)

    results = tf.matmul(final_state[1][1],w['out']) + b['out']

    return results
训练模型:
def train(mnist):

#构建模型

########################

    #设置训练的超参数,学习率、训练次数和每轮训练大小

    lr = 0.001

    training_iters = 100000

    batch_size = 128

    #设置神经网络的参数

    input_size = 28 #一个输入的向量大小

    time_steps = 28 #序列长度

    unit = 128 #隐藏层的神经元个数

    output_size = 10 #输出

    layer_num = 3

    #定义输入数据以及权重

    x = tf.placeholder(tf.float32,[None,time_steps,input_size])

    y = tf.placeholder(tf.float32,[None,output_size])

#     with tf.variable_scope("canshu", reuse=True):

    #in大小:(28*128),out大小:(128*10)。

    w = {

        'in':tf.Variable(tf.random_normal([input_size,unit])),

        'out':tf.Variable(tf.random_normal([unit,output_size]))

    }

    b = {

        'in':tf.Variable(tf.constant(0.1,shape = [unit])),

        'out':tf.Variable(tf.constant(0.1,shape = [output_size]))

    }

    #################################

    #定义损失函数和优化器,优化器采用AdamOptimizer

    with tf.variable_scope('train_op',reuse=tf.AUTO_REUSE):

        pred = mLSTM(x,w,b,input_size,unit,batch_size,layer_num)

        loss = tf.reduce_mean(tf.nn.softmax_cross_entropy_with_logits(logits = pred , labels = y))

        train_op = tf.train.AdamOptimizer(lr).minimize(loss)

    ####################################

    #计算模型预测结果以及准确率计算方法

    correct_pred = tf.equal(tf.argmax(pred,1),tf.argmax(y,1))

    acc = tf.reduce_mean(tf.cast(correct_pred,tf.float32))

    ######################################

    #训练数据及评估模型

    with tf.Session() as sess:

        sess.run(tf.global_variables_initializer())

        step = 0

        while step * batch_size < training_iters:

            batch_xs , batch_ys = mnist.train.next_batch(batch_size)

            batch_xs = batch_xs.reshape([batch_size,time_steps,input_size])

            sess.run([train_op],feed_dict = {

                x:batch_xs,

                y:batch_ys,

            })

            if step % 20 == 0:

                print(sess.run(acc,feed_dict = {

                    x:batch_xs,

                    y:batch_ys,

                }))

            step += 1
五、双向循环神经网络的代码:
加载模型:
import tensorflow as tf

import numpy as np

from tensorflow.examples.tutorials.mnist import input_data

mnist = input_data.read_data_sets('MNIST_data',one_hot = True)
构建模型:
def BiRNN(x,w,b):

    x = tf.transpose(x , [1,0,2])

    x = tf.reshape(x,[-1,input_size])

    x = tf.split(x,time_steps)

    with tf.variable_scope('BiRNN',reuse=tf.AUTO_REUSE):

        lstm_fw_cell = tf.contrib.rnn.BasicLSTMCell(hidden_size,forget_bias=1.0,state_is_tuple=True)

        lstm_bw_cell = tf.contrib.rnn.BasicLSTMCell(hidden_size,forget_bias=1.0,state_is_tuple=True)

    #x为一个长度为T的list,list中的每个Tensor元素shape为[batch_size,input_size]

        output , _ , _ = tf.contrib.rnn.static_bidirectional_rnn(lstm_fw_cell,lstm_bw_cell,x,dtype = tf.float32)

        result = tf.nn.bias_add(tf.matmul(output[-1],w) , b)

    return result
设置参数、训练会话
#设置参数

lr = 0.001

batch_size = 128

training_iters = 20000

input_size = 28

time_steps = 28

output_size = 10

hidden_size = 256

#占位符

X = tf.placeholder(tf.float32,[None,time_steps,input_size])

Y = tf.placeholder(tf.float32,[None,output_size])

with tf.variable_scope('out',reuse=tf.AUTO_REUSE):

    w = tf.Variable(tf.truncated_normal([2 * hidden_size , output_size],stddev = 0.1))

    b = tf.get_variable('biases',[output_size],initializer = tf.constant_initializer(0.1))

#后向传播

with tf.variable_scope('train_op',reuse=tf.AUTO_REUSE):

    pred = BiRNN(X,w,b)

    cost = tf.reduce_mean(tf.nn.softmax_cross_entropy_with_logits(logits = pred,labels =Y))

    train_op = tf.train.AdamOptimizer(lr).minimize(cost)

correct_pred = tf.equal(tf.argmax(pred,1),tf.argmax(Y,1))

acc = tf.reduce_mean(tf.cast(correct_pred,tf.float32))

#训练会话

init = tf.global_variables_initializer()

with tf.Session() as sess:

    sess.run(init)

    step = 1

    while step * batch_size < training_iters:

        batch_xs , batch_ys = mnist.train.next_batch(batch_size)

        batch_xs = batch_xs.reshape([batch_size,time_steps,input_size])

        sess.run(train_op,feed_dict = {X:batch_xs,Y:batch_ys})

        if step % 20 == 0:

            accuracy = sess.run(acc,feed_dict = {X:batch_xs,Y:batch_ys})

            print(accuracy)

        step += 1
TensorFlow技术解析与实战学习笔记(15)-----MNIST识别(LSTM)的更多相关文章
- TensorFlow技术解析与实战学习笔记(13)------Mnist识别和卷积神经网络AlexNet
一.AlexNet:共8层:5个卷积层(卷积+池化).3个全连接层,输出到softmax层,产生分类. 论文中lrn层推荐的参数:depth_radius = 4,bias = 1.0 , alpha ...
- 学习TF:《TensorFlow技术解析与实战》PDF+代码
TensorFlow 是谷歌公司开发的深度学习框架,也是目前深度学习的主流框架之一.<TensorFlow技术解析与实战>从深度学习的基础讲起,深入TensorFlow框架原理.模型构建. ...
- 《Tensorflow技术解析与实战》第四章
Tensorflow基础知识 Tensorflow设计理念 (1)将图的定义和图的运行完全分开,因此Tensorflow被认为是一个"符合主义"的库 (2)Tensorflow中涉 ...
- 学习笔记TF058:人脸识别
人脸识别,基于人脸部特征信息识别身份的生物识别技术.摄像机.摄像头采集人脸图像或视频流,自动检测.跟踪图像中人脸,做脸部相关技术处理,人脸检测.人脸关键点检测.人脸验证等.<麻省理工科技评论&g ...
- Elasticsearch技术解析与实战 PDF (内含目录)
Elasticsearch技术解析与实战 介绍: Elasticsearch是一个强[0大0]的搜索引擎,提供了近实时的索引.搜索.分 ...
- elasticsearch技术解析与实战ES
elasticsearch技术解析与实战ES 下载地址: https://pan.baidu.com/s/1NpPX05C0xKx_w9gBYaMJ5w 扫码下面二维码关注公众号回复100008 获取 ...
- Ext.Net学习笔记15:Ext.Net GridPanel 汇总(Summary)用法
Ext.Net学习笔记15:Ext.Net GridPanel 汇总(Summary)用法 Summary的用法和Group一样简单,分为两步: 启用Summary功能 在Feature标签内,添加如 ...
- SQL反模式学习笔记15 分组
目标:查询得到每组的max(或者min等其他聚合函数)值,并且得到这个行的其他字段 反模式:引用非分组列 单值规则:跟在Select之后的选择列表中的每一列,对于每个分组来说都必须返回且仅返回一直值. ...
- 深度学习-tensorflow学习笔记(1)-MNIST手写字体识别预备知识
深度学习-tensorflow学习笔记(1)-MNIST手写字体识别预备知识 在tf第一个例子的时候需要很多预备知识. tf基本知识 香农熵 交叉熵代价函数cross-entropy 卷积神经网络 s ...
随机推荐
- MySQL终端(Terminal)命令基本操作(转)
注意:MySQL数据库命令不区分大小写.但在MAC的终端,如果你想使用tab自动补全命令,那么你就必须使用大写,这样MAC的终端才会帮你补全命令,否则你按N遍tab都不会有响应. 1.数据库(data ...
- Windows超级卸载工具Total Uninstaller,能完全卸载.NET Framework
https://github.com/tsasioglu/Total-Uninstaller
- 成都传智播客java就业班激情洋溢的青春篮球赛
为了缓解学员们的学习压力,也为了培养学员们的团队协作精神,5月28日下午,在班主任倪老师和王老师联手带领下,我们1406280ls" style="color:rgb(51,102 ...
- 蓝牙调试工具hcitool的使用实例【转】
本文转载自:http://blog.csdn.net/kangear/article/details/37961769 这个工具据说是基于BlueZ的,但是Android4.2以后不再采用BlueZ取 ...
- linux select函数:Linux下select函数的使用详解【转】
本文转载自;http://www.bkjia.com/article/28216.html Linux下select函数的使用 Linux下select函数的使用 一.Select 函数详细介绍 Se ...
- bzoj 1024 [ SCOI 2009 ] 生日快乐 —— 递归
题目:https://www.lydsy.com/JudgeOnline/problem.php?id=1024 因为每次把一块切成两块,所以可以枚举从哪里切开,然后递归求解: 一开始用了不太对的贪心 ...
- Eqs(枚举+ hash)
http://poj.org/problem?id=1840 题意:给出系数a1,a2,a3,a4,a5,求满足方程的解有多少组. 思路:有a1x13+ a2x23+ a3x33+ a4x43+ a5 ...
- 【LuoguP2210 USACO】 Haywire
这种答案跟序列排列顺序有关的,n比较小的(稍微大一点的也可以),求最优解的,一般都可以随机化过 随机化不一定是模拟退火或是什么遗传蚁群 哪怕只是直接随机化一个序列,只要你随机的次数够多,它都能找到正解 ...
- EditPlus 4:设置字体
打开软件上面菜单栏点击Tools,在此下拉栏点击Configure User Tools,在弹出的设置框在左边框框中找到General->Fonts,显示的左边框即为字体框,具体如图:
- java selenium启动火狐浏览器报错:Cannot find firefox binary in PATH. Make sure firefox is installed. OS appears to be: VISTA Build info: version: '3.8.1', revision: '6e95a6684b', time: '2017-12-01T19:05:14.666Z
Cannot find firefox binary in PATH. Make sure firefox is installed. OS appears to be: VISTA Build in ...