
springmvc之定时器
一、通过注解方式实现定时器
1、工程结构
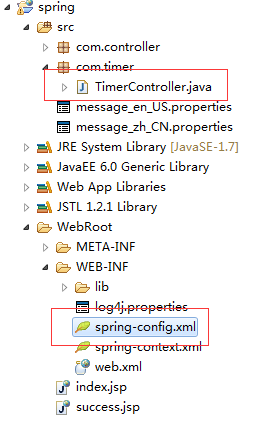
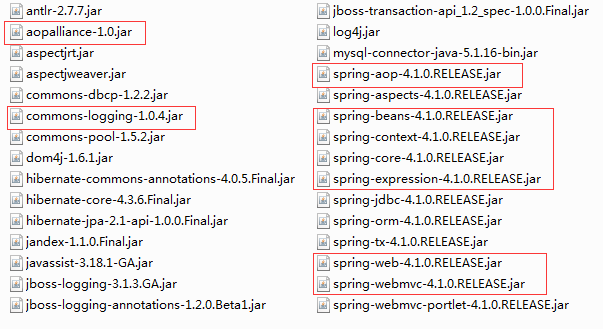
2、所需jar包
3、spring-config.xml,springmvc配置文件
<?xml version="1.0" encoding="UTF-8"?>

<beans xmlns="http://www.springframework.org/schema/beans"

    xmlns:xsi="http://www.w3.org/2001/XMLSchema-instance"

    xmlns:oxm="http://www.springframework.org/schema/oxm"

    xmlns:context="http://www.springframework.org/schema/context"

    xmlns:aop="http://www.springframework.org/schema/aop"

    xmlns:tx="http://www.springframework.org/schema/tx"

    xmlns:task="http://www.springframework.org/schema/task"

    xsi:schemaLocation="http://www.springframework.org/schema/beans

       http://www.springframework.org/schema/beans/spring-beans-3.0.xsd

       http://www.springframework.org/schema/oxm

       http://www.springframework.org/schema/oxm/spring-oxm-3.0.xsd

       http://www.springframework.org/schema/context

       http://www.springframework.org/schema/context/spring-context-3.0.xsd

       http://www.springframework.org/schema/tx

        http://www.springframework.org/schema/tx/spring-tx-3.0.xsd

         http://www.springframework.org/schema/aop

         http://www.springframework.org/schema/aop/spring-aop-3.0.xsd

         http://www.springframework.org/schema/task

       http://www.springframework.org/schema/task/spring-task-3.2.xsd">

    <!--  通知spring容器通过注解的方式装配bean -->

      <context:annotation-config />

    <!--  通知spring容器采用自动扫描机制查找注解的bean -->

      <context:component-scan base-package="com.*" />

      <task:annotation-driven /> <!-- 定时器开关-->

     <!--  配置返回页面过滤 -->

    <bean id="viewResolver" class="org.springframework.web.servlet.view.UrlBasedViewResolver">

        <property name="viewClass"

            value="org.springframework.web.servlet.view.JstlView" />

        <property name="prefix" value="/" />

        <property name="suffix" value=".jsp" />

    </bean>

</beans>
注:下面是需要引入头路径:
xmlns:task="http://www.springframework.org/schema/task"

xsi:schemaLocation="http://www.springframework.org/schema/task

http://www.springframework.org/schema/task/spring-task-3.2.xsd"
下面是定时器开关配置:
<task:annotation-driven/>
4、web.xml,加载springmvc配置
<?xml version="1.0" encoding="UTF-8"?>

<web-app xmlns:xsi="http://www.w3.org/2001/XMLSchema-instance"

    xmlns="http://java.sun.com/xml/ns/javaee"

    xmlns:web="http://java.sun.com/xml/ns/javaee/web-app_2_5.xsd"

    xsi:schemaLocation="http://java.sun.com/xml/ns/javaee

    http://java.sun.com/xml/ns/javaee/web-app_3_0.xsd" id="WebApp_ID" version="3.0">

      <display-name>spring</display-name>

    <!-- springmvc配置 -->

      <servlet>

        <servlet-name>springMVC</servlet-name>

        <servlet-class>org.springframework.web.servlet.DispatcherServlet</servlet-class>

        <init-param>

            <param-name>contextConfigLocation</param-name>

            <param-value>/WEB-INF/spring-config.xml</param-value>

        </init-param>

        <load-on-startup>1</load-on-startup>

    </servlet>

    <servlet-mapping>

        <servlet-name>springMVC</servlet-name>

        <url-pattern>/</url-pattern>

    </servlet-mapping>

  <welcome-file-list>

    <welcome-file>index.html</welcome-file>

    <welcome-file>index.htm</welcome-file>

    <welcome-file>index.jsp</welcome-file>

    <welcome-file>default.html</welcome-file>

    <welcome-file>default.htm</welcome-file>

    <welcome-file>default.jsp</welcome-file>

  </welcome-file-list>

</web-app>
5、TimerController.java
package com.timer;

import java.text.SimpleDateFormat;

import java.util.Date;

import org.springframework.scheduling.annotation.Scheduled;

import org.springframework.stereotype.Component;

@Component

public class TimerController {

    /**

     * 每隔20秒执行一次

     */

    @Scheduled(fixedRate = 1000*20)

    public void print(){

        SimpleDateFormat format = new SimpleDateFormat("yyyy-MM-dd H:m:s");

        System.out.println("timer : "+format.format(new Date()));

    }

}
注:使用注解类前必须有@Component
二、通过配置xml文件实现定时器
1、spring-config.xml,springmvc配置
<?xml version="1.0" encoding="UTF-8"?>

<beans xmlns="http://www.springframework.org/schema/beans"

    xmlns:xsi="http://www.w3.org/2001/XMLSchema-instance"

    xmlns:oxm="http://www.springframework.org/schema/oxm"

    xmlns:context="http://www.springframework.org/schema/context"

    xmlns:aop="http://www.springframework.org/schema/aop"

    xmlns:tx="http://www.springframework.org/schema/tx"

    xmlns:task="http://www.springframework.org/schema/task"

    xsi:schemaLocation="http://www.springframework.org/schema/beans

       http://www.springframework.org/schema/beans/spring-beans-3.0.xsd

       http://www.springframework.org/schema/oxm

       http://www.springframework.org/schema/oxm/spring-oxm-3.0.xsd

       http://www.springframework.org/schema/context

       http://www.springframework.org/schema/context/spring-context-3.0.xsd

       http://www.springframework.org/schema/tx

        http://www.springframework.org/schema/tx/spring-tx-3.0.xsd

         http://www.springframework.org/schema/aop

         http://www.springframework.org/schema/aop/spring-aop-3.0.xsd

         http://www.springframework.org/schema/task

       http://www.springframework.org/schema/task/spring-task-3.2.xsd">

    <!--  通知spring容器通过注解的方式装配bean -->

      <context:annotation-config />

    <!--  通知spring容器采用自动扫描机制查找注解的bean -->

      <context:component-scan base-package="com.*" />

      <task:annotation-driven /> <!-- 定时器开关-->

      <bean id="agentExcelTask" class="com.timer.TimerController1"/>

    <task:scheduled-tasks>

        <task:scheduled ref="agentExcelTask" method="print" cron="0/5 * * * * ?"/>

    </task:scheduled-tasks>

    <!--  配置返回页面过滤 -->

    <bean id="viewResolver" class="org.springframework.web.servlet.view.UrlBasedViewResolver">

        <property name="viewClass"

            value="org.springframework.web.servlet.view.JstlView" />

        <property name="prefix" value="/" />

        <property name="suffix" value=".jsp" />

    </bean>

</beans>
注: 多了创建bean和时间配置,每隔5秒触发一次,代码如下:
<bean id="agentExcelTask" class="com.timer.TimerController1"/>

    <task:scheduled-tasks>

        <task:scheduled ref="agentExcelTask" method="print" cron="0/5 * * * * ?"/>

    </task:scheduled-tasks>
注:method="print"指明触发的为TimerController1类中的print方法。
2、TimerController1.java
package com.timer;

import java.text.SimpleDateFormat;

import java.util.Date;

public class TimerController1 {

    public void print(){

        SimpleDateFormat format = new SimpleDateFormat("yyyy-MM-dd H:m:s");

        System.out.println("timer1 : "+format.format(new Date()));

    }

}
注:时间格式参考
springmvc之定时器的更多相关文章
- springMVC实现定时器
//springmvc.xml文件配置 <?xml version="1.0" encoding="UTF-8"?> <beans xmlns ...
- SpringMVC中定时器继承Task后无法对service注入问题
最近在做一个Spring+MyBatis的一个项目,其中用到了Redis的存储,然后遇到问题是这样的: RedisTask是通过定时器来每分钟像数据库里推送的,于是就有了 public class R ...
- Spring集成Memcached三种方式(一)
转载:http://blog.csdn.net/u013725455/article/details/52102170 Memcached Client目前有3种: Memcached Client ...
- spring核心及常用技术
一.核心内容 1.依赖注入(控制反转) 1)什么是依赖注入 spring将实例的创建交给spring容器(BeanFactory或ApplicationContext)管理,当实例创建后通过设值或构造 ...
- Memcached与Spring集成的方式(待实践)
主要是基于这几种方式http://www.cnblogs.com/EasonJim/p/7624822.html去实现与Spring集成,而个人建议使用Xmemcached去集成好一些,因为现在官方还 ...
- SpringMVC中使用Cron表达式的定时器
SpringMVC中使用Cron表达式的定时器 cron(定时策略)简要说明 顺序: 秒 分 时 日 月 星期 年份 (7个参数,空格隔开各个参数,年份非必须参数) 通配符: , 如果分钟位置为* 1 ...
- SpringMvc定时器任务
在最近的工作中,涉及到一个定时任务,由于以前对springMVC使用较少,所以,上网找了一点资料.这个demo感觉挺好,推荐给大家. 使用到的JAR文件: aopalliance-1.0.jarcom ...
- Springmvc 定时器的实现
有时候会需要项目中,定时去执行一些东西,这个时候就需要用到定时器了.比较简单, 当你springmvc环境搭建成功的时候. 本文转载自:https://www.cnblogs.com/wqj-blog ...
- springMVC + quartz实现定时器(任务调度器)
首先我们要知道任务调度器(定时器)有几种,这边我会写三种 第一种是基于JDK的本身的一个定时器(优点:简单,缺点:满足不了复杂的需求) package com.timer1; import java. ...
随机推荐
- BZOJ1577 USACO 2009 Feb Gold 1.Fair Shuttle Solution
权限题,不给传送门啦!在学校OJ上交的.. 有些不开心,又是一道贪心,又是一个高级数据结构的模板,又是看了别人的题解还写崩了QAQ,蒟蒻不需要理由呀. 正经题解: 首先,我们可以由「显然成立法」得出, ...
- JavaWeb---总结(十五)JSP基础语法
一.JSP模版元素 JSP页面中的HTML内容称之为JSP模版元素. JSP模版元素定义了网页的基本骨架,即定义了页面的结构和外观. 二.JSP表达式 JSP脚本表达式(expression)用于将 ...
- xbmc的静态链接办法
XBMC是一个相当酷的音频/视频播放器,号称家庭影视中心. 我是希望静态将一些库链接进可执行程序的,这样我用的ArchLinux就不用天天在更新一些东西了 但XBMC试了很多次,编译成功后,总是在运行 ...
- Java 运行环境的安装、配置与运行
(一)SDK 的下载与安装 1. 下载SDK 为了建立基于SDK 的Java 运行环境,需要先下载Sun 的免费SDK 软件包.SDK 包含了一整套开发工具,其中包含对编程最有用的是Java 编译器. ...
- 模拟退火解决TSP问题
// monituihuo.cpp : 定义控制台应用程序的入口点. // #include "stdafx.h" #include <stdio.h> #includ ...
- DOCKER windows安装
DOCKER windows安装 1.下载程序包 2. 设置环境变量 3. 启动DOCKERT 4. 分析start.sh 5. 利用SSH工具管理 6. 下载镜像 6.1 下载地址 6.2 用FTP ...
- C++ typedef用法小结 (※不能不看※)
C++ typedef用法小结 (※不能不看※) 第一.四个用途 用途一: 定义一种类型的别名,而不只是简单的宏替换.可以用作同时声明指针型的多个对象.比如:char* pa, pb; // 这多数不 ...
- C#----格式化字符串的操作
class Program { static void Main(string[] args) { //DateTime dt = DateTime.Now; //Console.WriteLine( ...
- Flash Decompiler
http://www.sothink.com/product/flash-decompiler-for-mac/ http://blog.sina.com.cn/s/blog_697935ad0100 ...
- Ubuntu 15.10安装KVM
1.查看cpu是否支持硬件虚拟化 egrep "svm|vmx" /proc/cpuinfo 2.安装KVM apt-get install qemu-kvm virt-manag ...