
Core Animation一些Demo总结 (动态切换图片、大转盘、图片折叠、进度条等动画效果)
前一篇总结了Core Animation的一些基础知识,这一篇主要是Core Animation 的一些应用,涉及到CAShapeLayer、CAReplicatorLayer等图层的知识。
先看效果图:
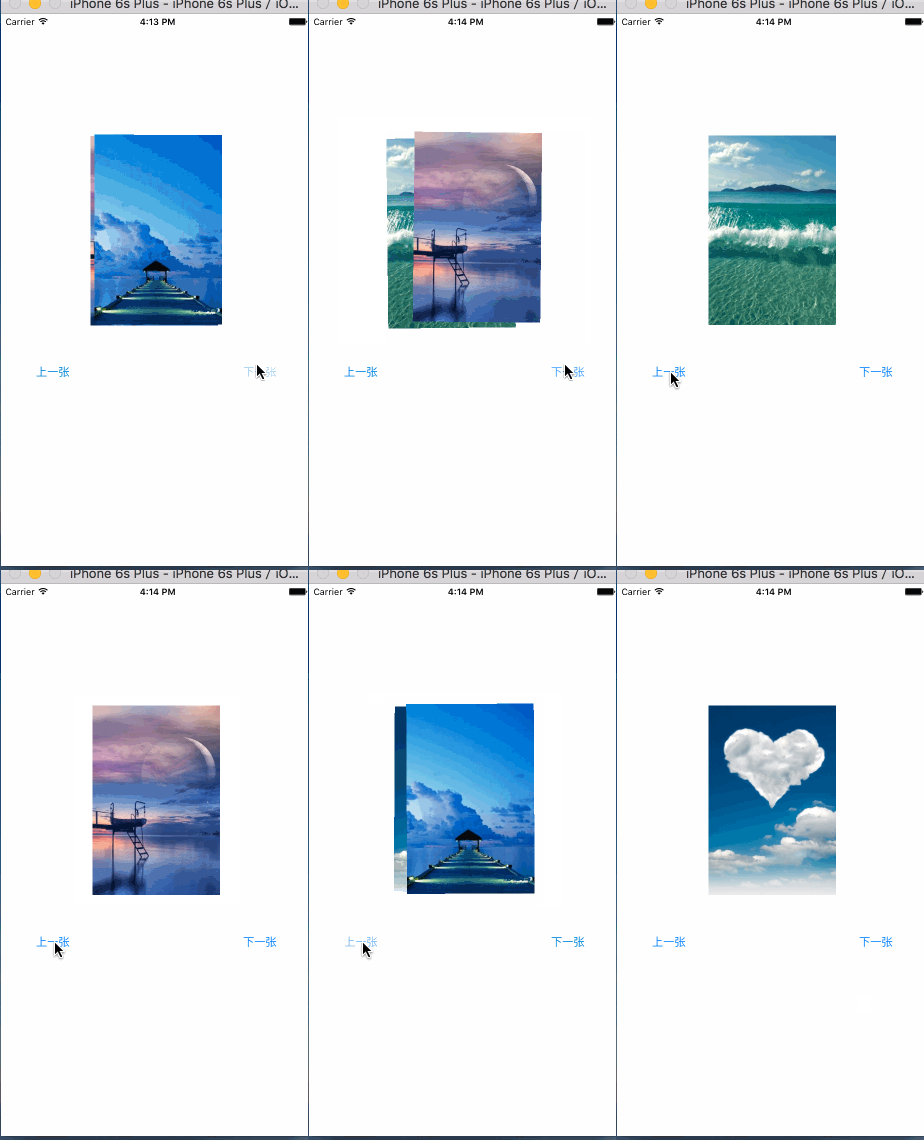
1、切换图片:
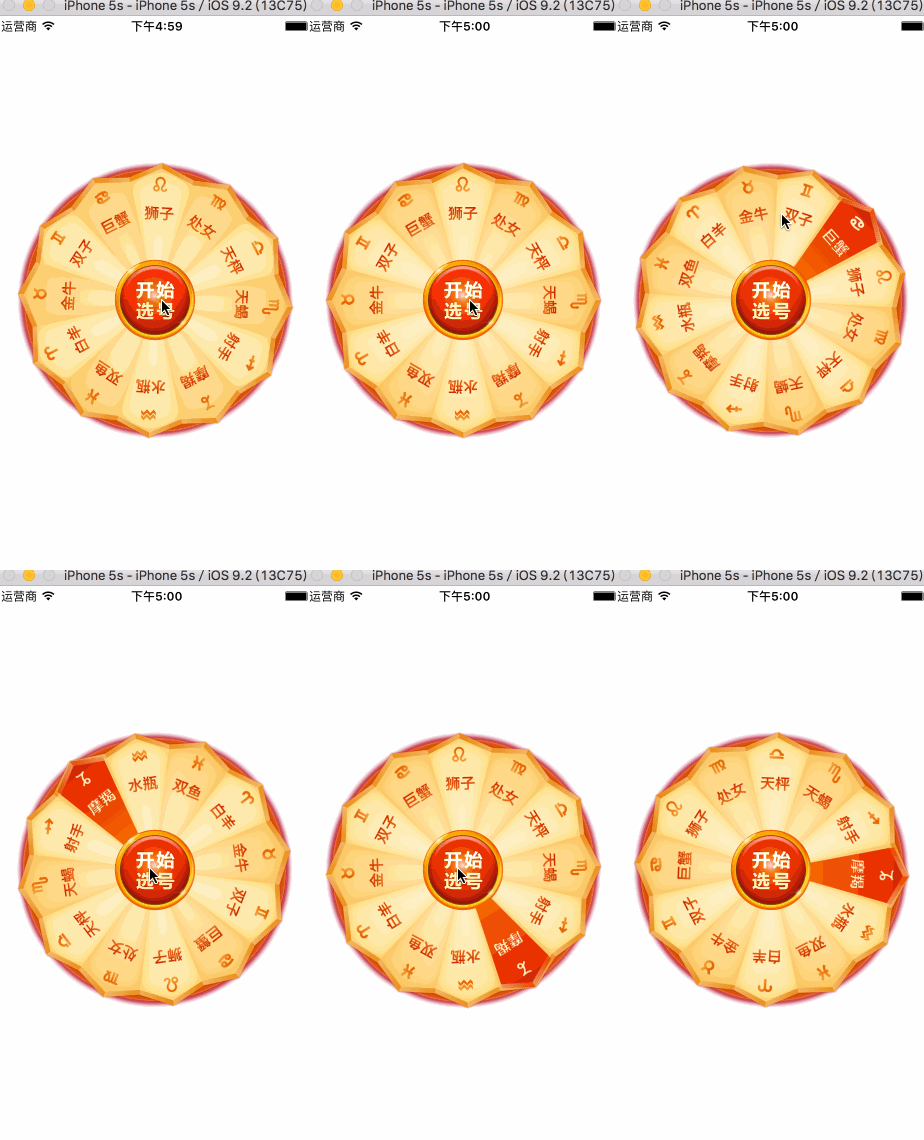
2、彩票转盘
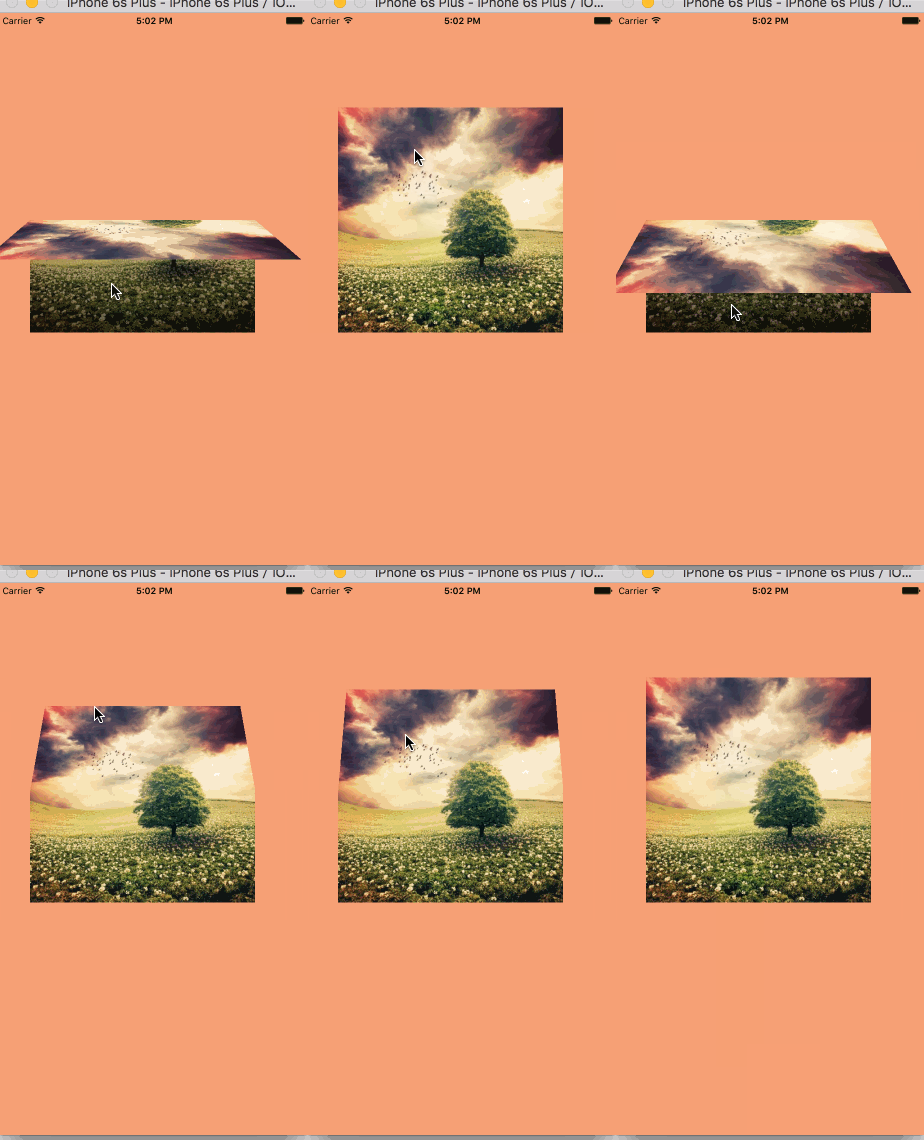
3、图片折叠
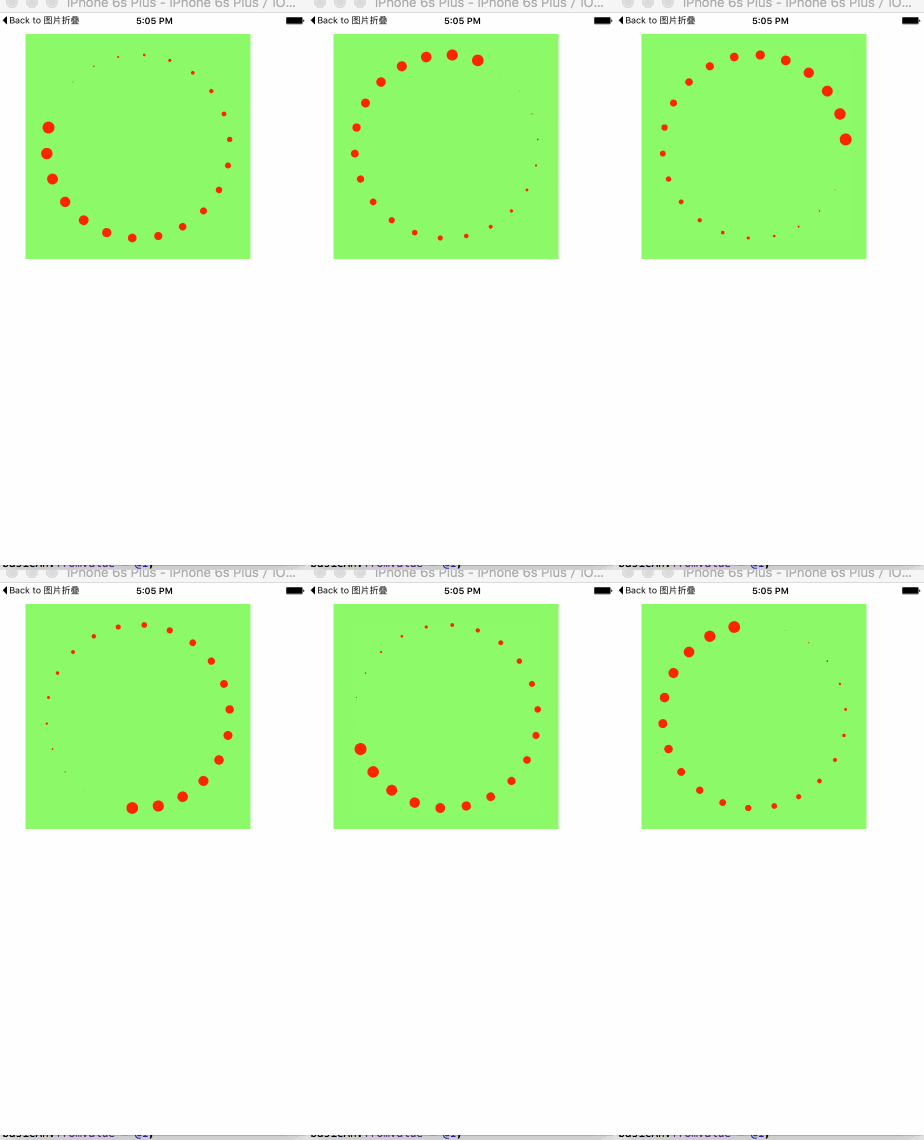
4、进度条旋转
5、粒子效果
一、切换图片
看起来很复杂的动画,通过少量的计算和编码就可以简单的实现。要做到这一步,必须是需要研究iOS开发中的Core Animation和Core Graphics框架的。日常工作中,对于很多东西不求甚解,只是拿过来用,甚至都不研究、封装一下别人代码,这种做法是很不好的。我喜欢自己造轮子,轮子造多了,开发经验与思维也就提升上去了。
这个动画实现是比较简单的,利用了CABasicAnimation、CAKeyframeAnimation和CAAnimationGroup。看似是两张图片各自有着自己不同的动画,实际不过是一个动画方法,其平移方向与旋转角度的不同。
我是用了CABasicAnimation设置了view的zPosition值,CAKeyframeAnimation对象设计了图片的位移与旋转动画,然后将之放到CAAnimationGroup对象里面,开始动画。
这里有一个注意点,那就是Core Animation设置的动画位移、旋转、缩放都只是一个假象,实际上的view该怎么还是怎么样,并未真正有过变化。所以,在动画结束后,想要正确的效果,那么需要设置view的zPosition值,这个值越大,view越在前面(z轴方向上的“前面”)。
代码:
#import "ViewController.h"

@interface ViewController ()

@property (nonatomic, strong) NSMutableArray *images;

@property (nonatomic, assign) int currentIndex;

@property (weak, nonatomic) IBOutlet UIImageView *currentImageView;

@property (weak, nonatomic) IBOutlet UIImageView *behindImageView;

@end

@implementation ViewController

- (NSMutableArray *)images

{

    if (_images == nil) {

        _images = [NSMutableArray array];

        for (int i = 1; i <= 7; i++) {

            UIImage *image = [UIImage imageNamed: [NSString stringWithFormat:@"%d",i]];

            [_images addObject:image];

        }

    }

    return _images;

}

- (void)viewDidLoad

{

    [super viewDidLoad];

    self.currentIndex = 0;

    self.currentImageView.image = self.images[_currentIndex];

}

- (void)addAnimateWithPoint:(CGPoint )point angle:(CGFloat)angle fromZ:(CGFloat)fromZ toZ:(CGFloat)toZ view:(UIView *)view

{

    CABasicAnimation *zPosition = [[CABasicAnimation alloc] init];

    zPosition.keyPath = @"zPosition";

    zPosition.fromValue = @(fromZ);

    zPosition.toValue = @(toZ);

    zPosition.duration = 1.2;

    CAKeyframeAnimation *rotation = [[CAKeyframeAnimation alloc] init];

    rotation.keyPath = @"transform.rotation";

    rotation.values = @[@(0), @(angle), @(0)];

    rotation.duration = 2;

    rotation.timingFunctions = @[

                                 [CAMediaTimingFunction functionWithName:kCAMediaTimingFunctionEaseInEaseOut],

                                 [CAMediaTimingFunction functionWithName:kCAMediaTimingFunctionEaseInEaseOut]];

    CAKeyframeAnimation *position = [[CAKeyframeAnimation alloc] init];

    position.keyPath = @"position";

//    CGPointMake(110, -20)

    position.values = @[

                        [NSValue valueWithCGPoint:CGPointZero],

                        [NSValue valueWithCGPoint:point],

                        [NSValue valueWithCGPoint:CGPointZero]

                        ];

    position.timingFunctions = @[

                                 [CAMediaTimingFunction functionWithName:kCAMediaTimingFunctionEaseInEaseOut],

                                 [CAMediaTimingFunction functionWithName:kCAMediaTimingFunctionEaseInEaseOut]

                                 ];

    position.additive = YES;

    position.duration = 1.2;

    CAAnimationGroup *animateGroup = [[CAAnimationGroup alloc] init];

    animateGroup.animations = @[zPosition, rotation, position];

//    animateGroup.beginTime = 0.5;

    animateGroup.delegate = self;

    animateGroup.duration = 1.2;

    [animateGroup setValue:view forKey:@"view"];

    [view.layer addAnimation:animateGroup forKey:nil];

    view.layer.zPosition = toZ;

}

- (void)animationDidStop:(CAAnimation *)anim finished:(BOOL)flag

{

    CAAnimationGroup *group = [anim valueForKey:@"view"];

    if (group != nil) {

        self.currentImageView.image = self.images[_currentIndex];

        self.currentImageView.layer.zPosition = 1;

        self.behindImageView.image = nil;

        self.behindImageView.layer.zPosition = -1;

    }

}

- (IBAction)previous:(id)sender {

    self.currentIndex = (self.currentIndex + 1) % self.images.count;

    self.behindImageView.image = self.images[_currentIndex];

    [self addAnimateWithPoint:CGPointMake(-90, 20) angle:0.15 fromZ:-1 toZ:1 view:self.behindImageView];

    [self addAnimateWithPoint:CGPointMake(90, -20) angle:-0.15 fromZ:1 toZ:-1 view:self.currentImageView];

}

- (IBAction)next:(id)sender {

    self.currentIndex = (self.currentIndex + 6) % self.images.count;

    self.behindImageView.image = self.images[_currentIndex];

    [self addAnimateWithPoint:CGPointMake(-90, 20) angle:-0.15 fromZ:-1 toZ:1 view:self.behindImageView];

    [self addAnimateWithPoint:CGPointMake(90, -20) angle:0.15 fromZ:1 toZ:-1 view:self.currentImageView];

}

@end
Github地址:https://github.com/wzpziyi1/Core-AnimationTest-Two
二、彩票转盘
这个动画的实现主要难点在于Button的摆放,只要摆放好button,其他就是简单的添加动画的一个过程。
12个星座,那么需要12个button。在摆放它们的时候,我是将一个个button的anchorPoint设置为(0.5, 1),将button的position设置为中心圆的圆心,然后设置transform来旋转它们,是的达到围绕一个圆摆放的目的。
需要知道的是,一般来说,控件的anchorPoint就是控件的中心点,所以在我们做旋转、平移等操作的时候,也就是在围绕中心点的一系列操作。但是,很多时候,只是围绕中心点来设置动画的话,会很复杂,CALayer提供了一个anchorPoint属性,可以让我们自由的改变其数值,从而实现比较复杂的动画。
还有就是button的点击事件,事实上由于一个扇形区域是上边大,下边小,要是不做相应的限制,当用户点击下面的区域时,很可能不是选中当前的button,因此要做一定的限制。这里我是自定义了一个button,在里面重写了hitTest: WwthEvent: 方法,这个方法可以设置你所要监听事件的区域范围。
代码:
#import "ZYWheelView.h"

#define ZYImageW 40

#define ZYImageH 46

@interface ZYButton : UIButton

@end

@implementation ZYButton

/**

 *  重写此方法,截取button的点击

 *

 */

- (UIView *)hitTest:(CGPoint)point withEvent:(UIEvent *)event

{

    CGFloat btnW = self.bounds.size.width;

    CGFloat btnH = self.bounds.size.height;

    CGFloat x = 0;

    CGFloat y = btnH / 2;

    CGFloat w = btnW;

    CGFloat h = y;

    CGRect rect = CGRectMake(x, y, w, h);

    if (CGRectContainsPoint(rect, point)) {

        return nil;

    }else{

        return [super hitTest:point withEvent:event];

    }

}

- (CGRect)imageRectForContentRect:(CGRect)contentRect

{

    CGFloat imageX = (contentRect.size.width - ZYImageW ) * 0.5;

    CGFloat imageY = 18;

    return CGRectMake(imageX, imageY, ZYImageW, ZYImageH);

}

- (void)setHighlighted:(BOOL)highlighted

{

}

@end

@interface ZYWheelView ()

@property (weak, nonatomic) IBOutlet UIImageView *wheelView;

@property (nonatomic, weak) UIButton *lastSelectedBtn;

@property (nonatomic, strong) CADisplayLink *timer;

@end

@implementation ZYWheelView

+ (instancetype)wheelView

{

    return [[[NSBundle mainBundle] loadNibNamed:@"ZYWheelView" owner:nil options:nil] lastObject];

}

- (void)awakeFromNib

{

    self.wheelView.userInteractionEnabled = YES;

    CGFloat angle = 2 * M_PI / 12.0;

    UIImage *normalImage = [UIImage imageNamed:@"LuckyAstrology"];

    UIImage *selectedImage = [UIImage imageNamed:@"LuckyAstrologyPressed"];

    for (int bi = 0; bi < 12; bi++) {

        ZYButton *btn = [[ZYButton alloc] init];

        [btn setBackgroundImage:[UIImage imageNamed:@"LuckyRototeSelected"] forState:UIControlStateSelected];

//        切割图片,将切割好的图片设置到按钮上

        // CGImage中rect是当做像素来使用

        // UIKit 中是点坐标系

        // 坐标系的特点:如果在非retain屏上 1个点等于1个像素

        //   在retain屏上1个点等于2个像素

        CGFloat imageH = ZYImageH * [UIScreen mainScreen].scale;

        CGFloat imageW = ZYImageW * [UIScreen mainScreen].scale;

        CGFloat imageY = 0;

        CGFloat imageX = bi * imageW;

        CGRect rect = CGRectMake(imageX, imageY, imageW, imageH);

        CGImageRef normalRef = CGImageCreateWithImageInRect(normalImage.CGImage, rect);

        CGImageRef selectedRef = CGImageCreateWithImageInRect(selectedImage.CGImage, rect);

        [btn setImage:[UIImage imageWithCGImage:normalRef] forState:UIControlStateNormal];

        [btn setImage:[UIImage imageWithCGImage:selectedRef] forState:UIControlStateSelected];

        btn.bounds = CGRectMake(0, 0, 58, 143);

        btn.layer.anchorPoint = CGPointMake(0.5, 1);

        btn.layer.position = CGPointMake(self.frame.size.width * 0.5, self.frame.size.height * 0.5);

        btn.transform = CGAffineTransformMakeRotation(angle * bi);

        [btn addTarget:self action:@selector(clickBtn:) forControlEvents:UIControlEventTouchUpInside];

        [self.wheelView addSubview:btn];

    }

    [self startRotating];

}

- (void)startRotating

{

    if (self.timer) return;

    self.timer = [CADisplayLink displayLinkWithTarget:self selector:@selector(updateTimer)];

    [self.timer addToRunLoop:[NSRunLoop mainRunLoop] forMode:NSRunLoopCommonModes];

}

- (void)stopRotating

{

    [self.timer invalidate];

    self.timer = nil;

}

- (void)clickBtn:(UIButton *)btn

{

    self.lastSelectedBtn.selected = NO;

    btn.selected = YES;

    self.lastSelectedBtn = btn;

}

- (IBAction)clickCenterBtn:(id)sender {

    self.userInteractionEnabled = NO;

    [self stopRotating];

    CABasicAnimation *basicAnimation = [CABasicAnimation animationWithKeyPath:@"transform.rotation"];

    basicAnimation.toValue = @(M_PI * 2 * 5);

    basicAnimation.duration = 2;

    basicAnimation.timingFunction = [CAMediaTimingFunction functionWithName:kCAMediaTimingFunctionEaseInEaseOut];

//    basicAnimation.removedOnCompletion = NO;

//    basicAnimation.fillMode = kCAFillModeForwards;

    basicAnimation.delegate = self;

    [self.wheelView.layer addAnimation:basicAnimation forKey:nil];

}

- (void)animationDidStop:(CAAnimation *)anim finished:(BOOL)flag

{

    self.userInteractionEnabled = YES;

    // 根据选中的按钮获取旋转的度数,

    // 通过transform获取角度

    CGFloat angle = atan2(self.lastSelectedBtn.transform.b, self.lastSelectedBtn.transform.a);

    // 从实际上旋转转盘

    self.wheelView.transform = CGAffineTransformMakeRotation(-angle);

    dispatch_after(dispatch_time(DISPATCH_TIME_NOW, (int64_t)(1 * NSEC_PER_SEC)), dispatch_get_main_queue(), ^{

        [self startRotating];

    });

}

- (void)updateTimer

{

    self.wheelView.transform = CGAffineTransformRotate(self.wheelView.transform, M_PI / 200);

}

- (void)dealloc

{

    [self stopRotating];

}

@end
Github地址:https://github.com/wzpziyi1/Core-AnimationTest-Three
3、图片折叠
这个效果看起来很炫酷,但实际做起来是比较简单的。需要三个View,两个UIImageView,一个接受拖拽action的View。CALayer里面有个contentRect属性,它可以设置layer里面的显示内容,利用这个属性,我们可以做在下载图片时,下载一点展示一点的效果。 在这里,我用这个属性来这是两张UIImageView各自展示一半的图片,然后将这两张ImageView拼接在一起,显示完整的图片。
在一个覆盖这张完整图片的View上添加拖拽手势,以实现动画过程。
这里有一个新的图层需要学习下,CAGradientLayer,它是用来做颜色渐变的,用法与CALayer的用法相似:
属性代码:
CAGradientLayer *gradientLayer = [CAGradientLayer layer];

    gradientLayer.frame = self.bottomView.bounds;

    gradientLayer.opacity = 0;

    gradientLayer.colors = @[(id)[UIColor clearColor].CGColor, (id)[UIColor blackColor].CGColor];

    self.gradientLayer = gradientLayer;

    [self.bottomView.layer addSublayer:gradientLayer];

    // 设置渐变颜色

    //    gradientL.colors = @[(id)[UIColor redColor].CGColor,(id)[UIColor greenColor].CGColor,(id)[UIColor yellowColor].CGColor];

    // 设置渐变定位点

    //    gradientL.locations = @[@0.1,@0.4,@0.5];

    // 设置渐变开始点,取值0~1

    //    gradientL.startPoint = CGPointMake(0, 1);
设置好之后,在pan手势的方法里面不断改变gradientLayer的opacity即可达到想要的效果。
CATransform3D有个m34属性,可以设置透视度,一般将这个值设置为- 1 / 500.0,特定需求可以微调这个值。
代码:
#import "ViewController.h"

@interface ViewController ()

@property (weak, nonatomic) IBOutlet UIImageView *topView;

@property (weak, nonatomic) IBOutlet UIImageView *bottomView;

@property (weak, nonatomic) IBOutlet UIView *containView;

@property (nonatomic, weak) CAGradientLayer *gradientLayer;

@end

@implementation ViewController

- (void)viewDidLoad {

    [super viewDidLoad];

    // Do any additional setup after loading the view, typically from a nib.

    [self setupOtherView];

    //设置渐变的阴影

    [self setupShadow];

}

- (void)setupOtherView

{

    //设置contentsRect用来表示图片显示的大小,可以做边下载边显示的UI效果,取值是(0--1)

    self.topView.layer.contentsRect = CGRectMake(0, 0, 1, 0.5);

    self.topView.layer.anchorPoint = CGPointMake(0.5, 1);

    self.bottomView.layer.contentsRect = CGRectMake(0, 0.5, 1, 0.5);

    self.bottomView.layer.anchorPoint = CGPointMake(0.5, 0);

    UIPanGestureRecognizer *gesture = [[UIPanGestureRecognizer alloc] initWithTarget:self action:@selector(pan:)];

    [self.containView addGestureRecognizer:gesture];

}

- (void)setupShadow

{

    CAGradientLayer *gradientLayer = [CAGradientLayer layer];

    gradientLayer.frame = self.bottomView.bounds;

    gradientLayer.opacity = 0;

    gradientLayer.colors = @[(id)[UIColor clearColor].CGColor, (id)[UIColor blackColor].CGColor];

    self.gradientLayer = gradientLayer;

    [self.bottomView.layer addSublayer:gradientLayer];

    // 设置渐变颜色

    //    gradientL.colors = @[(id)[UIColor redColor].CGColor,(id)[UIColor greenColor].CGColor,(id)[UIColor yellowColor].CGColor];

    // 设置渐变定位点

    //    gradientL.locations = @[@0.1,@0.4,@0.5];

    // 设置渐变开始点,取值0~1

    //    gradientL.startPoint = CGPointMake(0, 1);

}

- (void)pan:(UIPanGestureRecognizer *)recognizer

{

    CGFloat y = [recognizer translationInView:self.containView].y;

    if (y >= 300) y = 300;

    if (y <= -300) y = -300;

    // 旋转角度,往下逆时针旋转

    CGFloat angle = -y / 320.0 * M_PI;

    self.topView.layer.transform = CATransform3DIdentity;

    CATransform3D transfrom = CATransform3DIdentity;

    transfrom.m34 = -1 / 500.0;

    self.topView.layer.transform = CATransform3DRotate(transfrom, angle, 1, 0, 0);

    self.gradientLayer.opacity = y / 300.0;

    if (recognizer.state == UIGestureRecognizerStateEnded) {

        // 弹簧效果的动画

        // SpringWithDamping:弹性系数,越小,弹簧效果越明显

        [UIView animateWithDuration:0.5 delay:0 usingSpringWithDamping:0.3 initialSpringVelocity:11 options:UIViewAnimationOptionCurveEaseInOut animations:^{

            self.topView.layer.transform = CATransform3DIdentity;

            self.gradientLayer.opacity = 0;

        } completion:nil];

    }

}

@end
Github地址:https://github.com/wzpziyi1/Core-AnimationTest-Four
4、旋转进度条
圆圈旋转一般都是放在HUD上吧。记得以前我也做过一个类似的功能,那时候还没现在这样的知识储备,只能是用CAKeyframeAnimation做,让美工做出了一根顶部是一个小白点,除此之外,很长的那部分是为clearColor的小矩形,然后我设置它的anchorPoint,给 CAKeyframeAnimation添加一个圆形的path,然后围绕这个path旋转,做是勉强做出来,但是很不好看吧。
现在可以有更好的选择了,CAReplicatorLayer(复制图层)。我们可以在复制图层里面添加一个instance图层,如果设置了复制图层的instanceCount,假如让instanceCount == 5, 那么复制图层会自动帮我们复制5个跟instance图层一样的图层(事实上,我们可以在一开始就给instance图层设置动画,那么在复制的时候,一样会把动画也复制过来),除此之外,还可以设置复制图层里面的instance图层的transfrom,从而实现一定的布局。复制图层里面还有一个instanceDelay,它表示延迟多少时间开始动画等等。
这个Demo就是用了上面所说的实现的,代码:
#import "ViewController.h"

@interface ViewController ()

@property (weak, nonatomic) IBOutlet UIView *containView;

@end

@implementation ViewController

- (void)viewDidLoad {

    [super viewDidLoad];

    // Do any additional setup after loading the view, typically from a nib.

    [self setupReplicatorLayerAndAnimation];

}

- (void)setupReplicatorLayerAndAnimation

{

    CAReplicatorLayer *replicatorLayer = [CAReplicatorLayer layer];

    replicatorLayer.frame = self.containView.layer.bounds;

    [self.containView.layer addSublayer:replicatorLayer];

    CALayer *layer = [CALayer layer];

    layer.frame = CGRectMake(self.containView.frame.size.width * 0.5, 20, 16, 16);

    layer.backgroundColor = [UIColor redColor].CGColor;

    layer.cornerRadius = layer.frame.size.width / 2;

    //这一句可以将初始过程移除掉

    layer.transform = CATransform3DMakeScale(0, 0, 0);

    [replicatorLayer addSublayer:layer];

    replicatorLayer.instanceCount = 22;

    CABasicAnimation *basicAn = [CABasicAnimation animationWithKeyPath:@"transform.scale"];

    basicAn.fromValue = @1;

    basicAn.toValue = @0;

    basicAn.duration = 1;

    basicAn.repeatCount = MAXFLOAT;

    [layer addAnimation:basicAn forKey:nil];

    replicatorLayer.instanceDelay = basicAn.duration / (double)replicatorLayer.instanceCount;

    replicatorLayer.instanceTransform = CATransform3DMakeRotation(2 * M_PI / replicatorLayer.instanceCount, 0, 0, 1);

}

@end
Github地址:https://github.com/wzpziyi1/Core-Animation-Test-Five
5、粒子效果
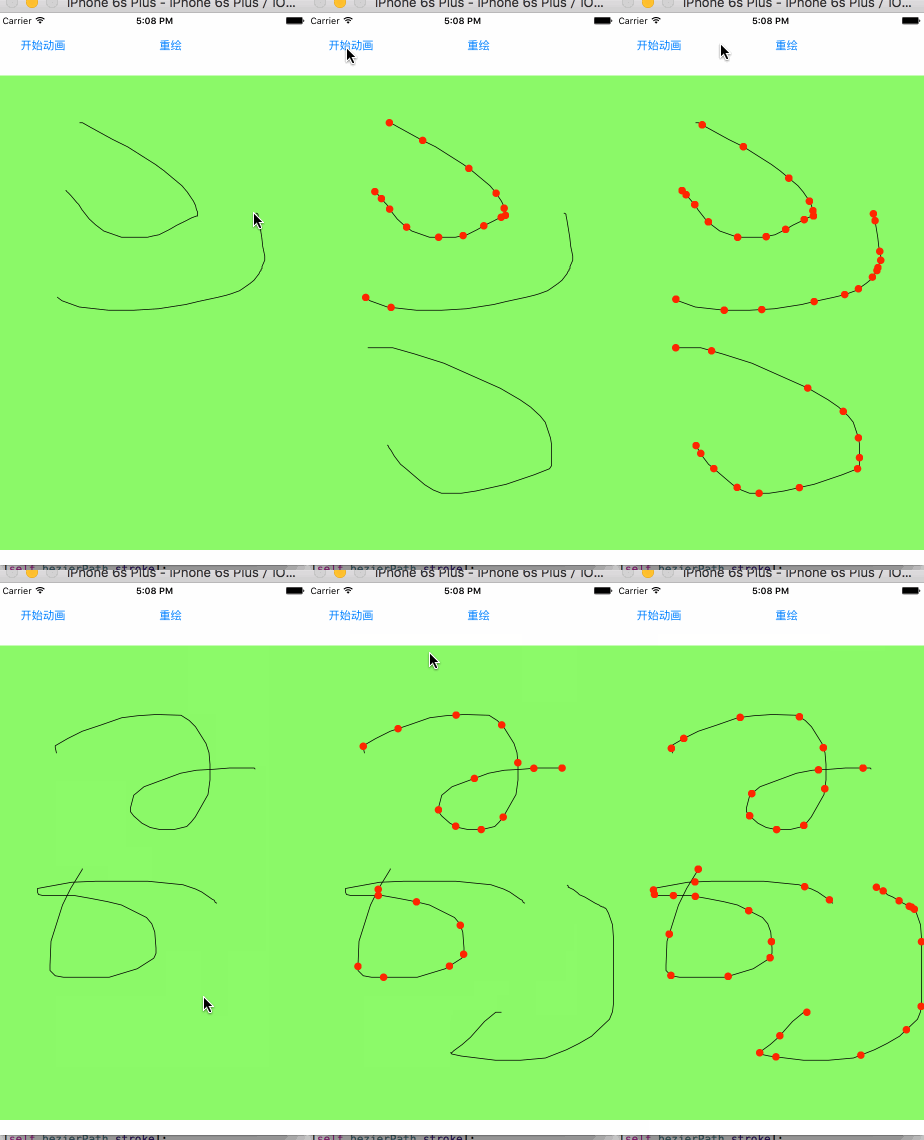
这个东西就是CAReplicatorLayer(复制图层)和Core Graphics的结合吧,我是采用UIBezierPath来绘制线条,然后将绘制好的path赋值给小球的animation路径,然后将小球添加到复制图层,设置下instanceCount,设置下延迟时间,效果就出来了。
代码:
#import "ZYDrawView.h"

@interface ZYDrawView ()

@property (nonatomic, strong) UIBezierPath *bezierPath;

@property (nonatomic, weak) CAReplicatorLayer *replicatorLayer;

@property (nonatomic, weak) CALayer *norLayer;

@end

static int _count = 0;

@implementation ZYDrawView

- (UIBezierPath *)bezierPath

{

    if (_bezierPath == nil) {

        _bezierPath = [[UIBezierPath alloc] init];

    }

    return _bezierPath;

}

- (void)awakeFromNib

{

    CAReplicatorLayer *replicatorLayer = [CAReplicatorLayer layer];

    replicatorLayer.frame = self.bounds;

    [self.layer addSublayer:replicatorLayer];

    CALayer *layer = [CALayer layer];

    layer.frame = CGRectMake(0, -200, 10, 10);

    layer.cornerRadius = layer.frame.size.width * 0.5;

    layer.backgroundColor = [UIColor redColor].CGColor;

    [replicatorLayer addSublayer:layer];

    self.replicatorLayer = replicatorLayer;

    self.norLayer = layer;

}

- (void)touchesBegan:(NSSet<UITouch *> *)touches withEvent:(UIEvent *)event

{

    CGPoint curPoint = [[touches anyObject] locationInView:self];

    [self.bezierPath moveToPoint:curPoint];

}

- (void)touchesMoved:(NSSet<UITouch *> *)touches withEvent:(UIEvent *)event

{

    _count++;

    CGPoint curPoint = [[touches anyObject] locationInView:self];

    [self.bezierPath addLineToPoint:curPoint];

    [self setNeedsDisplay];

}

- (void)startAnimation

{

    CAKeyframeAnimation *keyframeAn = [CAKeyframeAnimation animationWithKeyPath:@"position"];

    keyframeAn.path = self.bezierPath.CGPath;

    keyframeAn.duration = 4;

    keyframeAn.repeatCount = MAXFLOAT;

    [self.norLayer addAnimation:keyframeAn forKey:nil];

    self.replicatorLayer.instanceCount = _count;

    self.replicatorLayer.instanceDelay = 0.1;

}

- (void)reDraw

{

    _bezierPath = nil;

    _count = 1;

    [self.norLayer removeAllAnimations];

    [self setNeedsDisplay];

}

- (void)drawRect:(CGRect)rect

{

    [self.bezierPath stroke];

}

@end
Github地址:https://github.com/wzpziyi1/Core-Animation-Test-Six
Core Animation一些Demo总结 (动态切换图片、大转盘、图片折叠、进度条等动画效果)的更多相关文章
- 自制window下core animation引擎 - demo第二弹 - 仿QQ电脑管家加速小火箭
一年前想写一个像cocoa那样,可以方便层动画开发的引擎,写着写着又逆向它的QuartzCore.framework,也就是CoreAnimation的底层,已经大半年没有搞windows这个引擎.大 ...
- Core Animation学习总结
文件夹: The Layer Beneath The Layer Tree(图层树) The Backing Image(寄宿层) Layer Geometry(图层几何学) Visual Effec ...
- iOS——Core Animation 知识摘抄(四)
原文地址http://www.cocoachina.com/ios/20150106/10840.html 延迟解压 一旦图片文件被加载就必须要进行解码,解码过程是一个相当复杂的任务,需要消耗非常长的 ...
- Core Animation编程指南
本文是<Core Animation Programming Guide>2013-01-28更新版本的译文.本文略去了原文中关于OS X平台上Core Animation相关内容.因为原 ...
- 核心动画——Core Animation
一. CALayer (一). CALayer简单介绍 在iOS中,你能看得见摸得着的东西基本上都是UIView,比方一个button.一个文本标签.一个文本输入框.一个图标等等.这些都是UIView ...
- Core Animation之多种动画效果
前面介绍了Core Animation基础知识,还有CALayer的简单使用,最终还是有要动画的滴,这里列出几个动画效果,参考下能加深对Core Animation的认识和理解 1.把图片移到右下角变 ...
- 简析iOS动画原理及实现——Core Animation
本文转载至 http://www.tuicool.com/articles/e2qaYjA 原文 https://tech.imdada.cn/2016/06/21/ios-core-animati ...
- Qt实现炫酷启动图-动态进度条
目录 一.简述 二.动效进度条 1.光效进度条 2.延迟到达进度条 3.接口说明 三.启动图 1.实现思路 2.背景图切换 四.测试 1.构造启动图 2.背景图 3.其他信息 4.事件循环 五.源码 ...
- 为网格布局图片打造的超炫 CSS 加载动画
今天,我想与大家分享一些专门为网格布局的图像制作的很酷的 CSS 加载动画效果.您可以把这些效果用在你的作品集,博客或任何你想要的网页中.设置很简单.我们使用了下面这些工具库来实现这个效果: Norm ...
随机推荐
- oracle 查看运行中sql
sys用户登录 SELECT b.sid oracleID, b.username 登录Oracle用户名, b.serial#, spid 操作系统ID, paddr, sql_text 正在执行的 ...
- jquery 常用插件
50款最有用的 jQuery 插件集锦<表单篇> 50款最有用的 jQuery 插件集锦<网页布局篇> 50款最有用的 jQuery 插件集锦<内容滑块篇> 50款 ...
- [JS4] 最简单JS框架
<html> <head> <title></title> <SCRIPT TYPE="text/JavaScript"> ...
- [Python] 中文编码问题:raw_input输入、文件读取、变量比较等str、unicode、utf-8转换问题
最近研究搜索引擎.知识图谱和Python爬虫比较多,中文乱码问题再次浮现于眼前.虽然市面上讲述中文编码问题的文章数不胜数,同时以前我也讲述过PHP处理数据库服务器中文乱码问题,但是此处还是准备简单做下 ...
- CSS中一些不经意的细节问题1
CSS这样的语法,细节问题非常多,往往一些难以处理的问题,有可能是一些细节问题不到位,所以先记下一些,留给以后自己看看. 1.line-height:150%与line-height:1.5 的区别 ...
- Atitit.js图表控件总结
Atitit.js图表控件总结 1. 为什么要使用图表1 2. 图表分类1 3. 数据可视化的优点1 4. 流行的js图表类库1 5. 参考2 1. 为什么要使用图表 因为要可视化 2. 图表分类 条 ...
- atitit。自定义uml MOF EMF体系eclipse emf 教程o7t
atitit.自定义uml MOF EMF体系eclipse emf 教程o7t 1. 元对象机制(MOF,Meta-Object Facility)and 结构 1 2. 元模型图.模型图.对象 ...
- Git 操作 学习资源 网址
用git 有一段时间了,有点自己的小心得.个人觉得相对SVN来讲他更灵活,更合理. 陆陆续续的收集了一些学习资源: 1.理解Xcode 中的Git 版本控制 http://www.open-open. ...
- jQuery实现Checkbox中项目开发全选全不选的使用
<html> <head> <meta charset="utf-8"> <title>Checkbox的练习</title& ...
- static/final