Logstash 日志收集(补)
收集 Tomcat 日志
安装 Tomcat
# 安装 jdk

[root@web01 ~]# rpm -ivh jdk-8u181-linux-x64.rpm

# 下载

[root@web01 ~]# wget https://archive.apache.org/dist/tomcat/tomcat-10/v10.0.0-M7/bin/apache-tomcat-10.0.0-M7.tar.gz

# 解压

[root@web01 ~]# tar xf apache-tomcat-10.0.0-M7.tar.gz -C /usr/local/

# 做软连接

[root@web01 ~]# ln -s /usr/local/apache-tomcat-10.0.0-M7 /usr/local/tomcat

# 启动 Tomcat

[root@web01 ~]# /usr/local/tomcat/bin/startup.sh

# 6.访问页面 10.0.0.7:8080
收集 Tomcat 访问日志(Access-log)
Tomcat 访问日志(Access-log)的格式在 server.xml 中可以直接修改,先修改访问格式的日志试试水 ~ ~ ~
# 把原来的日志格式注释,添加我们的格式
[root@web01 ~]# vim /usr/local/tomcat/conf/server.xml
<Valve className="org.apache.catalina.valves.AccessLogValve" directory="logs"
prefix="localhost_access_log" suffix=".log"
pattern="{"clientip":"%h","ClientUser":"%l","authenticated":"%u","AccessTime":"%t","method":"%r","status":"%s","SendBytes":"%b","Query?string":"%q","partner":"%{Referer}i","AgentVersion":"%{User-Agent}i"}"/>
# 重启 tomcat
[root@web01 ~]# /usr/local/tomcat/bin/shutdown.sh
[root@web01 ~]# /usr/local/tomcat/bin/startup.sh
# 配置收集新的 tomcat 日志
[root@web01 ~]# vim /etc/logstash/conf.d/tomcat_json_es.conf
input {
file {
path => "/usr/local/tomcat/logs/localhost_access_log.*.log"
start_position => "beginning"
}
}
output {
elasticsearch {
hosts => ["10.0.0.121:9200"]
index => "tomcat_json_%{+YYYY-MM-dd}"
}
}
收集 Tomcat 服务运行日志(Catalina-log)
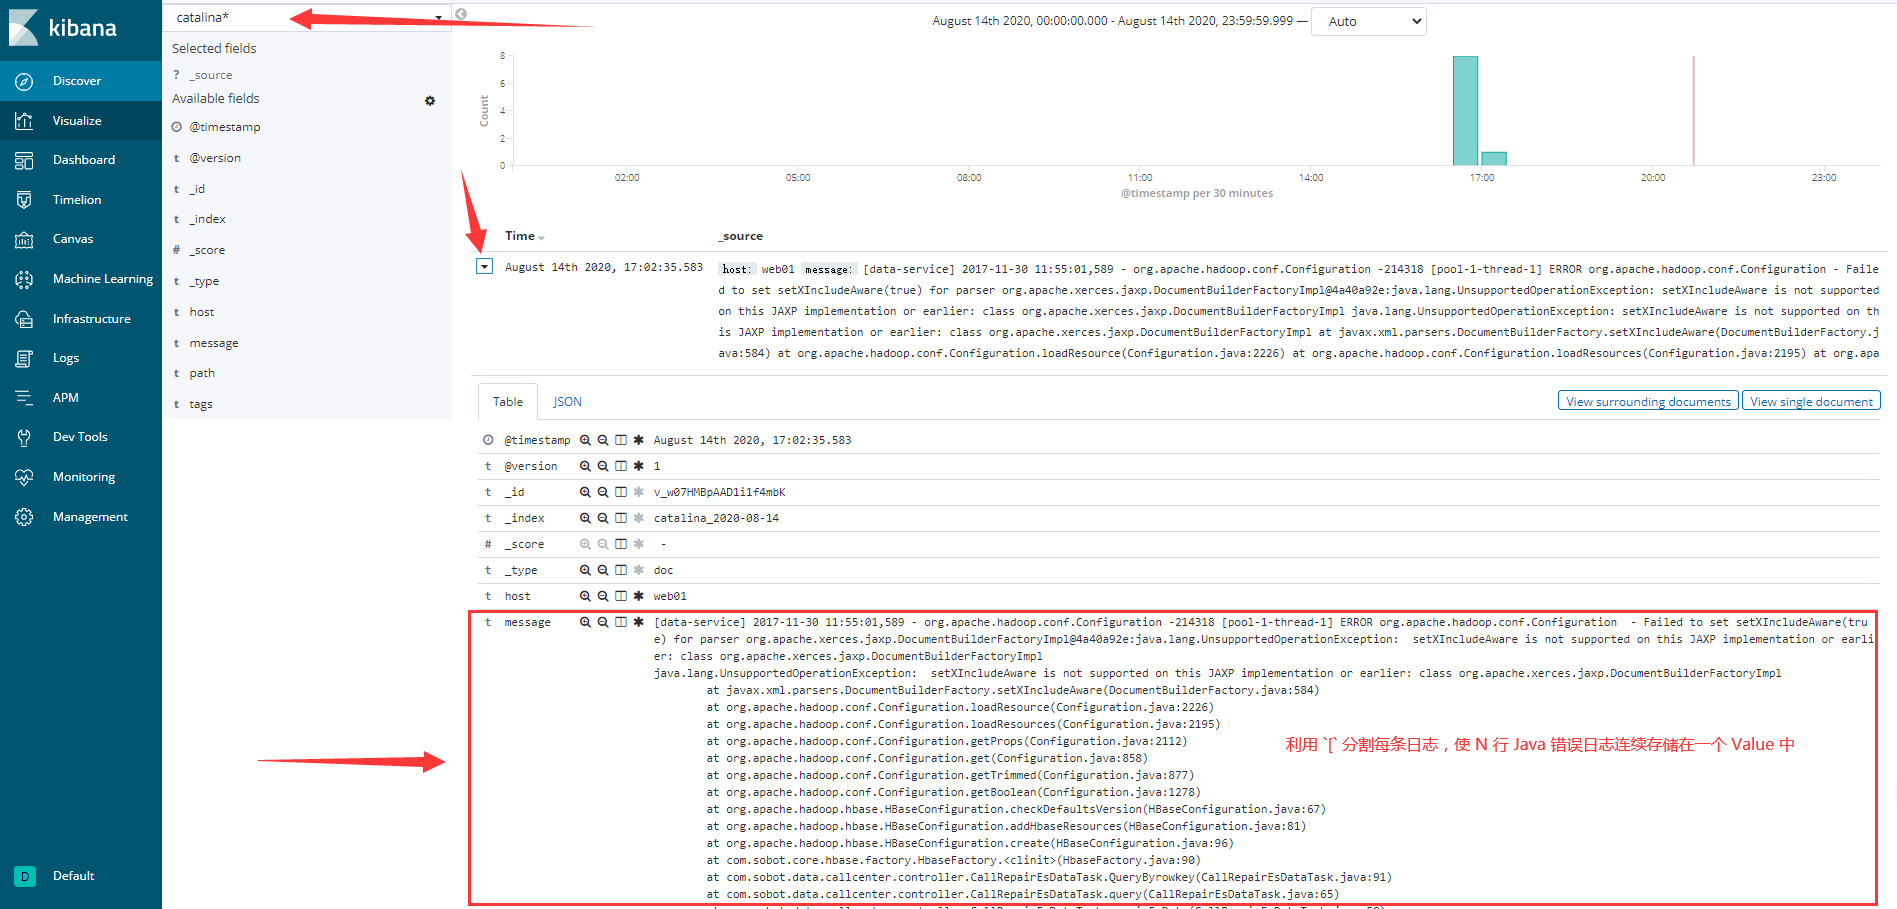
一般我们会收集 Tomcat 服务运行日志(Catalina-log),当遇到报错时,一条报错会被分割成很多条数据,不方便查看,解决方法:
①. — 修改 Tomcat 的 Catalina 日志格式为 Json
— 1)开发修改输出日志为 Json
— 2)修改 Tomcat 配置,日志格式为 Json
②. — 使用 Logstash 的 input 插件下的 mutiline 模块
下面使用第二种方法,即 mutiline 模块实现服务运行日志的切分
Mutiline 模块初识
# 使用 mutiline 模块

[root@web01 ~]# vim /etc/logstash/conf.d/test_mutiline.conf

input {

  stdin {

    codec => multiline {

	  # 匹配以 `[` 开头

      pattern => "^\["

      # 匹配到

      negate => true

      # 向上合并,向下合并是 next

      what => "previous"

    }

  }

}

output {

  stdout {

    codec => "json"

  }

}

# 测试,输入内容不会直接输出,当遇到以 [ 开头才会收集以上的日志

[root@web01 ~]# logstash -f /etc/logstash/conf.d/test_mutiline.conf

......

...

]

A

B

C

D

[

{"tags":["multiline"],"host":"web01","@timestamp":"2020-08-14T02:30:33.906Z","message":"[\n]\nA\nB\nC\nD","@version":"1"}

a

b

c

d

e

f

g

[

{"tags":["multiline"],"host":"web01","@timestamp":"2020-08-14T02:28:58.590Z","message":"[\na\nb\nc\nd\ne\nf\ng","@version":"1"}
收集 Tomcat 错误日志(Catalina-log)
# 收集 catalina 错误日志

[root@web01 conf.d]# vim /etc/logstash/conf.d/catalina_out.conf

input {

  file {

    path => "/usr/local/tomcat/logs/catalina.*.log"

    start_position => "beginning"

    codec => multiline {

      pattern => "^\["

      negate => true

      what => "previous"

    }

  }

}

output {

  elasticsearch {

    hosts => ["10.0.0.121:9200"]

    index => "catalina_%{+YYYY-MM-dd}"

    codec => "json"

  }

}
追加 Tomcat 错误日志(Catalina-log)
# 测试,手动添加一些错误的日志,到 Catlina 日志中

[root@web01 ~]# cat tomcat_error.log >> /usr/local/tomcat/logs/catalina.2020-08-14.log
收集 Nginx 日志
安装 Nginx
[root@web01 ~]# yum install -y nginx
收集 Nginx 访问日志(Access-log)
# 配置 nginx 访问日志格式

[root@web01 ~]# vim /etc/nginx/nginx.conf

... ...

http {

    log_format  json  '{"@timestamp":"$time_iso8601",'

                      '"host":"$server_addr",'

                      '"clientip":"$remote_addr",'

                      '"size":$body_bytes_sent,'

                      '"responsetime":$request_time,'

                      '"upstreamtime":"$upstream_response_time",'

                      '"upstreamhost":"$upstream_addr",'

                      '"http_host":"$host",'

                      '"url":"$uri",'

                      '"referer":"$http_referer",'

                      '"agent":"$http_user_agent",'

                      '"status":"$status"}';

    access_log  /var/log/nginx/access.log  json;

... ...

# 配置收集访问日志

[root@web01 ~]# vim /etc/logstash/conf.d/nginx_json.conf

input {

  file {

    path => "/var/log/nginx/access.log"

    start_position => "beginning"

  }

}

output {

  elasticsearch {

    hosts => ["10.0.0.121:9200"]

    index => "nginx_json_%{+YYYY-MM-dd}"

  }

}
收集 Nginx 错务日志(Error-log)
Nginx 中的错误日志不会像 Tomcat 中的错误日志一样分成很多行,只需要正常的配置,按行切分
将获取日志参数分离(方法一)
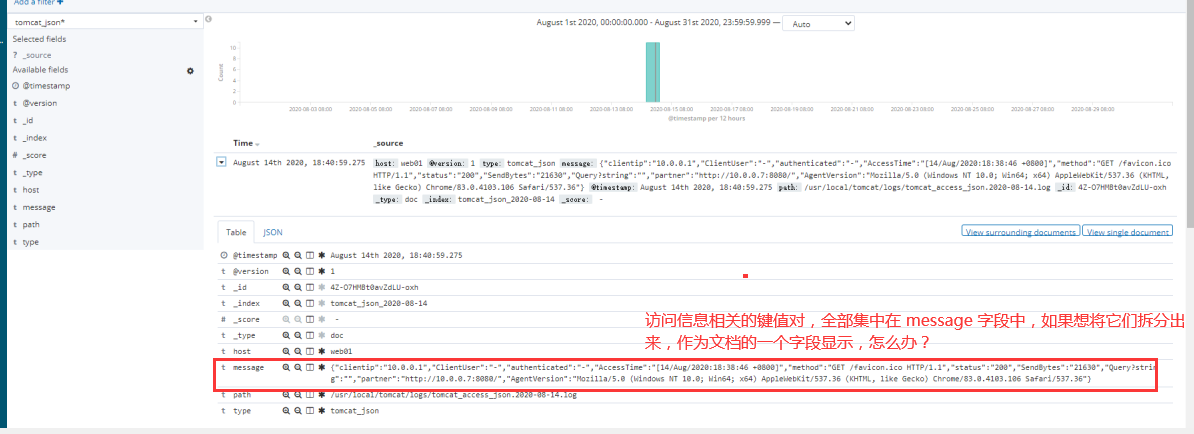
拆分 message 字段
[root@web01 ~]# vim /etc/logstash/conf.d/tomcat_json_es.conf

input {

  file {

    path => "/usr/local/tomcat/logs/localhost_access_log.*.log"

    start_position => "beginning"

  }

}

# 把收集到的数据进行处理

filter {

  json {

    # 将 message 字段中的键值对,拆分成为索引文档中的字段

    source => "message"

  }

}

output {

  elasticsearch {

    hosts => ["10.0.0.121:9200"]

    index => "tomcat_json_%{+YYYY-MM-dd}"

  }

}
移除 message 字段
因为将 Message 字段拆分到文档字段后,就不需要 Message 字段数据了,所以需要将 Message 字段移除:
# message 数据已经拆分,数据还在,去掉 message 数据

filter {

  json {

    source => "message"

    remove_field => ["message"]

  }

}
将获取日志参数分离(方法二)
# 最方便的方法,只需要一行 codec => "json"

# file 中的日志格式一定要是 Json 格式

[root@web01 ~]# vim /etc/logstash/conf.d/nginx_json.conf

input {

  file {

    path => "/var/log/nginx/access.log"

    start_position => "beginning"

    codec => "json"

  }

}

output {

  elasticsearch {

    hosts => ["10.0.0.121:9200"]

    index => "nginx_json_%{+YYYY-MM-dd}"

  }

}
综合 Logstash 配置
编辑 Logstash 配置文件
# 收集 catalina 服务启动(及报错)日志

[root@web01 conf.d]# cat catalina_out.conf

input {

  file {

    path => "/usr/local/tomcat/logs/catalina.*.log"

    start_position => "beginning"

    codec => multiline {

      pattern => "^\["

      negate => true

      what => "previous"

    }

  }

}

output {

  elasticsearch {

    hosts => ["10.0.0.121:9200"]

    index => "catalina_%{+YYYY-MM-dd}"

    codec => "json"

  }

}

# 收集 nginx 、tomcat 访问日志

[root@web01 conf.d]# cat nginx_tomcat.conf

input {

  file {

    type => "nginx_log"

    path => "/var/log/nginx/access.log"

    start_position => "beginning"

    codec => "json"

  }

  file {

    type => "tomcat_log"

    path => "/usr/local/tomcat/logs/localhost_access_log.*.log"

    start_position => "beginning"

    codec => "json"

  }

}

output {

  elasticsearch {

    hosts => ["10.0.0.121:9200"]

    index => "%{type}_%{+YYYY-MM-dd}"

  }

}
启动 Logstash 多实例
[root@web01 conf.d]# logstash -f /etc/logstash/conf.d/nginx_tomcat.conf  &

[root@web01 conf.d]# logstash -f /etc/logstash/conf.d/catalina_out.conf --path.data=/data/logstash/catalina/ &
收集日志到 Redis
安装 Redis(略)
配置输出数据到 Redis
[root@web01 ~]# vim /etc/logstash/conf.d/nginx_to_redis.conf

input {

  file {

    path => "/var/log/nginx/access.log"

    start_position => "beginning"

    codec => "json"

  }

}

output {

  redis {

    host => "172.16.1.121"

    port => "6379"

    data_type => "list"

    db => "0"

    key => "nginx_log"

  }

}
Logstash 日志收集(补)的更多相关文章
- es redis logstash 日志收集系统排错
用logstash收集日志并发送到redis,然后通过logstash取redis数据写入到es集群,最近kibana显示日志总是中断,日志收集不过来,客户端重启发现报错: Failed to sen ...
- springmvc项目 logback.xml配置 logstash日志收集
配置logback,需要一个转接的Appender,可以通过Maven依赖加到项目中: <dependency> <groupId>com.cwbase</groupId ...
- ELK Stack 介绍 & Logstash 日志收集
ELK Stack 组成 Software Description Function E:Elasticsearch Java 程序 存储,查询日志 L:Logstash Java 程序 收集.过滤日 ...
- StringBoot整合ELK实现日志收集和搜索自动补全功能(详细图文教程)
@ 目录 StringBoot整合ELK实现日志收集和搜索自动补全功能(详细图文教程) 一.下载ELK的安装包上传并解压 1.Elasticsearch下载 2.Logstash下载 3.Kibana ...
- 用ElasticSearch,LogStash,Kibana搭建实时日志收集系统
用ElasticSearch,LogStash,Kibana搭建实时日志收集系统 介绍 这套系统,logstash负责收集处理日志文件内容存储到elasticsearch搜索引擎数据库中.kibana ...
- ELK日志收集分析系统配置
ELK是日志收益与分析的利器. 1.elasticsearch集群搭建 略 2.logstash日志收集 我这里的实现分如下2步,中间用redis队列做缓冲,可以有效的避免es压力过大: 1.n个ag ...
- ELK分布式日志收集搭建和使用
大型系统分布式日志采集系统ELK全框架 SpringBootSecurity1.传统系统日志收集的问题2.Logstash操作工作原理3.分布式日志收集ELK原理4.Elasticsearch+Log ...
- 日志收集系统ELK搭建
一.ELK简介 在传统项目中,如果在生产环境中,有多台不同的服务器集群,如果生产环境需要通过日志定位项目的Bug的话,需要在每台节点上使用传统的命令方式查询,这样效率非常低下.因此我们需要集中化的管理 ...
- ELK 日志收集系统
传统系统日志收集的问题 在传统项目中,如果在生产环境中,有多台不同的服务器集群,如果生产环境需要通过日志定位项目的Bug的话,需要在每台节点上使用传统的命令方式查询,这样效率非常底下. 通常,日志被分 ...
随机推荐
- 【Linux】cron
每五分钟执行 */5 * * * * 每小时执行 0 * * * * 0 */1 * * * 效果相同 每天执行 0 0 * * * 每周执行 0 0 ...
- Nacos使用和注册部分源码介绍
Nacos简单介绍 Nacos致力于帮助您发现.配置和管理微服务.Nacos提供了一组简单易用的特性集,帮助您快速实现动态服务发现.服务配置.服务元数据及流量管理.Nacos帮助您更敏捷和容易地构建. ...
- ctfshow——web_AK赛
签到_观己 从题目描述中没发现什么有用的信息 发现文件包含 尝试使用PHP伪协议执行命令,发现无法执行 尝试使用远程文件包含,发现也未开启 尝试使用日志注入 记录了UA值,抓包写入一句话木马 使用蚁剑 ...
- [noip模拟]分组行动
题目描述 最近,木木中学要举行一年一度的辩论赛了,我们活泼开朗乐观向上不寂寞不生病不挂科天天回家吃饭的新时代好少年--飞飞,自然是热情参与咯!辩论嘛,就有正方和反方两个组,这是一个传统项目,所以,包括 ...
- 2021年首届.NET线下沙龙上海站 - 2021 .NET Meetup in Shanghai
.NET Conf 2020 刚刚在苏州落下帷幕, .NET 开发者们的热情不减,来自五湖四海的朋友一起参加疫情之下的 .NET 盛会. 2021年上海第一场线下活动就要来了,快来加入我们一起学习.N ...
- 关于Mysql数据库建库字符集utf8mb4下,排序规则utf8mb4_bin和utf8mb4_general_ci选择造成的查询匹配大小写问题
场景描述: 项目采用了分库模式进行不同业务的开发,在共有的功能模块进行设计的时候采用主从库,或者各分库之中存在同样的库表结构,在使用过程中做库表同步的时候一定要保证库表所在的数据库的字符集和编码格式是 ...
- Numpy的一些学习记录
Numpy的一些记录 产生numpy.array的方式 import numpy as np arr1 = np.array([1, 2, 3]) print(arr1) arr2 = np.zero ...
- C#高级编程第11版 - 第三章 索引
[1]3.1 创建及使用类 1.构造函数:构造函数的名字与类名相同: 使用 new 表达式创建类的对象或者结构(例如int)时,会调用其构造函数.并且通常初始化新对象的数据成员. 除非类是静态的,否则 ...
- .net core 和 WPF 开发升讯威在线客服与营销系统:使用 TCP协议 实现稳定的客服端
本系列文章详细介绍使用 .net core 和 WPF 开发 升讯威在线客服与营销系统 的过程.本产品已经成熟稳定并投入商用. 在线演示环境:https://kf.shengxunwei.com 注意 ...
- 【Soul网关探秘】http数据同步-Admin通知前处理
引言 本篇开始研究 Soul 网关 http 数据同步,将分为三篇进行分析: <Admin通知前处理> <变更通知机制> <Bootstrap处理变更通知> 希望三 ...