SpringBoot整合Xxl-Job
一、下载Xxl-Job源代码并导入本地并运行
Github地址:
https://github.com/xuxueli/xxl-job
中文文档地址:
https://www.xuxueli.com/xxl-job/
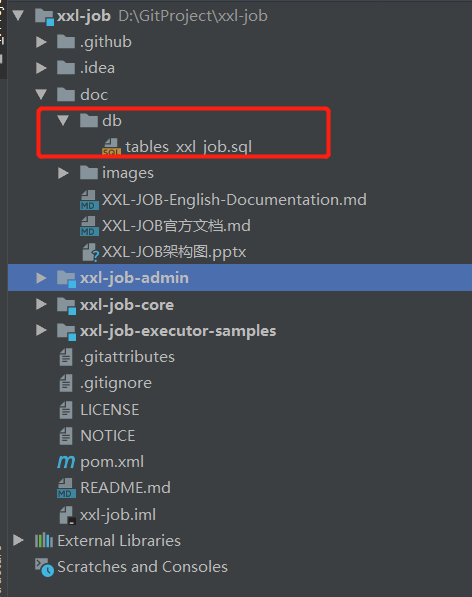
1.使用Idea或Eclipse导入
2.执行sql脚本(红色标记处)
3.运行xxl-job-admin(xxl-job后台管理,主要方便管理各种各样的任务)
注意:在运行之前,需要把2的sql脚本执行完毕,并修改数据库连接池。
正常启动,访问地址为:
http://localhost:8080/xxl-job-admin
效果图,如下所示: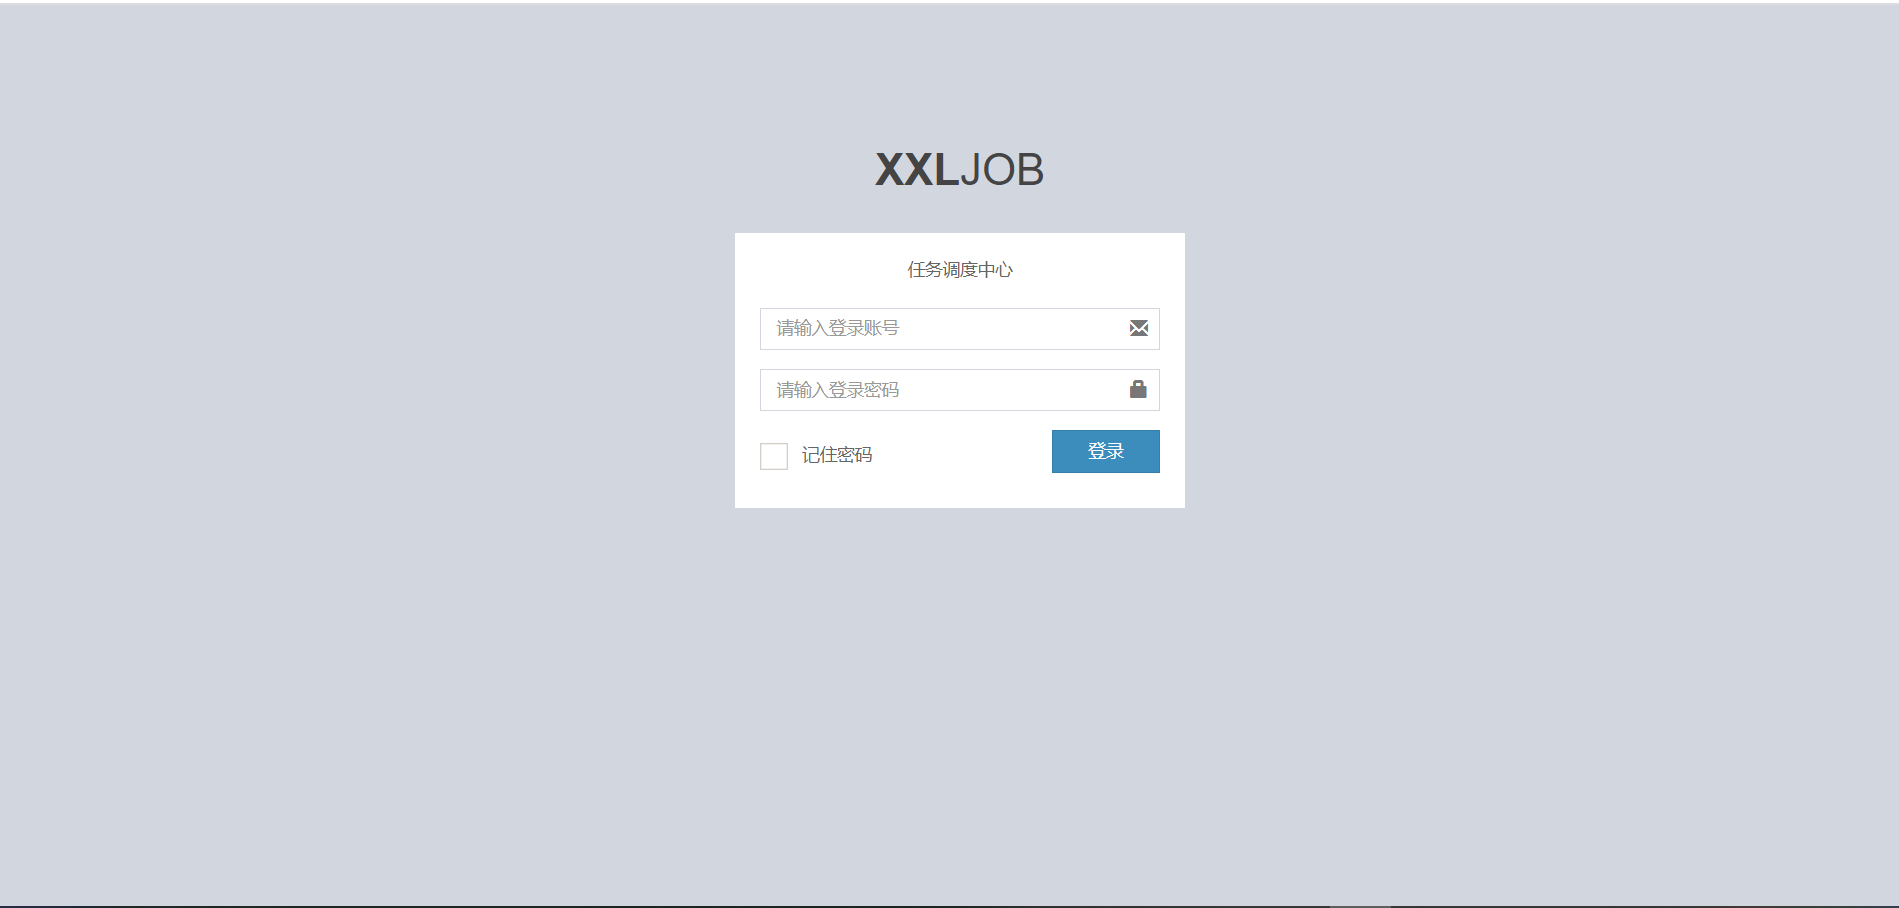
用户名默认为admin
密码为123456
输入后,进入这个界面,如图: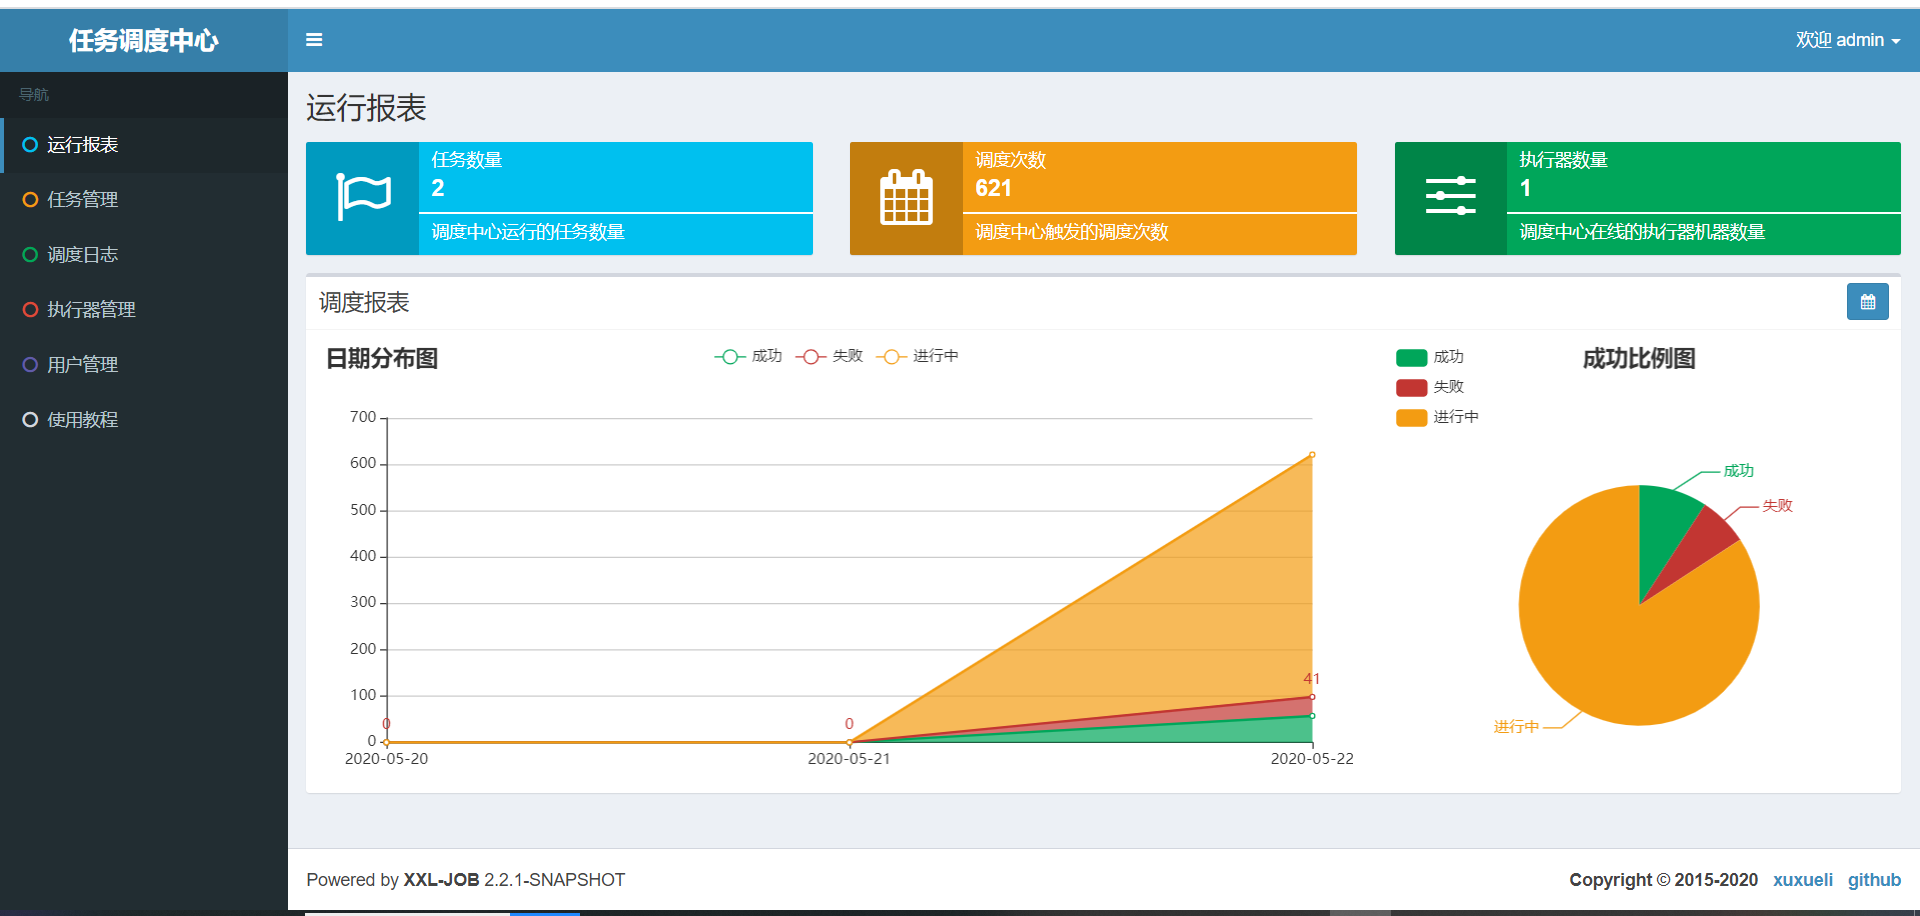
这样就表示Xxl-Job成功运行了。确保运行没问题后,就可以开始下一步。
二、添加执行器(Xxl-Job源代码就一个Example,可以复用过来,你也可以选择自己新建项目,新建项目可以在Xxl-Job基础上,也可以放在其它项目中)
1.新建一个Maven项目,命名为blog-xxl-job。
2.导入Maven依赖
<!-- https://mvnrepository.com/artifact/com.xuxueli/xxl-job-core -->

       <dependency>

           <groupId>com.xuxueli</groupId>

           <artifactId>xxl-job-core</artifactId>

           <version>2.2.0</version>

       </dependency>

       <dependency>

           <groupId>org.springframework.cloud</groupId>

           <artifactId>spring-cloud-starter-netflix-eureka-client</artifactId>

       </dependency>

       <dependency>

           <groupId>org.springframework.boot</groupId>

           <artifactId>spring-boot-starter-web</artifactId>

       </dependency>
3.新建application.yml配置文件并添加如下内容
#eureka

eureka.client.serviceUrl.defaultZone=http://localhost:8761/eureka/

# web port

server.port=8081

# no web

#spring.main.web-environment=false

# log config

logging.config=classpath:logback.xml

### xxl-job admin address list, such as "http://address" or "http://address01,http://address02"

xxl.job.admin.addresses=http://127.0.0.1:8080/xxl-job-admin

### xxl-job, access token

xxl.job.accessToken=

### xxl-job executor appname

xxl.job.executor.appname=blog-xxl-job-executor

### xxl-job executor registry-address: default use address to registry , otherwise use ip:port if address is null

xxl.job.executor.address=

### xxl-job executor server-info

xxl.job.executor.ip=

xxl.job.executor.port=9999

### xxl-job executor log-path

xxl.job.executor.logpath=/data/applogs/xxl-job/jobhandler

### xxl-job executor log-retention-days

xxl.job.executor.logretentiondays=30
可以不用eureka,这里我的项目中用到eureka所以增加该配置。
增加logback.xml配置:
<?xml version="1.0" encoding="UTF-8"?>

<configuration debug="false" scan="true" scanPeriod="1 seconds">

    <contextName>logback</contextName>

    <property name="log.path" value="/data/applogs/xxl-job/xxl-job-executor-sample-springboot.log"/>

    <appender name="console" class="ch.qos.logback.core.ConsoleAppender">

        <encoder>

            <pattern>%d{HH:mm:ss.SSS} %contextName [%thread] %-5level %logger{36} - %msg%n</pattern>

        </encoder>

    </appender>

    <appender name="file" class="ch.qos.logback.core.rolling.RollingFileAppender">

        <file>${log.path}</file>

        <rollingPolicy class="ch.qos.logback.core.rolling.TimeBasedRollingPolicy">

            <fileNamePattern>${log.path}.%d{yyyy-MM-dd}.zip</fileNamePattern>

        </rollingPolicy>

        <encoder>

            <pattern>%date %level [%thread] %logger{36} [%file : %line] %msg%n

            </pattern>

        </encoder>

    </appender>

    <root level="info">

        <appender-ref ref="console"/>

        <appender-ref ref="file"/>

    </root>

</configuration>
4.编写Application类
package com.springcloud.blog.job.execute;

import org.springframework.boot.SpringApplication;

import org.springframework.boot.autoconfigure.SpringBootApplication;

import org.springframework.cloud.client.discovery.EnableDiscoveryClient;

import org.springframework.cloud.netflix.eureka.EnableEurekaClient;

@EnableEurekaClient

@EnableDiscoveryClient

@SpringBootApplication

public class BlogXxlJobExecutorApplication {

    public static void main(String[] args) {

        SpringApplication.run(BlogXxlJobExecutorApplication.class, args);

    }

}
5.编写Job执行器
package com.springcloud.blog.job.execute.jobhandler;

import com.xxl.job.core.biz.model.ReturnT;

import com.xxl.job.core.handler.IJobHandler;

import com.xxl.job.core.handler.annotation.XxlJob;

import com.xxl.job.core.log.XxlJobLogger;

import com.xxl.job.core.util.ShardingUtil;

import org.slf4j.Logger;

import org.slf4j.LoggerFactory;

import org.springframework.stereotype.Component;

import java.io.BufferedInputStream;

import java.io.BufferedReader;

import java.io.DataOutputStream;

import java.io.InputStreamReader;

import java.net.HttpURLConnection;

import java.net.URL;

import java.util.Arrays;

import java.util.concurrent.TimeUnit;

/**

 * XxlJob开发示例(Bean模式)

 * <p>

 * 开发步骤:

 * 1、在Spring Bean实例中,开发Job方法,方式格式要求为 "public ReturnT<String> execute(String param)"

 * 2、为Job方法添加注解 "@XxlJob(value="自定义jobhandler名称", init = "JobHandler初始化方法", destroy = "JobHandler销毁方法")",注解value值对应的是调度中心新建任务的JobHandler属性的值。

 * 3、执行日志:需要通过 "XxlJobLogger.log" 打印执行日志;

 *

 * @author xuxueli 2019-12-11 21:52:51

 */

@Component

public class SampleXxlJob {

    private static Logger logger = LoggerFactory.getLogger(SampleXxlJob.class);

    /**

     * 1、简单任务示例(Bean模式)

     */

    @XxlJob("demoJobHandler")

    public ReturnT<String> demoJobHandler(String param) throws Exception {

        XxlJobLogger.log("XXL-JOB, Hello World.");

        for (int i = 0; i < 5; i++) {

            XxlJobLogger.log("beat at:" + i);

            TimeUnit.SECONDS.sleep(2);

        }

        return ReturnT.SUCCESS;

    }

    /**

     * 2、分片广播任务

     */

    @XxlJob("shardingJobHandler")

    public ReturnT<String> shardingJobHandler(String param) throws Exception {

        // 分片参数

        ShardingUtil.ShardingVO shardingVO = ShardingUtil.getShardingVo();

        XxlJobLogger.log("分片参数:当前分片序号 = {}, 总分片数 = {}", shardingVO.getIndex(), shardingVO.getTotal());

        // 业务逻辑

        for (int i = 0; i < shardingVO.getTotal(); i++) {

            if (i == shardingVO.getIndex()) {

                XxlJobLogger.log("第 {} 片, 命中分片开始处理", i);

            } else {

                XxlJobLogger.log("第 {} 片, 忽略", i);

            }

        }

        return ReturnT.SUCCESS;

    }

    /**

     * 3、命令行任务

     */

    @XxlJob("commandJobHandler")

    public ReturnT<String> commandJobHandler(String param) throws Exception {

        String command = param;

        int exitValue = -1;

        BufferedReader bufferedReader = null;

        try {

            // command process

            Process process = Runtime.getRuntime().exec(command);

            BufferedInputStream bufferedInputStream = new BufferedInputStream(process.getInputStream());

            bufferedReader = new BufferedReader(new InputStreamReader(bufferedInputStream));

            // command log

            String line;

            while ((line = bufferedReader.readLine()) != null) {

                XxlJobLogger.log(line);

            }

            // command exit

            process.waitFor();

            exitValue = process.exitValue();

        } catch (Exception e) {

            XxlJobLogger.log(e);

        } finally {

            if (bufferedReader != null) {

                bufferedReader.close();

            }

        }

        if (exitValue == 0) {

            return IJobHandler.SUCCESS;

        } else {

            return new ReturnT<String>(IJobHandler.FAIL.getCode(), "command exit value(" + exitValue + ") is failed");

        }

    }

    /**

     * 4、跨平台Http任务

     * 参数示例:

     * "url: http://www.baidu.com\n" +

     * "method: get\n" +

     * "data: content\n";

     */

    @XxlJob("httpJobHandler")

    public ReturnT<String> httpJobHandler(String param) throws Exception {

        // param parse

        if (param == null || param.trim().length() == 0) {

            XxlJobLogger.log("param[" + param + "] invalid.");

            return ReturnT.FAIL;

        }

        String[] httpParams = param.split("\n");

        String url = null;

        String method = null;

        String data = null;

        for (String httpParam : httpParams) {

            if (httpParam.startsWith("url:")) {

                url = httpParam.substring(httpParam.indexOf("url:") + 4).trim();

            }

            if (httpParam.startsWith("method:")) {

                method = httpParam.substring(httpParam.indexOf("method:") + 7).trim().toUpperCase();

            }

            if (httpParam.startsWith("data:")) {

                data = httpParam.substring(httpParam.indexOf("data:") + 5).trim();

            }

        }

        // param valid

        if (url == null || url.trim().length() == 0) {

            XxlJobLogger.log("url[" + url + "] invalid.");

            return ReturnT.FAIL;

        }

        if (method == null || !Arrays.asList("GET", "POST").contains(method)) {

            XxlJobLogger.log("method[" + method + "] invalid.");

            return ReturnT.FAIL;

        }

        // request

        HttpURLConnection connection = null;

        BufferedReader bufferedReader = null;

        try {

            // connection

            URL realUrl = new URL(url);

            connection = (HttpURLConnection) realUrl.openConnection();

            // connection setting

            connection.setRequestMethod(method);

            connection.setDoOutput(true);

            connection.setDoInput(true);

            connection.setUseCaches(false);

            connection.setReadTimeout(5 * 1000);

            connection.setConnectTimeout(3 * 1000);

            connection.setRequestProperty("connection", "Keep-Alive");

            connection.setRequestProperty("Content-Type", "application/json;charset=UTF-8");

            connection.setRequestProperty("Accept-Charset", "application/json;charset=UTF-8");

            // do connection

            connection.connect();

            // data

            if (data != null && data.trim().length() > 0) {

                DataOutputStream dataOutputStream = new DataOutputStream(connection.getOutputStream());

                dataOutputStream.write(data.getBytes("UTF-8"));

                dataOutputStream.flush();

                dataOutputStream.close();

            }

            // valid StatusCode

            int statusCode = connection.getResponseCode();

            if (statusCode != 200) {

                throw new RuntimeException("Http Request StatusCode(" + statusCode + ") Invalid.");

            }

            // result

            bufferedReader = new BufferedReader(new InputStreamReader(connection.getInputStream(), "UTF-8"));

            StringBuilder result = new StringBuilder();

            String line;

            while ((line = bufferedReader.readLine()) != null) {

                result.append(line);

            }

            String responseMsg = result.toString();

            XxlJobLogger.log(responseMsg);

            return ReturnT.SUCCESS;

        } catch (Exception e) {

            XxlJobLogger.log(e);

            return ReturnT.FAIL;

        } finally {

            try {

                if (bufferedReader != null) {

                    bufferedReader.close();

                }

                if (connection != null) {

                    connection.disconnect();

                }

            } catch (Exception e2) {

                XxlJobLogger.log(e2);

            }

        }

    }

    /**

     * 5、生命周期任务示例:任务初始化与销毁时,支持自定义相关逻辑;

     */

    @XxlJob(value = "demoJobHandler2", init = "init", destroy = "destroy")

    public ReturnT<String> demoJobHandler2(String param) throws Exception {

        XxlJobLogger.log("XXL-JOB, Hello World.");

        return ReturnT.SUCCESS;

    }

    public void init() {

        logger.info("init");

    }

    public void destroy() {

        logger.info("destory");

    }

}
6.增加XxlJobConfig配置类
package com.springcloud.blog.job.execute.core.config;

import com.xxl.job.core.executor.impl.XxlJobSpringExecutor;

import org.slf4j.Logger;

import org.slf4j.LoggerFactory;

import org.springframework.beans.factory.annotation.Value;

import org.springframework.context.annotation.Bean;

import org.springframework.context.annotation.Configuration;

@Configuration

public class XxlJobConfig {

    private Logger logger = LoggerFactory.getLogger(XxlJobConfig.class);

    @Value("${xxl.job.admin.addresses}")

    private String adminAddresses;

    @Value("${xxl.job.accessToken}")

    private String accessToken;

    @Value("${xxl.job.executor.appname}")

    private String appname;

    @Value("${xxl.job.executor.address}")

    private String address;

    @Value("${xxl.job.executor.ip}")

    private String ip;

    @Value("${xxl.job.executor.port}")

    private int port;

    @Value("${xxl.job.executor.logpath}")

    private String logPath;

    @Value("${xxl.job.executor.logretentiondays}")

    private int logRetentionDays;

    @Bean

    public XxlJobSpringExecutor xxlJobExecutor() {

        logger.info(">>>>>>>>>>> xxl-job config init.");

        XxlJobSpringExecutor xxlJobSpringExecutor = new XxlJobSpringExecutor();

        xxlJobSpringExecutor.setAdminAddresses(adminAddresses);

        xxlJobSpringExecutor.setAppname(appname);

        xxlJobSpringExecutor.setAddress(address);

        xxlJobSpringExecutor.setIp(ip);

        xxlJobSpringExecutor.setPort(port);

        xxlJobSpringExecutor.setAccessToken(accessToken);

        xxlJobSpringExecutor.setLogPath(logPath);

        xxlJobSpringExecutor.setLogRetentionDays(logRetentionDays);

        return xxlJobSpringExecutor;

    }

}
三、结合Xxl-Job后台系统增加定时任务
1.配置执行器
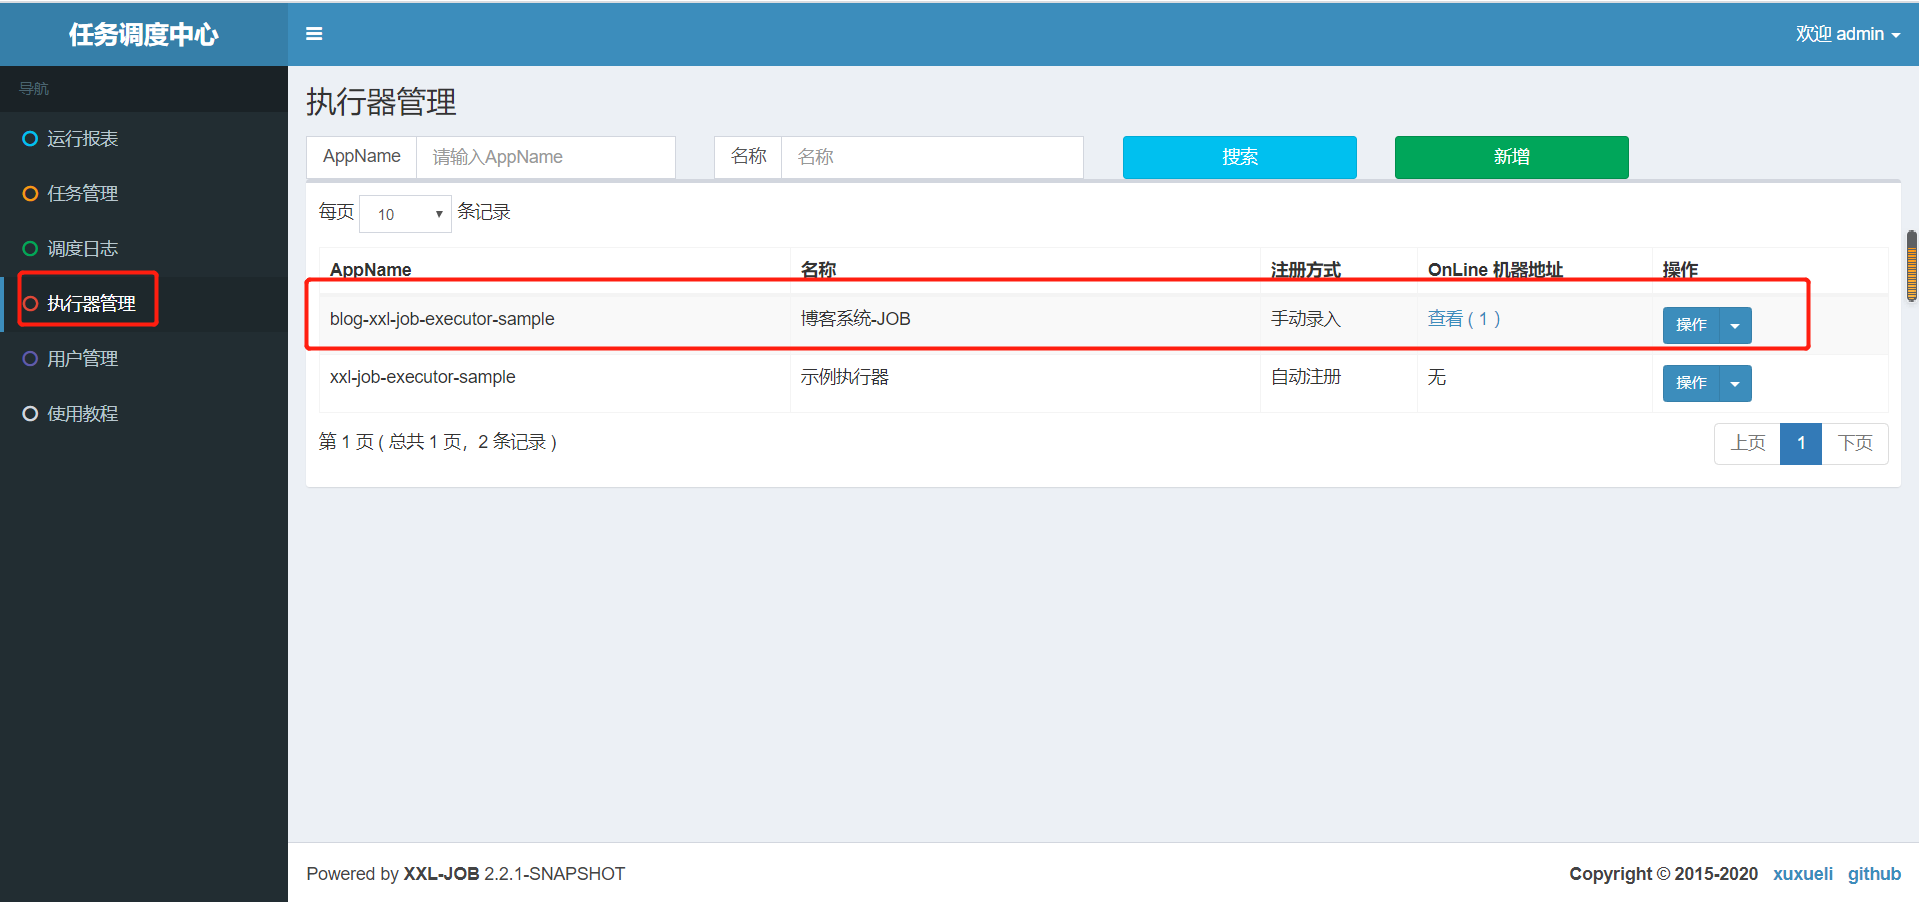
执行器地址为(与blog-xxl-job中application.yml配置文件里的执行器地址需要保持一致,否则会注册失败,导致任务执行不了: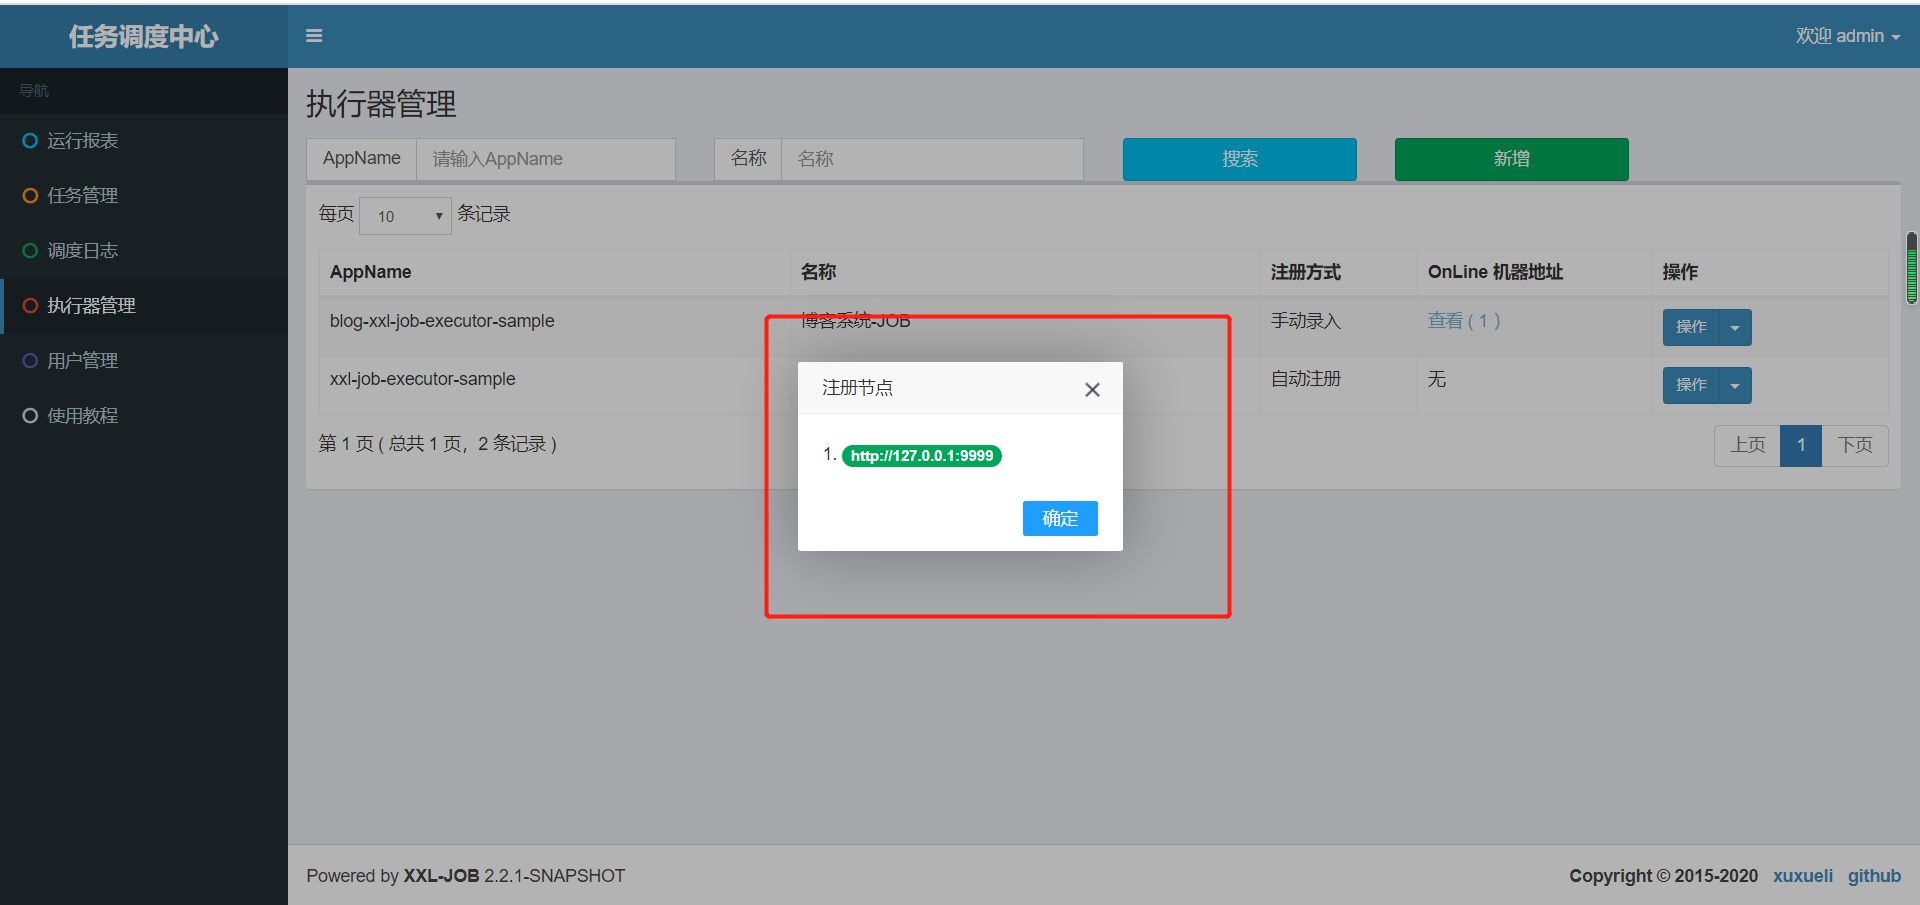
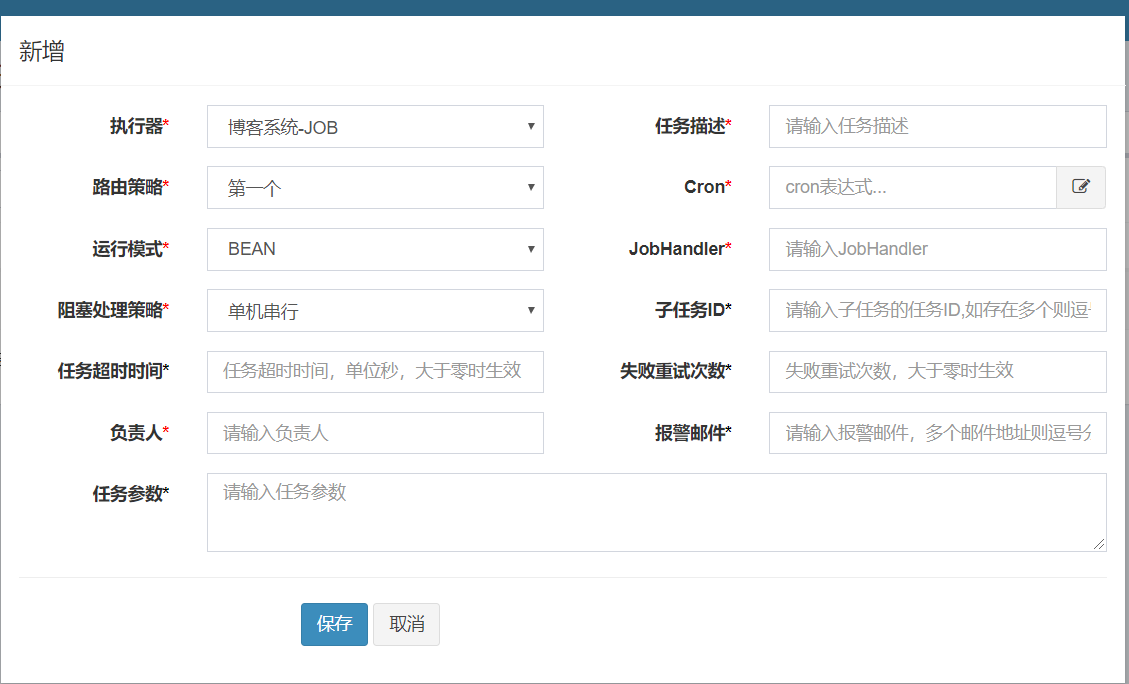
2.添加任务
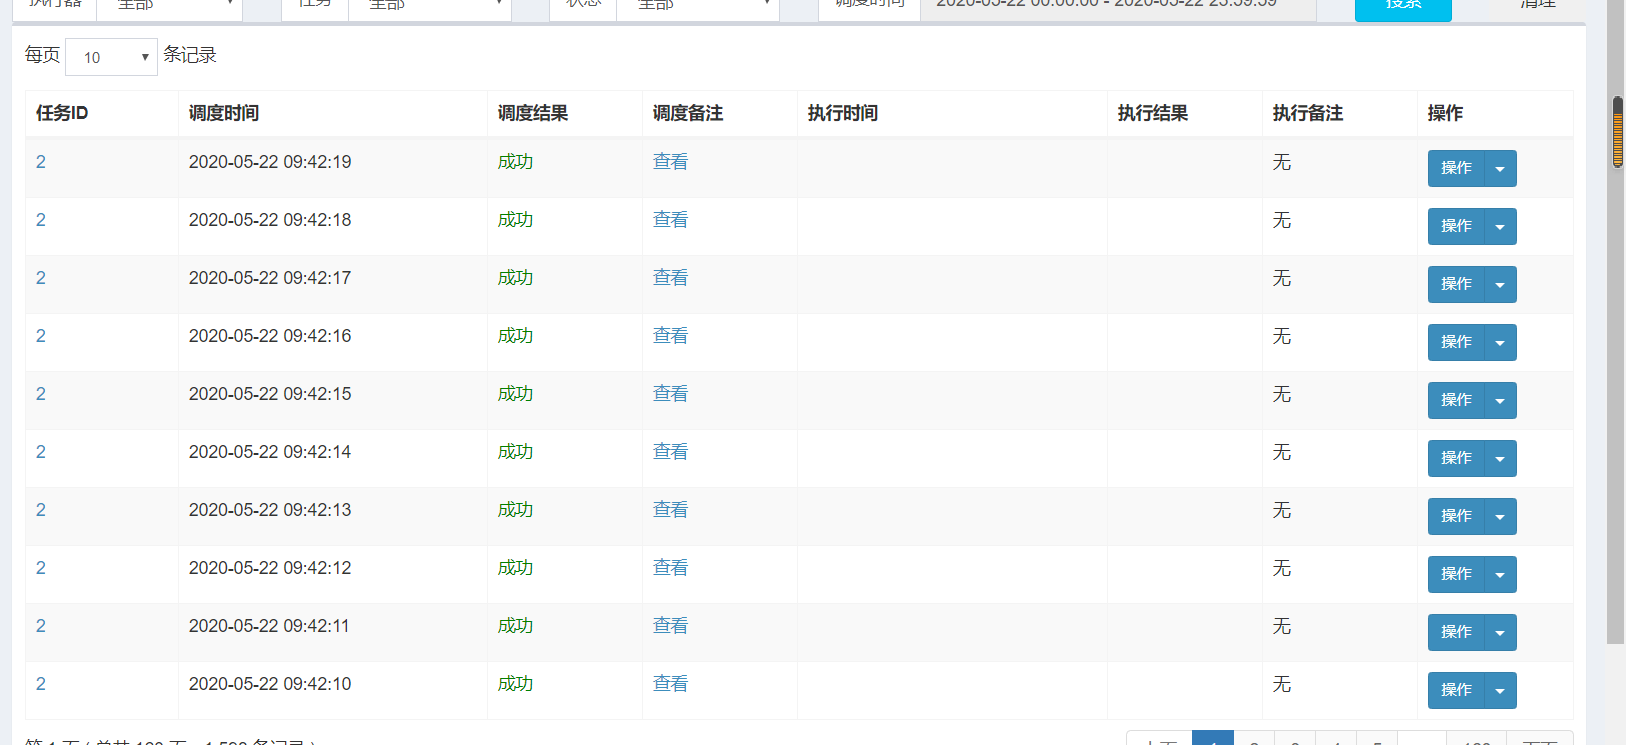
3.任务执行成功的标志
四、为什么选择Xxl-Job
当初选择使用Xxl-Job有这么几个原因:
第一、团队里有好几个人上一家公司或上上家公司用过。
第二、这个生态比较丰富且开源。
第三、确实非常容易上手且轻量化(轻量化的一个体现就是非侵入式)
SpringBoot整合Xxl-Job的更多相关文章
- springboot整合xxl-mq学习笔记
首先xxl-mq是大神xuxueli开发的一个消息中间件框架: 与springboot整合过程: <?xml version="1.0" encoding="UTF ...
- springboot整合xxl-job分布式定时任务【图文完整版】
一.前言 定时任务有很多种,有一些大的框架也有一些简单的实现. 比如常见的: JDK的Timer和TimerTask Quartz异步任务调度框架 分布式定时任务XXL-JOB Spring Task ...
- spring-boot整合mybatis(1)
sprig-boot是一个微服务架构,加快了spring工程快速开发,以及简便了配置.接下来开始spring-boot与mybatis的整合. 1.创建一个maven工程命名为spring-boot- ...
- SpringBoot整合Mybatis之项目结构、数据源
已经有好些日子没有总结了,不是变懒了,而是我一直在奋力学习springboot的路上,现在也算是完成了第一阶段的学习,今天给各位总结总结. 之前在网上找过不少关于springboot的教程,都是一些比 ...
- springboot整合mq接收消息队列
继上篇springboot整合mq发送消息队列 本篇主要在上篇基础上进行activiemq消息队列的接收springboot整合mq发送消息队列 第一步:新建marven项目,配置pom文件 < ...
- springboot整合mybaits注解开发
springboot整合mybaits注解开发时,返回json或者map对象时,如果一个字段的value为空,需要更改springboot的配置文件 mybatis: configuration: c ...
- SpringBoot整合Redis、ApachSolr和SpringSession
SpringBoot整合Redis.ApachSolr和SpringSession 一.简介 SpringBoot自从问世以来,以其方便的配置受到了广大开发者的青睐.它提供了各种starter简化很多 ...
- SpringBoot整合ElasticSearch实现多版本的兼容
前言 在上一篇学习SpringBoot中,整合了Mybatis.Druid和PageHelper并实现了多数据源的操作.本篇主要是介绍和使用目前最火的搜索引擎ElastiSearch,并和Spring ...
- SpringBoot整合Kafka和Storm
前言 本篇文章主要介绍的是SpringBoot整合kafka和storm以及在这过程遇到的一些问题和解决方案. kafka和storm的相关知识 如果你对kafka和storm熟悉的话,这一段可以直接 ...
- SpringBoot整合SpringCloud搭建分布式应用
什么是SpringCloud? SpringCloud是一个分布式的整体解决方案.SpringCloud为开发者提供了在分布式系统中快速构建的工具,使用SpringCloud可以快速的启动服务或构建应 ...
随机推荐
- 如何使用 Gin 和 Gorm 搭建一个简单的 API 服务 (二)
创建 API 我们之前已经跑过 Gin 框架的代码,现在是时候加些功能进去了. 读取全部信息 我们先从"增删改查"中的"查"入手,查询我们之前添加的信息.我接下来要删除几行代码,并把 Gin ...
- Spring之IOC/DI(反转控制/依赖注入)_入门Demo
在平时的java应用开发中,我们要实现某一个功能或者说是完成某个业务逻辑时至少需要两个或以上的对象来协作完成,在没有使用Spring的时候,每个对象在需要使用他的合作对象时,自己均要使用像new ob ...
- PS编辑工具
3.1PS污点修复 (1)快捷键:J. (2)中括号可以改变笔触的大小,前中括号减小笔触,后中括号增加笔触. (3)可以用选区把需要修复的地方框选上,再进行修复,这样不会影响到未选区域. 3.2PS修 ...
- 枚举 switch case 标签必须为枚举常量的非限定名称
枚举 switch case 标签必须为枚举常量的非限定名称 错误描述: Error:(63, 24) 错误: 枚举 switch case 标签必须为枚举常量的非限定名称. 解决思路: switch ...
- 解放双手,不写SQL!一个开源mybatis神器
什么是通用 Mapper? 它是一个可以方便的使用 Mybatis 进行单表的增删改查优秀开源产品.它使用拦截器来实现具体的执行 Sql,完全使用原生的 Mybatis 进行操作.在 Github 上 ...
- Kubernetes 使用 Ingress 实现灰度发布功能
使用 Ingress 实现灰度发布 一.Canary 规则说明 Ingress-Nginx 是一个K8S ingress工具,支持配置 Ingress Annotations 来实现不同场景下的灰度发 ...
- eclipse之SSH配置struts2【一】 (使用版本 2.3.24.1)
eclipse创建Dynamic web project,勾选生成web.xml,创建index.jsp页面,tomcat部署能正常运行.进行下一步struts配置. web.xml中添加配置,配置在 ...
- 合适的LoRa网关应该怎么选择
LoRa网关是什么 LoRa网关有时也被称之为lora基站或者lora集中器,它在lora星形组网中处于核心位置,是数据终端和服务器之间的一个信息桥梁.LoRa网关使用的是不同扩频因子,因为不同的扩频 ...
- 工业4G DTU是什么和普通DTU有什么不同
4G DTU作为一种物联网远程数据传输设备,现今在世界范围内都有非常广泛的应用,根据应用场景的不同,对4G DTU设备支持的功能,硬件设施的要求都有不同,特别是在工业现场,对4G DTU设备的要求非常 ...
- 监控制图OxyPlot组件的下载与安装
1.在工具(T)-NuGet包管理器(N)-管理解决方案的NuGet程序包(N),打开组件管理界面 2.切换到浏览窗口,安装以下三个窗口组件即可 3.OxyPlot文档手册 https://oxypl ...