ffmpeg 使用 gdb 调试相关技巧
本文说明了,在ffmpeg二次开发或调用库的过程,如何借助于ffmpeg源码进行调试。
注:ffmpeg版本是4.0。
1. 编写代码
编写将pcm数据转换为mp2的代码
pcm_to_mp2.c
#include <libavformat/avformat.h>

#include <libavcodec/avcodec.h>

#include <libswresample/swresample.h>

#include <stdio.h>

#include <stdbool.h>

SwrContext *g_swr_ctx = NULL;

int flush_encoder(AVFormatContext *fmt_ctx, unsigned int stream_index)

{

    int ret = 0;

    int got_frame = 0;

    AVPacket enc_pkt;

    if(!(fmt_ctx->streams[stream_index]->codec->codec->capabilities &

                CODEC_CAP_DELAY))

    {

        return 0;

    }

    while(1)

    {

        enc_pkt.data = NULL;

        enc_pkt.size = 0;

        av_init_packet(&enc_pkt);

        ret = avcodec_encode_audio2(fmt_ctx->streams[stream_index]->codec, &enc_pkt, NULL, &got_frame);

        if(ret < 0)

        {

            break;

        }

        if(!got_frame)

        {

            ret = 0;

            break;

        }

        ret = av_write_frame(fmt_ctx, &enc_pkt);

        if(ret < 0)

        {

            break;

        }

    }

    return ret;

}

void usage(void)

{

    printf("./aac input_file output_file.mp2\n");

}

int main(int argc, char *argv[])

{

    if(argc != 3)

    {

        usage();

        return -1;

    }

    char *input_file = argv[1];

    char *output_file = argv[2];

    AVFormatContext *pFormatCtx = NULL;

    AVOutputFormat *ofmt = NULL;

    AVStream *audio_stream = NULL;

    AVCodecContext *pCodecCtx = NULL;

    AVCodec *pCodec = NULL;

    uint8_t *frame_buf = NULL;

    AVFrame *pFrame = NULL;

    AVPacket pkt;

    int got_frame = 0;

    int ret = 0;

    int size = 0;

    int i = 0;

    FILE *fp = fopen(input_file, "rb");

    av_register_all();

    avformat_alloc_output_context2(&pFormatCtx, NULL, NULL, output_file);

    ofmt = pFormatCtx->oformat;

    if(avio_open(&pFormatCtx->pb, output_file, AVIO_FLAG_READ_WRITE) < 0)

    {

        printf("Error: call avio_open failed!\n");

        return -1;

    }

    audio_stream = avformat_new_stream(pFormatCtx, 0);

    if(!audio_stream)

    {

        return -1;

    }

    //初始化编码器

    pCodecCtx = audio_stream->codec;

    pCodecCtx->codec_id = ofmt->audio_codec;

    pCodecCtx->codec_type = AVMEDIA_TYPE_AUDIO;

    pCodecCtx->sample_fmt = AV_SAMPLE_FMT_S16;

    pCodecCtx->channel_layout = AV_CH_LAYOUT_STEREO;

    pCodecCtx->channels = av_get_channel_layout_nb_channels(pCodecCtx->channel_layout);

    pCodecCtx->sample_rate = 44100;

    pCodecCtx->bit_rate = 192000;

    pCodecCtx->frame_size = 1152;

    AVFrame *src_frame = NULL;

    AVFrame *dst_frame = NULL;

    src_frame = av_frame_alloc();

    src_frame->nb_samples = 1152;

    src_frame->sample_rate = 44100;

    src_frame->format= AV_SAMPLE_FMT_S16;

    src_frame->channel_layout = AV_CH_LAYOUT_STEREO;

    src_frame->channels = av_get_channel_layout_nb_channels(src_frame->channel_layout);

    pCodec = avcodec_find_encoder(pCodecCtx->codec_id);

    if(!pCodec)

    {

        printf("Error: call avcodec_find_encoder failed!\n");

        return -1;

    }

    if(avcodec_open2(pCodecCtx, pCodec, NULL) < 0)

    {

        printf("Error: call avcodec_open2 failed!\n");

        return -1;

    }

    int sr_size = 0;

    sr_size = av_samples_get_buffer_size(NULL, src_frame->channels, src_frame->nb_samples, src_frame->format, 1);

    frame_buf = (uint8_t *)av_malloc(sr_size);

    if(!frame_buf)

    {

        printf("Error: call av_malloc failed, sr_size = %d\n", sr_size);

        return -1;

    }

    if(av_sample_fmt_is_planar(src_frame->format))

    {

        avcodec_fill_audio_frame(src_frame, src_frame->channels, src_frame->format, (const uint8_t *)frame_buf, sr_size * src_frame->channels, 1 );

    }

    else

    {

        avcodec_fill_audio_frame(src_frame, src_frame->channels, src_frame->format, (const uint8_t *)frame_buf, sr_size, 0 );

    }

    //Write Header

    if(avformat_write_header(pFormatCtx,NULL) < 0)

    {

        printf("Error: call avformat_write_header..\n");

        return -1;

    }

    AVPacket *packet = (AVPacket *)av_malloc(sizeof(AVPacket));

    av_init_packet(packet);

    av_dump_format(pFormatCtx, 0, output_file, 1);

    src_frame->pts = 0;

    while(fread(frame_buf, 1, sr_size, fp) > 0)

    {

        got_frame = 0;

        ret = avcodec_encode_audio2(pCodecCtx, packet, src_frame, &got_frame);

        if(ret < 0)

        {

            printf("Error: call avcodec_encode_audio2\n");

            return -1;

        }

        i++;

        src_frame->pts = i * 100;

        if(1 == got_frame)

        {

            packet->stream_index = audio_stream->index;

            ret = av_write_frame(pFormatCtx, packet);

            if(ret < 0)

            {

                printf("Error: call av_write_frame..\n");

                return -1;

            }

            av_free_packet(packet);

        }

    }

    //flush encoder

    ret = flush_encoder(pFormatCtx, 0);

    if(ret < 0)

    {

        printf("Error: call flush_encoder failed!\n");

        return -1;

    }

    if(av_write_trailer(pFormatCtx) < 0)

    {

        printf("Error: call av_write_trailer..\n");

        return -1;

    }

    if(audio_stream)

    {

        avcodec_close(audio_stream->codec);

        av_free(src_frame);

        av_free(frame_buf);

    }

    avio_close(pFormatCtx->pb);

    avformat_free_context(pFormatCtx);

    av_free(packet);

    fclose(fp);

    printf("Encode Audio End...\n");

    return 0;

}
2. 编译ffmpeg源码
$ ./configure --enable-static --disable-shared --enable-debug --disable-optimizations --disable-asm --disable-stripping --enable-doc

$ make -j 4
3. 将代码放置在examples下
将pcm_to_mp2.c拷贝到 doc/examples目录下,该目录下都是ffmpeg的例子程序。
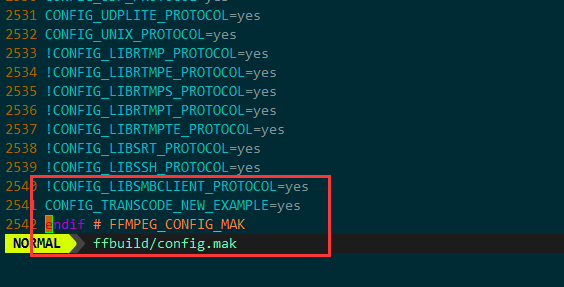
4. 添加编译配置
修改doc/Makefile文件添加pcm_to_mp2的编译项目。

修改ffbuild/config.mak文件,
添加CONFIG_PCM_TO_MP2_EXAMPLE=yes宏。
5. 编译
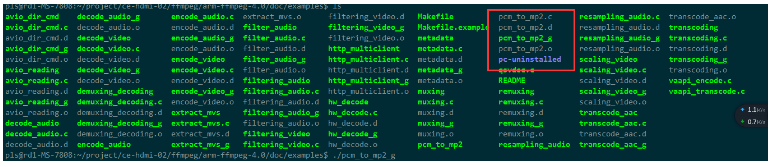
ffmpeg源码根目录下,执行make examples
这样就在doc/examples目录下生成了pcm_to_mp2的可执行程序。
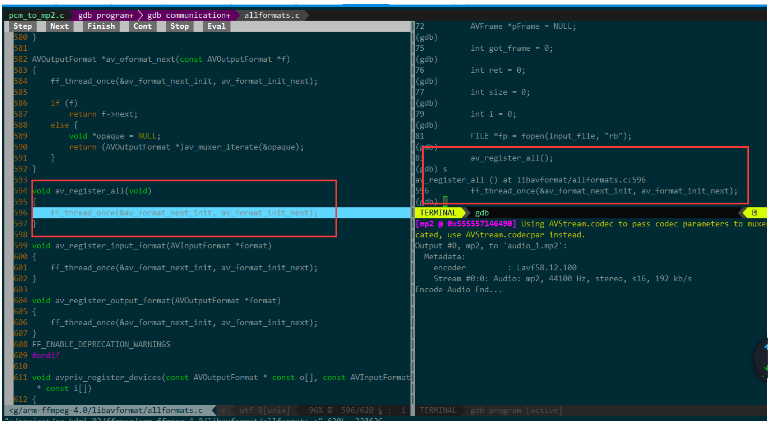
6. gdb调试
ffmpeg 使用 gdb 调试相关技巧的更多相关文章
- Linux下编译ffmpeg并用GDB调试
1.在Ubuntu界面上调处命令行界面,最方便的方式是使用快捷键Ctrl+Alt+T. 2.安装SDL SDL是一个开源的多媒体开发库,可以设置图像和视频的绘制等操作.如果不安装SDL,FFMPEG将 ...
- gdb调试相关
GDB调试及其调试脚本的使用返回脚本百事通一.GDB调试 1.1. GDB 概述 GDB是GNU开源组织发布的一个强大的UNIX下的程序调试工具.或许,各位比较喜欢那种图形界面方式的,像VC.BCB等 ...
- gdb调试小技巧
1.进入gdb,需要源码,然后gdb+可执行文件,如果要看代码一起的就gdb+可执行文件+tui 2.设置参数 set args +参数 3.设置断点,可以b +行数或者b+函数名字 4.r就是一直跑 ...
- GDB调试-从入门到实践
你好,我是雨乐! 在上篇文章中,我们分析了线上coredump产生的原因,其中用到了coredump分析工具gdb,这几天一直有读者在问,能不能写一篇关于gdb调试方面的文章,今天借助此文,分享一些工 ...
- roslaunch & gdb 调试指南(待补充)
1. 安装xterm sudo apt-get install xterm 2. 在launch文件中添加如下内容: <node name="navigation" pkg= ...
- gdb调试器在windows下的相关内容
1.gdb调试器在visual studio或dev c++中也有类似的调试图形化可视界面,但是gdb不同的是它是由命令行组成,他的界面对于习惯图形化可视界面的用户来说一时间会不知所措 2.通过gcc ...
- gdb调试运行时的程序小技巧
使用gdb调试运行时的程序小技巧 标签: 未分类 gdb pstack | 发表时间:2012-10-15 04:32 | 作者:士豪 分享到: 出处:http://rdc.taobao.com/bl ...
- ffmpeg调试相关知识点
1.若要调试FFMPEG,在编译时应当在configure时,加上 --enable-debug --disable-asm 注:在调试x264时就应该加上这两个配置选项,方能调试 2.make in ...
- GDB调试技巧:总结篇
目录 一 写在开头 1.1 本文内容 二 学习资料 三 常用命令 四 调试技巧 注:原创不易,转载请务必注明原作者和出处,感谢支持! 一 写在开头 1.1 本文内容 总结GDB调试的一些常用命令和调试 ...
随机推荐
- Java集合--Iterator和Enumeration比较
转载请注明出处:http://www.cnblogs.com/skywang12345/admin/EditPosts.aspx?postid=3311275 第1部分 Iterator和Enumer ...
- Vulkan 02
https://www.imgtec.com/blog/vulkan-high-efficiency-on-mobile/ vulkan性能上的优势 降低CPU开销 drawcall上限数量增加 Ho ...
- How to find First Non-Repeated Character from String
You need to write a function, which will accept a String and return first non-repeated character, fo ...
- 10 | MySQL为什么有时候会选错索引?
前面我们介绍过索引,你已经知道了在MySQL中一张表其实是可以支持多个索引的.但是,你写SQL语句的时候,并没有主动指定使用哪个索引.也就是说,使用哪个索引是由MySQL来确定的. 不知道你有没有碰到 ...
- 「51Nod 1601」完全图的最小生成树计数 「Trie」
题意 给定\(n\)个带权点,第\(i\)个点的权值为\(w_i\),任意两点间都有边,边权为两端点权的异或值,求最小生成树边权和,以及方案数\(\bmod 10^9 + 7\) \(n \leq 1 ...
- 安装包设计-------卸载(MFC)---------知识总结
1.删除目录及其下所有文件 bool MyDeleteFile(CString Path) { // SHFILEOPSTRUCT FileOp={0}; // FileOp.fFlags = FOF ...
- 【线性代数】5-3:克莱姆法则,逆和体积(Cramer's Rule,Inverses,and Volumes)
title: [线性代数]5-3:克莱姆法则,逆和体积(Cramer's Rule,Inverses,and Volumes) categories: Mathematic Linear Algebr ...
- Python 中操作 MySQL
引入模块 在py文件中引入pymysql模块 from pymysql import * Connection 对象 用于建立与数据库的连接 创建对象:调用connect()方法 conn=conne ...
- 经典算法:n个人围成一圈,报m的离开,最后剩下谁?
public int remainPersonNumber(int n, int m) { //输入不合法 if(n < 1 || m < 1) return -1; //初始化,存入Li ...
- 笔记七(编写第一个UEFI程序)
搭建好uefi开发环境之后,在MyWorkspace文件夹中建立一个文件夹ExamplePkg; ,然后在ExamplePkg文件夹中创建HelloWorld文件夹,Include文件夹,Exampl ...