
MonoRail学习:可重复组件ViewComponents的使用
在MonoRail中我们可以定义一些可重用的组件,在其他需要使用的页面引入这个组件就可以了。有点相当于.NET中的自定义控件,可以节约代码,方便开发,提高重用性。
在MonoRail中把这一功能叫做ViewComponent,下面就来具体看看它的使用方法:
ViewComponent可以使用现成的view,可以给父view发送数据,也支持参数输入和内部多节的方式
1、生成ViewComponent类:
要生成自己的ViewComponet必须从抽象类ViewComponent继承,继承后有三个方法可以被覆盖:
Initialize:初始化,可以在这个方法中接收传递的参数
Render:渲染实际的显示内容
SupportsSection:指定这个组件可以支持哪些子节点
最简单的一个ViewComponent:
 using Castle.MonoRail.Framework;public class HeaderComponent : ViewComponent
 {
{ }
}当使用这个组件时会直接渲染views下的components/headercomponent/default.vm文件
当然和Controller一样,我们也可以指定一个渲染的vm文件:
using Castle.MonoRail.Framework;

public class HeaderComponent : ViewComponent

{

    public override void Render()

    {

        RenderView("otherview");

    }

}
这样的话就会使用views下的components/headercomponent/otherview.vm文件
2、使用ViewComponent组件
生成组件之后,接下来就要看看如何使用它。主要的使用方式有两种:普通方式和嵌套内容的方式,使用时都是直接把类名作为组件名称来使用的
a、普通方式:
#component(HeaderComponent)使用component关键字来使用
b、嵌套内容的方式:
C#代码:
   public class BlockViewComponent2 : ViewComponent

    {

        public BlockViewComponent2()

        {

        }

        public override void Render()

        {

            Context.ContextVars["it"] = "GSpring";

            Context.RenderBody();

        }

    }
vm代码:
#blockcomponent(BlockViewComponent2)inner content $it#end调用之后,显示在页面上的内容就是:
inner content GSpring嵌套方式主要就是使用关键字:blockcomponent
Context.RenderBody()方法是用来渲染内容的,可以同时调用多次,那么所包含的内容就会显示多次
3、使用参数
正如.NET的自定义控件一样,MonoRail中的自定义控件也可以从外部接收一些参数,比如显示的颜色、大小、其他参数等。
使用ComponentParams属性在Initialize方法中来接收:
using Castle.MonoRail.Framework;

public class TableComponent : ViewComponent

{

    private ICollection elements;

    private object border;

    private string style;

    private object cellpadding;

    private object cellspacing;

    public override void Initialize()

    {

        elements = (ICollection) ComponentParams["elements"];

        border = ComponentParams["border"];

        style = (String) ComponentParams["style"];

        cellpadding = ComponentParams["cellpadding"];

        cellspacing = ComponentParams["cellspacing"];

        base.Initialize();

    }
调用的时候,就可以写成这样:
#blockcomponent(TableComponent with "elements=$items" "border=0" "style=border: 1px solid black;" "cellpadding=0" "cellspacing=2") #end
#end或:
#component(TableComponent with "elements=$items" "border=0" "style=border: 1px solid black;" "cellpadding=0" "cellspacing=2")4、嵌套子节点的使用
在ViewComponet中还可以定义多个子节点,在一些复杂的情况下比较方便,看下面的一个实例:
Contoller代码:
        public void Default()

        {

            ArrayList items = new ArrayList();

            items.Add("项目1");

            items.Add("项目2");

            items.Add("项目3");

            PropertyBag.Add("items", items);

        }
ViewCompoent代码:
 public class TableComponent : ViewComponent

    {

        private ICollection elements;

        private object border;

        private string style;

        private object cellpadding;

        private object cellspacing;

        public override void Initialize()

        {

            elements = (ICollection)ComponentParams["elements"];

            border = ComponentParams["border"];

            style = (String)ComponentParams["style"];

            cellpadding = ComponentParams["cellpadding"];

            cellspacing = ComponentParams["cellspacing"];

            base.Initialize();

        }

        public override void Render()

        {

            RenderText(

                String.Format("<table border=\"{0}\" style=\"{1}\" cellpadding=\"{2}\" cellspacing=\"{3}\">",

                              border, style, cellpadding, cellspacing));

            if (Context.HasSection("colheaders"))

            {

                Context.RenderSection("colheaders");

            }

            if (elements != null)

            {

                int index = 0;

                foreach (object item in elements)

                {

                    PropertyBag["index"] = ++index;

                    PropertyBag["item"] = item;

                    if (Context.HasSection("altitem") && index % 2 != 0)

                    {

                        Context.RenderSection("altitem");

                    }

                    else

                    {

                        Context.RenderSection("item");

                    }

                }

            }

            RenderText("</table>");

        }

        public override bool SupportsSection(string name)

        {

            return name == "colheaders" || name == "item" || name == "altitem";

        }

    }
vm代码:
#blockcomponent(TableComponent with "elements=$items")

#colheaders

<tr>

    <th> </th>

    <th>Element</th>

</tr>

#end

#item

<tr>

    <td>$index</td>

    <td>$item</td>

</tr>

#end

#altitem

<tr>

    <td style=" padding: 0px; color: rgb(0, 0, 255);">>$index</td>

    <td style=" padding: 0px; color: rgb(0, 0, 255);">>$item</td>

</tr>

#end

#end
显示的效果,如下图所示: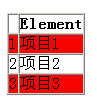
MonoRail学习:可重复组件ViewComponents的使用的更多相关文章
- 数百个 HTML5 例子学习 HT 图形组件 – 3D建模篇
http://www.hightopo.com/demo/pipeline/index.html <数百个 HTML5 例子学习 HT 图形组件 – WebGL 3D 篇>里提到 HT 很 ...
- 数百个 HTML5 例子学习 HT 图形组件 – 3D 建模篇
http://www.hightopo.com/demo/pipeline/index.html <数百个 HTML5 例子学习 HT 图形组件 – WebGL 3D 篇>里提到 HT 很 ...
- 数百个 HTML5 例子学习 HT 图形组件 – WebGL 3D 篇
<数百个 HTML5 例子学习 HT 图形组件 – 拓扑图篇>一文让读者了解了 HT的 2D 拓扑图组件使用,本文将对 HT 的 3D 功能做个综合性的介绍,以便初学者可快速上手使用 HT ...
- 数百个 HTML5 例子学习 HT 图形组件 – 拓扑图篇
HT 是啥:Everything you need to create cutting-edge 2D and 3D visualization. 这口号是当年心目中的产品方向,接着就朝这个方向慢慢打 ...
- HTML5 例子学习 HT 图形组件
HTML5 例子学习 HT 图形组件 HT 是啥:Everything you need to create cutting-edge 2D and 3D visualization. 这口号是当年心 ...
- vue学习笔记(八)组件校验&通信
前言 在上一章博客的内容中vue学习笔记(七)组件我们初步的认识了组件,并学会了如何定义局部组件和全局组件,上一篇内容仅仅只是对组件一个简单的入门,并没有深入的了解组件当中的其它机制,本篇博客将会带大 ...
- vue学习笔记(七)组件
前言 在前面vue的一些博客中,我们几乎将vue的基础差不多学习完了,而从本篇博客开始将会进入到vue的另一个阶段性学习,本篇博客的内容在以后的vue项目中占很大的比重,所以小伙伴们需要认真学习,本篇 ...
- 【Flutter学习】基本组件之图片组件Image
一,概述 Image(图片组件)是显示图像的组件,一个显示图片的widget,支持图像格式:JPEG,PNG,GIF,动画GIF,WebP,动画WebP,BMP和WBMP. Image组件有多种构造函 ...
- bootstrap学习笔记--bootstrap组件
前面已经学习了bootstrap环境搭建以及基本布局方面的知识,下面将学习下关于bootstrap的相关组件,知识点有点多. 关于bootstrap组件知识点目录: Bootstrap--代码显示 B ...
随机推荐
- new Date()时间对象
<!DOCTYPE html><html lang="zh-CN"><head> <meta charset="UTF-8&qu ...
- iOS开发之.pch文件初识
pch全称是“precompiled header”,即预编译头文件,自Xcode6诞生之日起,便在Supporting Files文件下消失多年.说起苹果对pch的爱恨情仇,其分析pch的作用便不言 ...
- VirtualBox的网络配置,Host Only+NAT方式 (zhuan)
http://blog.csdn.net/xinghun_4/article/details/7969894 ***************************************** 其实网 ...
- Spring多数据源的配置和使用
1. 配置多个数据源 最近开发一个数据同步的小功能,需要从A主机的Oracle数据库中把数据同步到B主机的Oracle库中.当然能够用dmp脚本或者SQL脚本是最好,但是对于两边异构的表结构来说,直接 ...
- 20160808_Qt570安装
1.安装的目录为 “/opt/Qt5.7.0/Tools/QtCreator/bin” 2.建立软连接 [root@localhost bin]# ln -s /opt/Qt5.7.0/Tools/Q ...
- Http简析
HTTP协议 属于应用层的面向对象的协议 HTTP协议的主要特点 支持C/S(客户/服务器)模式. 简单快速:客户向服务器请求服务时,只需传送请求方法和路径.请求方法常用的有GET.HEAD.POST ...
- 配置tomcat,java运行环境
1.下载JDK,安装 官网下载地址:http://java.sun.com/javase/downloads/index.jsp 下载后,安装,选择你想把JDK安装的目录: 比如:JDK安装目录:E: ...
- R统计建模与R软件
教材目录 第一章 概率统计的基本知识 第二章 R软件的使用 第三章 数据描述性分析 第四章 参数估计 第五章 假设检验 第六章 回归分析 第七章 方差分析 第八章 应用多元分析(I) 第九章 应用多元 ...
- x+y = ((x&y)<<1) + (x^y) 证明
法一:我们考虑x,y在二进制表示时候,按位相加其中第i位xi+yi = ((xi&yi)<<1) + (xi^yi)其中(xi&yi)<<1表示当xi和yi都是 ...
- Timer与TimerTask的真正原理&使用介绍
转载: Timer与TimerTask的真正原理&使用介绍 其实就Timer来讲就是一个调度器,而TimerTask呢只是一个实现了run方法的一个类,而具体的TimerTask需要由你自己来 ...