
(原)ubuntu16中简单的使用google的protobuf
转载请注明出处:
http://www.cnblogs.com/darkknightzh/p/5804395.html
参考网址:
http://www.cnblogs.com/luosongchao/p/3969988.html
1. 在当前文件夹内新建addressbook.proto,并输入:
package ContactInfo;

message Person

{

    required string curName = 1;

    required int32 curId = 2;

    optional string curEmail = 3;

    enum PhoneType

    {

        MOBILE = 0;

        HOME = 1;

        WORK = 2;

    }

    message PhoneNumber

    {

        required string number = 4;

        optional PhoneType type = 2[default = HOME];

    }

    repeated PhoneNumber phone = 4;

}

message AddressBook

{

    required string owner = 10;

    repeated Person personInfo = 6;

}
2. 将终端定位到当前文件夹,并输入:
protoc --cpp_out=./ addressbook.proto
说明:a 如果希望生成的.h和.cpp都在当前文件夹,则--cpp_out=./即可。
b 如果使用如下命令:
protoc -I=src --cpp_out=dst src/ addressbook.proto
则addressbook.proto在当前文件夹的src文件夹里,生成的.h和.cpp均位于当前文件夹下的dst文件夹下面。
c 生成的头文件中,ContactInfo为命名空间,里面包含Person、PhoneNumber、AddressBook三个类。枚举类型则看该类型所在的类,使用作用域限定符来访问,如:
ContactInfo::Person::MOBILE
3. 在生成的.h和.cpp文件所在的文件夹内,新建testAddBook.cpp,并输入:
 #include "addressbook.pb.h"

 #include <fstream>

 #include <iostream>

 using namespace std;

 /////////////////////////////////////////////////////////////////////////////////

 int saveAddInfo()

 {

     ContactInfo::AddressBook addbook;

     addbook.set_owner("xxx");

     // first person

     ContactInfo::Person* pperson = addbook.add_personinfo();

     pperson->set_curname("aaa");

     pperson->set_curid();

     pperson->set_curemail("aaa@126.com");

     ContactInfo::Person_PhoneNumber* pPhoneNum = pperson->add_phone();

     pPhoneNum->set_number("");

     pPhoneNum->set_type(ContactInfo::Person::HOME);

     pPhoneNum = pperson->add_phone();

     pPhoneNum->set_number("");

     pPhoneNum->set_type(ContactInfo::Person::MOBILE);

     // second person

     pperson = addbook.add_personinfo();

     pperson->set_curname("bbb");

     pperson->set_curid();

     // pperson->set_curemail("bbb@126.com");

     pPhoneNum = pperson->add_phone();

     pPhoneNum->set_number("");

     // pPhoneNum->set_type(ContactInfo::Person::HOME);

     pPhoneNum = pperson->add_phone();

     pPhoneNum->set_number("");

     pPhoneNum->set_type(ContactInfo::Person::MOBILE);

     // int length = addbook.ByteSize();

     // char* buf = new char[length];     // serialize to char*, and transmit by net or others

     // addbook.SerializeToArray(buf,length);

     fstream output("pbinfo.log", ios::out|ios::trunc|ios::binary);

     if(!addbook.SerializeToOstream(&output))

     {

         cerr << "fail to write msg" << endl;

         //delete[] buf;

         return -;

     }

     //delete[] buf;

     return ;

 }

 ////////////////////////////////////////////////////////////////////////////

 void showMsg(const ContactInfo::AddressBook& addbook)

 {

     cout << addbook.owner() << endl;

     for (int i = ; i < addbook.personinfo_size(); ++i)

     {

         cout << addbook.personinfo(i).curname() << endl;

         cout << addbook.personinfo(i).curid() << endl;

         if(addbook.personinfo(i).has_curemail())

             cout << addbook.personinfo(i).curemail() << endl;

         else

             cout << "no email" << endl;

         for (int j = ; j < addbook.personinfo(i).phone_size(); ++j)

         {

             cout<<addbook.personinfo(i).phone(j).number() << endl;

             if(addbook.personinfo(i).phone(j).has_type())

                 cout << addbook.personinfo(i).phone(j).type() << endl;

             else

                 cout << "no phone type" << endl;

         }

     }

 }

 void showMsgbyAuto(ContactInfo::AddressBook addbook)

 {

     cout << addbook.owner() << endl;

     auto pperson = addbook.mutable_personinfo();

     for (auto it = pperson->begin(); it != pperson->end(); ++it)

     {

         cout << it->curname() << endl;

         cout << it->curid() << endl;

         if(it->has_curemail())

             cout << it->curemail() << endl;

         else

             cout << "no email" << endl;

         auto pPhoneNum = it->mutable_phone();

         for (auto ij = pPhoneNum->begin(); ij != pPhoneNum->end(); ++ij)

         {

             cout << ij->number() << endl;

             if(ij->has_type())

                 cout << ij->type() << endl;

             else

                 cout << "no phone type" << endl;

         }

     }

 }

 int loadAddInfo()

 {

     ContactInfo::AddressBook addbook;

     fstream input("pbinfo.log", ios::in|ios::binary);

     if(!addbook.ParseFromIstream(&input))

     {

         cout << "fail to write msg" << endl;

         return -;

     }

     cout << "now show msg" << endl;

     showMsg(addbook);

     cout << endl;

     showMsgbyAuto(addbook);

     return ;

 }

 ///////////////////////////////////////////////////////////////////////////////

 int main()

 {

     int choice;

     cout << "input choice: 1 for save, 2 for load" << endl;

     cin >> choice;

     if( == choice)

     {

         saveAddInfo();

     }

     else if ( == choice)

     {

         loadAddInfo();

     }

     return ;

 }
说明:上面程序使用SerializeToArray后,可以将数据放到buf的缓冲区中,方便使用网络或者其他方式发送。
4. 终端定位到testAddBook.cpp所在文件夹,并输入:
g++ -std=c++ addressbook.pb.cc testAddBook.cpp -o testAddBook -lprotobuf -pthread
说明:a 上面程序showMsgbyAuto函数使用了C++11特性,因而终端中需要加上-std=c++11;否则可以不加。如果不使用C++11特性,则使用下面的方式访问,但是太长。。。:
::google::protobuf::RepeatedPtrField< ::ContactInfo::Person >
b 如果protobuf没有安装到/usr路径,而是/usr/local路径,可能需要下面的命令:

c 此处不能使用gcc编译,我这里提示出错了:
/usr/bin/ld: /tmp/ccO3HeHo.o: undefined reference to symbol '_ZNSaIcED1Ev@@GLIBCXX_3.4'

//usr/lib/x86_64-linux-gnu/libstdc++.so.6: error adding symbols: DSO missing from command line

collect2: error: ld returned 1 exit status
===========================================================================
170122更新:
d 如果编译该cpp文件的时候,提示好多未定义的引用:
addressbook.pb.cc:(.text+0x133):对‘google::protobuf::internal::GeneratedMessageReflection::NewGeneratedMessageReflection(google::protobuf::Descriptor const*, google::protobuf::Message const*, int const*, int, int, int, int, int, int)’未定义的引用

addressbook.pb.cc:(.text+0x193):对‘google::protobuf::internal::GeneratedMessageReflection::NewGeneratedMessageReflection(google::protobuf::Descriptor const*, google::protobuf::Message const*, int const*, int, int, int, int, int, int)’未定义的引用
可能是因为电脑安装了两个不同版本的protobuf(ubuntu16默认已经安装了protobuf.so.9这系列的,新装的是protobuf.so.10系列的)。默认的路径见http://www.cnblogs.com/darkknightzh/p/5782992.html中160819更新。
170122更新结束
===========================================================================
5. 终端中输入./testAddBook,之后输入1,会存储pbinfo.log文件。
6. 终端中输入./testAddBook,之后输入2,显示如下:
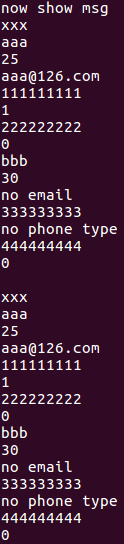
说明解析的文件成功。
说明:对于optional可选项,可以不使用has_xxx()进行判断,此时不输出(程序有endl,所以会输出一个空行)(不知道其他使用方式时,会是什么情况)。
(原)ubuntu16中简单的使用google的protobuf的更多相关文章
- (原)Ubuntu16中卸载并重新安装google的Protocol Buffers
转载请注明出处: http://www.cnblogs.com/darkknightzh/p/5782992.html 目前最新的是1.6.1 1. 卸载掉老版本的Protocol: sudo apt ...
- [软件测试]Linux环境中简单清爽的Google Test (GTest)测试环境搭建(初级使用)
本文将介绍单元测试工具google test(GTEST)在linux操作系统中测试环境的搭建方法.本文属于google test使用的基础教程.在linux中使用google test之前,需要对如 ...
- (原)ubuntu16中安装moses
转载请注明出处: http://www.cnblogs.com/darkknightzh/p/5653186.html 在ubuntu14中,可以使用下面的语句安装moses: luarocks in ...
- 在浏览器中简单输入一个网址,解密其后发生的一切(http请求的详细过程)
在浏览器中简单输入一个网址,解密其后发生的一切(http请求的详细过程) 原文链接:http://www.360doc.com/content/14/1117/10/16948208_42571794 ...
- Java原子类中CAS的底层实现
Java原子类中CAS的底层实现 从Java到c++到汇编, 深入讲解cas的底层原理. 介绍原理前, 先来一个Demo 以AtomicBoolean类为例.先来一个调用cas的demo. 主线程在f ...
- google的protobuf简单介绍
google的protobuf是一种轻便高效的结构化数据存储格式,在通信协议和数据存储等领域中使用比较多.protobuf对于结构中的每个成员,会提供set系列函数和get系列函数. 但是,对于使用来 ...
- Unity3D中简单的C#异步Socket实现
Unity3D中简单的C#异步Socket实现 简单的异步Socket实现..net框架自身提供了很完善的Socket底层.笔者在做Unity3D小东西的时候需要使用到Socket网络通信.于是决定自 ...
- 神奇的 SQL 之层级 → 为什么 GROUP BY 之后不能直接引用原表中的列
前言 开心一刻 感觉不妙呀,弟弟舔它! 不该舔的,舔到怀疑人生了...... GROUP BY 后 SELECT 列的限制 标准 SQL 规定,在对表进行聚合查询的时候,只能在 SELECT 子句中写 ...
- [转]神奇的 SQL 之层级 → 为什么 GROUP BY 之后不能直接引用原表中的列
原文:https://www.cnblogs.com/youzhibing/p/11516154.html 这篇文章,对group by的讲解不错 -------------------------- ...
随机推荐
- C#设置textboox只能输入数字`
1.在闪电KeyPress事件中添加 private void textBox_pwmx_fre_KeyPress(object sender, KeyPressEventArgs e) { //如果 ...
- Js与flash交互:在html页面中用js与MyReport插件交互
Html页面与flash的加载 如下图,flash是html页面的一个插件节点. js与flash进行交互,首先要处理好html页面和swf的加载问题. Swf调用外部js方法,要确保js方法已存在, ...
- FCKeditor插件开发实例:uploadify多文件上传插件
FCKeditor是一个专门使用在网页上属于开放源代码的所见即所得文字编辑器.它志于轻量化,不需要太复杂的安装步骤即可使用.它可和PHP.JavaScript.ASP.ASP.NET.ColdFusi ...
- forward 和redirect的区别
1.从地址栏显示来说 forward是服务器请求资源,服务器直接访问目标地址的URL,把那个URL的响应内容读取过来,然后把这些内容再发给浏览器.浏览器根本不知道服务器发送的内容从哪里来的,所以它的地 ...
- 【Nutch2.2.1基础教程之3】Nutch2.2.1配置文件
nutch-site.xml 在nutch2.2.1中,有两份配置文件:nutch-default.xml与nutch-site.xml. 其中前者是nutch自带的默认属性,一般情况下不要修改. 如 ...
- linux修改密码
情景:Linux 服务器上用户的密码被服务器管理员发现太过简单,需要重置密码.处理时为了方便记忆,就直接使用普通用户登录,修改密码时,在原密码的基础上增加一串特定的数字,结果提示不通过.例如出现错误提 ...
- Service Lane
Link https://www.hackerrank.com/challenges/service-lane def main(): n, t = map(int, raw_input().spli ...
- C语言多维数组的地址
设有整型二维数组a[3][4]如下: 0 1 2 3 4 5 6 7 8 9 10 11 它的定义为: int a[3][4]={{0,1,2,3},{4,5 ...
- mongodb 基本语法
成功启动MongoDB后,再打开一个命令行窗口输入mongo,就可以进行数据库的一些操作. 输入help可以看到基本操作命令: show dbs:显示数据库列表 show collections:显示 ...
- VirtualBox修改虚拟盘路径
VirtualBox虚拟盘路径默认是存在C盘的,而当我们发现C盘不够用的时候,想转移就感觉有点麻烦了,现在给大家介绍一个简单又使用的方法. 第一步:到默认目录C:\Users\Administrato ...