
iOS-夜间模式(换肤设置)
概述
详细
一、实现功能及主要思路
实现功能:
iOS 开发中有时候会有夜间模式(换肤设置)的需求, 其实主要是更改相关颜色操作.每次切换夜间/白天模式时,都会发出通知给所有ViewController,让它们切换到相应的主题.
主要思路:
1. 创建一个管理模式主题的单例管理类ThemeManage
2. 封装好需要做夜间模式变色处理的控件扩展:UIView (ThemeChange), UINavigationBar (ThemeChange), UITabBar (ThemeChange), UILabel (ThemeChange), UIButton (ThemeChange)
3. 在 AppDelegate里先获取夜间模式状态, 根控制器里先设置tabBar 及 子控制器里navigationBar的夜间模式状态
4. 添加控制白天/黑夜模式item,发通知切换相对应i模式及image
5. 添加相关控件是否黑夜模式下已更换字色和背景色
二、程序实现
Step1. 创建一个管理模式主题的单例管理类
ThemeManage.h 文件里添加模式管理单例:
// 是否是夜间 YES表示夜间, NO为正常

@property(nonatomic, assign) BOOL isNight;

/**

 * 模式管理单例

 */

+ (ThemeManage *)shareThemeManage;
ThemeManage. m 文件:
单例的初始化:
+ (ThemeManage *)shareThemeManage {

    static dispatch_once_t onceToken;

    dispatch_once(&onceToken, ^{

        themeManage = [[ThemeManage alloc] init];

    });

    return themeManage;

}
重写isNight的set方法 (是否是夜间 YES表示夜间, NO为正常)
- (void)setIsNight:(BOOL)isNight {

    _isNight = isNight;

    if (self.isNight) { // 夜间模式改变相关颜色

        self.bgColor = [UIColor colorWithRed:0.06 green:0.08 blue:0.1 alpha:1];

        self.textColor = [UIColor whiteColor];

        self.color1 = [UIColor colorWithRed:0.08 green:0.11 blue:0.13 alpha:1];

        self.navBarColor = [UIColor whiteColor];

        self.color2 = [UIColor colorWithRed:0.2 green:0.31 blue:0.43 alpha:1];

        self.textColorGray = [UIColor whiteColor];

    } else{

        self.bgColor = [UIColor whiteColor];

        self.textColor = [UIColor blackColor];

        self.color1 = [UIColor colorWithRed:0.06 green:0.25 blue:0.48 alpha:1];

        self.navBarColor = [UIColor colorWithRed:0.31 green:0.73 blue:0.58 alpha:1];

        self.color2 = [UIColor colorWithRed:0.57 green:0.66 blue:0.77 alpha:1];

        self.textColorGray = [UIColor grayColor];

    }

    static dispatch_once_t onceToken;

    dispatch_once(&onceToken, ^{

        self.colorClear = [UIColor clearColor];

    });

}
Step2. 封装好需要做夜间模式变色处理的控件扩展
一般需要UIView (ThemeChange), UINavigationBar (ThemeChange), UITabBar (ThemeChange), UILabel (ThemeChange), UIButton (ThemeChange);
详情见 Demo, 这里拿 UIView 做例子:
添加颜色状态枚举值 颜色的定义(一个代表一套):
typedef NS_ENUM(NSInteger, UIViewColorType) {

    UIViewColorTypeNormal, // 白天白色, 夜间黑色

    UIViewColorType1, // 白天蓝色, 夜间深灰

    UIViewColorType2, // 白天浅蓝, 夜间浅蓝

    UIViewColorTypeClear // 透明状态

};
添加type的set,get方法:
- (void)setType:(id)type {

    objc_setAssociatedObject(self, @selector(type), type, OBJC_ASSOCIATION_RETAIN_NONATOMIC);

}

- (id)type {

    return objc_getAssociatedObject(self, @selector(type));

}
开始监听:
- (void)startMonitor {

    [[NSNotificationCenter defaultCenter] addObserver:self selector:@selector(changeColor) name:@"changeColor" object:nil];

}
改变颜色:
- (void)changeColor {

    // type为NSNumber型, 变为NSInteger

    switch ([self.type integerValue]) {

        case UIViewColorTypeNormal:

            self.backgroundColor = [ThemeManage shareThemeManage].bgColor;

            break;

        case UIViewColorType1:

            self.backgroundColor = [ThemeManage shareThemeManage].color1;

            break;

        case UIViewColorType2:

            self.backgroundColor = [ThemeManage shareThemeManage].color2;

            break;

        case UIViewColorTypeClear:

            self.backgroundColor = [ThemeManage shareThemeManage].colorClear;

            break;

        default:

            break;

    }

}
设置颜色类型和对应颜色:
- (void)NightWithType:(UIViewColorType)type {

    self.type = [NSNumber numberWithInteger:type];

    [self changeColor];

    [self startMonitor];

    // 调用设置字体颜色的方法

    [self initTextColor];

}
改变字体颜色的方法, 空方法, 可以在子类中重写这个方法来改变颜色(例如:Label):
- (void)initTextColor {

}
Step3. 在 AppDelegate里先获取夜间模式状态, 根控制器里先设置tabBar 及 子控制器里navigationBar的夜间模式状态
#import "ThemeManage.h"

#import "UIView+ThemeChange.h"
获取夜间模式状态:
- (BOOL)application:(UIApplication *)application didFinishLaunchingWithOptions:(NSDictionary *)launchOptions {

    // 获取夜间模式状态

    [ThemeManage shareThemeManage].isNight = [[NSUserDefaults standardUserDefaults] boolForKey:@"night"];

    self.window = [[UIWindow alloc] initWithFrame:[[UIScreen mainScreen] bounds]];

    self.window.backgroundColor = [UIColor whiteColor];

    [self.window makeKeyAndVisible];

    RootViewController *rootVc = [[RootViewController alloc] init];

    self.window.rootViewController = rootVc;

    return YES;

}
RootViewController.m 文件里设置navigationBar的夜间模式状态:
- (void)viewDidLoad {

    [super viewDidLoad];

    [self.view NightWithType:UIViewColorTypeNormal];

    HomeViewController *vc = [[HomeViewController alloc] init];

    UINavigationController *nav = [[UINavigationController alloc] initWithRootViewController:vc];

    // 设置navigationBar的夜间模式状态

    [nav.navigationBar NightWithType:UIViewColorTypeNormal];

    vc.tabBarItem = [[UITabBarItem alloc] initWithTitle:@"首页" image:[UIImage imageNamed:@"home"] tag:10];

    SchemaViewController *secondVC = [[SchemaViewController alloc] init];

    UINavigationController *nav1 = [[UINavigationController alloc] initWithRootViewController:secondVC];

    // 设置navigationBar的夜间模式状态

    [nav1.navigationBar NightWithType:UIViewColorTypeNormal];

    secondVC.tabBarItem = [[UITabBarItem alloc] initWithTitle:@"菜单" image:[UIImage imageNamed:@"schema"] tag:11];

    [self.tabBar NightWithType:UIViewColorTypeNormal];

    self.viewControllers = @[nav, nav1];

    self.tabBar.translucent = NO;

    [[UINavigationBar appearance] setTranslucent:NO];

}
Step4. 添加控制白天/黑夜模式item,发通知切换相对应i模式及image
    [self.view NightWithType:UIViewColorTypeNormal];

    UIImage *barButtonImage = [ThemeManage shareThemeManage].isNight ? [UIImage imageNamed:@"night"] : [UIImage imageNamed:@"day"];

    self.navigationItem.rightBarButtonItem = [[UIBarButtonItem alloc] initWithImage:barButtonImage style:UIBarButtonItemStylePlain target:self action:@selector(rightBarBtnAction:)];
Action点击动作事件(切换夜间模式):
- (void)rightBarBtnAction:(UIBarButtonItem *)barButton {

    [ThemeManage shareThemeManage].isNight = ![ThemeManage shareThemeManage].isNight;

    [[NSNotificationCenter defaultCenter] postNotificationName:@"changeColor" object:nil];

    [[NSUserDefaults standardUserDefaults] setBool:[ThemeManage shareThemeManage].isNight forKey:@"night"];

    UIImage *barBtnImage = [ThemeManage shareThemeManage].isNight ? [UIImage imageNamed:@"night"] : [UIImage imageNamed:@"day"];

    [barButton setImage:barBtnImage];

}
发了通知不要忘记移除监听:
- (void)dealloc {

    // 移除监听

    [[NSNotificationCenter defaultCenter] removeObserver:self];

}
Step5. 添加相关控件是否黑夜模式下已更换字色和背景色
#import "UILabel+ThemeChange.h"
  UILabel *label = [[UILabel alloc] initWithFrame:CGRectMake(100, 100, 200, 40)];

    label.text = @"测试看看字色及背景色";

    [label NightWithType:UIViewColorTypeNormal];

    [label NightTextType:LabelColorGray];

    [self.view addSubview:label];
三、项目截图及运行效果
项目截图:
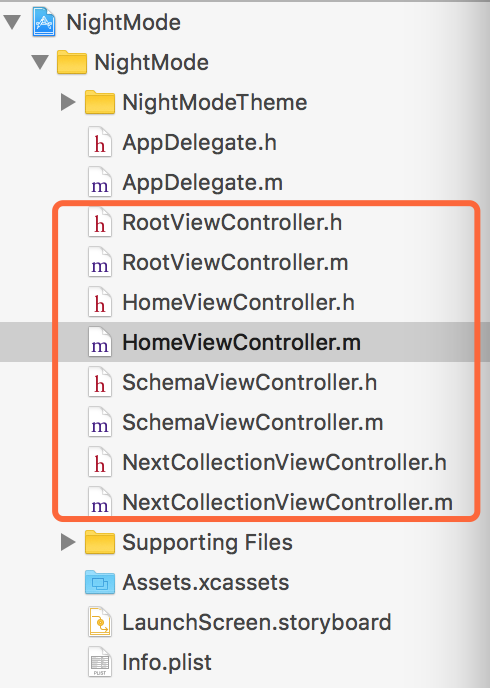
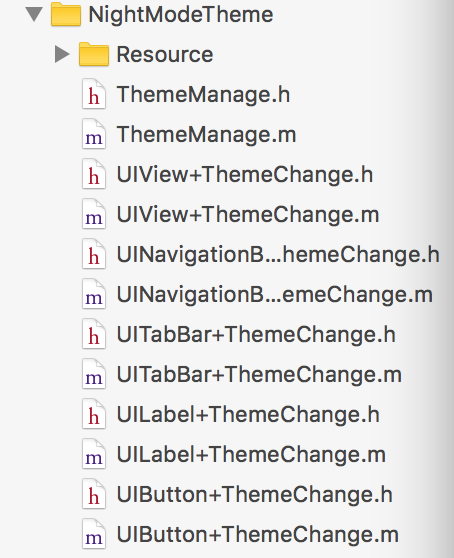
这时候测试下, 看下运行效果:
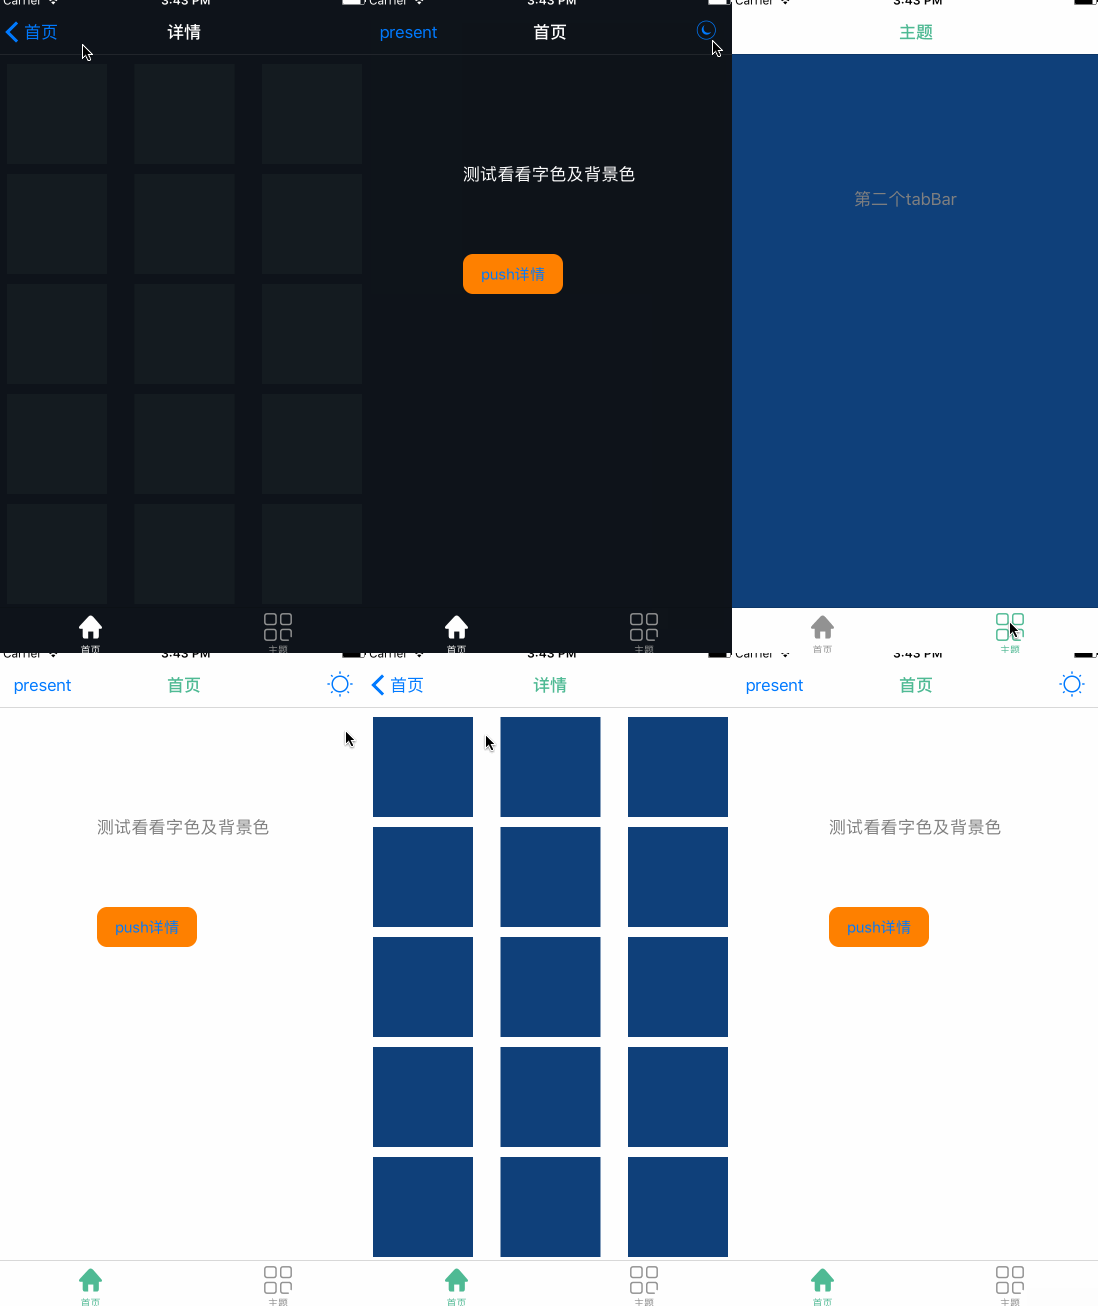
夜间模式对比截图:
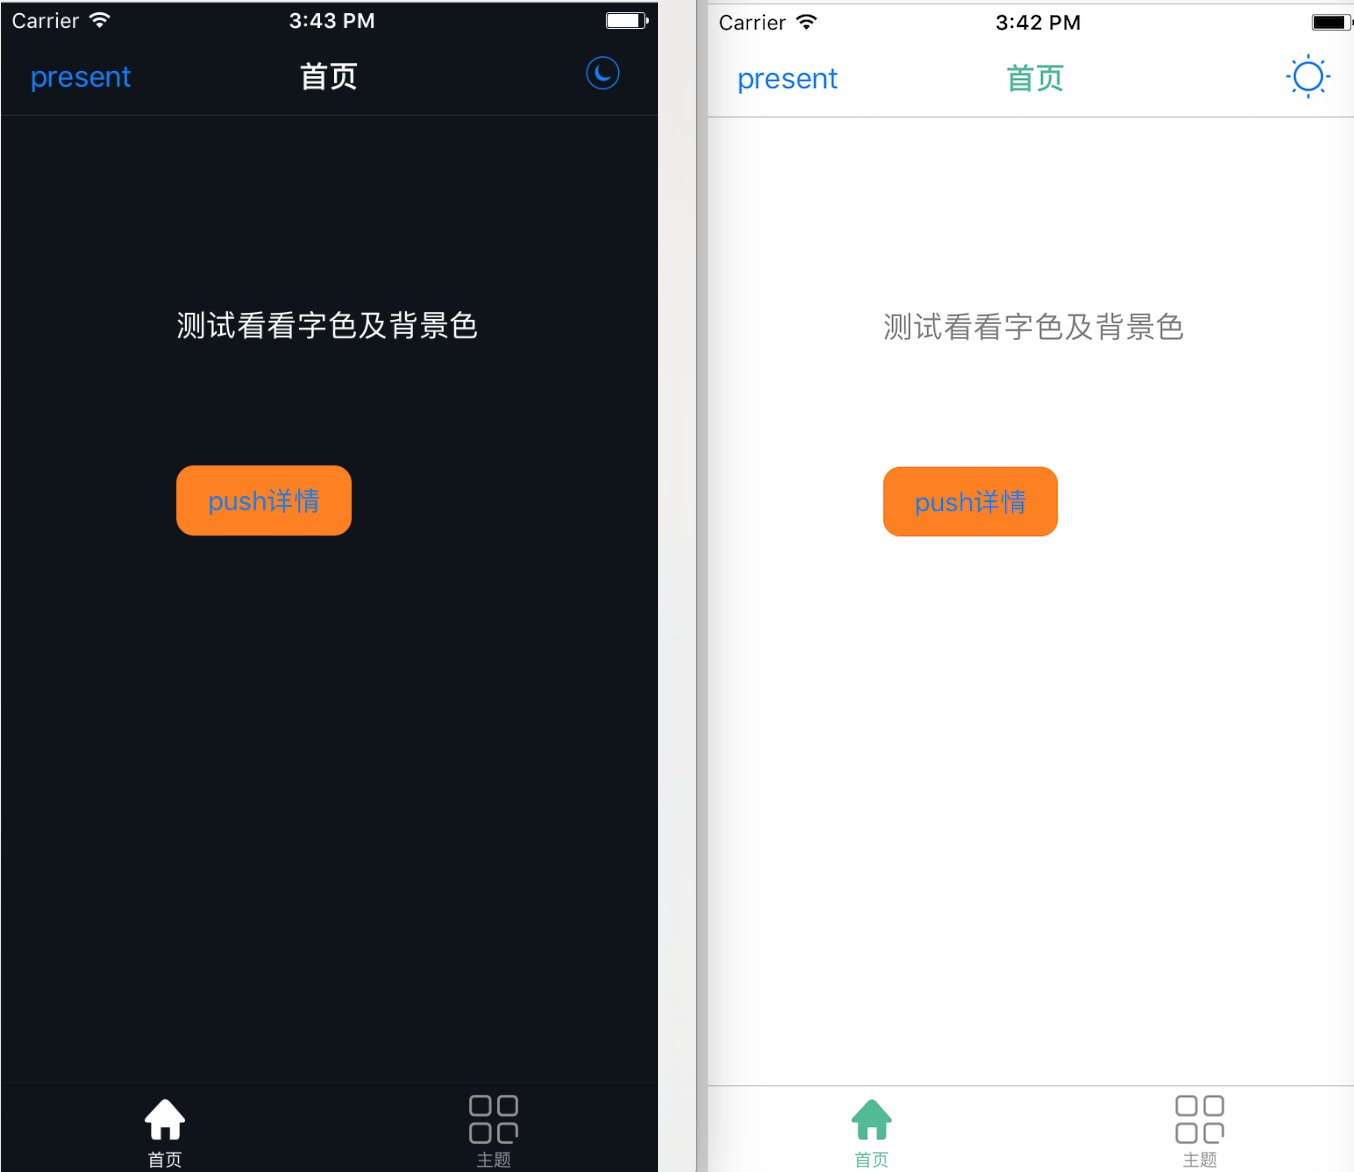
四、其他补充
界面性问题可以根据自己项目需求调整即可, 具体可参考代码, 项目能够直接运行!
注:本文著作权归作者,由demo大师发表,拒绝转载,转载需要作者授权
iOS-夜间模式(换肤设置)的更多相关文章
- android 换肤模式总结
由于Android的设置中并没有夜间模式的选项,对于喜欢睡前玩手机的用户,只能简单的调节手机屏幕亮度来改善体验.目前越来越多的应用开始把夜间模式加到自家应用中,没准不久google也会把这项功能添加到 ...
- DKNightVersion 的实现 --- 如何为 iOS 应用添加夜间模式
在很多重阅读或者需要在夜间观看的软件其实都会把夜间模式当做一个 App 所需要具备的特性. 而如何在不改变原有的架构, 甚至不改变原有的代码的基础上, 就能为应用优雅地添加夜间模式就成为一个在很多应用 ...
- Flex AIR应用换肤功能(Android和IOS)
说明 换肤功能,即将整个应用的皮肤都进行更换,其实质,是动态加载swf文件的过程,而这些swf文件则有css文件编译而来. 关于换肤功能,在android和ios系统的实现方式是不同的.主要原因,是因 ...
- Android QMUI实战:实现APP换肤功能,并自动适配手机深色模式
Android换肤功能已不是什么新鲜事了,市面上有很多第三方的换肤库和实现方案. 之所以选择腾讯的QMUI库来演示APP的换肤功能,主要原因: 1.换肤功能的实现过程较简单.容易理解: 2.能轻松适配 ...
- iOS开发--换肤简单实现以及工具类的抽取
一.根据美工提供的图片,可以有两种换肤的方案. <1>美工提供图片的类型一: <2>美工提供图片的类型二:这种分了文件夹文件名都一样的情况,拖入项目后最后用真实文件夹(蓝色文件 ...
- iOS开发——高级篇——换肤、静态库
一.换肤 1.思路1> 解决方案1,使用颜色作为图片素材的命名关键字 问题1:要保证每套图片的文件名 颜色+ 名称.png的格式比较麻烦 问题2:如果要将某一个图片应用到其他皮肤不方便2> ...
- iOS端实现节日换肤
本文是我在网上看到一篇不错的文章,因为之前没接触过,所以特意转过来,和大家一起分享下..以下正文: 一.问题的提出 不知道大家有没有发现, 元旦期间, 很多APP界面里的图标都换成了具有节日气氛的样式 ...
- vue中利用scss实现整体换肤和字体大小设置
一.前言 利用Sass预处理实现换肤和字体大小调整. 思路及达到的效果:字体大小的适配使用window.devicePixelRatio的值和需要调整的差量进行控制.页面初始化是的字体适配可以根据de ...
- Android白天/夜间模式Day/Night Mode标准原生SDK实现
Android白天/夜间模式Day/Night Mode标准原生SDK实现 章节A:Android实现白天/夜间模式主要控制器在于UiModeManager,UiModeManager是Andr ...
随机推荐
- 如何让access空值变成0?(确切的说是让access Null值变成0)
方法一 if IsNull(Me.新_退休费) = True Then Me.新_退休费 = 0 方法二 if Nz(Me.原_退休费) = Me.原_退休费 Then Me.原_退休费 = 0 有 ...
- 【Linux】在虚拟机上安装CentOS7
在配置好的机子上,可以装个双系统,但是在我自己的本子上,磁盘读写太垃圾了,连压缩卷 都执行不了,分不出空间,装不了CentOS系统,没办法,采用虚拟机的方式,把它转起来. -------------- ...
- UnityEditor研究学习之自定义Editor
UnityEditor研究学习之自定义Editor 今天我们来研究下Unity3d中自定义Editor,这个会让物体的脚本在Inspector视窗中,产生不同的视觉效果. 什么意思,举个例子,比如游戏 ...
- ArcEngine 连接sql server sde
前言 本想在soe中进行sde for sqlserver数据获取.由于soe的调试不方便,为了测试的简便,先在桌面上写了个arcengine连接sde for sqlserver的程序,但是本以为是 ...
- 15、高可用 PXC(percona xtradb cluster) 搭建
安装环境: 集群名 pxc_lk 节点1: 192.168.1.20 节点2: 192.168.1.21 节点3: 192.168.1.22 所有节点安装 wget http://www.perc ...
- Java中String,StringBuffer和StringBuilder的区别(转载)
String 字符串常量StringBuffer 字符串变量(线程安全)StringBuilder 字符串变量(非线程安全) 简 要的说, String 类型和 StringBuffer 类型的主要性 ...
- VS2010调试技巧
最近合作开发,代码已经完成了,但是一调试,错误一大堆,由于是合作开发,不确定是哪层的错误,得一步步得走,很是费时费力,平时调试的技巧用的不多,现在集中调试,结果有些手忙脚乱,效率也很低,所以在网上找了 ...
- linux安装scikit-learn
原文:http://www.cnblogs.com/cyttina/archive/2013/06/08/3127345.html ubuntu的看官方的文档就好了. http://scikit-le ...
- ACM-尼姆博弈之取(m堆)石子游戏——hdu2176
取(m堆)石子游戏 Time Limit: 3000/1000 MS (Java/Others) Memory Limit: 32768/32768 K (Java/Others) Total ...
- linux可视化桌面安装
[root@VM_193_201_centos ~]# yum grouplist Loaded plugins: fastestmirror, langpacks There is no insta ...