How to install Mysql in the CentOS
This article will walk through you the process of installing and updating latest MySQL 5.7.9 version onRHEL/CentOS 7/6/5 and Fedora 23/22/21 using MySQL Yum repository via YUM utility.
Step 1: Adding the MySQL Yum Repository
1. We will use official MySQL Yum software repository, which will provides RPM packages for installing the latest version of MySQL server, client, MySQL Utilities, MySQL Workbench, Connector/ODBC, and Connector/Python for the RHEL/CentOS 7/6/5 and Fedora 23-21.
Important: These instructions only works on fresh installation of MySQL on the server, if there is already a MySQL installed using a third-party-distributed RPM package, then I recommend you to upgrade or replace the installed MySQL package using the MySQL Yum Repository”.
Before Upgrading or Replacing old MySQL package, don’t forget to take all important databases backup and configuration files.
2. Now download and add the following MySQL Yum repository to your respective Linux distribution system’s repository list to install the latest version of MySQL (i.e. 5.7.9 released on 21 October 2015).
--------------- On RHEL/CentOS 7 ---------------

# wget http://dev.mysql.com/get/mysql57-community-release-el7-7.noarch.rpm
--------------- On RHEL/CentOS 6 ---------------

# wget http://dev.mysql.com/get/mysql57-community-release-el6-7.noarch.rpm
--------------- On RHEL/CentOS 5 ---------------

# wget http://dev.mysql.com/get/mysql57-community-release-el5-7.noarch.rpm
--------------- On Fedora 23 ---------------

# wget http://dev.mysql.com/get/mysql57-community-release-fc23-7.noarch.rpm
--------------- On Fedora 22 ---------------

# wget http://dev.mysql.com/get/mysql57-community-release-fc22-7.noarch.rpm
--------------- On Fedora 21 ---------------

# wget http://dev.mysql.com/get/mysql57-community-release-fc21-7.noarch.rpm
3. After downloading the package for your Linux platform, now install the downloaded package with the following command.
--------------- On RHEL/CentOS 7 ---------------

# yum localinstall mysql57-community-release-el7-7.noarch.rpm
--------------- On RHEL/CentOS 6 ---------------

# yum localinstall mysql57-community-release-el6-7.noarch.rpm
--------------- On RHEL/CentOS 5 ---------------

# yum localinstall mysql57-community-release-el5-7.noarch.rpm
--------------- On Fedora 23 ---------------

# dnf localinstall mysql57-community-release-fc23-7.noarch.rpm
--------------- On Fedora 22 ---------------

# dnf localinstall mysql57-community-release-fc22-7.noarch.rpm
--------------- On Fedora 21 ---------------

# yum localinstall mysql57-community-release-fc21-7.noarch.rpm
The above installation command adds the MySQL Yum repository to system’s repository list and downloads the GnuPG key to verify the integrity of the packages.
4. You can verify that the MySQL Yum repository has been added successfully by using following command.
# yum repolist enabled | grep "mysql.*-community.*"

# dnf repolist enabled | grep "mysql.*-community.*"      [On Fedora 22+ versions]

Verify MySQL Yum Repository
Step 2: Installing Latest MySQL Version
5. Install latest version of MySQL (currently 5.7) using the following command.
# yum install mysql-community-server

# dnf install mysql-community-server      [On Fedora 22+ versions]
The above command installs all the needed packages for MySQL server mysql-community-server, mysql-community-client, mysql-community-common and mysql-community-libs.
Step 3: Installing MySQL Release Series
6. You can also install different MySQL version using different sub-repositories of MySQL Community Server. The sub-repository for the recent MySQL series (currently MySQL 5.7) is activated by default, and the sub-repositories for all other versions (for example, the MySQL 5.6 or 5.5 series) are deactivated by default.
To install specific version from specific sub-repository, you can use --enable or --disable options usingyum-config-manager or dnf config-manager as shown:
# yum-config-manager --disable mysql57-community

# yum-config-manager --enable mysql56-community
------------------ Fedora 22+ Versions ------------------

# dnf config-manager --disable mysql57-community

# dnf config-manager --enable mysql56-community
Step 4: Starting the MySQL Server
7. After successful installation of MySQL, it’s time to start the MySQL server with the following command:
# service mysqld start
You can verify the status of the MySQL server with the help of following command.
# service mysqld status
This is the sample output of running MySQL under my CentOS 7 box.
Redirecting to /bin/systemctl status  mysqld.service

mysqld.service - MySQL Server

   Loaded: loaded (/usr/lib/systemd/system/mysqld.service; enabled)

   Active: active (running) since Thu 2015-10-29 05:15:19 EDT; 4min 5s ago

  Process: 5314 ExecStart=/usr/sbin/mysqld --daemonize $MYSQLD_OPTS (code=exited, status=0/SUCCESS)

  Process: 5298 ExecStartPre=/usr/bin/mysqld_pre_systemd (code=exited, status=0/SUCCESS)

 Main PID: 5317 (mysqld)

   CGroup: /system.slice/mysqld.service

           └─5317 /usr/sbin/mysqld --daemonize

Oct 29 05:15:19 localhost.localdomain systemd[1]: Started MySQL Server.
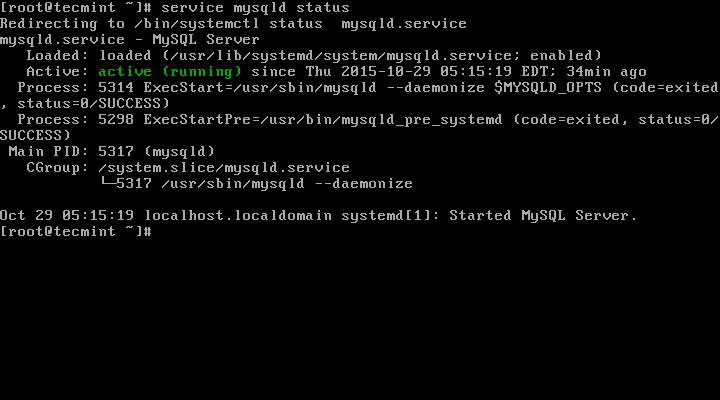
Check Mysql Status
8. Now finally verify the installed MySQL version using following command.
# mysql --version

mysql  Ver 14.14 Distrib 5.7.9, for Linux (x86_64) using  EditLine wrapper

Check MySQL Installed Version
Step 5: Securing the MySQL Installation
9. The command mysql_secure_installation allows you to secure your MySQL installation by performing important settings like setting the root password, removing anonymous users, removing root login, and so on.
# mysql_secure_installation
Now follow the onscreen instructions carefully, for reference see the output of the above command below.
Sample Output
Securing the MySQL server deployment.

Enter password for user root: Enter New Root Password

VALIDATE PASSWORD PLUGIN can be used to test passwords

and improve security. It checks the strength of password

and allows the users to set only those passwords which are

secure enough. Would you like to setup VALIDATE PASSWORD plugin?

Press y|Y for Yes, any other key for No: y

There are three levels of password validation policy:

LOW    Length >= 8

MEDIUM Length >= 8, numeric, mixed case, and special characters

STRONG Length >= 8, numeric, mixed case, special characters and dictionary                  file

Please enter 0 = LOW, 1 = MEDIUM and 2 = STRONG: 2

Using existing password for root.

Estimated strength of the password: 50

Change the password for root ? ((Press y|Y for Yes, any other key for No) : y

New password: Set New MySQL Password

Re-enter new password: Re-enter New MySQL Password

Estimated strength of the password: 100

Do you wish to continue with the password provided?(Press y|Y for Yes, any other key for No) : y

By default, a MySQL installation has an anonymous user,

allowing anyone to log into MySQL without having to have

a user account created for them. This is intended only for

testing, and to make the installation go a bit smoother.

You should remove them before moving into a production

environment.

Remove anonymous users? (Press y|Y for Yes, any other key for No) : y

Success.

Normally, root should only be allowed to connect from

'localhost'. This ensures that someone cannot guess at

the root password from the network.

Disallow root login remotely? (Press y|Y for Yes, any other key for No) : y

Success.

By default, MySQL comes with a database named 'test' that

anyone can access. This is also intended only for testing,

and should be removed before moving into a production

environment.

Remove test database and access to it? (Press y|Y for Yes, any other key for No) : y

 - Dropping test database...

Success.

 - Removing privileges on test database...

Success.

Reloading the privilege tables will ensure that all changes

made so far will take effect immediately.

Reload privilege tables now? (Press y|Y for Yes, any other key for No) : y

Success.

All done!
Step 6: Connecting to MySQL Server
10. Connecting to newly installed MySQL server by providing username and password.
# mysql -u root -p
Sample Output:
Welcome to the MySQL monitor.  Commands end with ; or \g.

Your MySQL connection id is 19

Server version: 5.7.9 MySQL Community Server (GPL)

Copyright (c) 2000, 2015, Oracle and/or its affiliates. All rights reserved.

Oracle is a registered trademark of Oracle Corporation and/or its

affiliates. Other names may be trademarks of their respective

owners.

Type 'help;' or '\h' for help. Type '\c' to clear the current input statement.

mysql>
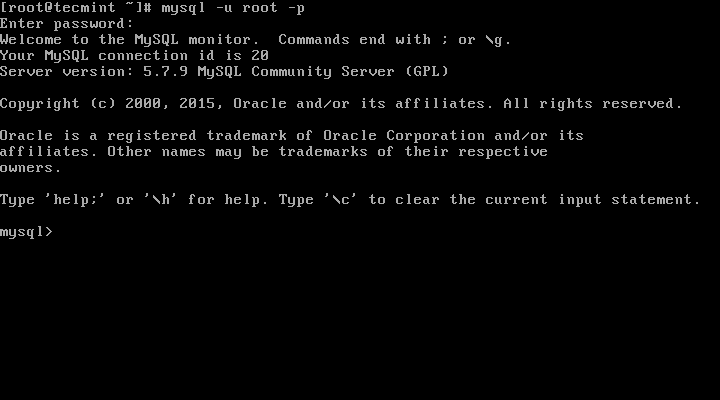
Connect to MySQL Server
Step 7: Updating MySQL with Yum
11. Besides fresh installation, you can also do updates for MySQL products and components with the help of following command.
# yum update mysql-server

# dnf update mysql-server       [On Fedora 22+ versions]
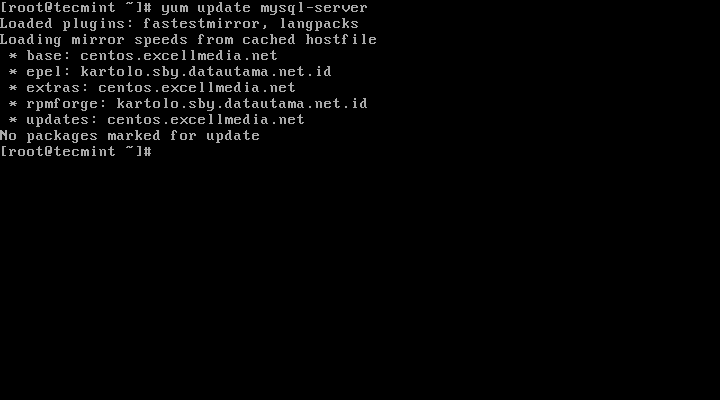
Update MySQL Version
When new updates are available for MySQL, it will auto install them, if not you will get a message saying NO packages marked for updates.
That’s it, you’ve successfully installed MySQL 5.7.9 on your system. If you’re having any trouble installing feel free to use our comment section for solutions.
How to install Mysql in the CentOS的更多相关文章
- Install MySQL 5.7 on Fedora 25/24, CentOS/RHEL 7.3/6.8/5.11
MySQL is a relational database management system (RDBMS) that runs as a server providing multi-user ...
- Install MySql on CentOS
Installing & Configuring MySQL Server This Howto will show you how to install MySQL 5.x, start t ...
- How to Install MySQL on CentOS 7
CentOS 7的yum源中貌似没有正常安装mysql时的mysql-sever文件,需要去官网上下载 # wget http://dev.mysql.com/get/mysql-communit ...
- Installing MySQL Server on CentOS
MySQL is an open-source relational database. For those unfamiliar with these terms, a database is wh ...
- linux下安装多个mysql实例(摘自国外:How to create multiple mysql instance in CentOS 6.4 and Red Hat 6.4)
How to create multiple mysql instance in CentOS 6.4 and Red Hat 6.4 from:http://sharadchhetri.com/20 ...
- Mysql 5.7 CentOS 7 安装MHA
Table of Contents 1. MHA简介 1.1. 功能 1.2. MHA切换逻辑 1.3. 工具 2. 环境 2.1. 软件 2.2. 环境 3. Mysql 主从复制 3.1. Mys ...
- Install MySQL on Mac by Homebrew
1. 安装mysql brew update brew install mysql 2. 启动mysql mysql.server start 3. 登录mysql mysql -uroot -p ...
- yum install mysql
rpm -qa|grep -i mysqlmysql-libs-5.1.52-1.1.alios6.1.x86_64mysql-5.1.52-1.1.alios6.1.x86_64mysql-deve ...
- 在OSX狮子(Lion)上安装MYSQL(Install MySQL on Mac OSX)
这篇文章简述了在Mac OSX狮子(Lion)上安装MySQL Community Server最新版本v10.6.7的过程. MySQL是最流行的开源数据库管理系统.首先,从MySQL的下载页面上下 ...
随机推荐
- Cognos让指定用户不具有删除内容的权限
为了方便用户使用Cognos,现在很多对权限要求不够严格的用户就想到了可以让用户实现匿名登陆,即不登陆系统即可实现访问报表,当然这也仅仅是按照客户的需求,我个人认为一个安全性的数据平台还是需要对登陆. ...
- 持续集成之路 —— Mock对象引起的测试失败
今天遇到了一个很奇怪的问题,纠结了好久.在和同事念叨这个问题时,突然想到了问题所在. 问题现象: 在一个Service的单元测试类中有八个测试用例,单独运行时都可以正常通过.可是一旦一起运行时,总是会 ...
- [Oracle] decode 函数及其用法
http://blog.csdn.net/oscar999/article/details/18399177 前言 DECODE()函数,它将输入数值与函数中的参数列表相比较,根据输入值返回一个对应值 ...
- 算法笔记_169:历届试题 兰顿蚂蚁(Java)
目录 1 问题描述 2 解决方案 1 问题描述 问题描述 兰顿蚂蚁,是于1986年,由克里斯·兰顿提出来的,属于细胞自动机的一种. 平面上的正方形格子被填上黑色或白色.在其中一格正方形内有一只“蚂 ...
- Ubuntu12.04+OpenERP6.1更改HTTP端口号为80
在Ubuntu12.04中安装好OpenERP6.1以后,默认的端口号为8069,如果我们想改变为默认的80端口,可以通过如下方式处理. 1.首先通过iptables进行端口映射转换:sudo ipt ...
- 混合用法模式 __name__和__main__
# -*- coding: utf-8 -*- #python 27 #xiaodeng #混合用法模式 __name__和__main__ #可把文件作为模块导入,并以独立式程序的形式运行,每个模块 ...
- 成为JavaGC专家(3)—如何监控Java垃圾回收机制(转载)
原文:http://www.importnew.com/3146.html 为什么需要优化GC 或者说的更确切一些,对于基于Java的服务,是否有必要优化GC?应该说,对于所有的基于Java的服务,并 ...
- DIV+CSS专题:十天学会DIV+CSS
DIV+CSS专题:十天学会DIV+CSS,在网上看到的.感觉蛮好,推荐一下. 十天学会DIV+CSS(WEB标准)CHM格式文件下载 第十天 div+css网页标准布局实例教程(三) 第十天 div ...
- git版本库管理介绍,撤销git pull操作
Git是分布式版本控制系统,GitHub 是最大的 Git 版本库托管商,是成千上万的开发者和项目能够合作进行的中心. 大部分 Git 版本库都托管在 GitHub,很多开源项目使用 GitHub 实 ...
- mysql优化利器之explain
一.语法 {EXPLAIN | DESCRIBE | DESC} tbl_name [col_name | wild] {EXPLAIN | DESCRIBE | DESC} [explain_typ ...