vim-snipmate编写snippet的语法
vim-snipmate真的很好用,以前好多编写代码的问题得到完美的解决。还附带提升我对vim的理解和信心,在这里感谢一下作者。thank you。
1、现说一下我浓缩的重要语法。
1、定义是下面这样,注意中间必须是一个制表符<TAB>不能用空格代替。
snippet<TAB>关键字

        代码片段
2、变量。${#},#代表变量数值,从1开始。还可以添加默认值。例如:${1:true},${2:/*condition*/},${3},${4:data},${5}等等。每按一次<TAB>键,光标会跳想下一个变量,如果没有变量了,则调到括号外。${0}有特殊意义,代表最后一跳的意思,${0}之后<TAB>键恢复正常。
3、${0}的难点。for(${1:true}){ ${2}}和for(${1:true}){${0}}的区别,表达是1的变量${2}内不可按<TAB>键,否则会直接跳转的大括号外面。而表达式2可以按<TAB>键,因为,${0}代表最后一跳,所以在按<TAB>就可以进行其他的snippet了,而表达1里第一个snippet还没有执行完,这是按<TAB>就会跳到大括号外面。
4、设置代码片段要综合考虑所有情况,并结合实践应用。例如: printf("${1:%s}"${}); ,如果我只是打印一个字符串,那么在输入完${1:%s}后,我按 <ESC>o ,如果需要输入变量,那么我在按<TAB>跳转到下一个变量${2},这样就可以一举两得了。
5、镜像,或者叫变量的引用。例如: printf("${1:test}=%d",$); ,后面的$1会根据前面的${1:test}自动输入。
2、vim-snippet的主要语法是根据textmate来的,所以,snippet没找到,textmate的找到就可以喽,呵呵。
Snippets
A snippet is a piece of text that you would like to insert in your document. It can include code to run at insertion time, variables (like selected text), tab stops/placeholders for missing information (which you can tab through after insertion) and perform transformations on the data which you enter in the placeholders.
7.1 Plain Text
In the simplest case, you can use snippets to insert text that you do not want to type again and again, either because you type it a lot, or because the actual text to insert is hard to remember (like your bank account details or the HTML entities for the Apple modifier keys).
If you use snippets to insert plain text there is only one thing you should be aware of: $ and ` are reserved characters. So if you want to insert one of these, prefix it with an escape (i.e. \$). An escape not followed by one of these two characters (or followed by another escape) will be inserted as a literal character.
7.2 Variables
You can insert the value of a variable by prefixing the name of the variable with $. All the normal dynamic variables are supported, the most useful probably being TM_SELECTED_TEXT. If for example we want to create a snippet which wraps the selection in a LaTeX \textbf command, we can make a snippet which is:
\textbf{$TM_SELECTED_TEXT}
If no text is selected the variable will not be set, so nothing will be inserted in its place. We can provide a default value by using this syntax: ${«variable»:«default value»}. For example:
\textbf{${TM_SELECTED_TEXT:no text was selected}}
The default value can itself contain variables or shell code. If you want the default text to contain a }, you need to escape it. But all other characters are used verbatim.
Variables also support regular expression replacements using this syntax: ${«variable»/«regexp»/«format»/«options»}. If the variable is not set the replacement will be performed on the empty string. For example, to prepend a bullet to each non-empty line in the selection (and insert that) we can do:
${TM_SELECTED_TEXT/^.+$/• $0/g}
7.3 Interpolated Shell Code
You can use backticks to have shell code executed when the snippet is inserted. The result from running the code gets inserted into the snippet, though with the last newline in the result removed (if present). So for example to create a snippet that wraps the selection in an HTML link, where the URL of that link comes from the clipboard, we can do:
<a href="`pbpaste`.html">$TM_SELECTED_TEXT</a>
Since this is normal bash code, we can write a small program. For example we can let it verify that the clipboard contains only a single line of text like this:
<a href="`

    if [[ $(pbpaste|wc -l) -eq 0 ]]

        then pbpaste

        else echo http://example.com/

    fi

`">$TM_SELECTED_TEXT</a>
Inside shell code, the only character you need to escape is the backtick.
7.4 Tab Stops
After insertion, the caret will be placed after the last character of the snippet. This is not always desirable and we can change that by using $0 to mark where we want the caret to be. So if for example we make an HTML div-snippet and want the caret to end between the opening and closing tags, we could make it like this:
<div>

    $0

</div>
Often though we want to fill in text in several places in the snippet. Multiple tab stops can be provided by inserting $1-$n. The caret will start at $1, then when pressing tab it will move to $2 and $3 on next tab etc. until there are no more tab stops. If you do not explicitly set $0, the caret will be at the end of the snippet.
So we could for example change the above to:
<div$1>

    $0

</div>
This allows us to fill in an argument and then tab on to $0.
7.5 Placeholders
Like variables, tab stops can also have default values (and are generally referred to as placeholders when they do). The syntax is the same: ${«tab stop»:«default value»}. And the default value can contain both text, shell code and other placeholders. So we can refine the previous example further:
<div${1: id="${2:some_id}"}>

    $0

</div>
Inserting this snippet will insert a div tag with the id argument selected and we can then decide either to overtype the argument (i.e. delete it) and press tab again to reach $0, or we can press tab immediately to get to the second tab stop (the value part of the argument) and edit that.
When you edit the placeholder text, any embedded tab stops will be removed.
7.6 Mirrors
There are times when you need to provide the same value several places in the inserted text and in these situations you can re-use the tab stop to signal that you want it mirrored at that location. So for example to create a LaTeX environment with a snippet, we can use:
\begin{${1:enumerate}}

    $0

\end{$1}
After inserting this snippet, enumerate will be selected and if we edit it, the changes will be reflected in the \end part as well.
7.7 Transformations
There are situations where we want our placeholder text mirrored but with slight changes or where we want some text to appear depending on the value/presence of a placeholder.
We can accomplish this by doing a regular expression substitution on the placeholder text (when mirroring it). The syntax for this is: ${«tab stop»/«regexp»/«format»/«options»}.
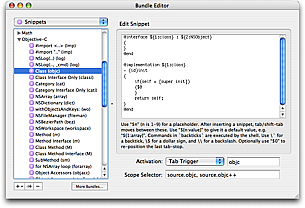
As an example, the Objective-C getter/setter methods (prior to the @property keyword) often look like this (in the thread-unsafe form):
- (id)foo

{

    return foo;

}

- (void)setFoo:(id)aValue

{

    [foo autorelease];

    foo = [aValue retain];

}
In the format string we can use \u to uppercase the next character, so a snippet that only asks for the name of the instance variable once could look like this:
- (${1:id})${2:foo}

{

    return $2;

}

- (void)set${2/./\u$0/}:($1)aValue

{

    [$2 autorelease];

    $2 = [aValue retain];

}
We can also use conditional insertions in the format string to make decisions. For example if we create a snippet for a method we can let the return type decide whether or not the method should include a return statement like this:
- (${1:void})${2:methodName}

{${1/void$|(.+)/(?1:\n\treturn nil;)/}

}
Here we match placeholder 1 against void or anything (.+) and put the latter match in capture register 1. Then only if we did match something (other than void) will we insert a newline, tab and the return nil; text.
vim-snipmate编写snippet的语法的更多相关文章
- Linux系统里让vim支持markdown格式的语法高亮
Markdown是深受程序员喜爱的一个文件格式. 然而Linux里默认的vim设置,并不支持markdown格式的语法高亮显示. 下面就来介绍如何设置使得markdown格式的文件在vim里也能享有语 ...
- vim显示行号、语法高亮、自动缩进的设置
转载自:http://blog.csdn.net/chuanj1985/article/details/6873830 在UBUNTU中vim的配置文件存放在/etc/vim目录中,配置文件名为v ...
- Vim的行号、语法显示等设置(.vimrc文件的配置)以及乱码解决
在终端下使用vim进行编辑时,默认情况下,编辑的界面上是没有显示行号.语法高亮度显示.智能缩进 等功能的.为了更好的在vim下进行工作,需要手动设置一个配置文件:.vimrc.在启动vim时,当前用户 ...
- 更适合程序员使用的Vim配置 显示行号 语法高亮 智能缩进
在终端下使用vim进行编辑时,默认情况下,编辑的界面上是没有显示行号.语法高亮度显示.智能缩进等功能的.为了更好的在vim下进行工作,需要手动设置一个配置文件:.vimrc.在启动vim时,当前用户根 ...
- vim显示行号、语法高亮、自动缩进、添加下划线的设置
ubuntu默认是没有安装vim的,所以设置以前请先安装vim:sudo apt-get install vim. 然后 打开vim的配置文件:sudo vim /etc/vim/vimrc 或者 s ...
- vim中编写python代码使用python-mode和syntastic插件时警告(Warning)的消除
问题: 在Vim使用了syntastic后,编写代码时,可以对代码错误和警告进行相对实时的了解,对编写代码有很大的帮助.同时这个插件和python-mode一起工作时,可以对python代码的编写提供 ...
- Vim技能修炼教程(3) - 语法高亮进阶
语法高亮进阶 首先我们复习一下上节学到的三个命令: * syntax match用于定义正则表达式和规则的对应 * highlight default定义配色方案 * highlight link将正 ...
- Vim技能修炼教程(2) - 语法高亮速成
语法高亮速成 我们继续在人间修行Vim技能之旅.上一次我们学习了如何通过vundle安装插件,这次我们迅速向写插件的方向挺进. 我们先学习一个最简单的语法高亮插件的写法. 语法高亮基本上是由三部分组成 ...
- 转 markdown编写规则、语法
http://www.jianshu.com/p/1e402922ee32/ Markdown——入门指南 字数2231 阅读307754 评论115 喜欢1350 转载请注明原作者,如果你觉得这篇文 ...
随机推荐
- 【死磕Java并发】-----深入分析synchronized的实现原理
记得刚刚開始学习Java的时候.一遇到多线程情况就是synchronized.相对于当时的我们来说synchronized是这么的奇妙而又强大,那个时候我们赋予它一个名字"同步". ...
- 安全删除U盘或其他硬件 unlocker的使用方法
1 假如我在优盘里新建一个文档,并且正在读写文件. 点击右下角的安全删除的时候弹出如下对话框. 2 在该优盘上右击,Unlocker,弹出的对话框显示NOTEPAD.EXE正在使用. 3 在确保左侧是 ...
- 搭建一个SpringBoot项目
1.创建项目 New->Spring Starter Project 2.添加支持 增加对mybatis plus的支持,修改pom.xml,增加如下内容: <dependency> ...
- es6(const、let)
首先我很好奇,明明现代浏览器支持ES6.ES7不是那么好,为何还推行? var let const 有何区别?它们之间的限制又是什么?且听我娓娓道来 1. var 和let的关系,为何推荐let? ( ...
- Java从零开始学八(循环结构)
一.循环结构 循环结构则是根据判断条件的成立与否,决定程序段落的执行次数,而这个程序段落就称为循环主体.
- YUM常用命令详解
yum是一个用于管理rpm包的后台程序,用python写成,可以非常方便的解决rpm的依赖关系.在建立好yum服务器后,yum客户端可以通过 http.ftp方式获得软件包,并使用方便的命令直接管理. ...
- 5、main方法详解
public class HelloWorld { public static void main(String[] args){ System.out.print("Hello World ...
- 利用SynchronizationContext.Current在线程间同步上下文
简而言之就是允许一个线程和另外一个线程进行通讯,SynchronizationContext在通讯中充当传输者的角色.另外这里有个地方需要清楚的,不是每个线程都附加SynchronizationCon ...
- 理解ROC和AUC
分类器各种各样,如何评价这些分类器的性能呢?(这里只考虑二元分类器,分类器的输出为概率值) 方法一:概率定义法 从正样本中随机选取元素记为x,从负样本中随机选取元素记为y,x的置信度大于y的概率 计算 ...
- 机器学习中的 ground truth
维基百科关于 ground truth的解释: [Ground truth] 大致为: 在统计学和机器学习中:在机器学习中ground truth表示有监督学习的训练集的分类准确性,用于证明或者推翻某 ...