
android+json+php+mysql实现用户反馈功能
相信每个项目都会有用户反馈建议等功能,这个实现的方法很多,下面是我实现的方法,供大家交流。首先看具体界面,三个字段。名字,邮箱为选填,可以为空,建议不能为空。如有需要可以给我留言。
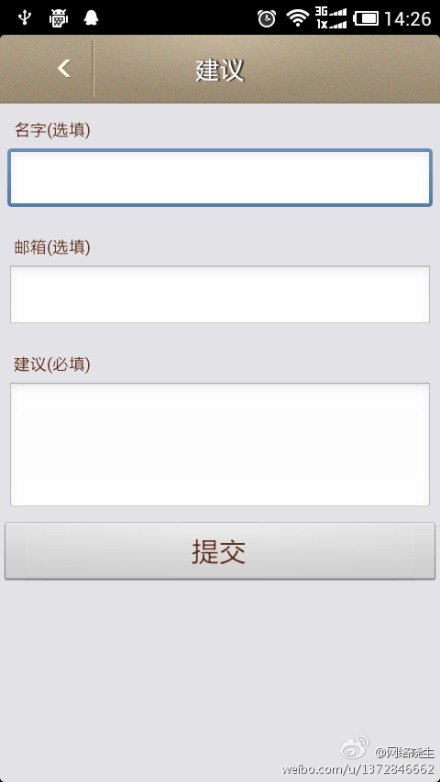
下面贴出布局代码,这里用到一个<include layout="@layout/uphead">就是把另外一个布局文件引入到这个布局中。
<?xml version="1.0" encoding="utf-8"?>

<LinearLayout xmlns:android="http://schemas.android.com/apk/res/android"

    android:layout_width="match_parent"

    android:layout_height="match_parent"

    android:orientation="vertical"

    android:background="@color/bg_gray" >

    <include layout="@layout/uphead"/>

    <!-- Name Label -->

    <TextView android:layout_width="fill_parent"

        android:layout_height="wrap_content"

        android:text="名字(选填)"

        android:paddingLeft="10dip"

        android:paddingRight="10dip"

        android:textColor="@color/coffee"

        android:paddingTop="10dip"

        android:textSize="12sp"/>

    <!-- Input Name -->

    <EditText android:id="@+id/inputName"

        android:layout_width="fill_parent"

        android:layout_height="wrap_content"

        android:layout_margin="5dip"

        android:layout_marginBottom="15dip"

        android:singleLine="true"/>

    <!-- Price Label -->

    <TextView android:layout_width="fill_parent"

        android:layout_height="wrap_content"

        android:text="邮箱(选填)"

        android:paddingLeft="10dip"

        android:paddingRight="10dip"

        android:textColor="@color/coffee"

        android:paddingTop="10dip"

        android:textSize="12sp"/>

    <!-- Input Price -->

    <EditText android:id="@+id/inputEmail"

        android:layout_width="fill_parent"

        android:layout_height="wrap_content"

        android:layout_margin="5dip"

        android:layout_marginBottom="15dip"

        android:singleLine="true"/>

    <!-- Description Label -->

    <TextView android:layout_width="fill_parent"

        android:layout_height="wrap_content"

        android:text="建议(必填)"

        android:paddingLeft="10dip"

        android:paddingRight="10dip"

        android:paddingTop="10dip"

        android:textColor="@color/coffee"

        android:textSize="12sp"/>

    <!-- Input description -->

    <EditText android:id="@+id/inputDesc"

        android:layout_width="fill_parent"

        android:layout_height="wrap_content"

        android:layout_margin="5dip"

        android:layout_marginBottom="15dip"

        android:lines="4"

        android:gravity="top"/>

    <!-- Button Create Product -->

    <Button android:id="@+id/btnCreateProduct"

        android:layout_width="fill_parent"

        android:layout_height="wrap_content"

        android:text="提交"

        android:textSize="20sp"

        android:textColor="@color/coffee"

        />

</LinearLayout>
下面贴出uphead的布局代码,里面用到一个TextView,一个Button为返回按钮。
<?xml version="1.0" encoding="utf-8"?>

<RelativeLayout xmlns:android="http://schemas.android.com/apk/res/android"

        android:layout_width="fill_parent"

        android:layout_height="50dp"

        android:background="@drawable/top" >

        <TextView

            android:id="@+id/tv_head"

            android:layout_width="wrap_content"

            android:layout_height="wrap_content"

            android:layout_centerInParent="true"

            android:shadowColor="#ff000000"

            android:shadowDx="2"

            android:shadowDy="0"

            android:shadowRadius="1"

            android:text=""

            android:textColor="@color/white"

            android:textSize="18sp"

            android:textStyle="bold" />

        <Button

            android:id="@+id/upback"

            android:layout_width="wrap_content"

            android:layout_height="wrap_content"

            android:layout_alignParentLeft="true"

            android:layout_centerVertical="true"

            android:layout_marginLeft="17dp"

            android:drawableLeft="@id/tv_head"

            android:background="@drawable/back" />

    </RelativeLayout>
下面贴出android客户端代码,三个类,一个用于与服务器交互发送post请求,以及json的传递。还有一个Dailog实例。
package com.android.up;

import java.util.ArrayList;

import java.util.List;

import org.apache.http.HttpResponse;

import org.apache.http.NameValuePair;

import org.apache.http.client.ClientProtocolException;

import org.apache.http.message.BasicNameValuePair;

import org.json.JSONObject;

import com.android.MainActivity;

import com.android.R;

import com.anroid.net.DialogUtil;

import android.app.Activity;

import android.app.ProgressDialog;

import android.content.Intent;

import android.os.AsyncTask;

import android.os.Bundle;

import android.view.View;

import android.view.View.OnClickListener;

import android.widget.Button;

import android.widget.EditText;

import android.widget.TextView;

public class up extends Activity {

    // Progress Dialog

    private ProgressDialog pDialog;

    private TextView tv_head;

    JSONParser jsonParser = new JSONParser();

    EditText inputName;

    EditText inputEmail;

    EditText inputDesc;

    Button upback;

    // 定义脚本文件地址,我这里是本地搭建的地址,服务器段脚本文件名为up.php

    private static String url_up = "http://127.0.0.1/up/up.php";

    private static final String TAG_MESSAGE = "message";

    @Override

    public void onCreate(Bundle savedInstanceState) {

        super.onCreate(savedInstanceState);

        setContentView(R.layout.up);

        tv_head = (TextView)findViewById(R.id.tv_head);

        tv_head.setText("建议");

        // Edit Text

        inputName = (EditText) findViewById(R.id.inputName);

        inputEmail = (EditText) findViewById(R.id.inputEmail);

        inputDesc = (EditText) findViewById(R.id.inputDesc);

        upback = (Button)findViewById(R.id.upback);

        upback.setOnClickListener(new OnClickListener() {

            @Override

            public void onClick(View arg0) {

                // TODO Auto-generated method stub

                Intent back = new Intent(up.this,MainActivity.class);

                back.setFlags(Intent.FLAG_ACTIVITY_CLEAR_TOP);

                startActivity(back);

                up.this.finish();

            }

        });

        // Create button

        Button btnCreateProduct = (Button) findViewById(R.id.btnCreateProduct);

        // button click event

        btnCreateProduct.setOnClickListener(new View.OnClickListener() {

            public void onClick(View view) {

                // creating new product in background thread

                if(validate()){

                new Up().execute();

            }

                }

        });

    }

    private boolean validate()

    {

        String description = inputDesc.getText().toString().trim();

        if (description.equals(""))

        {

            DialogUtil.showDialog(this, "您还没有填写建议", false);

            return false;

        }

        return true;

    }

    /**

     * Background Async Task to Create new product

     * */

    class Up extends AsyncTask<String, String, String> {

        /**

         * Before starting background thread Show Progress Dialog

         * */

        @Override

        protected void onPreExecute() {

            super.onPreExecute();

            pDialog = new ProgressDialog(up.this);

            pDialog.setMessage("正在上传..");

            pDialog.setIndeterminate(false);

            pDialog.setCancelable(true);

            pDialog.show();

        }

        /**

         * Creating product

         * */

        protected String doInBackground(String... args) {

            String name = inputName.getText().toString();

            String email = inputEmail.getText().toString();

            String description = inputDesc.getText().toString();

            // Building Parameters

            List<NameValuePair> params = new ArrayList<NameValuePair>();

            params.add(new BasicNameValuePair("name", name));

            params.add(new BasicNameValuePair("email", email));

            params.add(new BasicNameValuePair("description", description));

            // getting JSON Object

            // Note that create product url accepts POST method

           try{

            JSONObject json = jsonParser.makeHttpRequest(url_up,

                    "POST", params);

            String message = json.getString(TAG_MESSAGE);

            return message;

           }catch(Exception e){

               e.printStackTrace();

               return "";

           }

            // check for success tag

        }

        /**

         * After completing background task Dismiss the progress dialog

         * **/

        protected void onPostExecute(String message) {

            pDialog.dismiss();

           //message 为接收doInbackground的返回值

            Toast.makeText(getApplicationContext(), message, 8000).show();

        }

        }

    }
下面贴出Dailog实例类
/**

 *

 */

package com.anroid.net;

import android.app.AlertDialog;

import android.content.Context;

import android.content.DialogInterface;

import android.content.DialogInterface.OnClickListener;

import android.view.View;

import android.app.Activity;

public class DialogUtil

{

    // 定义一个显示消息的对话框

    public static void showDialog(final Context ctx

        , String msg , boolean closeSelf)

    {

        // 创建一个AlertDialog.Builder对象

        AlertDialog.Builder builder = new AlertDialog.Builder(ctx)

            .setMessage(msg).setCancelable(false);

        if(closeSelf)

        {

            builder.setPositiveButton("确定", new OnClickListener()

            {

                public void onClick(DialogInterface dialog, int which)

                {

                    // 结束当前Activity

                    ((Activity)ctx).finish();

                }

            });

        }

        else

        {

            builder.setPositiveButton("确定", null);

        }

        builder.create().show();

    }

    // 定义一个显示指定组件的对话框

    public static void showDialog(Context ctx , View view)

    {

        AlertDialog.Builder builder = new AlertDialog.Builder(ctx)

            .setView(view).setCancelable(false)

            .setPositiveButton("确定", null);

        builder.create()

            .show();

    }

}
剩下就是如何与服务器端交互了不多说,代码如下
package com.android.up;

import java.io.BufferedReader;

import java.io.IOException;

import java.io.InputStream;

import java.io.InputStreamReader;

import java.io.UnsupportedEncodingException;

import java.util.List;

import org.apache.http.HttpEntity;

import org.apache.http.HttpResponse;

import org.apache.http.NameValuePair;

import org.apache.http.client.ClientProtocolException;

import org.apache.http.client.entity.UrlEncodedFormEntity;

import org.apache.http.client.methods.HttpPost;

import org.apache.http.impl.client.DefaultHttpClient;

import org.apache.http.protocol.HTTP;

import org.json.JSONException;

import org.json.JSONObject;

import android.util.Log;

public class JSONParser {

    static InputStream is = null;

    static JSONObject jObj = null;

    static String json = "";

    // constructor

    public JSONParser() {

    }

    // function get json from url

    // by making HTTP POST

    public JSONObject makeHttpRequest(String url, String method,

            List<NameValuePair> params) {

        // Making HTTP request

        try {

                // request method is POST

                // defaultHttpClient

                DefaultHttpClient httpClient = new DefaultHttpClient();

                HttpPost httpPost = new HttpPost(url);

                httpPost.setEntity(new UrlEncodedFormEntity(params,HTTP.UTF_8));

                HttpResponse httpResponse = httpClient.execute(httpPost);

                HttpEntity httpEntity = httpResponse.getEntity();

                is = httpEntity.getContent();

        } catch (UnsupportedEncodingException e) {

            e.printStackTrace();

        } catch (ClientProtocolException e) {

            e.printStackTrace();

        } catch (IOException e) {

            e.printStackTrace();

        }

        try {

            BufferedReader reader = new BufferedReader(new InputStreamReader(

                    is, "UTF-8"));

            StringBuilder sb = new StringBuilder();

            String line = null;

            while ((line = reader.readLine()) != null) {

                sb.append(line + "\n");

            }

            is.close();

            json = sb.toString();

        } catch (Exception e) {

            Log.e("Buffer Error", "Error converting result " + e.toString());

            Log.d("json", json.toString());

        }

        // try parse the string to a JSON object

        try {

            jObj = new JSONObject(json);

        } catch (JSONException e) {

            Log.e("JSON Parser", "Error parsing data " + e.toString());

        }

        // return JSON String

        return jObj;

    }

}
到此android客户端已经完成,后天服务器端用php+mysql实现,当然这里只是个实例,存取到数据库里面,没有进行展示,代码如下
<?php

// array for JSON response

$response = array();

include("conn.php");

// check for required fields

if (isset($_POST['name']) && isset($_POST['email']) && isset($_POST['description'])) {

    $name = $_POST['name'];

    $email = $_POST['email'];

    $description = $_POST['description'];

    $result = mysql_query("INSERT INTO up(name, email, description) VALUES('$name', '$email', '$description')");// check if row inserted or not

    if ($result) {

        // successfully inserted into database

        $response["success"] = 1;

        $response["message"] = "Product successfully created.";

        // echoing JSON response

        echo json_encode($response);

    } else {

        // failed to insert row

        $response["success"] = 0;

        $response["message"] = "Oops! An error occurred.";

        // echoing JSON response

        echo json_encode($response);

    }

} else {

    // required field is missing

    $response["success"] = 0;

    $response["message"] = "Required field(s) is missing";

    // echoing JSON response

    echo json_encode($response);

}

?>
数据库表结构如下,连接数据库代码就不贴出了,记得把编码设置为UTF-8就行了。

到此就完成了一个用户反馈的基本功能,后台数据里展示。如有问题欢迎给我留言。
【原文地址】:http://www.cnblogs.com/LIANQQ/archive/2012/11/14/2769911.html
android+json+php+mysql实现用户反馈功能的更多相关文章
- Android开发之JavaMail发送邮件(用户反馈)
给APP增加了一个用户反馈的小功能,由于懒的搭服务器,所以就用邮件的形式进行通信,有如下两种方式: 1.使用调用手机上的其他程序完成邮件发送 2.使用javamail进行邮件发送 这里果断使用java ...
- iOS:移动端“用户反馈和客服”的几个平台SDK的介绍
简单阐述: 用户反馈功能几乎是每个app都有的一个功能点,通过反馈功能实现与用户的连接.沟通,随时随地收集用户意见反馈和Bug报告,即时和用户保持沟通,在一定程度上提升了app的竞争力.而给app评分 ...
- 小程序用户反馈 - HotApp小程序统计仿微信聊天用户反馈组件,开源
用户反馈是小程序开发必要的一个功能,但是和自己核心业务没关系,主要是产品运营方便收集用户的对产品的反馈.HotApp推出了用户反馈的组件,方便大家直接集成使用 源码下载地址: https://gith ...
- 利用MYSQL的函数实现用户登录功能,进出都是JSON(第二版)
利用MYSQL的函数实现用户登录功能,进出都是JSON(第二版) CREATE DEFINER=`root`@`%` FUNCTION `uc_session_login`( `reqjson` JS ...
- Android监听自身卸载,弹出用户反馈调查
1,情景分析 在上上篇博客中我写了一下NDK开发实践项目,使用开源的LAME库转码MP3,作为前面几篇基础博客的加深理解使用的,但是这样的项目用处不大,除了练练NDK功底.这篇博客,我将讲述一下一个各 ...
- Android 应用监听自身卸载,弹出用户反馈调查
监听卸载情景和原理分析 1,情景分析 在上上篇博客中我写了一下NDK开发实践项目,使用开源的LAME库转码MP3,作为前面几篇基础博客的加深理解使用的,但是这样的项目用处不大,除了练练NDK功底.这篇 ...
- 详解MySQL的用户密码过期功能
这篇文章主要为大家详细介绍了MySQL的用户密码过期功能的相关资料,需要的朋友可以参考下 Payment Card Industry,即支付卡行业,PCI行业表示借记卡.信用卡.预付卡.电子钱包. ...
- MySQL的用户密码过期功能详解
MySQL的用户密码过期功能详解 作者:chszs,未经博主允许不得转载.经许可的转载需注明作者和博客主页:http://blog.csdn.net/chszs 先说明两个术语. Payment Ca ...
- MySQL的用户密码过期功能
Payment Card Industry,即支付卡行业,PCI行业表示借记卡.信用卡.预付卡.电子钱包.ATM和POS卡及相关的业务. PCI DSS,即PCI数据安全标准(Payment Card ...
随机推荐
- 【已开源】Flutter 穿山甲广告插件的集成-FlutterAds
前言 上篇文章我们聊了国内各大广告平台对 Flutter 的支持程度和我为什么创建 FlutterAds 来构建优质的 Flutter 广告插件,帮助开发者获利.本篇我们来看看Flutter 穿山甲广 ...
- CentOS 系统 查看 cpu核数
转载自 :Centos下查看cpu核数 - 韩憨 - 博客园 (cnblogs.com) 1.概念物理CPU:实际Server中插槽上的CPU个数.物理cpu数量:可以数不重复的 physical i ...
- mongodb基础整理篇————简单介绍[一]
前言 简单介绍一下文档数据库. 正文 mongodb 是一个以json为数据模型的文档数据库. 这里要介绍一下什么是json.因为有些人认为'{a:1,b:2}' 是json,而"this ...
- textarea换行符转换
/** * @description textarea换行符转指定字符 * @param str:要放到textarea的字符串 * @param code:要转换成换行的字符,默认为',' */ e ...
- 百度地图BMap实现在行政区域内做标注
使用环境 vue bmap.js element-ui 页面展示 前提步骤 在index中引入百度地图提供的js库 在使用的vue页面中实例化地图 <!-- 给id随便起给名字 --> & ...
- CobaltStrike简介与安装
CobaltStrike的安装我踩了不少坑,所以我将正确的安装及启动过程跟大家分享一下,以免大家走一些不必要的弯路 Cobaltstrike简介 Cobalt Strike是一款美国Red Team开 ...
- Redis介绍一
一.五中数据类型 String: 字符串 Hash: 散列 List: 列表 Set: 集合 Sorted Set: 有序集合 Redis 发布订阅 Redis 发布订阅 (pub/sub) 是一种消 ...
- Flowable实战(八)BPMN2.0 任务
任务是流程中最重要的组成部分.Flowable提供了多种任务类型,以满足实际需求. 常用任务类型有: 用户任务 Java Service任务 脚本任务 业务规则任务 执行监听器 任务监听器 多 ...
- Android官方文档翻译 二 1.Building Your First App
Building Your First App 创建你的第一个App项目 Dependencies and prerequisites 依赖关系和先决条件 * Android SDK * ADT Pl ...
- WebGPU 中消失的 VAO
1 VAO 是 OpenGL 技术中提出来的 参考: 外链 其中有一段文字记录了 VAO 是什么: A Vertex Array Object (VAO) is an object which con ...