实验3:OpenFlow协议分析实践
作业链接:实验3:OpenFlow协议分析实践
一、实验目的
- 能够运用 wireshark 对 OpenFlow 协议数据交互过程进行抓包;
- 能够借助包解析工具,分析与解释 OpenFlow协议的数据包交互过程与机制。
二、实验环境
- 下载虚拟机软件Oracle VisualBox;
- 在虚拟机中安装Ubuntu 20.04 Desktop amd64,并完整安装Mininet;
三、实验要求
(一)基本要求
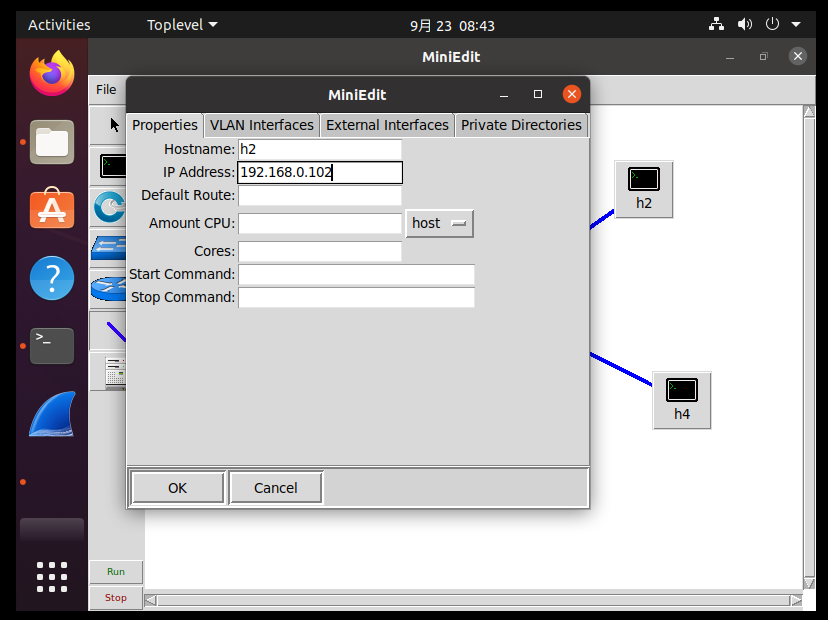
1.搭建下图所示拓扑,完成相关 IP 配置,并实现主机与主机之间的 IP 通信。用抓包软件获取控制器与交换机之间的通信数据包。
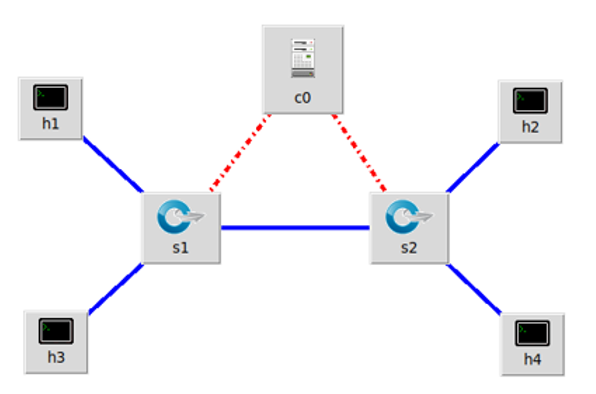
| 主机 | IP地址 |
|---|---|
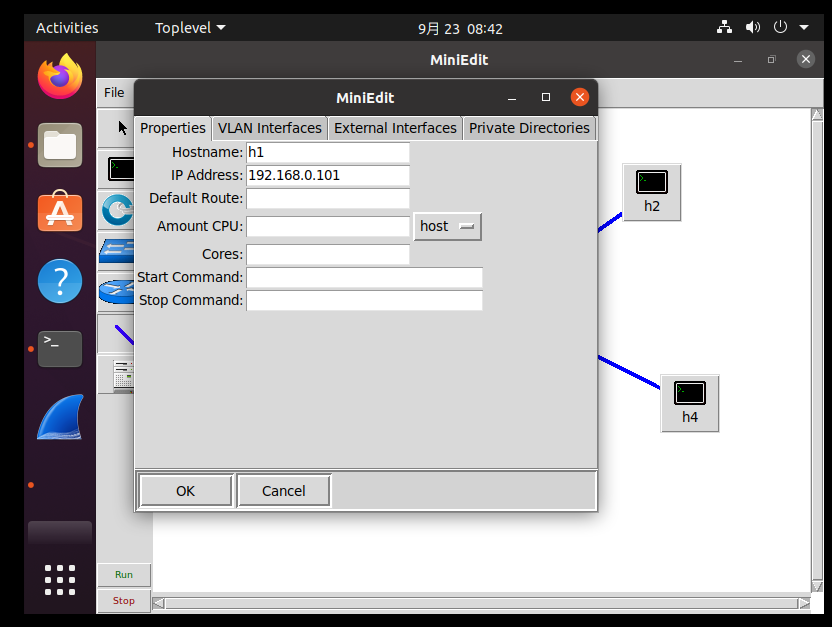
| h1 | 192.168.0.101/24 |
| h2 | 192.168.0.102/24 |
| h3 | 192.168.0.103/24 |
| h4 | 192.168.0.104/24 |
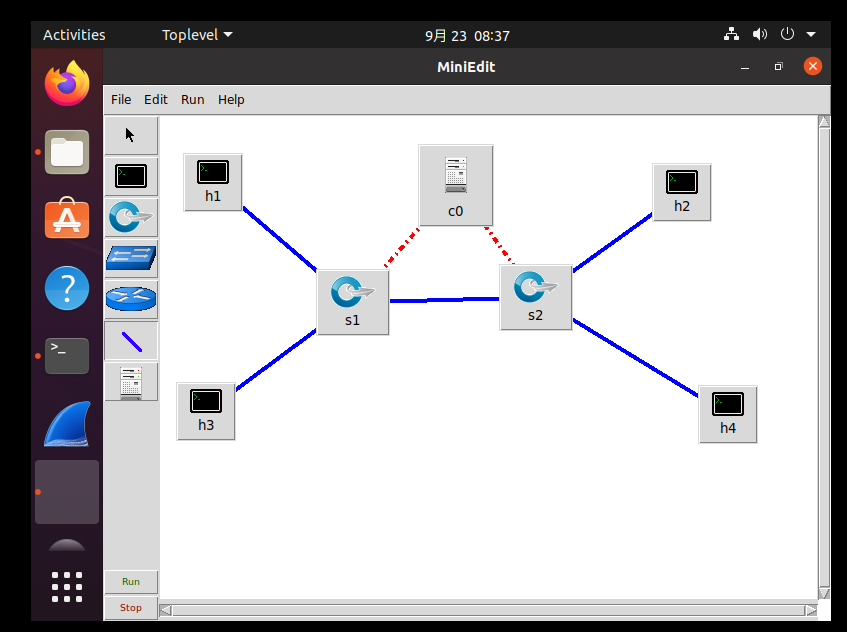
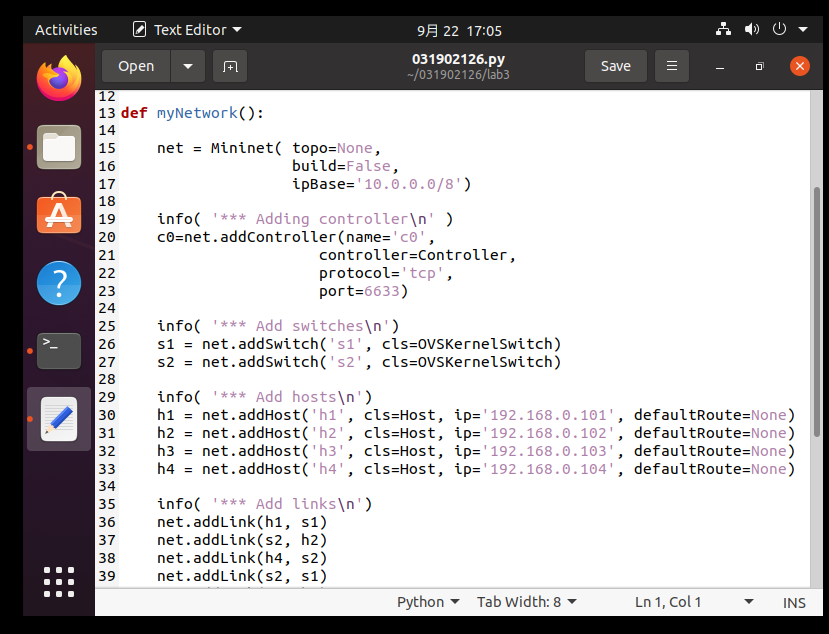
- 构建拓扑
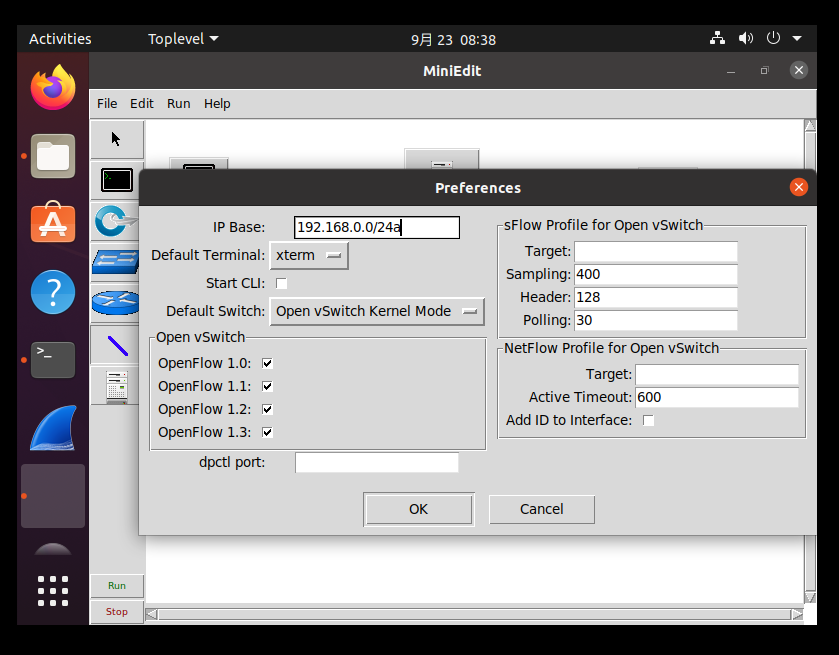
- 配置子网掩码和ip地址(只给出h1和h2的ip配置,其他是一样的)
- 检查
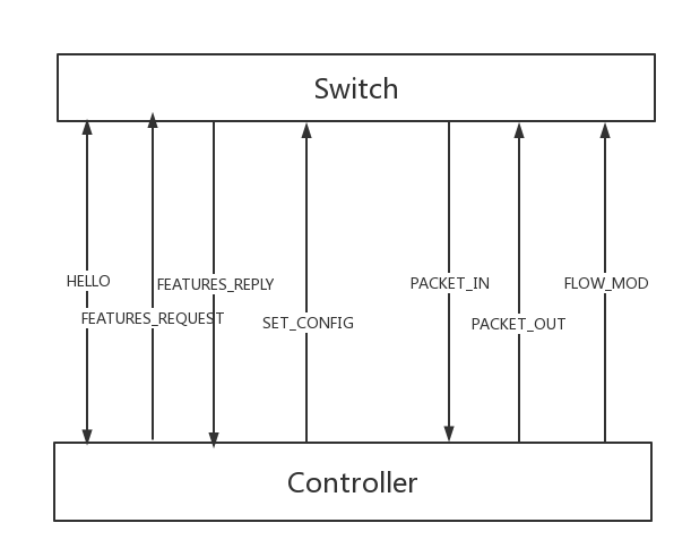
2.查看抓包结果,分析OpenFlow协议中交换机与控制器的消息交互过程,画出相关交互图或流程图。
- 在构建拓扑之前打开wireshark(选择any),然后运行文件并pingall。

- 查看抓的包
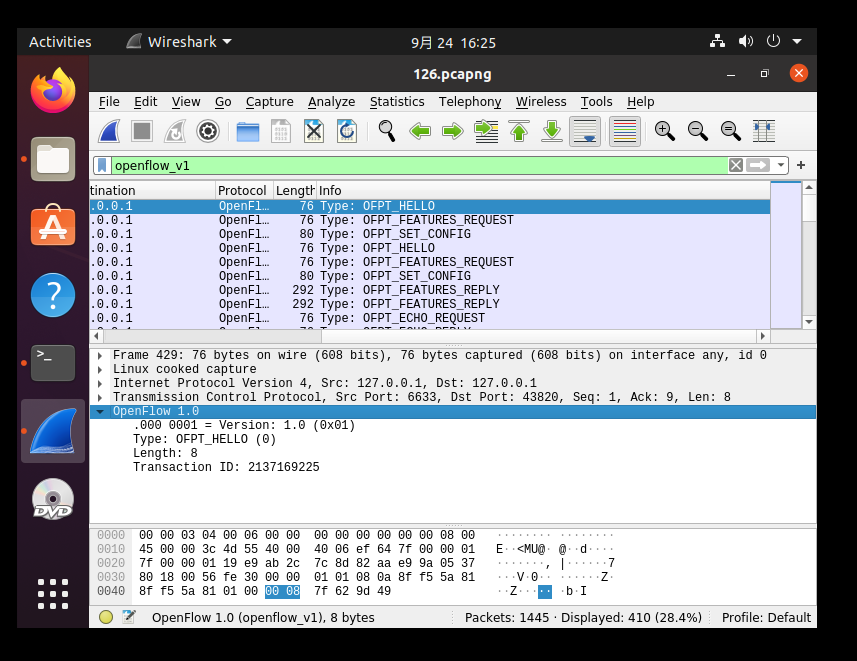
1.OFPT_HELLO
从6633端口到43820端口,openflow1.0协议
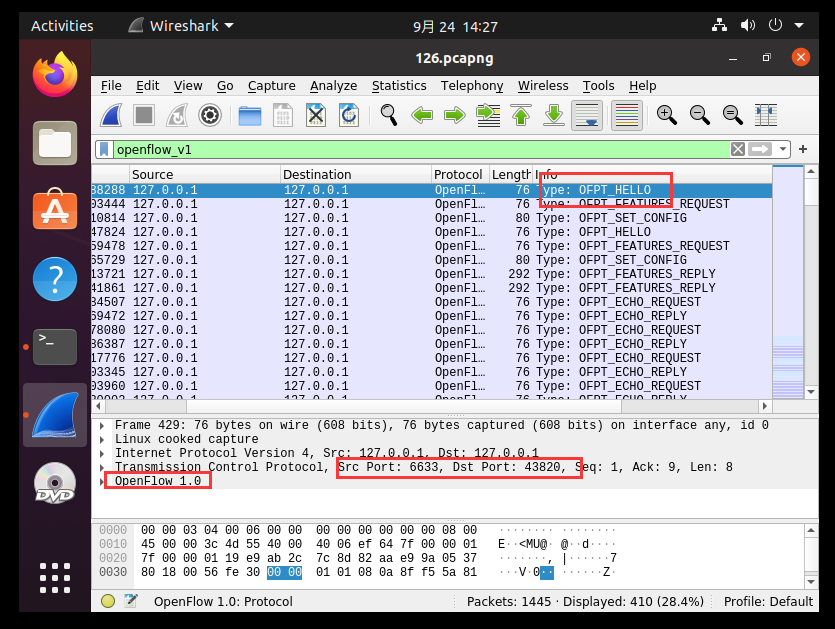
从43820端口到6633端口,openflow1.5协议

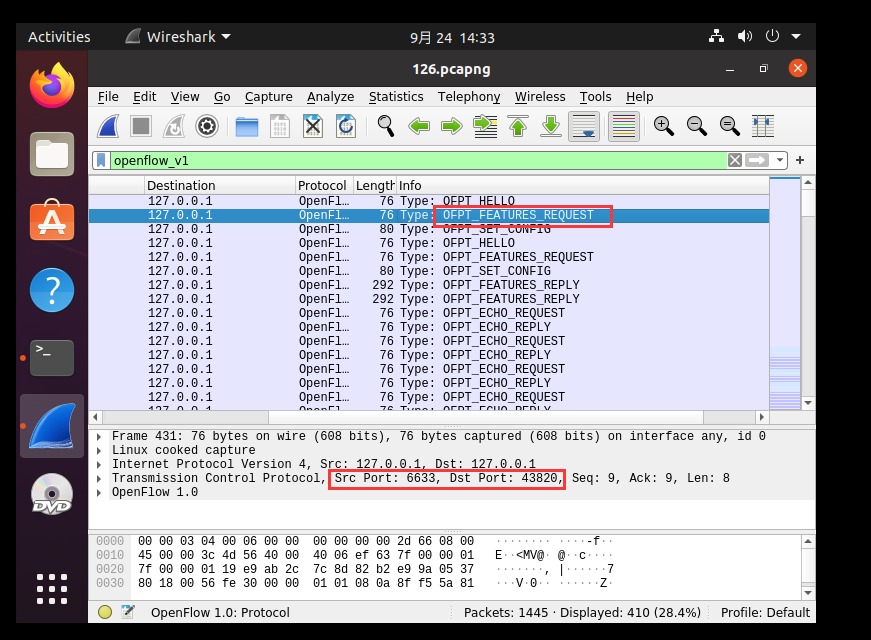
2.OFPT_FEATURES_REQUEST 从6633端口到43820端口
3.OFPT_SET_CONFIG 从6633端口到43820端口

4.OFPT_PORT_STATUS 从43820端口到6633端口
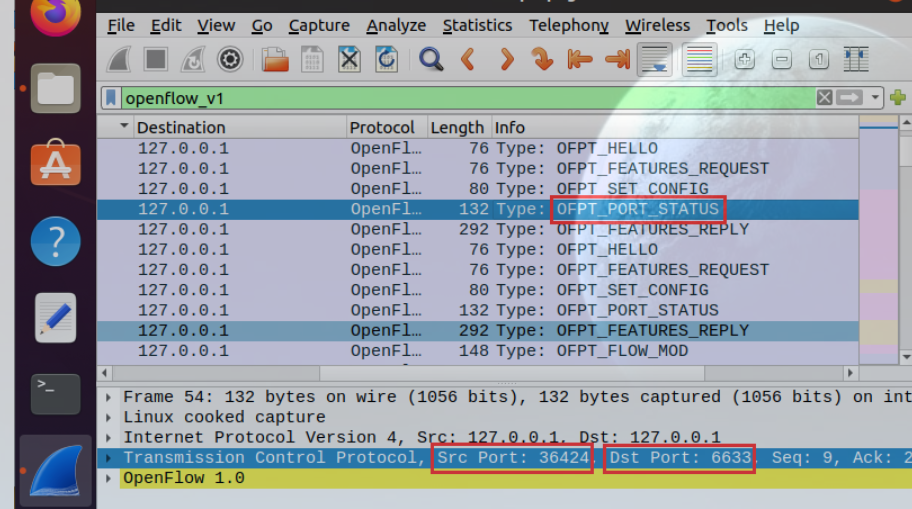
5.OFPT_FEATURES_REPLY 从43820端口到6633端口

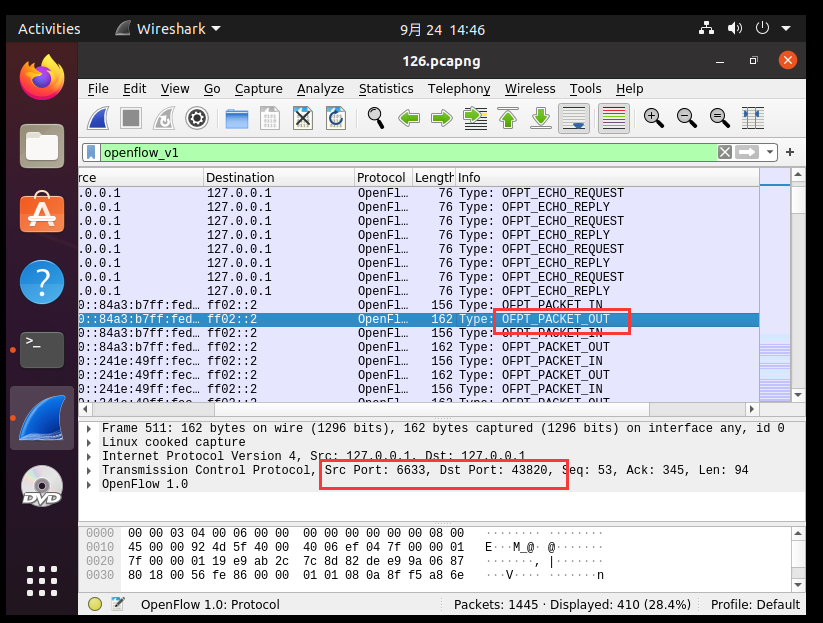
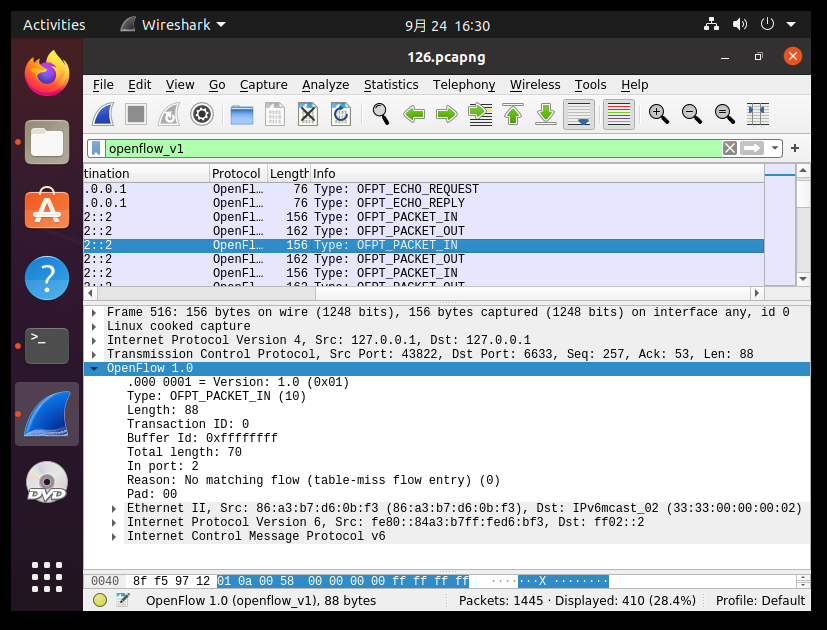
6.OFPT_PACKET_IN 从43820端口到6633端口

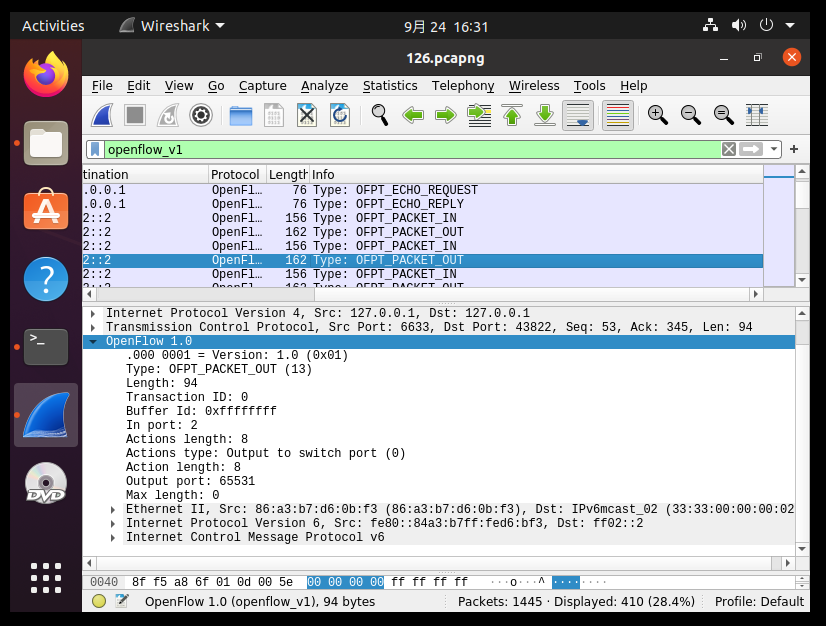
7.OFPT_PACKET_OUT 从6633端口到43820端口
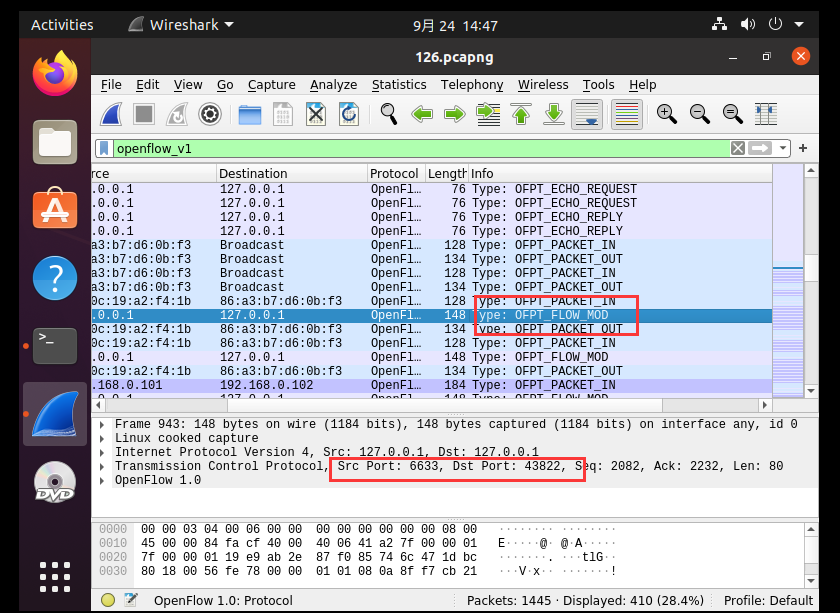
8.OFPT_FLOW_MOD 从6633端口到43820端口
- 对应流程图如下:
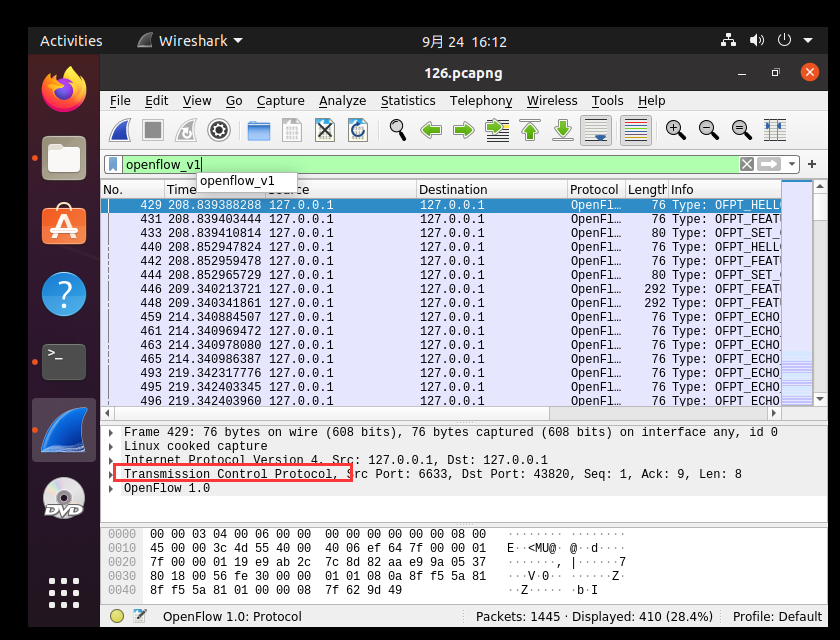
3.回答问题:交换机与控制器建立通信时是使用TCP协议还是UDP协议?
Transmission Control Protocol即TCP协议
(二)进阶要求
将抓包结果对照OpenFlow源码,了解OpenFlow主要消息类型对应的数据结构定义。
1.HELLO
struct ofp_header {

    uint8_t version;    /* OFP_VERSION. */

    uint8_t type;       /* One of the OFPT_ constants. */

    uint16_t length;    /* Length including this ofp_header. */

    uint32_t xid;       /* Transaction id associated with this packet.

                           Replies use the same id as was in the request

                           to facilitate pairing. */

};

struct ofp_hello {

    struct ofp_header header;

};
2.OFPT_FEATURES_REQUEST
源码与HELLO类似

3.OFPT_SET_CONFIG
/* Switch configuration. */

struct ofp_switch_config {

    struct ofp_header header;

    uint16_t flags;             /* OFPC_* flags. */

    uint16_t miss_send_len;     /* Max bytes of new flow that datapath should

                                   send to the controller. */

};

4.OFPT_PORT_STATUS
/* A physical port has changed in the datapath */

struct ofp_port_status {

    struct ofp_header header;

    uint8_t reason;          /* One of OFPPR_*. */

    uint8_t pad[7];          /* Align to 64-bits. */

    struct ofp_phy_port desc;

};

5.OFPT_FEATURES_REPLY
struct ofp_switch_features {

    struct ofp_header header;

    uint64_t datapath_id;   /* Datapath unique ID.  The lower 48-bits are for

                               a MAC address, while the upper 16-bits are

                               implementer-defined. */

    uint32_t n_buffers;     /* Max packets buffered at once. */

    uint8_t n_tables;       /* Number of tables supported by datapath. */

    uint8_t pad[3];         /* Align to 64-bits. */

    /* Features. */

    uint32_t capabilities;  /* Bitmap of support "ofp_capabilities". */

    uint32_t actions;       /* Bitmap of supported "ofp_action_type"s. */

    /* Port info.*/

    struct ofp_phy_port ports[0];  /* Port definitions.  The number of ports

                                      is inferred from the length field in

                                      the header. */

};

/* Description of a physical port */

struct ofp_phy_port {

    uint16_t port_no;

    uint8_t hw_addr[OFP_ETH_ALEN];

    char name[OFP_MAX_PORT_NAME_LEN]; /* Null-terminated */

    uint32_t config;        /* Bitmap of OFPPC_* flags. */

    uint32_t state;         /* Bitmap of OFPPS_* flags. */

    /* Bitmaps of OFPPF_* that describe features.  All bits zeroed if

     * unsupported or unavailable. */

    uint32_t curr;          /* Current features. */

    uint32_t advertised;    /* Features being advertised by the port. */

    uint32_t supported;     /* Features supported by the port. */

    uint32_t peer;          /* Features advertised by peer. */

};

6.OFPT_PACKET_IN
struct ofp_packet_in {

    struct ofp_header header;

    uint32_t buffer_id;     /* ID assigned by datapath. */

    uint16_t total_len;     /* Full length of frame. */

    uint16_t in_port;       /* Port on which frame was received. */

    uint8_t reason;         /* Reason packet is being sent (one of OFPR_*) */

    uint8_t pad;

    uint8_t data[0];        /* Ethernet frame, halfway through 32-bit word,

                               so the IP header is 32-bit aligned.  The

                               amount of data is inferred from the length

                               field in the header.  Because of padding,

                               offsetof(struct ofp_packet_in, data) ==

                               sizeof(struct ofp_packet_in) - 2. */

};
7.OFPT_PACKET_OUT
struct ofp_packet_out {

    struct ofp_header header;

    uint32_t buffer_id;           /* ID assigned by datapath (-1 if none). */

    uint16_t in_port;             /* Packet's input port (OFPP_NONE if none). */

    uint16_t actions_len;         /* Size of action array in bytes. */

    struct ofp_action_header actions[0]; /* Actions. */

    /* uint8_t data[0]; */        /* Packet data.  The length is inferred

                                     from the length field in the header.

                                     (Only meaningful if buffer_id == -1.) */

};
8.OFPT_FLOW_MOD
struct ofp_flow_mod {

    struct ofp_header header;

    struct ofp_match match;      /* Fields to match */

    uint64_t cookie;             /* Opaque controller-issued identifier. */

    /* Flow actions. */

    uint16_t command;             /* One of OFPFC_*. */

    uint16_t idle_timeout;        /* Idle time before discarding (seconds). */

    uint16_t hard_timeout;        /* Max time before discarding (seconds). */

    uint16_t priority;            /* Priority level of flow entry. */

    uint32_t buffer_id;           /* Buffered packet to apply to (or -1).

                                     Not meaningful for OFPFC_DELETE*. */

    uint16_t out_port;            /* For OFPFC_DELETE* commands, require

                                     matching entries to include this as an

                                     output port.  A value of OFPP_NONE

                                     indicates no restriction. */

    uint16_t flags;               /* One of OFPFF_*. */

    struct ofp_action_header actions[0]; /* The action length is inferred

                                            from the length field in the

                                            header. */

};

struct ofp_action_header {

    uint16_t type;                  /* One of OFPAT_*. */

    uint16_t len;                   /* Length of action, including this

                                       header.  This is the length of action,

                                       including any padding to make it

                                       64-bit aligned. */

    uint8_t pad[4];

};

四、个人总结
实验难度
本次实验大部分为验证性实验,相对于之前几次实验来说比较简单。主要是验证各个包传递的信息以及从哪里传到哪里。在实验过程中需要不断查阅资料,询问同学,难度算是很正常的。
实验过程遇到的困难及解决办法
- 主要遇到的问题是:经常没办法一次抓包就抓到所需要的全部包,总因为步骤不是很规范导致缺少某个包。
解决方法:最好在建立拓扑之前就打开wireshark,然后拓扑构建完成之后pingall,即可获取到所有的包。
个人感想
这次试验进一步学习了wireshark的使用,对wireshark的各项功能有了更加深刻的理解。其次也认识到了拓扑建立过程中所用到的协议,以及OpenFlow协议的数据交互的机制。有了这些理论知识的铺垫,我认为我能够在接下来的实践过程中游刃有余地完成任务。
实验3:OpenFlow协议分析实践的更多相关文章
- 软件定义网络实验记录⑤--OpenFlow 协议分析和 OpenDaylight 安装
一.实验目的 回顾 JDK 安装配置,了解 OpenDaylight 控制的安装,以及 Mininet 如何连接: 通过抓包获取 OpenFlow 协议,验证 OpenFlow 协议和版本,了解协议内 ...
- 实验 5:OpenFlow 协议分析和 OpenDaylight 安装
一.实验目的 回顾 JDK 安装配置,了解 OpenDaylight 控制的安装,以及 Mininet 如何连接;通过抓包获取 OpenFlow 协议,验证 OpenFlow 协议和版本,了解协议内容 ...
- 实验 5 :OpenFlow 协议分析和 OpenDaylight 安装
实验 5 :OpenFlow 协议分析和 OpenDaylight 安装 一.实验目的 回顾 JDK 安装配置,了解 OpenDaylight 控制的安装,以及 Mininet 如何连接: 通过抓包获 ...
- OpenFlow协议分析
OpenFlow协议分析实验手册 启动虚拟机mininet 和 控制器 ODL 启动wireshark,在控制器的ens32 网卡抓包 使用mininet创建简单拓扑,并连接控制器,指定交换机为ovs ...
- 实验 5:OpenFlow 协议分析和 OpenDaylight 安装
一.实验目的 回顾 JDK 安装配置,了解 OpenDaylight 控制的安装,以及 Mininet 如何连接:通过抓包获取 OpenFlow 协议,验证 OpenFlow 协议和版本,了解协议内容 ...
- SDN学习之OpenFlow协议分析
学习SDN相关的学习也已经有快半年了,期间从一无所知到懵懵懂懂,再到现在的有所熟悉,经历了许多,也走了不少弯路,其中,最为忌讳的便是,我在学习过程中,尚未搞明白OpenFlow协议的情况下,便开始对S ...
- 实战录 | 基于openflow协议的抓包分析
<实战录>导语 云端卫士<实战录>栏目定期会向粉丝朋友们分享一些在开发运维中的经验和技巧,希望对于关注我们的朋友有所裨益.本期分享人为云端卫士安全SDN工程师宋飞虎,将带来基于 ...
- OpenFlow协议1.0及1.3版本分析
OpenFlow是SDN控制器和交换之间交流的协议,在SDN领域有着十分重要的地位. OpenFlow协议发展到现在已经经过了1.0.1.3.1.4等版本.其中1.0和1.3版本使用的是最为广泛的. ...
- 实验八 应用层协议Ⅱ-FTP协议分析
实验八 应用层协议Ⅱ-FTP协议分析 一.实验目的 1.掌握FTP协议的实现原理. 2.了解控制通道和数据通道. 二.实验内容 用WareShark追踪ftp连接. 1.三次握手 2.ftp服务器回发 ...
随机推荐
- wpf toggleSwitch 的只读属性
xml code --------------------------------------------- <Page x:Class="UWPDemo.MainPage" ...
- Javascript - Vue - 在vscode里使用webpack
cnpm(node package manager)和webpack模块 npm是运行在node.js环境下的包管理工具,使用npm可以很快速的安装前端文件里需要依赖的那些项目文件,比如js.css文 ...
- springboot全局异常封装案例
@ControllerAdvice三个场景:>https://www.cnblogs.com/lenve/p/10748453.html 全局异常处理 全局数据绑定 全局数据预处理 首先定义一个 ...
- TFRecord读写简介+Demo 基于Ubuntu18.04+Tensorflow1.12 无WARNING
简介 TFRecord是TensorFlow官方推荐使用的数据格式化存储工具. 它规范了数据的读写方式. 只要生成一次TFRecord,之后的数据读取和加工处理的效率都会得到提高. 将图片转换成TFR ...
- 5M1E,软件质量管理最佳解决方案
- 如何做好一个产品? - 用户.需求.文化.价值.设计.流程,这些因素缺一不可.- 那么,如何做好产品的质量管理?- 人.机器.物料.方法.环境.测量,这些因素同样缺一不可.能够影响产品质量波动的因 ...
- kratos
技术文章 日志库的使用姿势 通过 layout 探索 kratos 运行原理 发版日志 发布日志 - kratos v2.0.5 版本发布 发布日志 - kratos v2.0.4 版本发布
- 一、Git分布式版本控制系统
1.引入 在开发一个软件项目时,本地只有几十行代码或几百行代码时还可以维护,但当代码达到一定的数量后或两三个人共同开发一个项目时,就很容易会出现代码混乱.冲突.排错难等问题.一旦开发完工以后发现整个项 ...
- Docker详解(一)——
Docker详解 https://www.cnblogs.com/antLaddie/p/14276726.html
- kivy之ProgressBar、ToggleButton实操学习
之所以将kivy的ProgressBar(进度条)与ToggleButton(切换按钮)作一篇内容来记录学习,是因为这两个内容比较简单,源码内容篇幅也少. 两个功能实例源码均以main.py+prog ...
- 第二课:启动 GDB 调试
使用 GDB 调试程序一般有三种方式: gdb filename gdb attach pid gdb filename corename 这也对应着本节课的核心内容: 直接调试目标程序 附加进程 调 ...