IOC装配Bean(XML方式)
Spring框架Bean实例化的方式
提供了三种方式实例化Bean
构造方法实例化(默认无参数,用的最多)
静态工厂实例化
实例工厂实例化
无参数构造方法的实例化
<!-- 默认情况下使用的就是无参数的构造方法. -->

<bean id="bean1" class="cn.yzu.spring3.demo2.Bean1"></bean>
静态工厂实例化
public class Bean2Factory {

  public static Bean2 getBean2(){

    System.out.println("静态工厂的获得Bean2的方法...");

    return new Bean2();

  }

}
<!-- 第二种使用静态工厂实例化 -->

<bean id="bean2" class="cn.yzu.spring3.demo2.Bean2Factory" factory-method="getBean2"></bean>
实例工厂实例化
public class Bean3Factory {

  public Bean3 getBean3(){

    System.out.println("Bean3实例工厂的getBean3方法...");

    return new Bean3();

  }

}
<!-- 第三种使用实例工厂实例化 -->

<bean id="bean3" factory-bean="bean3Factory" factory-method="getBean3"></bean>

<bean id="bean3Factory" class="cn.yzu.spring3.demo2.Bean3Factory"/>
Bean的其他配置
id和name的区别
id遵守XML约束的id的约束.id约束保证这个属性的值是唯一的,而且必须以字母开始,可以使用字母、数字、连字符、下划线、句话、冒号,name没有这些要求
如果bean标签上没有配置id,那么name可以作为id.现在的开发中一般都使用id
类的作用范围
scope属性
singleton :单例的.(默认的值.)
prototype :多例的.
request :web开发中.创建了一个对象,将这个对象存入request范围,request.setAttribute();
session :web开发中.创建了一个对象,将这个对象存入session范围,session.setAttribute();
globalSession :一般用于Porlet应用环境.指的是分布式开发.不是porlet环境,globalSession等同于session;
实际开发中主要使用singleton,prototype
Bean的生命周期
配置Bean的初始化和销毁的方法
init-method=”setup”
destroy-method=”teardown”
执行销毁的时候,必须手动关闭工厂,而且只对scope=”singleton”有效.
Bean的生命周期的11个步骤
1.instantiate bean对象实例化
2.populate properties 封装属性
3.如果Bean实现BeanNameAware 执行 setBeanName
4.如果Bean实现BeanFactoryAware 或者 ApplicationContextAware 设置工厂 setBeanFactory 或者上下文对象 setApplicationContext
5.如果存在类实现 BeanPostProcessor(后处理Bean) ,执行postProcessBeforeInitialization
6.如果Bean实现InitializingBean 执行 afterPropertiesSet
7.调用<bean init-method="init"> 指定初始化方法 init
8.如果存在类实现 BeanPostProcessor(处理Bean) ,执行postProcessAfterInitialization
9.执行业务处理
10.如果Bean实现 DisposableBean 执行 destroy
11.调用<bean destroy-method="customerDestroy"> 指定销毁方法 customerDestroy
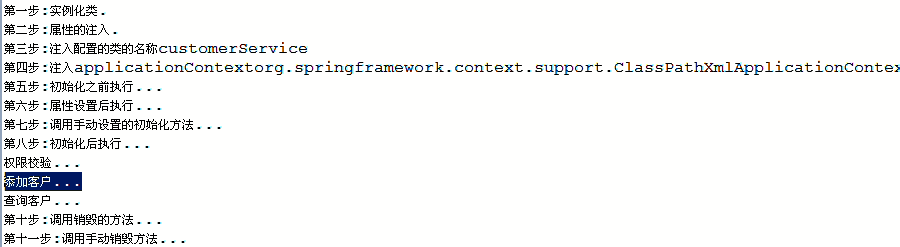
演示(在CustomerService类的add方法之前进行权限校验)
public interface CustomerService {

  public void add();

  public void find();

}
public class CustomerServiceImpl implements CustomerService, BeanNameAware,ApplicationContextAware,InitializingBean,DisposableBean {

  private String name;

  public void setName(String name) {

    System.out.println("第二步:属性的注入.");

    this.name = name;

  }

  public CustomerServiceImpl() {

    super();

    System.out.println("第一步:实例化类.");

  }

  public void add(){

    System.out.println("添加客户...");

  }

  public void find(){

    System.out.println("查询客户...");

  }

  public void setBeanName(String name) {

    System.out.println("第三步:注入配置的类的名称"+name);

  }

  public void setApplicationContext(ApplicationContext applicationContext) throws BeansException {

    System.out.println("第四步:注入applicationContext"+applicationContext);

  }

  public void afterPropertiesSet() throws Exception {

    System.out.println("第六步:属性设置后执行...");

  }

  public void setup(){

    System.out.println("第七步:调用手动设置的初始化方法...");

  }

  public void destroy() throws Exception {

    System.out.println("第十步:调用销毁的方法...");

  }

  public void teardown(){

    System.out.println("第十一步:调用手动销毁方法...");

  }

}
public class MyBeanPostProcessor implements BeanPostProcessor{

  /**

  * bean:实例对象

  * beanName:在配置文件中配置的类的标识.

  */

  public Object postProcessBeforeInitialization(Object bean, String beanName) throws BeansException {

    System.out.println("第五步:初始化之前执行...");

    return bean;

  }

  public Object postProcessAfterInitialization(final Object bean, String beanName) throws BeansException {

    System.out.println("第八步:初始化后执行...");

    // 动态代理:

    if(beanName.equals("customerService")){

      Object proxy = Proxy.newProxyInstance(bean.getClass().getClassLoader(), bean.getClass().getInterfaces() , new InvocationHandler() {

        // 调用目标方法的时候,调用invoke方法.

        public Object invoke(Object proxy, Method method, Object[] args) throws Throwable {

          if("add".equals(method.getName())){

            System.out.println("权限校验...");

            Object result = method.invoke(bean, args);

            //System.out.println(System.currentTimeMillis());

            return result;

          }

          return method.invoke(bean, args);

        }

      });

      return proxy;

    }

    return bean;

  }

}
public class SpringTest4 {

  @Test

  // Bean完整的生命周期

  public void demo1() {

    ClassPathXmlApplicationContext applicationContext = new ClassPathXmlApplicationContext("applicationContext.xml");

    CustomerService customerService = (CustomerService) applicationContext.getBean("customerService");

    customerService.add();

    customerService.find();

    applicationContext.close();

  }

}
运行结果:
Bean中属性注入
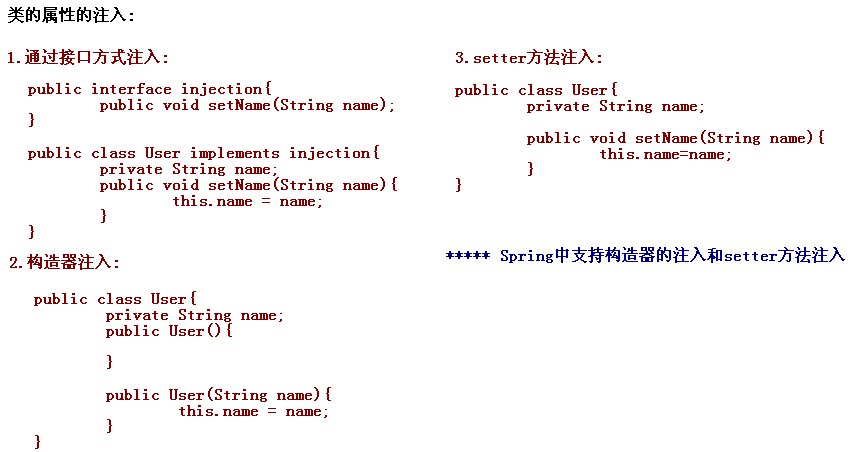
构造器注入
<bean id="car" class="cn.yzu.spring3.demo5.Car">

  <!-- <constructor-arg name="name" value="宝马"/>

      <constructor-arg name="price" value="1000000"/> -->

  <constructor-arg index="0" type="java.lang.String" value="奔驰"/>

  <constructor-arg index="1" type="java.lang.Double" value="2000000"/>

</bean>
setter方法注入
<bean id="car2" class="cn.yzu.spring3.demo5.Car2">

  <!-- <property>标签中name就是属性名称,value是普通属性的值,ref:引用其他的对象 -->

  <property name="name" value="保时捷"/>

  <property name="price" value="5000000"/>

</bean>

<bean id="person" class="cn.yzu.spring3.demo5.Person">

  <property name="name" value="任童"/>

  <property name="car2" ref="car2"/>

</bean>
名称空间p注入属性
Spring2.5版本引入了名称空间p
p:<属性名>="xxx" 引入常量值
p:<属性名>-ref="xxx" 引用其它Bean对象
引入名称空间
<beans xmlns="http://www.springframework.org/schema/beans"

    xmlns:p="http://www.springframework.org/schema/p"

    xmlns:xsi="http://www.w3.org/2001/XMLSchema-instance"

    xsi:schemaLocation="

http://www.springframework.org/schema/beans http://www.springframework.org/schema/beans/spring-beans.xsd">
<bean id="car2" class="cn.yzu.spring3.demo5.Car2" p:name="宝马" p:price="400000"/>

<bean id="person" class="cn.yzu.spring3.demo5.Person" p:name="童童" p:car2-ref="car2"/>
SpEL:属性的注入
Spring3.0提供注入属性方式
语法:#{表达式} <bean id="" value="#{表达式}">
<bean id="car2" class="cn.yzu.spring3.demo5.Car2">

  <property name="name" value="#{'大众'}"></property>

  <property name="price" value="#{'120000'}"></property>

</bean>

<bean id="person" class="cn.yzu.spring3.demo5.Person">

  <!--<property name="name" value="#{personInfo.name}"/>-->

  <property name="name" value="#{personInfo.showName()}"/>

  <property name="car2" value="#{car2}"/>

</bean>

<bean id="personInfo" class="cn.yzu.spring3.demo5.PersonInfo">

  <property name="name" value="张三"/>

</bean>
集合属性的注入
<bean id="collectionBean" class="cn.yzu.spring3.demo6.CollectionBean">

  <!-- 注入List集合 -->

  <property name="list">

    <list>

      <value>童童</value>

      <value>小凤</value>

    </list>

  </property>

  <!-- 注入set集合 -->

  <property name="set">

    <set>

      <value>杜宏</value>

      <value>如花</value>

    </set>

  </property>

  <!-- 注入map集合 -->

  <property name="map">

    <map>

      <entry key="刚刚" value="111"/>

      <entry key="娇娇" value="333"/>

    </map>

  </property>

  <property name="properties">

    <props>

      <prop key="username">root</prop>

      <prop key="password">123</prop>

    </props>

  </property>

</bean>
加载配置文件
一种写法:ApplicationContext applicationContext = new ClassPathXmlApplicationContext("bean1.xml",”bean2.xml”);
二种方法:<import resource="applicationContext2.xml"/>
IOC装配Bean(XML方式)的更多相关文章
- 04_IOC容器装配Bean(xml方式)
IOC容器装配Bean(xml方式) 1.Spring 提供配置Bean三种实例化方式 1)使用类构造器实例化(默认无参数) <bean id="bean1" class=& ...
- Spring框架(3)---IOC装配Bean(注解方式)
IOC装配Bean(注解方式) 上面一遍文章讲了通过xml来装配Bean,那么这篇来讲注解方式来讲装配Bean对象 注解方式需要在原先的基础上重新配置环境: (1)Component标签举例 1:导入 ...
- Spring框架(2)---IOC装配Bean(xml配置方式)
IOC装配Bean (1)Spring框架Bean实例化的方式提供了三种方式实例化Bean 构造方法实例化(默认无参数,用的最多) 静态工厂实例化 实例工厂实例化 下面先写这三种方法的applicat ...
- spring IOC装配Bean(注解方式)
1 Spring的注解装配Bean (1) Spring2.5 引入使用注解去定义Bean @Component 描述Spring框架中Bean (2) Spring的框架中提供了与@Componen ...
- Spring 框架 详解 (四)------IOC装配Bean(注解方式)
Spring的注解装配Bean Spring2.5 引入使用注解去定义Bean @Component 描述Spring框架中Bean Spring的框架中提供了与@Component注解等效的三个注 ...
- Spring 框架 详解 (三)-----IOC装配Bean
IOC装配Bean: 1.1.1 Spring框架Bean实例化的方式: 提供了三种方式实例化Bean. * 构造方法实例化:(默认无参数) * 静态工厂实例化: * 实例工厂实例化: 无参数构造方法 ...
- 05_IOC容器装配Bean(注解方式)
IOC容器装配Bean(注解方式) 1.使用注解方式进行Bean注册 xml 方式: <bean id="" class=""> spring2.5 ...
- Spring框架---IOC装配Bean
IOC装配Bean (1)Spring框架Bean实例化的方式提供了三种方式实例化Bean 构造方法实例化(默认无参数,用的最多) 静态工厂实例化 实例工厂实例化 下面先写这三种方法的applicat ...
- IOC装配Bean(注解方式)
Spring的注解装配Bean Spring2.5 引入使用注解去定义Bean @Component 描述Spring框架中Bean Spring的框架中提供了与@Component注解等效的三个注解 ...
- Spring容器、BeanFactory和ApplicationContext,及3种装配Bean的方式
目录 一. spring容器理解 二. BeanFactory和ApplicationContext之间的关系 三. BeanFactory详情介绍 四.ApplicationContext介绍 五. ...
随机推荐
- 【bzoj1923】 Sdoi2010—外星千足虫
http://www.lydsy.com/JudgeOnline/problem.php?id=1923 (题目链接) 题意 按顺序给出m个n元模线性方程,问最少当给出多少个方程时整个方程组有解. S ...
- php多文件压缩下载
/*php多文件压缩并且下载*/ function addFileToZip($path,$zip){ $handler=opendir($path); //打开当前文件夹由$path指定. whil ...
- pair correlation ggpair ggmatrix
https://zhuanlan.zhihu.com/p/23400450 首发于 R语言数据分析与可视化 关注专栏 登录 写文章 R 语言矩阵散点图 EasyCharts· 15 天前 散点 ...
- win7计划任务执行php脚本方法
第一步:编写bat文件 方法1:php方法 方法2:exploere浏览器 电脑上新建一个txt文本,把代码放进去.然后把他另存为xxx.bat explorer "http://网址/e/ ...
- Tomcat基本入门知识及发布,虚拟访问及启动碰到的错误,虚拟目录,虚拟路径,各种Tomcat的配置
Tomcat容器入门介绍 转自javaresearch.com由timgball 整理 Tomcat是一个免费的开源Web服务器,最新版本是5.5.1,支持Servlet2.4,JSP2.0,非常适合 ...
- Apache Shiro 学习记录1
最近几天在学习Apache Shiro......看了一些大神们的教程.....感觉收获不少.....但是毕竟教程也只是指引一下方向....即使是精品教程,仍然有很多东西都没有说明....所以自己也稍 ...
- Dijkstra算法
Dijkstra(迪杰斯特拉)算法是典型的单源最短路径算法,用于计算一个节点到其他所有节点的最短路径.主要特点是以起始点为中心向外层层扩展,直到扩展到终点为止. /*图的邻接矩阵表示*/typedef ...
- 大熊君学习html5系列之------WebStorage(客户端轻量级存储方案)
一,开篇分析 Hi,大家好!大熊君又和大家见面了,(*^__^*) 嘻嘻……,这系列文章主要是学习Html5相关的知识点,以学习API知识点为入口,由浅入深的引入实例, 让大家一步一步的体会" ...
- Coursera-Getting and Cleaning Data-Week2-课程笔记
Coursera-Getting and Cleaning Data-Week2 Saturday, January 17, 2015 课程概述 week2主要是介绍从各个来源读取数据.包括MySql ...
- 用JS获取地址栏参数的方法
采用正则表达式获取地址栏参数: function GetQueryString(name) { var reg = new RegExp("(^|&)"+ nam ...