
android学习2——RelativeLayout
相对布局管理器,一个View的位置是相对于另外一个View定义的.
<?xml version="1.0" encoding="utf-8"?>

<RelativeLayout xmlns:android="http://schemas.android.com/apk/res/android"

              android:orientation="vertical"

              android:layout_width="fill_parent"

              android:layout_height="fill_parent"

        >

    <Button

            android:layout_width="wrap_content"

            android:layout_height="wrap_content"

            android:text="Button1"

            android:id="@+id/btn1"/>

</RelativeLayout>
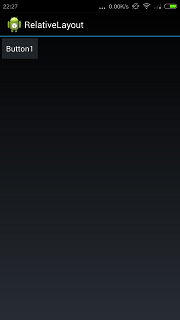
当只有一个按钮的时候,位置和线性布局管理器一样.在左上角.如下图所示:
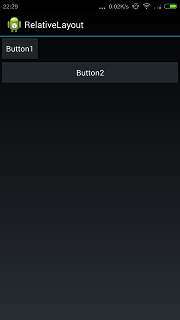
android:layout_below用于指定当前的View在指定view的下面.代码如下:
<?xml version="1.0" encoding="utf-8"?>

<RelativeLayout xmlns:android="http://schemas.android.com/apk/res/android"

              android:orientation="vertical"

              android:layout_width="fill_parent"

              android:layout_height="fill_parent"

        >

    <Button

            android:layout_width="wrap_content"

            android:layout_height="wrap_content"

            android:text="Button1"

            android:id="@+id/btn1"/>

    <Button

            android:layout_width="fill_parent"

            android:layout_height="wrap_content"

            android:text="Button2"

            android:id="@+id/btn2"

            android:layout_below="@id/btn1"/>

</RelativeLayout>
效果如下所示:
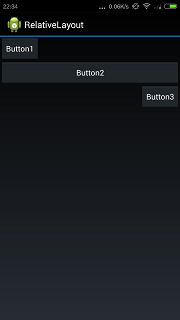
android:layout_alignRight用于表示和指定view右对齐.代码如下:
<?xml version="1.0" encoding="utf-8"?>

<RelativeLayout xmlns:android="http://schemas.android.com/apk/res/android"

              android:orientation="vertical"

              android:layout_width="fill_parent"

              android:layout_height="fill_parent"

        >

    <Button

            android:layout_width="wrap_content"

            android:layout_height="wrap_content"

            android:text="Button1"

            android:id="@+id/btn1"/>

    <Button

            android:layout_width="fill_parent"

            android:layout_height="wrap_content"

            android:text="Button2"

            android:id="@+id/btn2"

            android:layout_below="@id/btn1"/>

    <Button

            android:layout_width="wrap_content"

            android:layout_height="wrap_content"

            android:text="Button3"

            android:id="@+id/btn3"

            android:layout_below="@id/btn2"

            android:layout_alignRight="@id/btn2"/>

</RelativeLayout>
右对齐的效果如下所示:
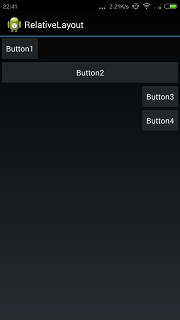
layout_alignParentRight表示和父组件的右边缘对齐.代码如下所示:
<?xml version="1.0" encoding="utf-8"?>

<RelativeLayout xmlns:android="http://schemas.android.com/apk/res/android"

              android:orientation="vertical"

              android:layout_width="fill_parent"

              android:layout_height="fill_parent"

        >

    <Button

            android:layout_width="wrap_content"

            android:layout_height="wrap_content"

            android:text="Button1"

            android:id="@+id/btn1"/>

    <Button

            android:layout_width="fill_parent"

            android:layout_height="wrap_content"

            android:text="Button2"

            android:id="@+id/btn2"

            android:layout_below="@id/btn1"/>

    <Button

        android:layout_width="wrap_content"

        android:layout_height="wrap_content"

        android:text="Button3"

        android:id="@+id/btn3"

        android:layout_below="@id/btn2"

        android:layout_alignRight="@id/btn2"/>

    <Button

            android:layout_width="wrap_content"

            android:layout_height="wrap_content"

            android:text="Button4"

            android:id="@+id/btn4"

            android:layout_below="@id/btn3"

            android:layout_alignParentRight="true"/>

</RelativeLayout>
代码产生的效果如下所示:
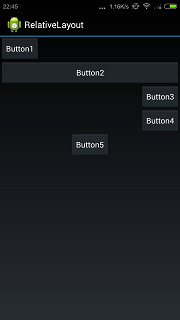
android:layout_centerHorizontal表示水平方向居中,代码如下所示:
<?xml version="1.0" encoding="utf-8"?>

<RelativeLayout xmlns:android="http://schemas.android.com/apk/res/android"

              android:orientation="vertical"

              android:layout_width="fill_parent"

              android:layout_height="fill_parent"

        >

    <Button

            android:layout_width="wrap_content"

            android:layout_height="wrap_content"

            android:text="Button1"

            android:id="@+id/btn1"/>

    <Button

            android:layout_width="fill_parent"

            android:layout_height="wrap_content"

            android:text="Button2"

            android:id="@+id/btn2"

            android:layout_below="@id/btn1"/>

    <Button

        android:layout_width="wrap_content"

        android:layout_height="wrap_content"

        android:text="Button3"

        android:id="@+id/btn3"

        android:layout_below="@id/btn2"

        android:layout_alignRight="@id/btn2"/>

    <Button

            android:layout_width="wrap_content"

            android:layout_height="wrap_content"

            android:text="Button4"

            android:id="@+id/btn4"

            android:layout_below="@id/btn3"

            android:layout_alignParentRight="true"/>

    <Button

            android:layout_width="wrap_content"

            android:layout_height="wrap_content"

            android:text="Button5"

            android:id="@+id/btn5"

            android:layout_below="@id/btn4"

            android:layout_centerHorizontal="true"/>

</RelativeLayout>
代码产生的效果如下所示:
另外注意相对布局管理器默认是以左上为参照排列的.看下面的代码:
<?xml version="1.0" encoding="utf-8"?>

<RelativeLayout xmlns:android="http://schemas.android.com/apk/res/android"

              android:orientation="vertical"

              android:layout_width="fill_parent"

              android:layout_height="fill_parent"

        >

    <Button

            android:layout_width="wrap_content"

            android:layout_height="wrap_content"

            android:text="Button1"

            android:id="@+id/button1"/>

    <Button

            android:layout_width="wrap_content"

            android:layout_height="wrap_content"

            android:text="Button2"

            android:id="@+id/button2"

            android:layout_toRightOf="@id/button1"/>

    <Button

        android:layout_width="wrap_content"

        android:layout_height="wrap_content"

        android:text="Button3"

        android:id="@+id/button3"

        android:layout_below="@id/button1"/>

</RelativeLayout>
代码的效果如下所示:
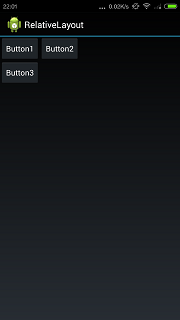
android:layout_toRightOf表示在view的右边.现在加一个按钮,代码如下:
<?xml version="1.0" encoding="utf-8"?>

<RelativeLayout xmlns:android="http://schemas.android.com/apk/res/android"

              android:orientation="vertical"

              android:layout_width="fill_parent"

              android:layout_height="fill_parent"

        >

    <Button

            android:layout_width="wrap_content"

            android:layout_height="wrap_content"

            android:text="Button1"

            android:id="@+id/button1"/>

    <Button

            android:layout_width="wrap_content"

            android:layout_height="wrap_content"

            android:text="Button2"

            android:id="@+id/button2"

            android:layout_toRightOf="@id/button1"/>

    <Button

        android:layout_width="wrap_content"

        android:layout_height="wrap_content"

        android:text="Button3"

        android:id="@+id/button3"

        android:layout_below="@id/button1"/>

    <Button

            android:layout_width="wrap_content"

            android:layout_height="wrap_content"

            android:text="Button4"

            android:layout_toRightOf="@id/button3"

            />

</RelativeLayout>
直观感觉按钮4应该在按钮3的右边.但实际上的效果如下所示:
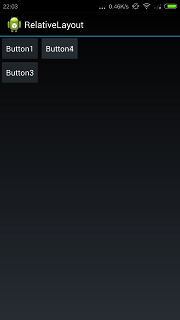
按钮4把按钮2遮住了.为什么?因为只指定了按钮4在按钮3的右边,没有指定上面的位置.默认是尽量向左上排,所以按钮4把按钮2遮住了.
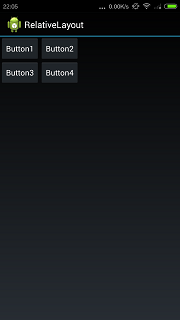
所以想得到按钮4在按钮3右边的效果,要再指定上下的位置,代码如下:
<?xml version="1.0" encoding="utf-8"?>

<RelativeLayout xmlns:android="http://schemas.android.com/apk/res/android"

              android:orientation="vertical"

              android:layout_width="fill_parent"

              android:layout_height="fill_parent"

        >

    <Button

            android:layout_width="wrap_content"

            android:layout_height="wrap_content"

            android:text="Button1"

            android:id="@+id/button1"/>

    <Button

            android:layout_width="wrap_content"

            android:layout_height="wrap_content"

            android:text="Button2"

            android:id="@+id/button2"

            android:layout_toRightOf="@id/button1"/>

    <Button

        android:layout_width="wrap_content"

        android:layout_height="wrap_content"

        android:text="Button3"

        android:id="@+id/button3"

        android:layout_below="@id/button1"/>

    <Button

            android:layout_width="wrap_content"

            android:layout_height="wrap_content"

            android:text="Button4"

            android:layout_toRightOf="@id/button3"

            android:layout_below="@+id/button2"/>

</RelativeLayout>
效果如下所示:
android学习2——RelativeLayout的更多相关文章
- [Android学习笔记]RelativeLayout的使用
RelativeLayout是相对布局控件,在屏幕适配的时候非常有用,在此记录一些它的常用属性 第一类:属性值为true或falseandroid:layout_centerHrizontal ...
- Android学习笔记(九) 视图的应用布局效果
最近少了写博客,可能最近忙吧,工作上忙,因为工作原因也忙于学习,也没记录什么了,也没有按照之前的计划去学习了.现在就记录一下最近学到的. 要做Android应用,界面设计少不了,可惜之前一直在用Win ...
- 三、Android学习第三天——Activity的布局初步介绍(转)
(转自:http://wenku.baidu.com/view/af39b3164431b90d6c85c72f.html) 三.Android学习第三天——Activity的布局初步介绍 今天总结下 ...
- Android – 学习操作NFC – 2
在<Android – 学习操作NFC – 1>说明了Android在处理NFC tag的机制.tag dispatch system的运作流程,以及三种ACTION_NDEF_DISCO ...
- Android 学习笔记之如何实现简单相机功能
PS:看来算法和数据结构还是非常有用的,以后每天都练习两道算法题目...这次忘了对代码进行折叠了..导致篇幅过长... 学习内容: 1.Android如何实现相机功能... 2.如何实现音频的录制.. ...
- Android 学习笔记之SurfaceView的使用+如何实现视频播放...
学习内容: 1.掌握Surface的使用... 2.Android中如何实现视频播放... 1.SurfaceView类的使用 在Android中,一般播放音频时我们可以去使用Android提供的 ...
- Android学习随笔--ListView的分页功能
第一次写博客,可能格式,排版什么的会非常不美观,不过我主要是为了记录自己的Android学习之路,为了以后能有些东西回顾.既然是为了学习,那我肯定会吸收各位大大们的知道经验,有不足的地方请指出. 通过 ...
- Android学习系列(23)--App主界面实现
在上篇文章<Android学习系列(22)--App主界面比较>中我们浅略的分析了几个主界面布局,选了一个最大众化的经典布局.今天我们就这个经典布局,用代码具体的实现它. 1.预览图先看下 ...
- android学习日记03--常用控件button/imagebutton
常用控件 控件是对数据和方法的封装.控件可以有自己的属性和方法.属性是控件数据的简单访问者.方法则是控件的一些简单而可见的功能.所有控件都是继承View类 介绍android原生提供几种常用的控件bu ...
随机推荐
- html 上传文件
1.html代码 <form id="form1" action="TestYield" method="post" enctype= ...
- git 关联远程库(https协议)
1.在oschina上新建库 2.在本地文件夹右键->"git Bash here" 3.设置全局变量: git config --global user.name &quo ...
- Oracle用户管理和角色管理
原博:http://liwx.iteye.com/blog/1182251 一.创建用户的Profile文件 SQL> create profile student limit // stude ...
- OC字符串的使用(一)
#import <Foundation/Foundation.h> int main(int argc, const char * argv[]) { @autoreleasepool { ...
- YII 1.0 小功能总结
1.操作成功提示 只能使用一次,getFlash()取值以后,值就删除了 控制器中: Yii::app()->user->setFlash('success','修改成功'); 视图中: ...
- emmet学习笔记
Emment语法使用:按table键的结果1.初始化:(HTML文档需要包含一些固定的标签,比如<html>.<head>.<body>等). html:或! :用 ...
- 建立、配置和使用Activity——Activity
Activity是Android应用中最重要.最常见的应用组件(此处的组件是粗粒度的系统组成部分,并非指界面控件:widget).Android应用的一个重要组成部分就是开发Activity,下 面将 ...
- yum网络源配置
[root@xuegod60 ~]# mv /etc/yum.repos.d/CentOS-Base.repo /etc/yum.repos.d/CentOS-Base.repo.bak[root@x ...
- HDU5916
Harmonic Value Description Time Limit: 2000/1000 MS (Java/Others) Memory Limit: 65536/65536 K (Ja ...
- iOS initWithFrame、initWithCoder、awakeFromNib的区别解析
当我们需要自定义一个View控件时,会有 initWithFrame.initWithCoder.awakeFromNib 这三个系统方法,关于这三个方法何时调用,如何调用,有时候可能很多人会弄混淆. ...