UITableView、UICollectionView行高/尺寸自适应
UITableView
我们都知道UITableView从iOS 8开始实现行高的自适应相对比较简单,首先必须设置estimatedRowHeight给出预估高度,设置rowHeight为UITableViewAutomaticDimension(注意:如果不修改rowHeight默认就是UITableViewAutomaticDimension),对于这两个参数除了直接修改tableview对应的属性之外仍然支持使用对应的代理方法设置。最后只要在UITableViewCell中设置contentView的约束即可。由于UITableViewCell的宽度等同于UITableView因此约束的设置事实上只是为了自动计算高度。通常的做法就是设置contentView的top和bottom约束,而后其内部子视图可以提供intrinsicContentSize(例如UIButtonUILabel默认就已经提供)或者已经有明确的height约束。这样一来就可以做到子控件确定了自身高度,而contentView子控件又设置了和contentView相关的bottom约束来反向计算出UITableViewCell的实际高度。
下面仍然以前面UITableView文章的自定义Cell举例,相比之前大量的运算而言Self-Sizing Cells可以说简化了很多。除了设置estimatedRowHeight外最重要的就是添加相关Autolayout约束。由于头像高度已经固定,内容高度可以通过固有高度自动计算,而二者的间隔和top、bottom约束已经固定,从而Self-Sizing Cells可以自动计算出Cell的高度。
高度计算约束关系:

Cell布局代码:
	import UIKit

	import SnapKit

	class StatusTableViewCell: UITableViewCell {

	    // MARK: - 公共属性

	    var status:Status! {

	        didSet {

	            self.avatarImageView.image = UIImage(named: status.profileImageUrl)

	            self.userNameLabel.text = status.userName

	            self.mtypeImageView.image = UIImage(named: status.mbtype)

	            self.createdAtLabel.text = status.createdAt

	            self.sourceLabel.text = status.source

	            self.contentLabel.text = status.text

	        }

	    }

	    // MARK: - 生命周期及方法覆盖

	    override func awakeFromNib() {

	        super.awakeFromNib()

	    }

	    override init(style: UITableViewCellStyle, reuseIdentifier: String?) {

	        super.init(style: style, reuseIdentifier: reuseIdentifier)

	        self.setup()

	    }

	    required init?(coder aDecoder: NSCoder) {

	        super.init(coder: aDecoder)

	    }

	    override func setSelected(_ selected: Bool, animated: Bool) {

	    }

	    // MARK: - 私有方法

	    private func setup() {

	        self.contentView.addSubview(self.avatarImageView)

	        self.contentView.addSubview(self.userNameLabel)

	        self.contentView.addSubview(self.mtypeImageView)

	        self.contentView.addSubview(self.createdAtLabel)

	        self.contentView.addSubview(self.sourceLabel)

	        self.contentView.addSubview(self.contentLabel)

	        self.avatarImageView.snp.makeConstraints { (make) in

	            make.top.left.equalTo(10.0)

	            make.size.equalTo(CGSize(width: 40.0, height: 40.0))

	        }

	        self.userNameLabel.snp.makeConstraints { (make) in

	            make.top.equalTo(self.avatarImageView.snp.top)

	            make.left.equalTo(self.avatarImageView.snp.right).offset(8.0)

	        }

	        self.mtypeImageView.snp.makeConstraints { (make) in

	            make.top.equalTo(self.userNameLabel.snp.top)

	            make.left.equalTo(self.userNameLabel.snp.right).offset(8.0)

	            make.size.equalTo(CGSize(width: 14.0, height: 14.0))

	        }

	        self.createdAtLabel.snp.makeConstraints { (make) in

	            make.left.equalTo(self.userNameLabel.snp.left)

	            make.bottom.equalTo(self.avatarImageView.snp.bottom)

	        }

	        self.sourceLabel.snp.makeConstraints { (make) in

	            make.left.equalTo(self.createdAtLabel.snp.right).offset(10.0)

	            make.bottom.equalTo(self.createdAtLabel.snp.bottom)

	            make.right.lessThanOrEqualTo(-8.0)

	        }

	        self.contentLabel.snp.makeConstraints { (make) in

	            make.top.equalTo(self.avatarImageView.snp.bottom).offset(8.0)

	            make.left.equalTo(self.avatarImageView.snp.left)

	            make.right.equalTo(-8.0)

	            make.bottom.equalTo(-10.0) // 注意此处必须设置,否则contentView无法自适应高度

	        }

	    }

	    // MARK: - 私有属性

	    private lazy var avatarImageView:UIImageView = {

	        let temp = UIImageView()

	        return temp

	    }()

	    private lazy var mtypeImageView:UIImageView = {

	        let temp = UIImageView()

	        return temp

	    }()

	    private lazy var userNameLabel:UILabel = {

	        let temp = UILabel()

	        temp.textColor = UIColor(red: 50.0/255.0, green: 50.0/255.0, blue: 50.0/255.0, alpha: 1.0)

	        temp.font = UIFont.systemFont(ofSize: 14.0)

	        return temp

	    }()

	    private lazy var createdAtLabel:UILabel = {

	        let temp = UILabel()

	        temp.textColor = UIColor(red: 120.0/255.0, green: 120.0/255.0, blue: 120.0/255.0, alpha: 1.0)

	        temp.font = UIFont.systemFont(ofSize: 12.0)

	        return temp

	    }()

	    private lazy var sourceLabel:UILabel = {

	        let temp = UILabel()

	        temp.textColor = UIColor(red: 120.0/255.0, green: 120.0/255.0, blue: 120.0/255.0, alpha: 1.0)

	        temp.font = UIFont.systemFont(ofSize: 12.0)

	        return temp

	    }()

	    private lazy var contentLabel:UILabel = {

	        let temp = UILabel()

	        temp.textColor = UIColor(red: 50.0/255.0, green: 50.0/255.0, blue: 50.0/255.0, alpha: 1.0)

	        temp.font = UIFont.systemFont(ofSize: 14.0)

	        temp.numberOfLines = 0

	        return temp

	    }()

	}
最终效果:
无论是UITableView还是后面的UICollectionview,Self-Sizing Cells的概念均是从iOS 8开始提出的。如果是iOS 8之前的版本则需要通过systemLayoutSizeFitting()进行计算或者通过frame直接设置。
UICollectionView
了解了UITableView的Cell行高自适应之后,要理解UICollectionviewCell的Size自适应并不难,因为UICollectionViewCell相比较于UITableViewCell除了要通过AutoLayout确定contentView的高度之外还要确定其宽度,其宽度确定原则和UITableViewCell的高度确定是类似的,只是要通过UICollectionviewCell的contentView子控件自身确定其宽度,然后设置子控件和contentView相关的right约束即可。当然对于UICollectionViewCell自适应尺寸同样必须设置UICollectionViewFlowLayout的estimatedItemSize属性(如果使用UICollectionViewFlowLayout)。
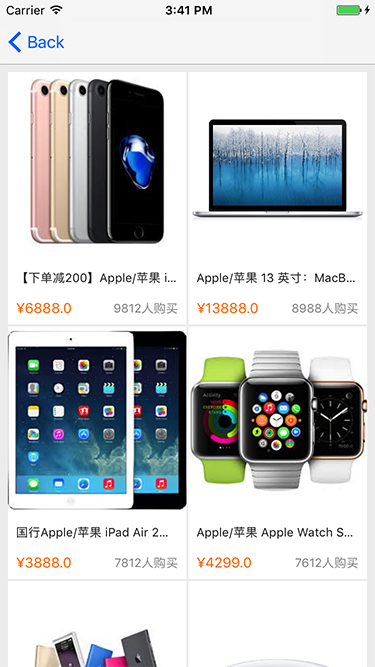
下面的的demo演示了类淘宝商品展示的UICollectionview布局,除了通过AutoLayout确定高度外,通过商品图片的left、right约束和width的设置可以反向推断出contentView的宽度,通过Self-Sizing Cells就可以最终确定UICollectionviewCell的size。
Cell布局代码:
	import UIKit

	class ProductCollectionViewCell: UICollectionViewCell {

	    // MARK: - 公共属性

	    var product:Product! {

	        didSet {

	            self.productImageView.image = UIImage(named: product.image)

	            self.contentLabel.text = product.text

	            self.priceLabel.text = "¥\(product.price)"

	            self.salesLabel.text = "\(product.sale)人购买"

	        }

	    }

	    // MARK: - 生命周期及方法覆盖

	    override init(frame: CGRect) {

	        super.init(frame: frame)

	        self.setup()

	    }

	    required init?(coder aDecoder: NSCoder) {

	        super.init(coder: aDecoder)

	    }

	    override func preferredLayoutAttributesFitting(_ layoutAttributes: UICollectionViewLayoutAttributes) -> UICollectionViewLayoutAttributes {

	        return super.preferredLayoutAttributesFitting(layoutAttributes)

	    }

	    // MARK: - 私有方法

	    private func setup() {

	        self.backgroundColor = UIColor.white

	        self.contentView.addSubview(self.productImageView)

	        self.contentView.addSubview(self.contentLabel)

	        self.contentView.addSubview(self.priceLabel)

	        self.contentView.addSubview(self.salesLabel)

	        let screenWidth = UIScreen.main.bounds.width

	        self.productImageView.snp.makeConstraints { (make) in

	            make.top.left.right.equalTo(0.0)

	            make.height.equalTo(screenWidth*0.5).priority(999)

	            make.width.equalTo((screenWidth-18)*0.5).priority(999) // 此设置可以确定cell宽度,注意尽管降低了默认的优先级仅仅是为了计算中间步骤不至于约束冲突,最终显示时此约束仍然会生效

	        }

	        self.contentLabel.snp.makeConstraints { (make) in

	            make.top.equalTo(self.productImageView.snp.bottom).offset(4.0)

	            make.left.equalTo(8.0)

	            make.right.equalTo(-8.0)

	            make.height.equalTo(28.0)

	        }

	        self.priceLabel.snp.makeConstraints { (make) in

	            make.top.equalTo(self.contentLabel.snp.bottom).offset(8.0)

	            make.left.equalTo(self.contentLabel.snp.left)

	            make.bottom.equalTo(-8.0) //此设置可以确定cell高度

	        }

	        self.salesLabel.snp.makeConstraints { (make) in

	            make.centerY.equalTo(self.priceLabel.snp.centerY)

	            make.right.equalTo(-8.0)

	        }

	    }

	    // MARK: - 私有属性

	    private lazy var productImageView:UIImageView = {

	        let temp = UIImageView()

	        temp.contentMode = .scaleAspectFit

	        temp.clipsToBounds = true

	        return temp

	    }()

	    private lazy var contentLabel:UILabel = {

	        let temp = UILabel()

	        temp.textColor = UIColor(red: 50.0/255.0, green: 50.0/255.0, blue: 50.0/255.0, alpha: 1.0)

	        temp.font = UIFont.systemFont(ofSize: 12.0)

	        temp.numberOfLines = 2

	        return temp

	    }()

	    private lazy var priceLabel:UILabel = {

	        let temp = UILabel()

	        temp.textColor = UIColor.orange

	        temp.font = UIFont.systemFont(ofSize: 14.0)

	        return temp

	    }()

	    private lazy var salesLabel:UILabel = {

	        let temp = UILabel()

	        temp.textColor = UIColor(red: 150.0/255.0, green: 150.0/255.0, blue: 150.0/255.0, alpha: 1.0)

	        temp.font = UIFont.systemFont(ofSize: 12.0)

	        return temp

	    }()

	}
最终效果:
除此之外从iOS 8开始,UICollectionViewCell提供了preferredLayoutAttributesFitting()方法用于提供一些cell属性修改,当然通过此方法可以重新修改cell的size(包括Self-Sizing Cells自动计算后的size),对于手动计算高度的情况这也方法也提供了一种不用外部设置cell size的而能提供让UICollectionView确定cell尺寸的方式,但是这并不在Self-Sizing Cells讨论之列,因此本文不再深入讨论。
UITableView、UICollectionView行高/尺寸自适应的更多相关文章
- iOS开发tips-UITableView、UICollectionView行高/尺寸自适应
UITableView 我们都知道UITableView从iOS 8开始实现行高的自适应相对比较简单,首先必须设置estimatedRowHeight给出预估高度,设置rowHeight为UITabl ...
- UItableView动态行高 用这两句实现(可以自己计算数据来实现,一般在model中计算)
// 动态行高 self.tableView.rowHeight = UITableViewAutomaticDimension; // 预估行高 self.tableView.estimatedRo ...
- C# 解决EXCEL单元格合并,行高无法自适应问题
解决方法:根据单元格内容长度,设置单元格所在行的行高 public static float getExcelCellAutoHeight(string strtest, float fontCoun ...
- C# 设置Excel数据自适应行高、列宽的2种情况
Excel表格中,由于各种数据的复杂性,可能存在单元格中的数据字号大小.数据内容长度不一而出现,列宽过宽.过窄或者行高过大.过小的问题.常见的解决方法是调整行高.列宽.在Microsoft Excel ...
- UITableView!别再用代码计算行高了(一)
你还在用代码去计算行高吗?你不感觉那种方式很low吗?从今天起,试着做些改变吧! 别给我讲你喜欢写代码的感觉,你就是要用代码去计算行高,那我这篇文章不适合你. 在讲解复杂内容之前,还是先学习简单的内容 ...
- UITableView+FDTemplateLayoutCell计算行高显示<二>
之前记录过一篇UITableView+FDTemplateLayoutCell计算行高不成功的博客... 传送门:http://www.cnblogs.com/pengsi/p/6571311.htm ...
- dataGridView行高自适应
今天从网上查询相关datagridview行高自适应的信息时,好多都是告诉你直接用下面三行代码: dataGridView1.AutoSizeRowsMode = DataGridViewAutoSi ...
- wpf datagrid row height 行高自动计算使每行行高自适应文本
wpf 的datagrid的行高 要么是Auto,要么是定值:但会带来麻烦就是每行行高都一样. 当需要按内容(主要是wrap 换行的textbox或textblock)来动态调整行高的时候,需要用到d ...
- iOS UITableView 解决估算行高和指定行高的矛盾
喜欢交朋友的加:微信号 dwjluck2013 1.一般来说 在iOS 中若UITableViewCell 固定行高, 会通过 - (CGFloat)tableView:(UITableView *) ...
随机推荐
- Linux包管理工具分析
转自:http://blog.csdn.net/carolzhang8406/article/details/14198219 在正式进入讨论之前,先贴几条非常有用的link: linux 发行版比较 ...
- (中等) HDU 4069 Squiggly Sudoku , DLX+精确覆盖。
Description Today we play a squiggly sudoku, The objective is to fill a 9*9 grid with digits so that ...
- [Unity UGUI]UGUI提供多种不同的解决方案
现代游戏和应用程序经常需要支持各种不同的屏幕分辨率,特别是UI布局需要能够适应.UI系统在统一中包括各种工具来实现此目的,可以以多种方式组合在一起. 在这个小节我们将使用一个简单的案例研究和观察和比较 ...
- ISP和IAP
ISP(在系统编程)是一种不依赖于单片机自身软件的程序下载方式,特点是不需要从电路板上取下单片机,通过某种方式使单片机进入ISP模式,开放编程接口,由其使用的计算机将新的程序代码写入到存储器内.我们平 ...
- xCode中如何安装旧的模拟器
http://blog.csdn.net/cmengzhongren/article/details/50414493 这里给出如何把老版本的SDK加入到新的Xcode中的方法.其实很简单,就是将老版 ...
- Effective java -- 3 类和接口
第十三条:使类和成员的可访问性最小化 一个设计良好的模块会将实现细节隐藏起来,只将暴露API.模块之间调用并不知道对象的细节.这个概念成为信息隐藏或封装.要注意一点,设计的一个方法或者其他什么,只要不 ...
- 主流IOC框架测验(.NET)
上一篇中,我简单介绍了下Autofac的使用,有人希望能有个性能上的测试,考虑到有那么多的IOC框架,而主流的有:Castle Windsor.微软企业库中的Unity.Spring.NET.Stru ...
- Round Numbers(poj 3252)
题意:算出区间内二进制中0的个数大于等于1的个数的数字有多少个 /* 本来以为用数位DP搞,但是组合数更简单. 我们设n的二进制长度为len. ①:先考虑长度小于len的数字. 这里以数字22为例,二 ...
- iOS 倒出spa文件 打包
1. 修改Build Settings 修改 Code Signing: codesign failded 意思是签名错误,看看是否xcode -perferences是否没有登录,还有就是钥匙串密码 ...
- Linux目录结构示意详解图