SpringMVC(上)
一、SpringMVC简介
(1)springMVC概述
Spring MVC属于SpringFrameWork的后续产品,Spring 框架提供了构建 Web 应用程序的全功能 MVC 模块。
使用 Spring 可插入的 MVC 架构,从而在使用Spring进行WEB开发时,可以选择使用Spring的SpringMVC框架或集成其他MVC开发框架。
Spring web mvc和Struts2都属于表现层的框架。
(2)Springmvc处理流程
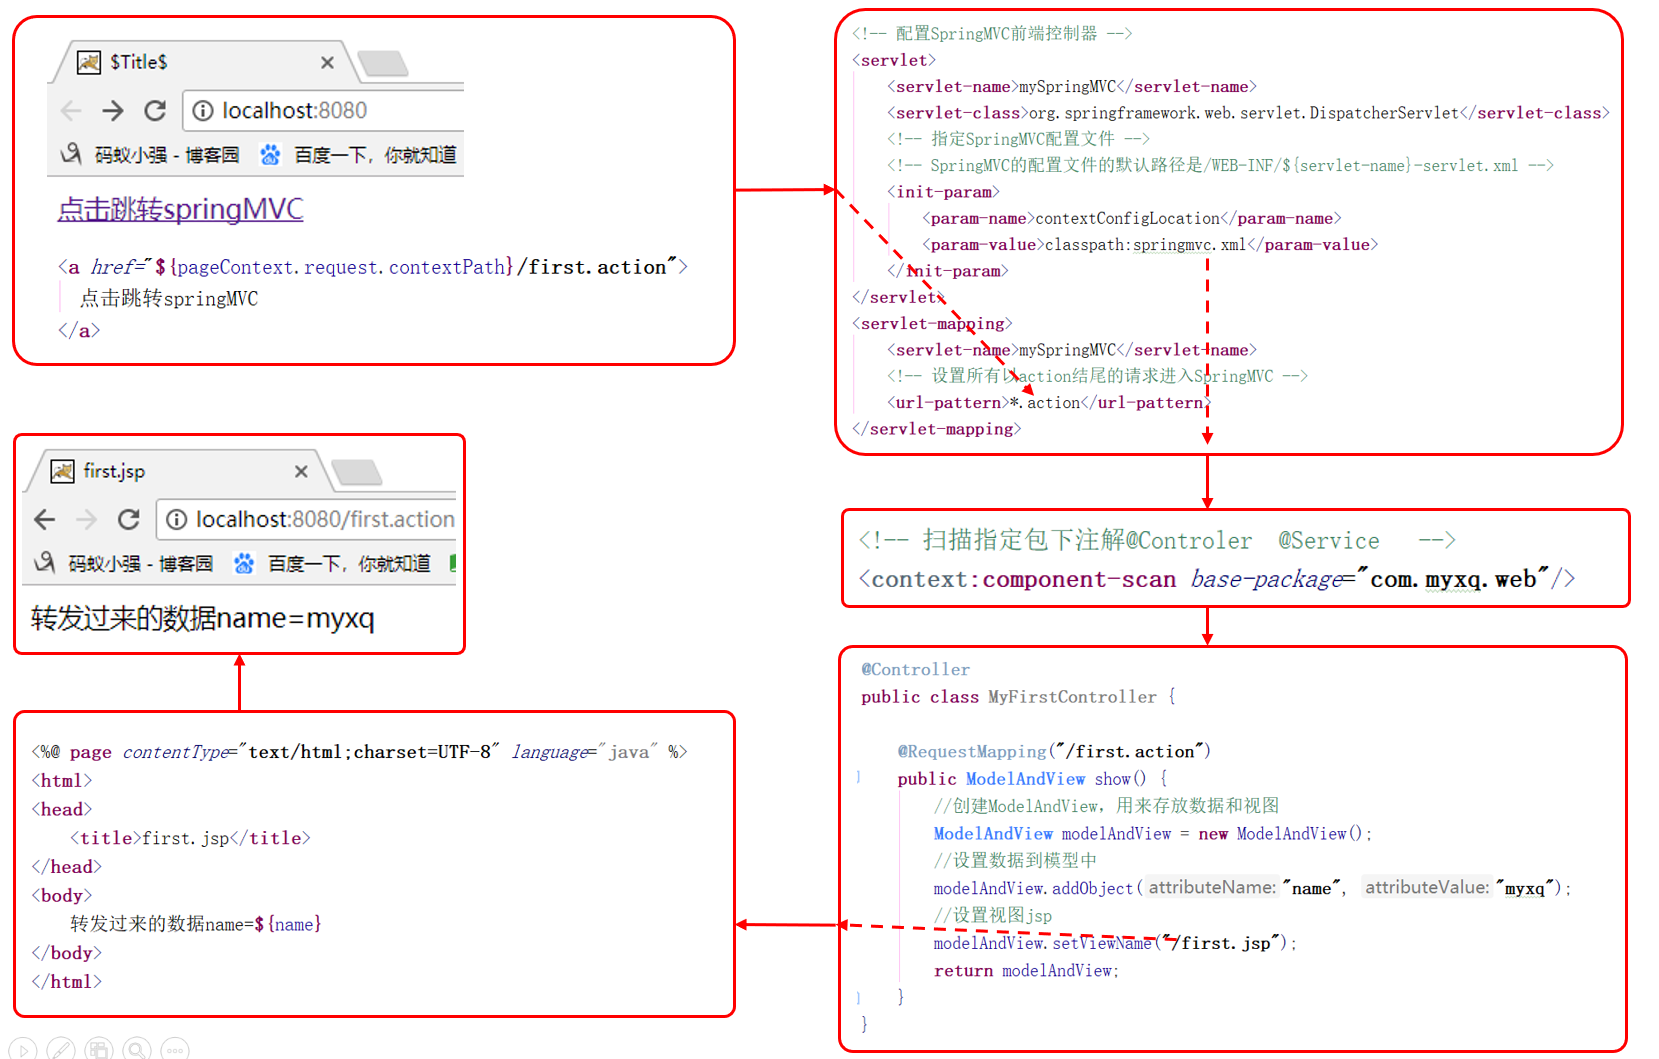
(3)入门程序
① 创建web工程
② 导入springMVC相关jar包
在spring的基础上添加一个mvc的包
+ lib

    - com.springsource.com.mchange.v2.c3p0-0.9.1.2.jar

    - com.springsource.org.aopalliance-1.0.0.jar

    - com.springsource.org.apache.commons.dbcp-1.2.2.osgi.jar

    - com.springsource.org.apache.commons.logging-1.1.1.jar

    - com.springsource.org.apache.commons.pool-1.5.3.jar

    - com.springsource.org.apache.log4j-1.2.15.jar

    - com.springsource.org.aspectj.weaver-1.6.8.RELEASE.jar

    - druid-1.0.15.jar

    - hamcrest-core-1.3.jar

    - junit-4.12.jar

    - mysql-connector-java-8.0.15.jar

    - spring-aop-5.0.7.RELEASE.jar

    - spring-aspects-5.0.7.RELEASE.jar

    - spring-beans-5.0.7.RELEASE.jar

    - spring-context-5.0.7.RELEASE.jar

    - spring-core-5.0.7.RELEASE.jar

    - spring-expression-5.0.7.RELEASE.jar

    - spring-jdbc-5.0.7.RELEASE.jar

    - spring-test-5.0.7.RELEASE.jar

    - spring-tx-5.0.7.RELEASE.jar

    - spring-web-5.0.7.RELEASE.jar

    - spring-webmvc-5.0.7.RELEASE.jar
③ 添加配置文件
配置文件 springmvc.xml
<?xml version="1.0" encoding="UTF-8"?>

<beans xmlns="http://www.springframework.org/schema/beans"

       xmlns:xsi="http://www.w3.org/2001/XMLSchema-instance"

       xmlns:context="http://www.springframework.org/schema/context"

       xmlns:mvc="http://www.springframework.org/schema/mvc"

       xmlns:aop="http://www.springframework.org/schema/aop"

       xmlns:tx="http://www.springframework.org/schema/tx"

       xsi:schemaLocation="http://www.springframework.org/schema/beans

    http://www.springframework.org/schema/beans/spring-beans.xsd

    http://www.springframework.org/schema/context

    http://www.springframework.org/schema/context/spring-context.xsd

    http://www.springframework.org/schema/aop

    http://www.springframework.org/schema/aop/spring-aop.xsd

    http://www.springframework.org/schema/mvc

    http://www.springframework.org/schema/mvc/spring-mvc-4.0.xsd

    http://www.springframework.org/schema/tx

    http://www.springframework.org/schema/tx/spring-tx.xsd">

</beans>
④ 配置前端控制器
在web.xml当中配置前端控制器
<?xml version="1.0" encoding="UTF-8"?>

<web-app xmlns="http://xmlns.jcp.org/xml/ns/javaee"

         xmlns:xsi="http://www.w3.org/2001/XMLSchema-instance"

         xsi:schemaLocation="http://xmlns.jcp.org/xml/ns/javaee http://xmlns.jcp.org/xml/ns/javaee/web-app_4_0.xsd"

         version="4.0">

    <!-- 配置SpringMVC前端控制器 -->

    <servlet>

        <servlet-name>mySpringMVC</servlet-name>

        <servlet-class>org.springframework.web.servlet.DispatcherServlet</servlet-class>

        <!-- 指定SpringMVC配置文件 -->

        <!-- SpringMVC的配置文件的默认路径是/WEB-INF/${servlet-name}-servlet.xml -->

        <init-param>

            <!-- DispatcherServlet类的初始化参数 -->

            <param-name>contextConfigLocation</param-name>

            <!-- 初始化参数的值,即springmvc配置文件的路径 -->

            <param-value>classpath:springmvc.xml</param-value>

        </init-param>

    </servlet>

    <servlet-mapping>

        <servlet-name>mySpringMVC</servlet-name>

        <!-- 设置所有以action结尾的请求进入SpringMVC -->

        <url-pattern>*.action</url-pattern>

    </servlet-mapping>

</web-app>
springMVC中 url-patten 取值
- /* :拦截所有 jsp js png .css 真的全拦截,不建议使用
- *.action *.do :拦截以do action 结尾的请求
- / :拦截所有,不包括jsp,包含.js .png.css ,建议使用
⑤ 创建控制器
package com.ssm.web;

import org.springframework.stereotype.Controller;

import org.springframework.web.bind.annotation.RequestMapping;

import org.springframework.web.servlet.ModelAndView;

@Controller

public class MyController {

    @RequestMapping("/first.action")

    public ModelAndView show(){

        // 创建 ModelAndView,用来存放数据和视图

        ModelAndView modelAndView = new ModelAndView();

        // 设置数据存到模型中,往别一个界面当中传一些数据

        modelAndView.addObject("name","itlike");

        // 请求过来后, 跳转到别一个界面

        modelAndView.setViewName("/first.jsp");

        return modelAndView;

    }

}
⑥ 在springMVC核心配置文件当中添加控制器扫描范围
<?xml version="1.0" encoding="UTF-8"?>

<beans xmlns="http://www.springframework.org/schema/beans"

       xmlns:xsi="http://www.w3.org/2001/XMLSchema-instance"

       xmlns:context="http://www.springframework.org/schema/context"

       xmlns:mvc="http://www.springframework.org/schema/mvc"

       xmlns:aop="http://www.springframework.org/schema/aop"

       xmlns:tx="http://www.springframework.org/schema/tx"

       xsi:schemaLocation="http://www.springframework.org/schema/beans

    http://www.springframework.org/schema/beans/spring-beans.xsd

    http://www.springframework.org/schema/context

    http://www.springframework.org/schema/context/spring-context.xsd

    http://www.springframework.org/schema/aop

    http://www.springframework.org/schema/aop/spring-aop.xsd

    http://www.springframework.org/schema/mvc

    http://www.springframework.org/schema/mvc/spring-mvc-4.0.xsd

    http://www.springframework.org/schema/tx

    http://www.springframework.org/schema/tx/spring-tx.xsd">

    <!--注解扫描-->

    <context:component-scan base-package="com.ssm"/>

</beans>
⑦ 创建结果页接收数据
first.jsp
<%@ page contentType="text/html;charset=UTF-8" language="java" %>

<%@ page isELIgnored="false"%>

<html>

<head>

    <title>Title</title>

</head>

<body>

    <h3>发送过来的数据</h3>

    name= ${name}

</body>

</html>
⑧ index.jsp页面跳转
<%@ page contentType="text/html;charset=UTF-8" language="java" %>

<html>

  <head>

    <title>Title</title>

  </head>

  <body>

    <a href="${pageContext.request.contextPath}/first.action">发送请求</a>

  </body>

</html>
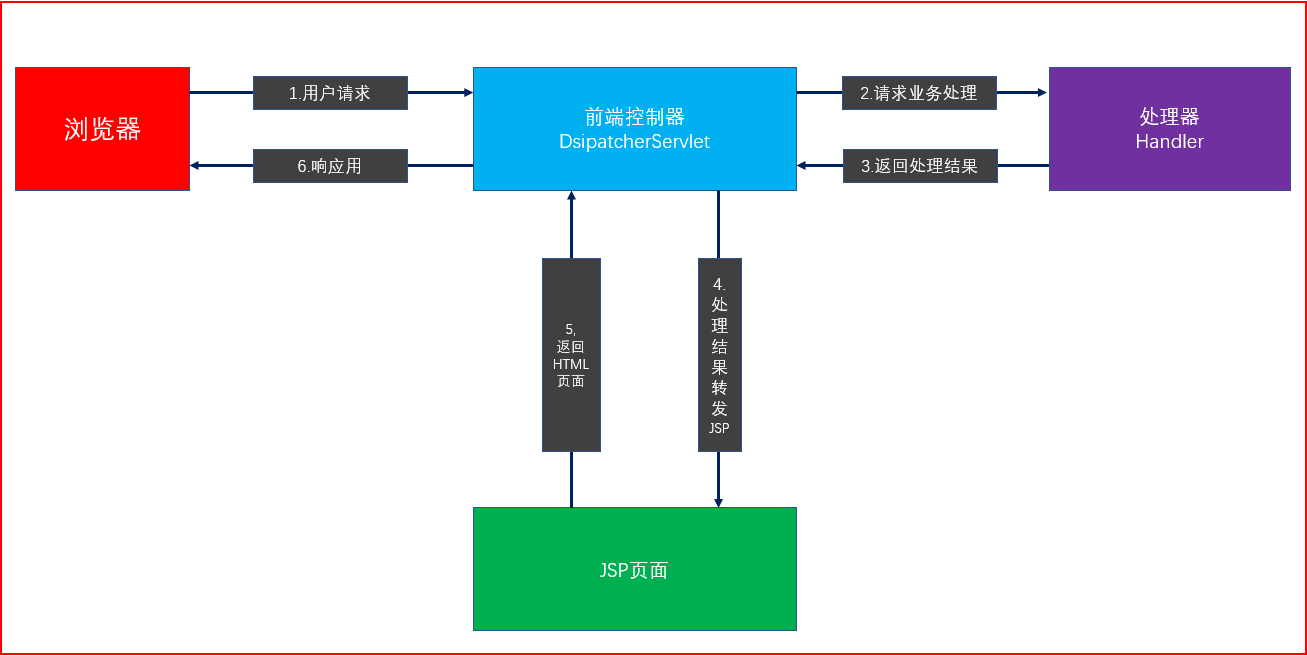
(4)执行流程
(5)详细执行流程

架构流程
① 用户发送请求至前端控制器 DispatcherServlet。
② DispatcherServlet收到请求调用HandlerMapping处理器映射器。
③ 处理器映射器根据请求url找到具体的处理器,生成处理器对象及处理器拦截器(如果有则生成)一并返回给DispatcherServlet。
④ DispatcherServlet通过HandlerAdapter处理器适配器调用处理器。
⑤ 执行处理器(Controller,也叫后端控制器)。
⑥ Controller执行完成返回ModelAndView。
⑦ HandlerAdapter将controller执行结果ModelAndView返回给DispatcherServlet。
⑧ DispatcherServlet将ModelAndView传给ViewReslover视图解析器。
⑨ ViewReslover解析后返回给 DispatcherServlet 具体View。
⑩ DispatcherServlet对View进行渲染视图(即将模型数据填充至视图中)。
⑪ DispatcherServlet响应用户。
组件说明
(1)DispatcherServlet
DispatcherServlet 前端控制器。
用户请求到达前端控制器,它就相当于MVC 模式中的 C,DispatcherServlet 是整个流程控制的中心。由它调用其它组件处理用户的请求。DispatcherServlet 的存在降低了组件之间的耦合性。
(2)HandlerMapping
HandlerMapping 处理器映射器。
HandlerMapping负责根据用户请求url找到Handler处理器,springmvc提供了不同的映射器实现不同的映射方式。HandlerMapping会把找到映射返回给前端控制器。
(3)Handler
Handler 后端控制器。
在DispatcherServlet的控制下Handler对具体的用户请求进行处理。
(4)HandlAdapter
HandlAdapter 处理器适配器。
通过HandlerAdapter对处理器进行执行。
(5)ViewResolver
ViewResolver 视图解析器。
View Resolver负责将处理结果生成View视图
(6)View
springmvc框架提供了很多的View视图类型的支持,包括:jstlView、freemarkerView、pdfView等。我们最常用的视图就是jsp。
二、默认加载组件
处理器映射器
@RequestMapping:定义请求url到处理器功能方法的映射。
注解式处理器映射器:
① 对类中标记了@ResquestMapping的方法进行映射。
② 根据@ResquestMapping定义的url匹配@ResquestMapping标记的方法。
③ 匹配成功返回HandlerMethod对象给前端控制器。
④ HandlerMethod对象中封装url对应的方法Method。
处理器适配器
① 对标记@ResquestMapping的方法进行适配
② 解析对应的方法
视图解析器
视图解析器使用SpringMVC框架默认的 InternalResourceViewResolver
可以在 spring-webmvc-5.0.7.RELEASE.jar -> org.springframework.web.servlet -> DispatcherServlet.properties 中查看:
org.springframework.web.servlet.ViewResolver=org.springframework.web.servlet.view.InternalResourceViewResolver
这个视图解析器支持JSP视图解析。
配置视图解析器
当一个页面存放目录结构比较多时,就可以配置目录:可以在返回地址上添加前缀和后缀
first.jsp 目录结构
+ web

  - admin

    - list

      - first.jsp
没有添加前缀和后缀,要写成
package com.ssm.web;

import org.springframework.stereotype.Controller;

import org.springframework.web.bind.annotation.RequestMapping;

import org.springframework.web.servlet.ModelAndView;

@Controller

public class MyController {

    @RequestMapping("/first.action")

    public ModelAndView show(){

        // 创建 ModelAndView,用来存放数据和视图

        ModelAndView modelAndView = new ModelAndView();

        // 设置数据存到模型中,往别一个界面当中传一些数据

        modelAndView.addObject("name","itlike");

        // 请求过来后, 跳转到别一个界面

        modelAndView.setViewName("/admin/list/first.jsp");

        return modelAndView;

    }

}
添加前缀和后缀
springmvc.xml
<?xml version="1.0" encoding="UTF-8"?>

<beans xmlns="http://www.springframework.org/schema/beans"

       xmlns:xsi="http://www.w3.org/2001/XMLSchema-instance"

       xmlns:context="http://www.springframework.org/schema/context"

       xmlns:mvc="http://www.springframework.org/schema/mvc"

       xmlns:aop="http://www.springframework.org/schema/aop"

       xmlns:tx="http://www.springframework.org/schema/tx"

       xsi:schemaLocation="http://www.springframework.org/schema/beans

    http://www.springframework.org/schema/beans/spring-beans.xsd

    http://www.springframework.org/schema/context

    http://www.springframework.org/schema/context/spring-context.xsd

    http://www.springframework.org/schema/aop

    http://www.springframework.org/schema/aop/spring-aop.xsd

    http://www.springframework.org/schema/mvc

    http://www.springframework.org/schema/mvc/spring-mvc-4.0.xsd

    http://www.springframework.org/schema/tx

    http://www.springframework.org/schema/tx/spring-tx.xsd">

    <!--注解扫描-->

    <context:component-scan base-package="com.ssm"/>

    <!--配置视图解析器-->

    <bean class="org.springframework.web.servlet.view.InternalResourceViewResolver">

        <property name="prefix" value="/admin/list/"/>

        <property name="suffix" value=".jsp"/>

    </bean>

</beans>
配置后,可以写成
// 请求过来后, 跳转到别一个界面

modelAndView.setViewName("first");
3.2之前 注册映射器和适配器
defaultAnnotationHandlerMapping
AnnotationMethodHandlerAdapter
<mvc:annotation-driven />
三、请求转发与重定向
启动服务器加载SpringMVC
第一次请求时,会做SpringMVC的初始化,需要花费一些时间。
我们可以让服务器启动时加载SpringMVC
web.xml:
<?xml version="1.0" encoding="UTF-8"?>

<web-app xmlns="http://xmlns.jcp.org/xml/ns/javaee"

         xmlns:xsi="http://www.w3.org/2001/XMLSchema-instance"

         xsi:schemaLocation="http://xmlns.jcp.org/xml/ns/javaee http://xmlns.jcp.org/xml/ns/javaee/web-app_4_0.xsd"

         version="4.0">

    <!-- 配置SpringMVC前端控制器 -->

    <servlet>

        <servlet-name>mySpringMVC</servlet-name>

        <servlet-class>org.springframework.web.servlet.DispatcherServlet</servlet-class>

        <!-- 指定SpringMVC配置文件 -->

        <!-- SpringMVC的配置文件的默认路径是/WEB-INF/${servlet-name}-servlet.xml -->

        <init-param>

            <!-- DispatcherServlet类的初始化参数 -->

            <param-name>contextConfigLocation</param-name>

            <!-- 初始化参数的值,即springmvc配置文件的路径 -->

            <param-value>classpath:springmvc.xml</param-value>

        </init-param>

        <!-- 表示web应用启动即加载该servlet -->

        <load-on-startup>1</load-on-startup>

    </servlet>

    <servlet-mapping>

        <servlet-name>mySpringMVC</servlet-name>

        <!-- 设置所有以action结尾的请求进入SpringMVC -->

        <url-pattern>*.action</url-pattern>

    </servlet-mapping>

</web-app>
请求转发与重定向,发送请求页面
<%@ page contentType="text/html;charset=UTF-8" language="java" %>

<html>

  <head>

    <title>Title</title>

  </head>

  <body>

  <p><a href="${pageContext.request.contextPath}/first.action">发送请求-需要设置数据</a></p>

  <p><a href="${pageContext.request.contextPath}/second.action">发送请求-不需要设置数据</a></p>

  </body>

</html>
请求转发
需要设置数据
@RequestMapping("/first.action")

public ModelAndView show(){

    // 创建 ModelAndView,用来存放数据和视图

    ModelAndView modelAndView = new ModelAndView();

    // 设置数据存到模型中,往别一个界面当中传一些数据

    modelAndView.addObject("name","itlike");

    // 请求过来后, 跳转到别一个界面

    modelAndView.setViewName("/first.jsp");

    return modelAndView;

}
不需要设置数据,直接转发
@RequestMapping("/second.action")

public String show2(){

    return "/first.jsp";

}
转发至另一个action
不会丢失传递的信息
package com.ssm.web;

import org.springframework.stereotype.Controller;

import org.springframework.web.bind.annotation.RequestMapping;

import org.springframework.web.servlet.ModelAndView;

@Controller

public class MyController {

    @RequestMapping("/first.action")

    public ModelAndView show(){

        // 创建 ModelAndView,用来存放数据和视图

        ModelAndView modelAndView = new ModelAndView();

        // 设置数据存到模型中,往别一个界面当中传一些数据

        modelAndView.addObject("name","itlike");

        // 请求过来后, 跳转到别一个界面

        modelAndView.setViewName("/second.action");

        return modelAndView;

    }

    @RequestMapping("/second.action")

    public String show2(){

        System.out.println(123);

        return "/first.jsp";

    }

}
重定向
需要设置数据
@RequestMapping("/first.action")

public ModelAndView show(){

    // 创建 ModelAndView,用来存放数据和视图

    ModelAndView modelAndView = new ModelAndView();

    // 设置数据存到模型中,往别一个界面当中传一些数据

    modelAndView.addObject("name","itlike");

    // 请求过来后, 跳转到别一个界面

    modelAndView.setViewName("redirect:/first.jsp");

    return modelAndView;

}
不需要设置数据
@RequestMapping("/second.action")

public String show2(){

    return "redirect:/first.jsp";

}
重定向至另一个action
会丢失传递的信息
package com.ssm.web;

import org.springframework.stereotype.Controller;

import org.springframework.web.bind.annotation.RequestMapping;

import org.springframework.web.servlet.ModelAndView;

@Controller

public class MyController {

    @RequestMapping("/first.action")

    public ModelAndView show(){

        // 创建 ModelAndView,用来存放数据和视图

        ModelAndView modelAndView = new ModelAndView();

        // 设置数据存到模型中,往别一个界面当中传一些数据

        modelAndView.addObject("name","itlike");

        // 请求过来后, 跳转到别一个界面

        modelAndView.setViewName("redirect:/second.action");

        return modelAndView;

    }

    @RequestMapping("/second.action")

    public String show2(){

        System.out.println(123);

        return "redirect:/first.jsp";

    }

}
四、接收参数
(1)使用传统request对象接收参数
需要 servlet-api.jar 或者 依赖 Tomcat 的运行库。
Springmvc框架会自动把Request对象传递给方法。
发送请求页:
<%@ page contentType="text/html;charset=UTF-8" language="java" %>

<html>

  <head>

    <title>Title</title>

  </head>

  <body>

  <form action="${pageContext.request.contextPath}/first">

      <div> 用户ID:<input type="text" name="id"> </div><br>

      <div> 用户名:<input type="text" name="username"> </div><br>

      <div> 密码:<input type="password" name="password"> </div><br>

      <div><input type="submit" value="提交"> </div>

  </form>

  </body>

</html>
Controller 处理请求
@Controller

public class MyController {

    @RequestMapping("/first")

    public ModelAndView show(HttpServletRequest request){

        // 接收参数

        String id = request.getParameter("id");

        String username = request.getParameter("username");

        String password = request.getParameter("password");

        // 输出参数

        System.out.println(id);

        System.out.println(username);

        System.out.println(password);

        // 发送参数

        ModelAndView modelAndView = new ModelAndView();

        modelAndView.addObject("id",id);

        modelAndView.addObject("username",username);

        modelAndView.addObject("password",password);

        modelAndView.setViewName("/first.jsp");

        return modelAndView;

    }

}
结果页 first.jsp
<%@ page contentType="text/html;charset=UTF-8" language="java" %>

<html>

<head>

    <title>Title</title>

</head>

<body>

    <h3>发送过来的数据</h3>

    <p>用户id :${id}</p>

    <p>用户名 :${username}</p>

    <p>密码 :${password}</p>

</body>

</html>
(2)使用简单类型传参接收参数(不使用 request 接收简单类型参数)
发送请求页和结果页 first.jsp和(1)使用传统request对象接收参数 一致。
当请求的参数名称和处理器形参名称一致时,会将请求参数与形参进行绑定。
@Controller

public class MyController {

    // 使用简单类型传参接收参数

    @RequestMapping("/first")

    public ModelAndView show(Integer id, String username, String password){

        // 输出参数

        System.out.println(id);

        System.out.println(username);

        System.out.println(password);

        // 发送参数

        ModelAndView modelAndView = new ModelAndView();

        modelAndView.addObject("id",id);

        modelAndView.addObject("username",username);

        modelAndView.addObject("password",password);

        modelAndView.setViewName("/first.jsp");

        return modelAndView;

    }

}
当请求的参数名称和处理器形参名称不一致时,可以使用@RequestParam进行匹配
@RequestParam
- value :请求参数名字
- required :是否必须,默认是true,表示请求中一定要有相应的参数,否则将报错
- defaultValue : 默认值,表示如果请求中没有同名参数时的默认值
@Controller

public class MyController {

    // 使用简单类型传参接收参数

    @RequestMapping("/first")

    public ModelAndView show(@RequestParam(required = false, defaultValue = "100")Integer id, @RequestParam(value = "username")String name, String password){

        // 输出参数

        System.out.println(id);

        System.out.println(name);

        System.out.println(password);

        // 发送参数

        ModelAndView modelAndView = new ModelAndView();

        modelAndView.addObject("id",id);

        modelAndView.addObject("username",name);

        modelAndView.addObject("password",password);

        modelAndView.setViewName("/first.jsp");

        return modelAndView;

    }

}
(3)以一个javaBean对象接收
要求对象当中的属性要和表单当中的名称一致
package com.ssm.domain;

import lombok.Getter;

import lombok.Setter;

@Setter @Getter

public class User {

    private Integer id;

    private String username;

    private String password;

    @Override

    public String toString() {

        return "User{" +

                "id=" + id +

                ", username='" + username + '\'' +

                ", password='" + password + '\'' +

                '}';

    }

}
发送请求页(和之前一样)
<%@ page contentType="text/html;charset=UTF-8" language="java" %>

<html>

  <head>

    <title>Title</title>

  </head>

  <body>

  <form action="${pageContext.request.contextPath}/first">

      <div> 用户ID:<input type="text" name="id"> </div><br>

      <div> 用户名:<input type="text" name="username"> </div><br>

      <div> 密码:<input type="password" name="password"> </div><br>

      <div><input type="submit" value="提交"> </div>

  </form>

  </body>

</html>
MyController.java
@Controller

public class MyController {

    // 使用JavaBean接收参数

    @RequestMapping("/first")

    public ModelAndView show(User user){

        // 输出参数

        System.out.println(user);

        // 发送参数

        ModelAndView modelAndView = new ModelAndView();

        modelAndView.addObject("user",user);

        modelAndView.setViewName("/first.jsp");

        return modelAndView;

    }

}
结果页
<%@ page contentType="text/html;charset=UTF-8" language="java" %>

<html>

<head>

    <title>Title</title>

</head>

<body>

    <h3>发送过来的数据</h3>

    <p>用户id :${user.id}</p>

    <p>用户名 :${user.username}</p>

    <p>密码 :${user.password}</p>

</body>

</html>
(4)数组接收数据
name相同时,可以使用数组来接收对应的参数
发送请求页
<%@ page contentType="text/html;charset=UTF-8" language="java" %>

<html>

  <head>

    <title>Title</title>

  </head>

  <body>

  <form action="${pageContext.request.contextPath}/first">

      <div>

          爱好:

          <input type="checkbox" name="hobby" value="篮球"> 篮球

          <input type="checkbox" name="hobby" value="足球"> 足球

          <input type="checkbox" name="hobby" value="排球"> 排球

          <input type="checkbox" name="hobby" value="乒乓球"> 乒乓球

      </div>

      <div> <input type="submit" value="提交"> </div>

  </form>

  </body>

</html>
Controller 处理请求
@Controller

public class MyController {

    // 使用数组形式接收参数

    @RequestMapping("/first")

    public ModelAndView show(String[] hobby){

        // 输出参数

        // 发送参数

        ModelAndView modelAndView = new ModelAndView();

        modelAndView.addObject("hobby",hobby);

        modelAndView.setViewName("/first.jsp");

        return modelAndView;

    }

}
结果页
<%@ page contentType="text/html;charset=UTF-8" language="java" %>

<%@ taglib uri="http://java.sun.com/jsp/jstl/core" prefix="c"%>

<html>

<head>

    <title>Title</title>

</head>

<body>

    <h3>发送过来的数据</h3>

    <p>爱好 :

        <c:forEach items="${hobby}" var="like">

            ${like}

        </c:forEach>

    </p>

</body>

</html>
将数组添加到User对象中
User.java
package com.ssm.domain;

import lombok.Getter;

import lombok.Setter;

import java.util.Arrays;

@Setter @Getter

public class User {

    private Integer id;

    private String username;

    private String password;

    private String[] hobby;

    @Override

    public String toString() {

        return "User{" +

                "id=" + id +

                ", username='" + username + '\'' +

                ", password='" + password + '\'' +

                ", hobby=" + Arrays.toString(hobby) +

                '}';

    }

}
发送请求页
<%@ page contentType="text/html;charset=UTF-8" language="java" %>

<html>

  <head>

    <title>Title</title>

  </head>

  <body>

  <form action="${pageContext.request.contextPath}/first">

      <div> 用户ID:<input type="text" name="id"> </div><br>

      <div> 用户名:<input type="text" name="username"> </div><br>

      <div> 密码:<input type="password" name="password"> </div><br>

      <div>

          爱好:

          <input type="checkbox" name="hobby" value="篮球"> 篮球

          <input type="checkbox" name="hobby" value="足球"> 足球

          <input type="checkbox" name="hobby" value="排球"> 排球

          <input type="checkbox" name="hobby" value="乒乓球"> 乒乓球

      </div><br>

      <div><input type="submit" value="提交"> </div>

  </form>

  </body>

</html>
Controller
@Controller

public class MyController {

    @RequestMapping("/first")

    public ModelAndView show(User user){

        // 输出参数

        System.out.println(user);

        // 发送参数

        ModelAndView modelAndView = new ModelAndView();

        modelAndView.addObject("user",user);

        modelAndView.setViewName("/first.jsp");

        return modelAndView;

    }

}
结果页
<%@ page contentType="text/html;charset=UTF-8" language="java" %>

<%@ taglib uri="http://java.sun.com/jsp/jstl/core" prefix="c"%>

<html>

<head>

    <title>Title</title>

</head>

<body>

    <h3>发送过来的数据</h3>

    <p>用户id :${user.id}</p>

    <p>用户名 :${user.username}</p>

    <p>密码 :${user.password}</p>

    <p>爱好 :

        <c:forEach items="${user.hobby}" var="like">

            ${like}

        </c:forEach>

    </p>

</body>

</html>
(5)包装类接收参数
User
package com.ssm.domain;

import lombok.Getter;

import lombok.Setter;

import java.util.Arrays;

@Setter @Getter

public class User {

    private Integer id;

    private String username;

    private String password;

    private String[] hobby;

    private Dog dog;

    @Override

    public String toString() {

        return "User{" +

                "id=" + id +

                ", username='" + username + '\'' +

                ", password='" + password + '\'' +

                ", hobby=" + Arrays.toString(hobby) +

                ", dog=" + dog +

                '}';

    }

}
Dog
package com.ssm.domain;

import lombok.Getter;

import lombok.Setter;

@Setter @Getter

public class Dog {

    private String name;

    private String color;

    @Override

    public String toString() {

        return "Dog{" +

                "name='" + name + '\'' +

                ", color='" + color + '\'' +

                '}';

    }

}
发送请求页
<%@ page contentType="text/html;charset=UTF-8" language="java" %>

<html>

  <head>

    <title>Title</title>

  </head>

  <body>

  <form action="${pageContext.request.contextPath}/first">

      <div> 用户ID:<input type="text" name="id"> </div><br>

      <div> 用户名:<input type="text" name="username"> </div><br>

      <div> 密码:<input type="password" name="password"> </div><br>

      <div>

          爱好:

          <input type="checkbox" name="hobby" value="篮球"> 篮球

          <input type="checkbox" name="hobby" value="足球"> 足球

          <input type="checkbox" name="hobby" value="排球"> 排球

          <input type="checkbox" name="hobby" value="乒乓球"> 乒乓球

      </div><br>

      <div> 宠物名称:<input type="text" name="dog.name"> </div><br>

      <div> 宠物颜色:<input type="text" name="dog.color"> </div><br>

      <div><input type="submit" value="提交"> </div>

  </form>

  </body>

</html>
Controller
@Controller

public class MyController {

    @RequestMapping("/first")

    public ModelAndView show(User user){

        // 输出参数

        System.out.println(user);

        // 发送参数

        ModelAndView modelAndView = new ModelAndView();

        modelAndView.addObject("user",user);

        modelAndView.setViewName("/first.jsp");

        return modelAndView;

    }

}
结果页
<html>

<head>

    <title>Title</title>

</head>

<body>

    <h3>发送过来的数据</h3>

    <p>用户id :${user.id}</p>

    <p>用户名 :${user.username}</p>

    <p>密码 :${user.password}</p>

    <p>爱好 :

        <c:forEach items="${user.hobby}" var="like">

            ${like}

        </c:forEach>

    </p>

    <p> 宠物名称:${user.dog.name}</p>

    <p> 宠物颜色:${user.dog.color}</p>

</body>

</html>
(6)List集合接受数据
user
package com.ssm.domain;

import lombok.Getter;

import lombok.Setter;

import java.util.Arrays;

import java.util.List;

@Setter @Getter

public class User {

    private Integer id;

    private String username;

    private String password;

    private String[] hobby;

    private List<Dog> dog;

    @Override

    public String toString() {

        return "User{" +

                "id=" + id +

                ", username='" + username + '\'' +

                ", password='" + password + '\'' +

                ", hobby=" + Arrays.toString(hobby) +

                ", dog=" + dog +

                '}';

    }

}
请求发送页
<%@ page contentType="text/html;charset=UTF-8" language="java" %>

<html>

  <head>

    <title>Title</title>

  </head>

  <body>

  <form action="${pageContext.request.contextPath}/first">

      <div> 用户ID:<input type="text" name="id"> </div><br>

      <div> 用户名:<input type="text" name="username"> </div><br>

      <div> 密码:<input type="password" name="password"> </div><br>

      <div>

          爱好:

          <input type="checkbox" name="hobby" value="篮球"> 篮球

          <input type="checkbox" name="hobby" value="足球"> 足球

          <input type="checkbox" name="hobby" value="排球"> 排球

          <input type="checkbox" name="hobby" value="乒乓球"> 乒乓球

      </div><br>

      <div> 宠物名称:<input type="text" name="dog[0].name"> </div><br>

      <div> 宠物颜色:<input type="text" name="dog[0].color"> </div><br>

      <div> 宠物名称:<input type="text" name="dog[1].name"> </div><br>

      <div> 宠物颜色:<input type="text" name="dog[1].color"> </div><br>

      <div> 宠物名称:<input type="text" name="dog[2].name"> </div><br>

      <div> 宠物颜色:<input type="text" name="dog[2].color"> </div><br>

      <div><input type="submit" value="提交"> </div>

  </form>

  </body>

</html>
Controller
@Controller

public class MyController {

    @RequestMapping("/first")

    public ModelAndView show(User user){

        // 输出参数

        System.out.println(user);

        // 发送参数

        ModelAndView modelAndView = new ModelAndView();

        modelAndView.addObject("user",user);

        modelAndView.setViewName("/first.jsp");

        return modelAndView;

    }

}
结果页
<%@ page contentType="text/html;charset=UTF-8" language="java" %>

<%@ taglib uri="http://java.sun.com/jsp/jstl/core" prefix="c"%>

<html>

<head>

    <title>Title</title>

</head>

<body>

    <h3>发送过来的数据</h3>

    <p>用户id :${user.id}</p>

    <p>用户名 :${user.username}</p>

    <p>密码 :${user.password}</p>

    <p>爱好 :

        <c:forEach items="${user.hobby}" var="like">

            ${like}

        </c:forEach>

    </p>

    <c:forEach items="${user.dog}" var="dog">

        <p> 宠物名称:${dog.name}</p>

        <p> 宠物颜色:${dog.color}</p>

    </c:forEach>

</body>

</html>
(7)自定义参数绑定
根据业务需求自定义数据显示格式
需求
修改用户出生日期,由于日期数据有很多种格式,springmvc 没办法把字符串转换成日期类型。所以需要自定义参数绑定。
分析
前端控制器接收到请求后,找到注解形式的处理器适配器。对RequestMapping标记的方法进行适配,并对方法中的形参进行参数绑定。
内部已经定义了很多的转换器,比如可以直接使用int类型来接收字符串。日期类型与字符串比较特殊,字符串的日期格式有很多种。可以自己来定义是哪种格式的转换。
可以在springmvc处理器适配器上自定义转换器Converter进行参数绑定。
步骤
① 创建转换器
package com.ssm.web.converter;

import org.springframework.core.convert.converter.Converter;

import java.text.ParseException;

import java.text.SimpleDateFormat;

import java.util.Date;

/**

 * 转换日期类型的数据

 * S :页面传递过来的类型

 * T :转换后的类型

 */

public class DateConverter implements Converter<String, Date> {

    @Override

    public Date convert(String s) {

        if(s != null){

            SimpleDateFormat simpleDateFormat = new SimpleDateFormat("yyyy-MM-dd");

            try {

                return simpleDateFormat.parse(s);

            } catch (ParseException e) {

                System.out.println("转换出现异常");

                e.printStackTrace();

            }

        }

        return null;

    }

}
② 在springMVC核心配置文件当中自定义转换器
<?xml version="1.0" encoding="UTF-8"?>

<beans xmlns="http://www.springframework.org/schema/beans"

       xmlns:xsi="http://www.w3.org/2001/XMLSchema-instance"

       xmlns:context="http://www.springframework.org/schema/context"

       xmlns:mvc="http://www.springframework.org/schema/mvc"

       xmlns:aop="http://www.springframework.org/schema/aop"

       xmlns:tx="http://www.springframework.org/schema/tx"

       xsi:schemaLocation="http://www.springframework.org/schema/beans

    http://www.springframework.org/schema/beans/spring-beans.xsd

    http://www.springframework.org/schema/context

    http://www.springframework.org/schema/context/spring-context.xsd

    http://www.springframework.org/schema/aop

    http://www.springframework.org/schema/aop/spring-aop.xsd

    http://www.springframework.org/schema/mvc

    http://www.springframework.org/schema/mvc/spring-mvc-4.0.xsd

    http://www.springframework.org/schema/tx

    http://www.springframework.org/schema/tx/spring-tx.xsd">

    <!--注解扫描-->

    <context:component-scan base-package="com.ssm"/>

    <bean id="dateConverter" class="org.springframework.format.support.FormattingConversionServiceFactoryBean">

        <property name="converters">

            <list>

                <bean class="com.ssm.web.converter.DateConverter"></bean>

            </list>

        </property>

    </bean>

    <!--注解驱动-->

    <mvc:annotation-driven conversion-service="dateConverter"/>

</beans>
运行
user
package com.ssm.domain;

import lombok.Getter;

import lombok.Setter;

import java.util.Arrays;

import java.util.Date;

import java.util.List;

@Setter @Getter

public class User {

    private Integer id;

    private String username;

    private String password;

    private Date date;

    private String[] hobby;

    private List<Dog> dog;

    @Override

    public String toString() {

        return "User{" +

                "id=" + id +

                ", username='" + username + '\'' +

                ", password='" + password + '\'' +

                ", date=" + date +

                ", hobby=" + Arrays.toString(hobby) +

                ", dog=" + dog +

                '}';

    }

}
请求发送页
<%@ page contentType="text/html;charset=UTF-8" language="java" %>

<html>

  <head>

    <title>Title</title>

  </head>

  <body>

  <form action="${pageContext.request.contextPath}/first">

      <div> 用户ID:<input type="text" name="id"> </div><br>

      <div> 用户名:<input type="text" name="username"> </div><br>

      <div> 密码:<input type="password" name="password"> </div><br>

      <div> 出生日期:<input type="text" name="date"> </div><br>

      <div>

          爱好:

          <input type="checkbox" name="hobby" value="篮球"> 篮球

          <input type="checkbox" name="hobby" value="足球"> 足球

          <input type="checkbox" name="hobby" value="排球"> 排球

          <input type="checkbox" name="hobby" value="乒乓球"> 乒乓球

      </div><br>

      <div> 宠物名称:<input type="text" name="dog[0].name"> </div><br>

      <div> 宠物颜色:<input type="text" name="dog[0].color"> </div><br>

      <div> 宠物名称:<input type="text" name="dog[1].name"> </div><br>

      <div> 宠物颜色:<input type="text" name="dog[1].color"> </div><br>

      <div> 宠物名称:<input type="text" name="dog[2].name"> </div><br>

      <div> 宠物颜色:<input type="text" name="dog[2].color"> </div><br>

      <div><input type="submit" value="提交"> </div>

  </form>

  </body>

</html>
Controller
@Controller

public class MyController {

    @RequestMapping("/first")

    public ModelAndView show(User user){

        // 输出参数

        System.out.println(user);

        // 发送参数

        ModelAndView modelAndView = new ModelAndView();

        modelAndView.addObject("user",user);

        modelAndView.setViewName("/first.jsp");

        return modelAndView;

    }

}
结果页
<%@ page contentType="text/html;charset=UTF-8" language="java" %>

<%@ taglib uri="http://java.sun.com/jsp/jstl/core" prefix="c"%>

<html>

<head>

    <title>Title</title>

</head>

<body>

    <h3>发送过来的数据</h3>

    <p>用户id :${user.id}</p>

    <p>用户名 :${user.username}</p>

    <p>出生日期 :${String.format("%tF", user.date)}</p>

    <p>密码 :${user.password}</p>

    <p>爱好 :

        <c:forEach items="${user.hobby}" var="like">

            ${like}

        </c:forEach>

    </p>

    <c:forEach items="${user.dog}" var="dog">

        <p> 宠物名称:${dog.name}</p>

        <p> 宠物颜色:${dog.color}</p>

    </c:forEach>

</body>

</html>
(注意)post请求中文参数乱码
当发送post请求时,带有中文的参数会发生乱码
解决办法
在web.xml当中添加一个过滤器
<?xml version="1.0" encoding="UTF-8"?>

<web-app xmlns="http://xmlns.jcp.org/xml/ns/javaee"

         xmlns:xsi="http://www.w3.org/2001/XMLSchema-instance"

         xsi:schemaLocation="http://xmlns.jcp.org/xml/ns/javaee http://xmlns.jcp.org/xml/ns/javaee/web-app_4_0.xsd"

         version="4.0" metadata-complete="true">

    <!-- 解决post乱码问题 -->

    <filter>

        <filter-name>encoding</filter-name>

        <filter-class>org.springframework.web.filter.CharacterEncodingFilter</filter-class>

        <!-- 设置编码参是UTF8 -->

        <init-param>

            <param-name>encoding</param-name>

            <param-value>UTF-8</param-value>

        </init-param>

    </filter>

    <filter-mapping>

        <filter-name>encoding</filter-name>

        <url-pattern>/*</url-pattern>

    </filter-mapping>

    <!-- 配置SpringMVC前端控制器 -->

    <servlet>

        <servlet-name>mySpringMVC</servlet-name>

        <servlet-class>org.springframework.web.servlet.DispatcherServlet</servlet-class>

        <!-- 指定SpringMVC配置文件 -->

        <!-- SpringMVC的配置文件的默认路径是/WEB-INF/${servlet-name}-servlet.xml -->

        <init-param>

            <!-- DispatcherServlet类的初始化参数 -->

            <param-name>contextConfigLocation</param-name>

            <!-- 初始化参数的值,即springmvc配置文件的路径 -->

            <param-value>classpath:springmvc.xml</param-value>

        </init-param>

        <!-- 表示web应用启动即加载该servlet -->

        <load-on-startup>1</load-on-startup>

    </servlet>

    <servlet-mapping>

        <servlet-name>mySpringMVC</servlet-name>

        <url-pattern>/</url-pattern>

    </servlet-mapping>

</web-app>
五、@RequestMapping相关属性
(1)Value属性
用来设置请求路径,值是一个字符串数组,可以设置多个路径共同访问对应方法。
示例:
请求发送页
<%@ page contentType="text/html;charset=UTF-8" language="java" %>

<html>

  <head>

    <title>Title</title>

  </head>

  <body>

  <a href="${pageContext.request.contextPath}/first">发送请求1</a>

  <a href="${pageContext.request.contextPath}/second">发送请求2</a>

  </body>

</html>
Controller
package com.ssm.web.controller;

import org.springframework.stereotype.Controller;

import org.springframework.web.bind.annotation.RequestMapping;

import org.springframework.web.servlet.ModelAndView;

@Controller

public class MyController {

    @RequestMapping(value = {"first","second"})

    public String show(){

        System.out.println("show");

        return "/result.jsp";

    }

}
结果页
<%@ page contentType="text/html;charset=UTF-8" language="java" %>

<html>

<head>

    <title>Title</title>

</head>

<body>

    <h3>结果页</h3>

</body>

</html>
(2)method属性
用来设置映射的请求方式,值是RequestMethod类型的数组。
如果没有写,则没有限制,post与get都可以请求到对应的方法,
如果指定了请求类型,则必须得是相应的请求才能访问到对应的方法。
示例:
请求发送页
<%@ page contentType="text/html;charset=UTF-8" language="java" %>

<html>

  <head>

    <title>Title</title>

  </head>

  <body>

  <form action="${pageContext.request.contextPath}/first" method="get">

      <input type="submit" value="发送GET请求">

  </form>

  <form action="${pageContext.request.contextPath}/first" method="post">

      <input type="submit" value="发送POST请求">

  </form>

  </body>

</html>
Controller
package com.ssm.web.controller;

import org.springframework.stereotype.Controller;

import org.springframework.web.bind.annotation.RequestMapping;

import org.springframework.web.bind.annotation.RequestMethod;

@Controller

public class MyController {

    @RequestMapping(value = "first", method = {RequestMethod.POST,RequestMethod.DELETE})

    public String show(){

        System.out.println("show");

        return "/result.jsp";

    }

}
结果页
<%@ page contentType="text/html;charset=UTF-8" language="java" %>

<html>

<head>

    <title>Title</title>

</head>

<body>

    <h3>结果页</h3>

</body>

</html>
(3)params属性
必须设置对应的请求参数和请求值,才能访问到对应的内容
params属性可以限制请求参数:
① param1: 表示请求必须包含名为 param1 的请求参数
② !param1: 表示请求不能包含名为 param1 的请求参数
③ param1 != value1: 表示请求包含名为 param1 的请求参数,但其值不能为 value1
④ {“param1=value1”, “param2”}: 请求必须包含名为 param1 和param2 的两个请求参数,且 param1 参数的值必须为 value1
示例
请求发送页
<%@ page contentType="text/html;charset=UTF-8" language="java" %>

<html>

  <head>

    <title>Title</title>

  </head>

  <body>

  <a href="${pageContext.request.contextPath}/first?name=admin&age=20">发送请求</a>

  </body>

</html>
Controller
package com.ssm.web.controller;

import org.springframework.stereotype.Controller;

import org.springframework.web.bind.annotation.RequestMapping;

import org.springframework.web.bind.annotation.RequestMethod;

@Controller

public class MyController {

    @RequestMapping(value = "first", params = {"name=admin","age"})

    public String show(){

        System.out.println("show");

        return "/result.jsp";

    }

}
结果页
<%@ page contentType="text/html;charset=UTF-8" language="java" %>

<html>

<head>

    <title>Title</title>

</head>

<body>

    <h3>结果页</h3>

</body>

</html>
(4)headers属性
发送的请求头必须要与设置的请求相同时,才能够访问到对应的方法
示例
请求发送页
<%@ page contentType="text/html;charset=UTF-8" language="java" %>

<html>

  <head>

    <title>Title</title>

  </head>

  <body>

  <a href="${pageContext.request.contextPath}/first">发送请求</a>

  </body>

</html>
Controller
package com.ssm.web.controller;

import org.springframework.stereotype.Controller;

import org.springframework.web.bind.annotation.RequestMapping;

import org.springframework.web.bind.annotation.RequestMethod;

@Controller

public class MyController {

    @RequestMapping(value = "first", headers = {"Host=localhost:8081","Referer=http://localhost:8081/"})

    public String show(){

        System.out.println("show");

        return "/result.jsp";

    }

}
结果页
<%@ page contentType="text/html;charset=UTF-8" language="java" %>

<html>

<head>

    <title>Title</title>

</head>

<body>

    <h3>结果页</h3>

</body>=-</html>)
(5)ant风格地址
Ant风格 :请求路径的一种匹配方法。
通配符
① ?
一个 ? 匹配一个字符,几个?匹配几个字符。
请求发送页
<%@ page contentType="text/html;charset=UTF-8" language="java" %>

<html>

  <head>

    <title>Title</title>

  </head>

  <body>

  <a href="${pageContext.request.contextPath}/first/a">发送请求</a>

  </body>

</html>
Controller
package com.ssm.web.controller;

import org.springframework.stereotype.Controller;

import org.springframework.web.bind.annotation.RequestMapping;

import org.springframework.web.bind.annotation.RequestMethod;

@Controller

public class MyController {

    @RequestMapping("first/?")

    public String show(){

        System.out.println("show");

        return "/result.jsp";

    }

}
结果页
<%@ page contentType="text/html;charset=UTF-8" language="java" %>

<html>

<head>

    <title>Title</title>

</head>

<body>

    <h3>结果页</h3>

</body>

</html>
一些特殊字符的处理
String charEncode = java.net.URLEncoder.encode("#");

System.out.println("字符转译后的值为:" + charEncode);
对照表
| 字符 | 转义后 |
|---|---|
| # | %23 |
| % | %25 |
| & | %26 |
| + | %2B |
| \ | %2F |
| = | %3D |
| ? | %3F |
请求发送页
<%@ page contentType="text/html;charset=UTF-8" language="java" %>

<html>

  <head>

    <title>Title</title>

  </head>

  <body>

  <a href="${pageContext.request.contextPath}/first/#">失败 404 – 未找到</a>

  <a href="${pageContext.request.contextPath}/first/%23">成功</a>

  </body>

</html>
Controller 和 结果页 不变(和 ①?的一致)
② * 单重路径匹配任意字符
请求发送页
<%@ page contentType="text/html;charset=UTF-8" language="java" %>

<html>

  <head>

    <title>Title</title>

  </head>

  <body>

  <a href="${pageContext.request.contextPath}/first/abcd">成功</a>

  <a href="${pageContext.request.contextPath}/first/#">成功</a>

  <a href="${pageContext.request.contextPath}/first/%">失败</a>

  <a href="${pageContext.request.contextPath}/first/%25">成功</a>

  <a href="${pageContext.request.contextPath}/first/&">成功</a>

  <a href="${pageContext.request.contextPath}/first/+">成功</a>

  <a href="${pageContext.request.contextPath}/first/=">成功</a>

  <a href="${pageContext.request.contextPath}/first/?">成功</a>

  <a href="${pageContext.request.contextPath}/first/abc/">成功</a>

  <a href="${pageContext.request.contextPath}/first/a/1">失败</a>

  <a href="${pageContext.request.contextPath}/first/a%2F1">失败</a>

  </body>

</html>
Controller
package com.ssm.web.controller;

import org.springframework.stereotype.Controller;

import org.springframework.web.bind.annotation.RequestMapping;

import org.springframework.web.bind.annotation.RequestMethod;

@Controller

public class MyController {

    @RequestMapping("first/*")

    public String show(){

        System.out.println("show");

        return "/result.jsp";

    }

}
③ ** 多重路径匹配任意字符
请求发送页
<%@ page contentType="text/html;charset=UTF-8" language="java" %>

<html>

  <head>

    <title>Title</title>

  </head>

  <body>

  <a href="${pageContext.request.contextPath}/first/abcd">成功</a>

  <a href="${pageContext.request.contextPath}/first/#">成功</a>

  <a href="${pageContext.request.contextPath}/first/%">失败</a>

  <a href="${pageContext.request.contextPath}/first/%25">成功</a>

  <a href="${pageContext.request.contextPath}/first/&">成功</a>

  <a href="${pageContext.request.contextPath}/first/+">成功</a>

  <a href="${pageContext.request.contextPath}/first/=">成功</a>

  <a href="${pageContext.request.contextPath}/first/?">成功</a>

  <a href="${pageContext.request.contextPath}/first/abc/">成功</a>

  <a href="${pageContext.request.contextPath}/first/a/1">成功</a>

  <a href="${pageContext.request.contextPath}/first/a%2F1">失败</a>

  </body>

</html>
Controller
package com.ssm.web.controller;

import org.springframework.stereotype.Controller;

import org.springframework.web.bind.annotation.RequestMapping;

import org.springframework.web.bind.annotation.RequestMethod;

@Controller

public class MyController {

    @RequestMapping("first/**")

    public String show(){

        System.out.println("show");

        return "/result.jsp";

    }

}
六、@PathVariable
@PathVariable 路径变量
REST风格
资源定位及资源操作的风格。不是协议,可以遵循,也可以不遵循。
REST风格请求:
REST 即 Representational State Transfer (资源)表现层状态转化
用URL定位资源,用HTTP描述操作
是目前最流行的一种互联网软件架构。它结构清晰、符合标准、易于理解、扩展方便,所以正得到越来越多网站的采用,使用POST, DELETE, PUT, GET 分别对应 CRUD,Spring3.0 开始支持 REST 风格的请求。
传统的操作资源
查询 get
http://localhost:8080/get.action?id=10
新增 post
http://localhost:8080/add.action
修改 post
http://localhost:8080/update.action
删除 post
http://localhost:8080/delete.action?id=10
restful操作资源
查询GET
http://localhost:8080/goods/1
新增POST
http://localhost:8080/goods
更新PUT
http://localhost:8080/goods
删除DELETE
http://localhost:8080/goods/1
使用@PathVariable接收RestFul风格参数
请求发送页
<%@ page contentType="text/html;charset=UTF-8" language="java" %>

<html>

  <head>

    <title>Title</title>

  </head>

  <body>

  <a href="${pageContext.request.contextPath}/first/1">发送请求</a>

  </body>

</html>
Controller
package com.ssm.web.controller;

import org.springframework.stereotype.Controller;

import org.springframework.web.bind.annotation.PathVariable;

import org.springframework.web.bind.annotation.RequestMapping;

@Controller

public class MyController {

    @RequestMapping("first/{id}")

    public String show(@PathVariable Integer id){

        System.out.println(id);

        return "/result.jsp";

    }

}
发送put与delete请求
默认情况下 Form 表单是不支持 PUT 请求和 DELETE 请求的。
spring3.0添加了一个过滤器 HiddenHttpMethodFilter,可以将post请求转换为PUT或DELETE请求
配置过滤器 web.xml
<!--实现restful请求-->

<filter>

    <filter-name>HiddenHttpMethodFilter</filter-name>

    <filter-class>org.springframework.web.filter.HiddenHttpMethodFilter</filter-class>

</filter>

<filter-mapping>

    <filter-name>HiddenHttpMethodFilter</filter-name>

    <url-pattern>/*</url-pattern>

</filter-mapping>
发送请求
<%@ page contentType="text/html;charset=UTF-8" language="java" %>

<html>

  <head>

    <title>Title</title>

  </head>

  <body>

  <form action="${pageContext.request.contextPath}/first/10" method="post">

    <input type="hidden" name="_method" value="put">

    <input type="submit" value="提交">

  </form>

  </body>

</html>
服务器接收处理
package com.ssm.web.controller;

import org.springframework.stereotype.Controller;

import org.springframework.web.bind.annotation.PathVariable;

import org.springframework.web.bind.annotation.RequestMapping;

import org.springframework.web.bind.annotation.RequestMethod;

@Controller

public class MyController {

    @RequestMapping(value = "first/{id}", method = RequestMethod.PUT)

    public String show(@PathVariable Integer id){

        System.out.println(id);

        // return "redirect:/result.jsp";

        return "redirect:/result";

    }

    @RequestMapping("result")

    public String res(){

        return "result.jsp";

    }

}
注意事项
从tomcat8开始,如果直接返回jsp页面,会报405错误 JSPs only permit GET POST or HEAD
解决方法
使用重定向的形式跳转到对应jsp
或者是直接把对应jsp的 isErrorPage="true"
七、@RequestHeader
在方法中接收请求头当中的信息
发送请求页
<%@ page contentType="text/html;charset=UTF-8" language="java" %>

<html>

  <head>

    <title>Title</title>

  </head>

  <body>

  <a href="${pageContext.request.contextPath}/first">发送请求</a>

  </body>

</html>
Controller
@Controller

public class MyController {

    @RequestMapping("first")

    public String show(@RequestHeader("Referer") String referer, @RequestHeader("Host") String host){

        System.out.println(referer);

        System.out.println(host);

        return "result.jsp";

    }

}
八、@CookieValue
用来接收浏览发送过来的cookes值
发送请求页和 七、@RequestHeader 一致
Controller
@Controller

public class MyController {

    @RequestMapping("first")

    public String show(@CookieValue("JSESSIONID") String sessionID, @RequestHeader("Cookie") String cookie){

        System.out.println(sessionID);

        System.out.println(cookie);

        return "result.jsp";

    }

}
SpringMVC(上)的更多相关文章
- springmvc上传文件,抄别人的
SpringMVC中的文件上传 分类: SpringMVC 2012-05-17 12:55 26426人阅读 评论(13) 收藏 举报 stringuserinputclassencoding 这是 ...
- SpringMVC上传下载
springmvc上传和下载功能 写在一个简单的示例在线基准码 1.导入的必要性jar包:ant.jar.commons-fileupload.jar.connom-io.jar. 当然spring ...
- 2. SpringMVC 上传文件操作
1.创建java web项目:SpringMVCUploadDownFile 2.在项目的WebRoot下的WEB-INF的lib包下添加如下jar文件 com.springsource.com.mc ...
- SpringMVC上传压缩文件,解压文件,并检测上传文件中是否有index.html
SpringMVC上传压缩文件,解压文件,并检测上传文件中是否有index.html 说明: 1.环境:SpringMVC+Spring+Tomcat7+JDK1.7 2.支持 zip和rar格式的压 ...
- SpringMVC 上传下载 异常处理
SpringMVC 上传下载 异常处理 上一章节对SpringMVC的表单验证进行了详细的介绍,本章节介绍SpringMVC文件的上传和下载(重点),国际化以及异常处理问题.这也是SpringMVC系 ...
- SpringMVC上传文件大小的设置
在spring-mvc.xml(springmvc的配置文件)里: <!-- SpringMVC上传文件时,需要配置MultipartResolver处理器 --> <bean id ...
- 使用springMVC上传文件
control层实现功能: @RequestMapping(value="upload2") public String upLoad2(HttpServletRequest re ...
- SpringMVC上传文件(图片)并保存到本地
SpringMVC上传文件(图片)并保存到本地 小记一波~ 基本的MVC配置就不展示了,这里给出核心代码 在spring-mvc的配置文件中写入如下配置 <bean id="multi ...
- SpringMVC上传文件总结
如果是maven项目 需要在pom.xml文件里面引入下面两个jar包 <dependency> <groupId>commons-fileupload</groupId ...
- SpringMVC 上传文件 MultipartFile 转为 File
在使用 SpringMVC 上传文件时,接收到的文件格式为 MultipartFile,但是在很多场景下使用都需要File格式的文件,记录下以便日后使用. 以下mFile为MultipartFile文 ...
随机推荐
- 当ABAP遇见普罗米修斯
Jerry每次在工作场合中同Prometheus(普罗米修斯)打交道时,都会"出戏",因为这个单词给我的第一印象,并不是用go语言实现的微服务监控利器,而是名导雷德利·斯科特(Ri ...
- 使用Blynk打造一款物联网产品
前言 一直以来想自己打造一款物联网产品. 围绕这个话题写过一些文章: 一辆树莓派可编程小车的问题 基于树莓派的积木化编程解决方案 物联网相关开源项目整理 物联网.开源硬件与开源社区 之前在一辆树莓派可 ...
- 【体系结构】有关Oracle SCN知识点的整理
[体系结构]有关Oracle SCN知识点的整理 1 BLOG文档结构图 BLOG_Oracle_lhr_Oracle SCN的一点研究.pdf 2 前言部分 2.1 导读和注意事项 各位技 ...
- Linq 等式运算符:SequenceEqual(转载)
https://www.bbsmax.com/A/nAJvbKywJr/ 引用类型比较的是引用,需要自己实现IEqualityComparer 比较器. IList<string> str ...
- Linux下的基本命令(不定期更新,欢迎指正错误、交流学习)
ls 列出目录内容 -a //显示所有文件,包括隐藏文件 -i //显示详细信息 -d //显示目录属性 -h //人性化显示文件大小 -l //长格式显示,也可简写为 ll pwd 显示当前工作路径 ...
- mysql数据库创建、查看、修改、删除
一.创建数据库 使用默认字符集 不指定字符集时,mysql使用默字符集,从mysql8.0开始,默认字符集改为utf8mb4 ,创建数据库的命令为create database 数据库名称. #创建数 ...
- Pod生命周期和健康检查
Pod生命周期和健康检查 Pod的生命周期涵盖了前面所说的PostStart 和 PreStop在内 Pod phase Pod的status定义在 PodStatus对象中,其中有一个phase字段 ...
- Docker CMD ENTRYPOING 和Kubernetes command args对比
Docker CMD ENTRYPOING 和Kubernetes command args对比 exec 模式 使用 exec 模式时,容器中的任务进程就是容器内的 1 号进程 shell 模式 使 ...
- Eclipse经常出现未响应问题
修改eclipse.ini文件 -startupplugins/org.eclipse.equinox.launcher_1.5.0.v20180512-1130.jar--launcher.libr ...
- 助教总结---继alpha版本1之后
本周心得: 在项目的开发当中,学生难免会有懈怠的时候,作为助教更应该去督促和激励同学们,但本质上该对自己负责任的是同学们自己.同学们项目的第一版本已经出来了,这个过程他们自己知道付出了多少,相信他们体 ...