django rest_framework vue 实现用户登录
django rest_framework vue 实现用户登录
后端代码就不介绍了,可以参考 django rest_framework 实现用户登录认证
这里介绍一下前端代码,和前后端的联调过程
在components下新建login.vue 文件
<template>

    <div class="login">

      <el-form label-width="80px">

        <el-form-item label="用户名">

          <el-input v-model="form.username"></el-input>

        </el-form-item>

        <el-form-item label="密码">

          <el-input v-model="form.password" type="password"></el-input>

        </el-form-item>

        <el-form-item>

          <el-button type="primary" @click="onLogin">登录</el-button>

          <el-button>取消</el-button>

        </el-form-item>

      </el-form>

    </div>

</template>

<script>

import axios from 'axios';

export default {

  name: "login",

  data() {

    return {

      form: {

        username: null,

        password: null

      }

    }

  },

  methods: {

    onLogin() {

      axios.post('http://127.0.0.1:8000/api/v1/auth/',this.form,{withCredentials:true}).then((res)=> {

        console.log(res);

        this.$router.go({path:'/'});

      });

    }

  }

}

</script>

<style scoped>

.login {

  width: 50%;

  margin: 0 auto;

}

</style>
修改rounter下index.js
import Vue from 'vue'

import Router from 'vue-router'

import HelloWorld from '@/components/HelloWorld'

import test from '@/components/test'

import runoob from '@/components/runoob'

import vhtml from '@/components/vhtml'

import Login from '@/components/login'

Vue.use(Router)

var router =  new Router({

  routes: [

    {

      path: '/',

      name: 'HelloWorld',

      component: HelloWorld

    },

    {

      path: '/test',

      name: 'test',

      component: test

    }

    ,

    {

      path: '/login',

      name: 'login',

      component: Login

    }

    ,

    {

      path: '/runoob',

      name: 'runoob',

      component: runoob

    },

    {

      path: '/vhtml',

      name: 'vhtml',

      component: vhtml

    },

  ]

})

router.beforeEach((to,from,next)=> {

  if(to.path==='/login') {

    window.hideLogin = false;

  }

  // if(!window.token&&to.path!=='/login') {

  //   router.go('/login');

  // }else {

  //   next();

  // }

  next();

})

export default router;
修改项目 man.js
// The Vue build version to load with the `import` command

// (runtime-only or standalone) has been set in webpack.base.conf with an alias.

import Vue from 'vue'

import App from './App'

import router from './router'

import ElementUI from 'element-ui'

import axios from 'axios'

Vue.prototype.axios = axios

Vue.config.productionTip = false

Vue.use(ElementUI); // 引入elementui

/* eslint-disable no-new */

new Vue({

  el: '#app',

  router,

  components: { App },

  template: '<App/>'

})
启动项目 npm run dev

输入url,访问查看页面 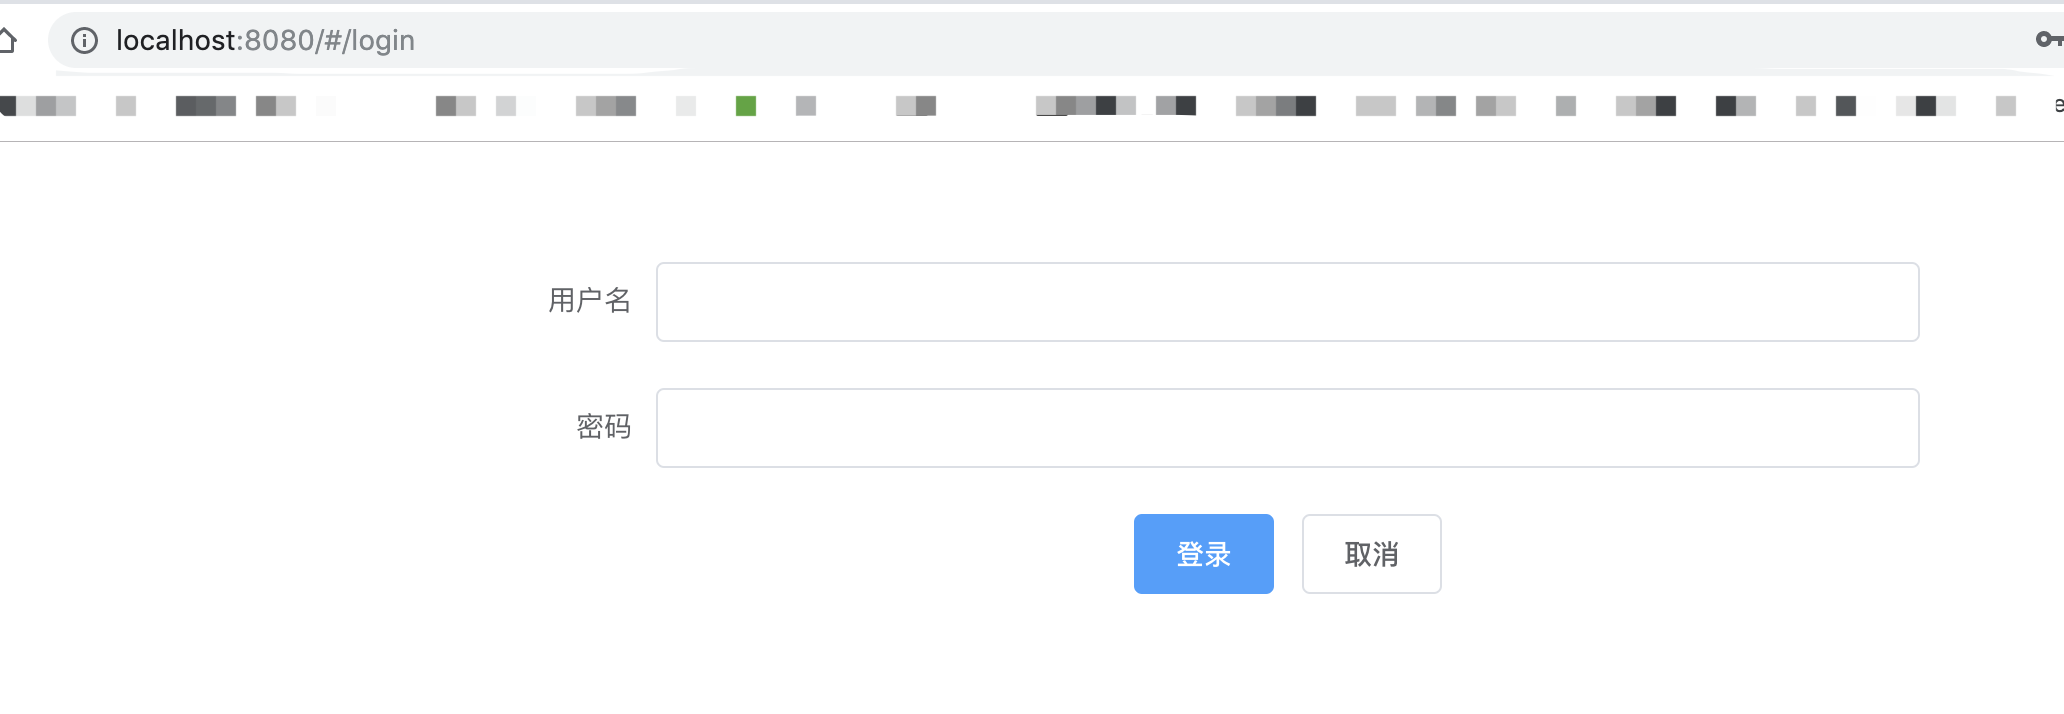
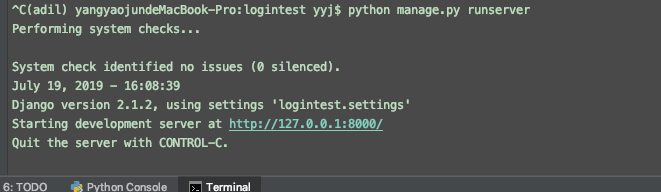
启动服务端
浏览器打开检查功能
数据用户名和密码,点击登录 如下图。

因为还没做登录跳转页。所以 先通过这种方式,检验是否登录成功。
查看后台返回信息

遇到的问题:
1、跨域问题
因为vue 和django项目是两个前后端独立的项目,分别启动后,存在端口不一致的跨域问题。
如这里vue端口是8080,django 是8000,会一直存在找不到服务的问题。
解决方法:修改jango settings.py 文件
首先安装 corsheaders
# 安装

pip install django-cors-headers
# 添加 corsheaders 应用

# Application definition

INSTALLED_APPS = [

    'django.contrib.admin',

    'django.contrib.auth',

    'django.contrib.contenttypes',

    'django.contrib.sessions',

    'django.contrib.messages',

    'django.contrib.staticfiles',

    'rest_framework',

    'api',

    'corsheaders',  # 解决跨域问题 修改1

]
# 中间层设置

# 添加如下

MIDDLEWARE = [

    ...

    'corsheaders.middleware.CorsMiddleware',

    'django.middleware.common.CommonMiddleware',

    ...

]
# CORS 设置跨域域名 配置白名单

CORS_ORIGIN_WHITELIST = [

    "https://example.com",

    "https://sub.example.com",

    "http://localhost:8080",

    "http://localhost:8000",

    "http://127.0.0.1:8000"

]
#直接允许所有主机跨域

CORS_ORIGIN_ALLOW_ALL = True 默认为False
CORS_ALLOW_CREDENTIALS = True # 允许携带cookie
# 下面这两个设置 经测试无用

#

# # 解决跨域问题 修改5

# CORS_ALLOW_METHODS = (

#     'DELETE',

#     'GET',

#     'OPTIONS',

#     'PATCH',

#     'POST',

#     'PUT',

#     'VIEW',

# )

# # 解决跨域问题 修改6

# CORS_ALLOW_HEADERS = (

#     'XMLHttpRequest',

#     'X_FILENAME',

#     'accept-encoding',

#     'authorization',

#     'content-type',

#     'dnt',

#     'origin',

#     'user-agent',

#     'x-csrftoken',

#     'x-requested-with',

#     'Pragma',

# )
settings.py文件
"""

Django settings for logintest project.

Generated by 'django-admin startproject' using Django 2.1.2.

For more information on this file, see

https://docs.djangoproject.com/en/2.1/topics/settings/

For the full list of settings and their values, see

https://docs.djangoproject.com/en/2.1/ref/settings/

"""

import os

# Build paths inside the project like this: os.path.join(BASE_DIR, ...)

BASE_DIR = os.path.dirname(os.path.dirname(os.path.abspath(__file__)))

# Quick-start development settings - unsuitable for production

# See https://docs.djangoproject.com/en/2.1/howto/deployment/checklist/

# SECURITY WARNING: keep the secret key used in production secret!

SECRET_KEY = 'zj9a#c4al&@_up8^g46ke44a1l%p^_wa1_5xgx60ertwu9$y(%'

# SECURITY WARNING: don't run with debug turned on in production!

# DEBUG = True

DEBUG = False

ALLOWED_HOSTS = ['localhost', '127.0.0.1']

# Application definition

INSTALLED_APPS = [

    'django.contrib.admin',

    'django.contrib.auth',

    'django.contrib.contenttypes',

    'django.contrib.sessions',

    'django.contrib.messages',

    'django.contrib.staticfiles',

    'rest_framework',

    'api',

    'corsheaders',  # 解决跨域问题 修改1

]

MIDDLEWARE = [

    'django.middleware.security.SecurityMiddleware',

    'django.contrib.sessions.middleware.SessionMiddleware',

    'django.middleware.common.CommonMiddleware',

    'django.middleware.csrf.CsrfViewMiddleware',

    'django.contrib.auth.middleware.AuthenticationMiddleware',

    'django.contrib.messages.middleware.MessageMiddleware',

    'django.middleware.clickjacking.XFrameOptionsMiddleware',

    'corsheaders.middleware.CorsMiddleware',  # 解决跨域问题 修改2

    'django.middleware.common.CommonMiddleware', # 注意顺序 解决跨域问题 修改3

]

ROOT_URLCONF = 'logintest.urls'

#

# #跨域增加忽略 修改4

CORS_ALLOW_CREDENTIALS = True

CORS_ORIGIN_ALLOW_ALL = True

# # CORS_ORIGIN_WHITELIST = (

# #     '*'

# # )

CORS_ORIGIN_WHITELIST = [

    "https://example.com",

    "https://sub.example.com",

    "http://localhost:8080",

    "http://localhost:8000",

    "http://127.0.0.1:8000"

]

#

#

# # 解决跨域问题 修改5

# CORS_ALLOW_METHODS = (

#     'DELETE',

#     'GET',

#     'OPTIONS',

#     'PATCH',

#     'POST',

#     'PUT',

#     'VIEW',

# )

# # 解决跨域问题 修改6

# CORS_ALLOW_HEADERS = (

#     'XMLHttpRequest',

#     'X_FILENAME',

#     'accept-encoding',

#     'authorization',

#     'content-type',

#     'dnt',

#     'origin',

#     'user-agent',

#     'x-csrftoken',

#     'x-requested-with',

#     'Pragma',

# )

TEMPLATES = [

    {

        'BACKEND': 'django.template.backends.django.DjangoTemplates',

        # 'DIRS': [],

        'DIRS': ['vuefront/dist'],  # 修改1

        'APP_DIRS': True,

        'OPTIONS': {

            'context_processors': [

                'django.template.context_processors.debug',

                'django.template.context_processors.request',

                'django.contrib.auth.context_processors.auth',

                'django.contrib.messages.context_processors.messages',

            ],

        },

    },

]

# 新增2

# Add for vue.js

STATICFILES_DIRS = [

    os.path.join(BASE_DIR, "vuefront/dist/static"),

]

WSGI_APPLICATION = 'logintest.wsgi.application'

# Database

# https://docs.djangoproject.com/en/2.1/ref/settings/#databases

# DATABASES = {

#     'default': {

#         'ENGINE': 'django.db.backends.sqlite3',

#         'NAME': os.path.join(BASE_DIR, 'db.sqlite3'),

#     }

# }

# MySQL  adil   密码:helloyyj

DATABASES = {

    'default':{

     'ENGINE':'django.db.backends.mysql',

     'HOST':'127.0.0.1',

     'PORT':'',

     'NAME':'pyweb',  # 数据库名

     'USER':'adil',

     'PASSWORD':'helloyyj',

     'OPTIONS':{

         'sql_mode': 'traditional'

     },

    }

}

# Password validation

# https://docs.djangoproject.com/en/2.1/ref/settings/#auth-password-validators

AUTH_PASSWORD_VALIDATORS = [

    {

        'NAME': 'django.contrib.auth.password_validation.UserAttributeSimilarityValidator',

    },

    {

        'NAME': 'django.contrib.auth.password_validation.MinimumLengthValidator',

    },

    {

        'NAME': 'django.contrib.auth.password_validation.CommonPasswordValidator',

    },

    {

        'NAME': 'django.contrib.auth.password_validation.NumericPasswordValidator',

    },

]

# Internationalization

# https://docs.djangoproject.com/en/2.1/topics/i18n/

# LANGUAGE_CODE = 'en-us'

#

# TIME_ZONE = 'UTC'

LANGUAGE_CODE = 'zh-Hans'

TIME_ZONE = 'Asia/Shanghai'

USE_I18N = True

USE_L10N = True

USE_TZ = True

# Static files (CSS, JavaScript, Images)

# https://docs.djangoproject.com/en/2.1/howto/static-files/

STATIC_URL = '/static/'
更多设置可以参考 https://github.com/ottoyiu/django-cors-headers/
2、ESlint代码检测,启动vue时系统报错错误警告
解决方式
1、如果对自己信不过。最好的办法就是创建项目的时候不要ESlint 直接N
2、注释掉ESlint
在自己的项目目录下build.js——webpack.base.conf.js文件里面有段代码注释掉就行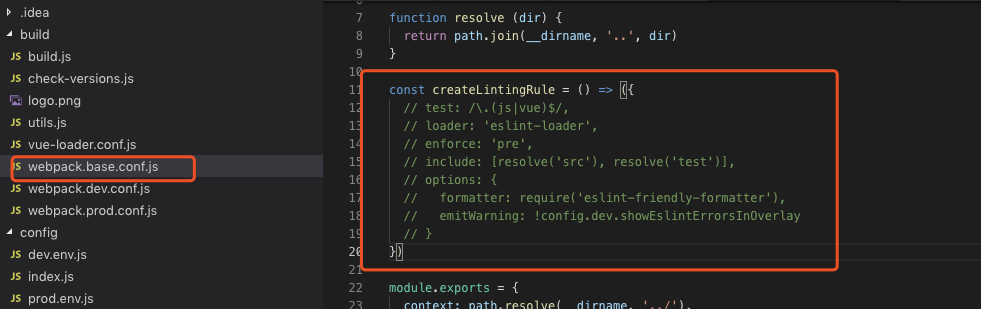
django rest_framework vue 实现用户登录的更多相关文章
- django rest_framework vue 实现用户列表分页
django rest_framework vue 实现用户列表分页 后端 配置urls # 导入view from api.appview.userListView import userListV ...
- 「Django」rest_framework学习系列-用户登录
用户POST登录-->后台验证用户名密码-->验证正确返回TOKEN-->验证错误返回错误信息 class UserAPI(APIView): #用户登录类 def post(sel ...
- django使用JWT保存用户登录信息
在使用前必须弄明白JWT的原理,原理可以看我的另一篇博文:https://www.cnblogs.com/chichung/p/9966027.html JWT的流程 1.签发JWT 在用户正确输入账 ...
- Django 是如何实现用户登录和登出机制的(默认版本-数据库版本)
Django session 字典,保存到数据库的时候是要先序列化的(session.encode方法), 读取的时候反序列化(session.decode),这样比较安全. 一 settings.p ...
- Django+pycharm+mysql 实现用户登录/注册(Django五)
首先是让Django项目与mysql数据库初步建立连接 具体做法见:pycharm连接mysql(注意其中第二步MySQL驱动最好安装最新版的) 这里讲一下我在做这一步遇到的问题.一般Driver 那 ...
- vue项目用户登录状态管理,vuex+localStorage实现
安装vuex cnpm install vuex --save-dev
- 关于django用户登录认证中的cookie和session
最近弄django的时候在用户登录这一块遇到了困难,网上的资料也都不完整或者存在缺陷. 写这篇文章的主要目的是对一些刚学django的新手朋友提供一些帮助.前提是你对django中的session和c ...
- 基于jwt的用户登录认证
最近在app的开发过程中,做了一个基于token的用户登录认证,使用vue+node+mongoDB进行的开发,前来总结一下. token认证流程: 1:用户输入用户名和密码,进行登录操作,发送登录信 ...
- django rest_framework 实现用户登录认证
django rest_framework 实现用户登录认证 1.安装 pip install djangorestframework 2.创建项目及应用 创建过程略 目录结构如图 3.设置setti ...
随机推荐
- 04-人脸识别-triplets loss 的解释(转载)
转载至: https://blog.csdn.net/tangwei2014/article/details/46788025 下面是内容: [前言] 最近,learning to rank 的思想逐 ...
- matlab的plot3()函数、mesh()函数和surf()函数
1.plot3()函数 例1:绘制一条空间折线. x=[0.2,1.8,2.5]; y=[1.3,2.8,1.1]; z=[0.4,1.2,1.6]; figure(1);plot3(x,y,z); ...
- 团队冲刺---Five
今天的计划:做界面. 昨天做了什么? 研究了css代码和模板,进行测试模板. 遇到的困难:使用标签时运用不熟总出错.
- javascript专题系列--尾调用和尾递归
最近在看<冴羽的博客>,讲真,确实受益匪浅,已经看了javascript 深入系列和专题系列的大部分文章,可是现在才想起来做笔记.所以虽然很多以前面试被问得一脸懵逼的问题都被“一语惊醒梦中 ...
- 网络1911、1912 C语言第5次作业--循环结构 批改总结
如题 一.评分规则 1.伪代码务必是文字+代码描述,直接反应代码,每题扣1分 2.提交列表没内容,或者太简单,每题得分0分.注意选择提交列表长的题目介绍. 3.代码格式不规范,包括命名随意.继续扣分. ...
- oracle--表空间故障
一,错误问题描述 ERROR: ORA: cannot identify - see DBWR trace file ORA: data : '/u01/oracle/TEST/oratmp01/te ...
- java ssh免密登录
package com.meituan.stabletest.sshtest; import java.io.InputStream; import com.jcraft.jsch.Channel; ...
- POI打印Excel
一.POI概述 Apache POI是Apache软件基金会的开放源码函式库,POI提供API给Java程序对Microsoft Office格式档案读和写的功能. 结构:HSSF - 提供读写Mic ...
- PDMan-2.1.0 正式发布:用心开源,免费的国产数据库建模工具 PowerDesigner
PDMan是一款开源免费的数据库模型建模工具,支持Windows,Mac,Linux等操作系统,是PowerDesigner之外,更好的免费的替代方案.他具有颜值高,使用简单的特点.包含数据库建模,灵 ...
- 使用VUECLI3
$ yarn global add @vue/cli // OR $ npm install @vue/cli -g 然后在加入下面的代码 $ vue create my-app $ cd my-ap ...