玩转DNS服务器——Bind服务
合理的配置DNS的查询方式
实验环境:
虚拟机:VMware® Workstation 15 Pro
均使用NAT连接 网段为192.168.1.0/24
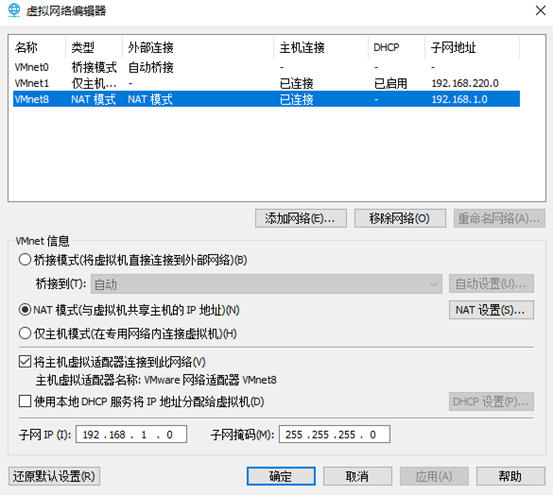
DNS 服务器 ---- Centos 7.4
内核版本 Kernel: Linux 3.10.0-693.el7.x86_64
IP地址:192.168.1.1/24
网关: 192.168.1.254
DNS: 192.168.1.1
客户端 ---- Centos 7.4
内核版本 Kernel: Linux 3.10.0-693.el7.x86_64
IP地址:192.168.1.2/24
网关: 192.168.1.254
DNS: 192.168.1.1
安装DNS服务
[root@localhost ~]#yum install bind -y                //安装

Loaded plugins: fastestmirror, langpacks

repo                                                            | 3.6 kB  ::

Determining fastest mirrors

Resolving Dependencies

--> Running transaction check

---> Package bind.x86_64 :9.9.-.el7 will be installed

--> Finished Dependency Resolution

Dependencies Resolved

=======================================================================================

 Package         Arch              Version                       Repository       Size

=======================================================================================

Installing:

 bind            x86_64            :9.9.-.el7               repo            1.8 M

Transaction Summary

=======================================================================================

Install   Package

Total download size: 1.8 M

Installed size: 4.3 M

Downloading packages:

Running transaction check

Running transaction test

Transaction test succeeded

Running transaction

  Installing : :bind-9.9.-.el7.x86_64                                         /

  Verifying  : :bind-9.9.-.el7.x86_64                                         /

Installed:

  bind.x86_64 :9.9.-.el7

Complete!

[root@localhost ~]#
编辑dns服务器配置文件
[root@localhost ~]# vim /etc/named.conf
//
// named.conf
//
// Provided by Red Hat bind package to configure the ISC BIND named(8) DNS // server as a caching only nameserver (as a localhost DNS resolver only).
//
// See /usr/share/doc/bind*/sample/ for example named configuration files.
//
// See the BIND Administrator's Reference Manual (ARM) for details about the
// configuration located in /usr/share/doc/bind-{version}/Bv9ARM.html
options {
listen-on port { 127.0.0.1; }; //修改为listen-on port 53 { any; };
listen-on-v6 port { ::; }; //修改为linsten-on-v6 port 53 { any; };
directory "/var/named";
dump-file "/var/named/data/cache_dump.db";
statistics-file "/var/named/data/named_stats.txt";
memstatistics-file "/var/named/data/named_mem_stats.txt";
allow-query { localhost; }; //修改为allow-query { any; };
/*
- If you are building an AUTHORITATIVE DNS server, do NOT enable recursion.
- If you are building a RECURSIVE (caching) DNS server, you need to enable
recursion.
- If your recursive DNS server has a public IP address, you MUST enable access
control to limit queries to your legitimate users. Failing to do so will
cause your server to become part of large scale DNS amplification
attacks. Implementing BCP38 within your network would greatly
reduce such attack surface
*/
recursion yes;
dnssec-enable yes;
dnssec-validation yes;
/* Path to ISC DLV key */
bindkeys-file "/etc/named.iscdlv.key";
managed-keys-directory "/var/named/dynamic";
pid-file "/run/named/named.pid"; session-keyfile "/run/named/session.key";
};
logging {
channel default_debug {
file "data/named.run";
severity dynamic;
};
};
zone "." IN {
type hint;
file "named.ca";
};
include "/etc/named.rfc1912.zones";
include "/etc/named.root.key";
编辑DNS正反向区域
 [root@localhost named]# vim /etc/named.rfc1912.zones

 // named.rfc1912.zones:

 //

 // Provided by Red Hat caching-nameserver package

 //

 // ISC BIND named zone configuration for zones recommended by

 // RFC 1912 section 4.1 : localhost TLDs and address zones

 // and http://www.ietf.org/internet-drafts/draft-ietf-dnsopdefault-local-zones-02.txt

 // (c)2007 R W Franks

 //

 // See /usr/share/doc/bind*/sample/ for example named configuration files.

 //

 zone "localhost.localdomain" IN {

         type master;

         file "named.localhost";

         allow-update { none; };

 };

 zone "localhost" IN {

         type master;

         file "named.localhost";

         allow-update { none; };

 };

 zone "1.0.0.0.0.0.0.0.0.0.0.0.0.0.0.0.0.0.0.0.0.0.0.0.0.0.0.0.0.0.0.0.ip6.arpa" IN {

         type master;

         file "named.loopback";

         allow-update { none; };

 };

 zone "1.0.0.127.in-addr.arpa" IN {

         type master;

         file "named.loopback";

         allow-update { none; };

 };

 zone "0.in-addr.arpa" IN {

         type master;

         file "named.empty";

         allow-update { none; };

 };

 //-------------------------------------------//在最底下添加下面两段

 //第一段为正向解析

 zone "netdj.net" IN {

         type master;

         file "netdj.net.zone";

         allow-update { none; };

 };

 //第二段为反向解析

 zone "1.168.192.in-addr.arpa" IN {

         type master;

         file "1.168.192.zone";

         allow-update { none; };

 };
创建DNS正反向区域解析文件
[root@localhost ~]# cd /var/named/

[root@localhost named]# ls

data dynamic named.ca named.empty named.localhost named.loopback slaves

//复制模板创建正反向解析文件

[root@localhost named]# cp -p named.empty netdj.net.zone

[root@localhost named]# cp -p named.empty 1.168..zone
编辑正向解析文件
 [root@localhost named]# vim netdj.net.zone

 $TTL 3H

 @       IN SOA  @ rname.invalid. (

                                                ; serial

                                         1D      ; refresh

                                         1H      ; retry

                                         1W      ; expire

                                         3H )    ; minimum

         NS      @

         A       127.0.0.1

 dns     A       192.168.1.1         //使用A记录将dns.netdj.net指向192.168.1.1

 client  A       192.168.1.2         //使用A记录将client.netdj.net指向192.168.1.2
编辑反向解析文件
 [root@localhost named]# vim 1.168..zone

 $TTL 3H

 @       IN SOA  @ rname.invalid. (

                                                ; serial

                                         1D      ; refresh

                                         1H      ; retry

                                         1W      ; expire

                                         3H )    ; minimum

         NS      @

         A       127.0.0.1

        PTR     dns.netdj.net.         //使用PTR记录将192.168.1.1指向dns.netdj.net

        PTR     client.netdj.net.      //使用PTR记录将192.168.1.2指向client.netdj.net
重启服务
[root@localhost named]# systemctl restart named //重启服务

[root@localhost named]# systemctl enable named //开机自启动

Created symlink from /etc/systemd/system/multi-user.target.wants/named.service to /usr/lib/systemd/system/named.service.
关闭防火墙、selinux
[root@localhost named]# systemctl stop firewalld.service

[root@localhost named]# setenforce  //临时生效,重启后失效
服务端测试
[root@localhost named]# nslookup

> dns.netdj.net

Server: 192.168.1.1

Address: 192.168.1.1#

Name: dns.netdj.net

Address: 192.168.1.1

> client.netdj.net

Server: 192.168.1.1

Address: 192.168.1.1#

Name: client.netdj.net

Address: 192.168.1.2

> exit

[root@localhost named]#
客户端测试
[root@localhost ~]# nslookup

> dns.netdj.net

Server: 192.168.1.1

Address: 192.168.1.1#

Name: dns.netdj.net

Address: 192.168.1.1

> client.netdj.net

Server: 192.168.1.1

Address: 192.168.1.1#

Name: client.netdj.net

Address: 192.168.1.2

> exit

[root@localhost ~]#
DNS服务搭建完成!!
限制区域传送,可实现两个IP之间的区域传送。避免黑客的缓存投毒进而利用虚假IP地址替换域名系统表中的地址造成破坏。此外还可以防止注册劫持,DNS欺骗等攻击
 [root@localhost named]# vim /etc/named.rfc1912.zones

 // named.rfc1912.zones:

 //

 // Provided by Red Hat caching-nameserver package

 //

 // ISC BIND named zone configuration for zones recommended by

 // RFC 1912 section 4.1 : localhost TLDs and address zones

 // and http://www.ietf.org/internet-drafts/draft-ietf-dnsop-default-local-zones-02.txt

 // (c)2007 R W Franks

 //

 // See /usr/share/doc/bind*/sample/ for example named configuration files.

 //

 zone "localhost.localdomain" IN {

     type master;

     file "named.localhost";

     allow-update { none; };

 };

 zone "localhost" IN {

     type master;

     file "named.localhost";

     allow-update { none; };

 };

 zone "1.0.0.0.0.0.0.0.0.0.0.0.0.0.0.0.0.0.0.0.0.0.0.0.0.0.0.0.0.0.0.0.ip6.arpa" IN {

     type master;

     file "named.loopback";

     allow-update { none; };

 };

 zone "1.0.0.127.in-addr.arpa" IN {

     type master;

     file "named.loopback";

     allow-update { none; };

 };

 zone "0.in-addr.arpa" IN {

     type master;

     file "named.empty";

     allow-update { none; };

 };

 zone "netdj.net" IN {

     type master;

     file "netdj.net.zone";

     allow-update { none; };     //修改为allow-transfer { 192.168.1.1;192.168.1.2; };

 };

 zone "1.168.192.in-addr.arpa" IN {

     type master;

     file "1.168.192.zone";

     allow-update { none; };     //修改为allow-transfer { 192.168.1.1;192.168.1.2; };

 };
修改DNS配置查询,可实现仅指定网段主机查询DNS信息。以保障DNS服务器不易被黑客发现并攻击。
 [root@localhost named]# vim /etc/named.conf

 //

 // named.conf

 //

 // Provided by Red Hat bind package to configure the ISC BIND named(8) DNS

 // server as a caching only nameserver (as a localhost DNS resolver only).

 //

 // See /usr/share/doc/bind*/sample/ for example named configuration files.

 //

 // See the BIND Administrator's Reference Manual (ARM) for details about the

 // configuration located in /usr/share/doc/bind-{version}/Bv9ARM.html

 options {

         listen-on port  { any; };

         listen-on-v6 port  { any; };

         directory       "/var/named";

         dump-file       "/var/named/data/cache_dump.db";

         statistics-file "/var/named/data/named_stats.txt";

         memstatistics-file "/var/named/data/named_mem_stats.txt";

         allow-query     { any; };      //修改为allow-query     { 192.168.1.0/24; };

         /*

          - If you are building an AUTHORITATIVE DNS server, do NOT enable recursion.

          - If you are building a RECURSIVE (caching) DNS server, you need to enable

            recursion.

          - If your recursive DNS server has a public IP address, you MUST enable access

            control to limit queries to your legitimate users. Failing to do so will

            cause your server to become part of large scale DNS amplification

            attacks. Implementing BCP38 within your network would greatly

            reduce such attack surface

         */

         recursion yes;

         dnssec-enable yes;

         dnssec-validation yes;

         /* Path to ISC DLV key */

         bindkeys-file "/etc/named.iscdlv.key";

         managed-keys-directory "/var/named/dynamic";

         pid-file "/run/named/named.pid";

         session-keyfile "/run/named/session.key";

 };

 logging {

         channel default_debug {

                 file "data/named.run";

                 severity dynamic;

         };

 };

 zone "." IN {

         type hint;

         file "named.ca";

 };

 include "/etc/named.rfc1912.zones";

 include "/etc/named.root.key";
本文由博主亲测有效,若有错误请评论指出谢谢
----------持续更新中
玩转DNS服务器——Bind服务的更多相关文章
- centos6.5环境DNS-本地DNS服务器bind的搭建
centos6.5环境DNS-本地DNS服务器bind的搭建 域名系统(英文:Domain Name System,缩写:DNS)是因特网的一项服务.它作为将域名和IP地址相互映射的一个分布式数据库, ...
- 内建DNS服务器--BIND
参考 BIND 官网:http://www.isc.org/downloads/bind/ 1.系统环境说明 [root@clsn6 ~]# cat /etc/redhat-release CentO ...
- Debian9.5系统DNS服务器BIND软件配置说明
DNS的出现的历史 网络出现的早期是使用IP地址通讯的,那时就几台主机通讯.但是随着接入网络主机的增多,这种数字标识的地址非常不便于记忆,UNIX上就出现了建立一个叫做hosts的文件(Linux和W ...
- CentOS7-1810 系统DNS服务器BIND软件配置说明
DNS的出现的历史 网络出现的早期是使用IP地址通讯的,那时就几台主机通讯.但是随着接入网络主机的增多,这种数字标识的地址非常不便于记忆,UNIX上就出现了建立一个叫做hosts的文件(Linux和W ...
- Centos7.3搭建DNS服务器--BIND
1.系统环境说明 [root@dns-server etc]# cat /etc/redhat-release CentOS Linux release (Core) 防火墙和Selinux关闭 [r ...
- centos7 主从dns配置 bind服务
一,配置前请先关闭防火墙selinux 防火墙关闭方法,参见上一篇文章. setenforce 0 #临时关闭 修改/etc/selinux/config 文件 将SELINUX=enforc ...
- redhat配置dns服务器bind
配置Oracle11g的RAC需要使用DNS服务器来解析SCAN IP,本文就是以此为例介绍bind服务器的使用.首先科普一下bind服务器,属于企业级产品了,还是开源的: Bind是Berkeley ...
- 搭建DNS服务器-bind
1. 安装 yum install -y bind-chroot yum install -y bind-utils service named-chroot start 2. 修改配置 增加一 ...
- 简单搭建DNS服务器——bind
1安装bind yum install -y bind bind-utils bind-chroot 2 修改配置文件 # grep '^[^#]' /etc/named.conf options { ...
随机推荐
- svn"重新定位"提示版本库uuid不匹配
svn"重新定位"提示版本库 uuid不匹配: 版本库 "https://wolfcome110/svn/andon" 的 uuid是 "d52648 ...
- ANR无法生成traces.txt文件
在有些设备上ANR无法生成traces.txt文件,kill -3又不能准确把握时机或者没权限,可能是软件访问这个路径失败,可以在/data/anr/下面建立一个空的traces.txt,注意保证an ...
- 【Spring Cloud学习之二】服务注册和发现
环境 eclipse 4.7 jdk 1.8 Spring Boot 1.5.2 Spring Cloud 1.2 一.EurekaEureka是Netflix开源的一个RESTful服务,主要用于服 ...
- cocoapods安装 Unable to download data from http://ruby.taobao.org/ & don't have write permissions for the /Library/Ruby/Gems/2.0.0 directory.
安装cocoapods,记录两个问题! 1.镜像已经替换成了 http://ruby.taobao.org/, 还是不能不能安装cocoapods, 报错:Unable to download dat ...
- 【bat】【windows】win10查看所有wifi密码
win10的可以,win7的好像不行 @echo off & setlocal EnableDelayedExpansion title 查看所有wifi和密码 for /f "us ...
- php imagick添加文字和图片的方法
Imagick添加文字和图片的方法<pre><?php $image = new Imagick(); $image->readImage("/home/www/wo ...
- OpenLDAP + phpLDAPadmin
一.基础设置 1.1 环境说明 Centos 7.5 openldap 1.2 关闭防火墙和selinux setenforce sed -i 's/SELINUX=enforcing/SELINUX ...
- shoshana-摄影文集
20190331 冬宫之油画 20190427 [遇见•梦露]画展 20190428 [三极探索之旅]公益摄影 20190504 赏美-第[000]期 20190505 赏美-第[001]期 201 ...
- Leetcode Note
算法刷题笔记 Leetcode-11. Container With Most Water Method: (对撞指针)每次保留两指针中最大的那个即可求得最大的面积 Runtime: 16 ms, f ...
- 阿里巴巴 Java 开发手册 (十)MySQL 数据库
(一) 建表规约 1. [强制]表达是与否概念的字段,必须使用 is_xxx 的方式命名,数据类型是 unsigned tinyint ( 1 表示是,0 表示否). 说明:任何字段如果为非负数,必须 ...