
.20-浅析webpack源码之compile流程-Template模块
这里的编译前指的是开始触发主要的事件流this-compilaiton、compilation之前,由于还有一些准备代码,这一节全部弄出来。
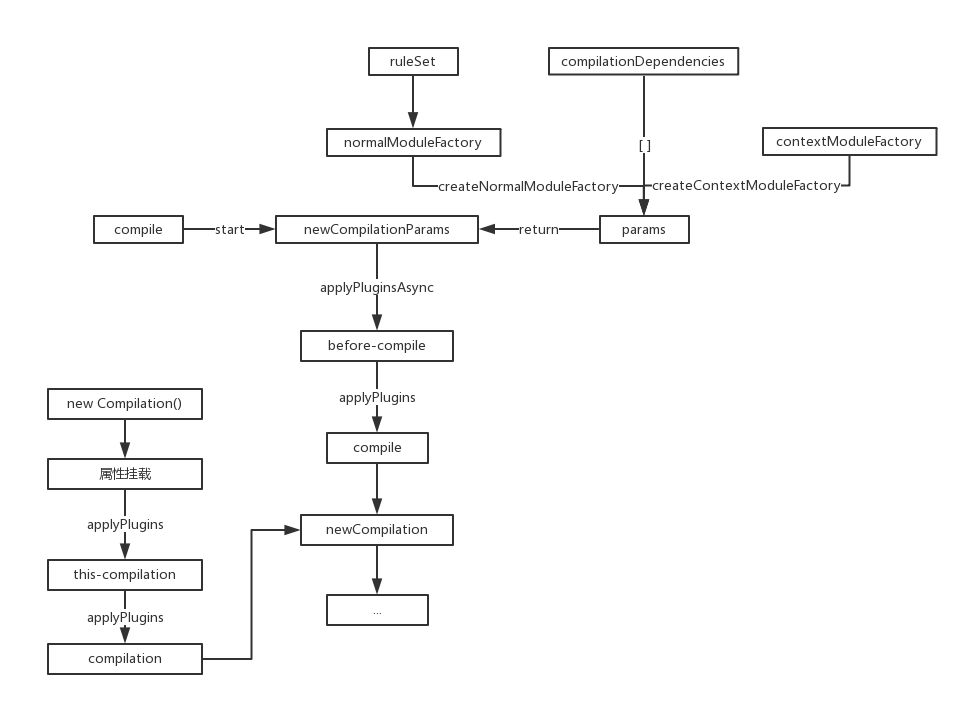
模块基本上只走构造函数,具体的方法调用的时候再具体讲解。
上一节NormalModuleFactory模块的构造函数中,在处理完rules后,注入两个事件流就结束了,所以可以回到如下代码:
createNormalModuleFactory() {

    // 构造完成

    const normalModuleFactory = new NormalModuleFactory(this.options.context, this.resolvers, this.options.module || {});

    // 该事件流默认是没有的

    this.applyPlugins("normal-module-factory", normalModuleFactory);

    return normalModuleFactory;

}
由于没有对应的事件流,所以会回到params参数的构建:
newCompilationParams() {

    const params = {

        // done

        normalModuleFactory: this.createNormalModuleFactory(),

        contextModuleFactory: this.createContextModuleFactory(),

        compilationDependencies: []

    };

    return params;

}
这里的contextModuleFactory模块并没有任何初始化好讲的,简单贴一下代码跳过:
createContextModuleFactory() {

    const contextModuleFactory = new ContextModuleFactory(this.resolvers, this.inputFileSystem);

    this.applyPlugins("context-module-factory", contextModuleFactory);

    return contextModuleFactory;

}

class ContextModuleFactory extends Tapable {

    constructor(resolvers) {

        super();

        this.resolvers = resolvers;

    };

    // methods...

}
完成了params对象的构建后,会回到compile函数,继续触发其余的事件流:
compile(callback) {

    const params = this.newCompilationParams();

    // 暂无

    this.applyPluginsAsync("before-compile", params, err => {

        if (err) return callback(err);

        // 暂无

        this.applyPlugins("compile", params);

        const compilation = this.newCompilation(params);

        this.applyPluginsParallel("make", compilation, err => { /**/ });

    });

}
然而在打包中,'before-compile'、'compile'事件流是空的,代码会继续下面一行:
const compilation = this.newCompilation(params);
这行代码源码如下:
createCompilation() {

    return new Compilation(this);

}

newCompilation(params) {

    // 生成一个Compilation类

    const compilation = this.createCompilation();

    // 空对象{}

    compilation.fileTimestamps = this.fileTimestamps;

    // 空对象{}

    compilation.contextTimestamps = this.contextTimestamps;

    // undefined

    compilation.name = this.name;

    // 空对象{}

    compilation.records = this.records;

    // 空数组[]

    compilation.compilationDependencies = params.compilationDependencies;

    // 编译

    this.applyPlugins("this-compilation", compilation, params);

    this.applyPlugins("compilation", compilation, params);

    return compilation;

}
除去第一行代码,其余的都是进行属性挂载,在初次打包时都是空的对象或数组,所以作用也看不出,后面再进行详解。
Compilation
剩余的就是Compilation对象的实例化,只过构造函数,源码如下:
class Compilation extends Tapable {

    constructor(compiler) {

        super();

        // 获取配置属性

        this.compiler = compiler;

        this.resolvers = compiler.resolvers;

        this.inputFileSystem = compiler.inputFileSystem;

        const options = this.options = compiler.options;

        this.outputOptions = options && options.output;

        this.bail = options && options.bail;

        this.profile = options && options.profile;

        this.performance = options && options.performance;

        // 引入模板解析模块

        this.mainTemplate = new MainTemplate(this.outputOptions);

        this.chunkTemplate = new ChunkTemplate(this.outputOptions);

        this.hotUpdateChunkTemplate = new HotUpdateChunkTemplate(this.outputOptions);

        this.moduleTemplate = new ModuleTemplate(this.outputOptions);

        this.semaphore = new Semaphore(options.parallelism || 100);

        this.entries = [];

        // ...其余属性初始化

    };

    // methods...

}
构造函数中主要有三块内容:
1、获取配置文件中的一些属性
2、引入模板解析的辅助模块
3、初始化其余本地属性
配置文件的属性获取与初始化本地属性跳过,这里简单过一下几个辅助模块,分别为:MainTemplate、ChunkTemplate、HotUpdateChunkTemplate、ModuleTemplate,从名字应该能看出作用了吧?
MainTemplate
源码简化如下:
// require function shortcuts:

// __webpack_require__.s = the module id of the entry point

// __webpack_require__.c = the module cache

// __webpack_require__.m = the module functions

// __webpack_require__.p = the bundle public path

// __webpack_require__.i = the identity function used for harmony imports

// __webpack_require__.e = the chunk ensure function

// __webpack_require__.d = the exported propery define getter function

// __webpack_require__.o = Object.prototype.hasOwnProperty.call

// __webpack_require__.n = compatibility get default export

// __webpack_require__.h = the webpack hash

// __webpack_require__.oe = the uncatched error handler for the webpack runtime

// __webpack_require__.nc = the script nonce

class MainTemplate extends Template {

    constructor(outputOptions) {

        super(outputOptions);

        this.plugin("startup", (source, chunk, hash) => { /**/ });

        this.plugin("render", (bootstrapSource, chunk, hash, moduleTemplate, dependencyTemplates) => { /**/ });

        this.plugin("local-vars", (source, chunk, hash) => { /**/ });

        this.plugin("require", (source, chunk, hash) => { /**/ });

        this.plugin("module-obj", (source, chunk, hash, varModuleId) => { /**/ });

        this.plugin("require-extensions", (source, chunk, hash) => { /**/ });

        this.requireFn = "__webpack_require__";

    };

    render(hash, chunk, moduleTemplate, dependencyTemplates) { /**/ }

    renderRequireFunctionForModule(hash, chunk, varModuleId) { /**/ }

    renderAddModule(hash, chunk, varModuleId, varModule) { /**/ }

    renderCurrentHashCode(hash, length) { /**/ }

    entryPointInChildren(chunk) { /**/ }

    getPublicPath(options) { /**/ }

    updateHash(hash) { /**/ }

    updateHashForChunk(hash, chunk) { /**/ }

    useChunkHash(chunk) { /**/ }

};
注意头部的注释,这里解释了打包后文件中模块生成函数__webpack_require__上各个参数的意义,属于Template的主模块。
最后的requireFn就是那个函数的名字,如果改了打包后文件的名字也会变哦,演示一下:

执行一下webpack指令,会看到打包文件如下:
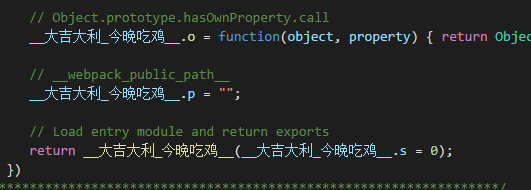
还挺好玩的。
ChunkTemplate
class ChunkTemplate extends Template {

    constructor(outputOptions) {

        super(outputOptions);

    };

    render(chunk, moduleTemplate, dependencyTemplates) {/**/};

    updateHash(hash) {/**/};

    updateHashForChunk(hash, chunk) {/**/};

};
HotUpdateChunkTemplate
class HotUpdateChunkTemplate extends Template {

    constructor(outputOptions) {

        super(outputOptions);

    };

    render(id, modules, removedModules, hash, moduleTemplate, dependencyTemplates) { /**/ };

    updateHash(hash) { /**/ };

};
ModuleTemplate
class ModuleTemplate extends Template {

    constructor(outputOptions) {

        super(outputOptions);

    }

    render(module, dependencyTemplates, chunk) { /**/ }

    updateHash(hash) { /**/ }

};
这三个模块都是辅助用,简单看一下方法有个印象就行了。
可以注意到4个模块都有一个爹,叫做Template。
这个模块属于纯工具模块,内部定义了大量的静态方法以便操作字符串,这里讲一下得了,不然这节没啥内容,源码整理后如下:
"use strict";

const Tapable = require("tapable");

const ConcatSource = require("webpack-sources").ConcatSource;

const START_LOWERCASE_ALPHABET_CODE = "a".charCodeAt(0);

// ...其余常量定义

module.exports = class Template extends Tapable {

    constructor(outputOptions) {

        super();

        this.outputOptions = outputOptions || {};

    };

    static getFunctionContent(fn) { /**/ };

    static toIdentifier(str) { /**/ };

    static toPath(str) { /**/ };

    static numberToIdentifer(n) { /**/ };

    indent(str) { /**/ }

    prefix(str, prefix) { /**/ }

    asString(str) { /**/ }

    getModulesArrayBounds(modules) { /**/ }

    renderChunkModules(chunk, moduleTemplate, dependencyTemplates, prefix) { /**/ }

};

function stringifyIdSortPredicate(a, b) { /**/ }

function moduleIdIsNumber(module) { /**/ }
内部主要包括四部分:
1、常量定义
2、静态方法
3、工具方法
4、内部函数
一个一个来。
常量const
// a的Unicode编码 => 97

const START_LOWERCASE_ALPHABET_CODE = "a".charCodeAt(0);

// A的Unicode编码 => 65

const START_UPPERCASE_ALPHABET_CODE = "A".charCodeAt(0);

// 122 - 97 + 1 = 26 返回字母数量

const DELTA_A_TO_Z = "z".charCodeAt(0) - START_LOWERCASE_ALPHABET_CODE + 1;

// 匹配函数内容

const FUNCTION_CONTENT_REGEX = /^function\s?\(\)\s?\{\n?|\n?\}$/g;

// 全行匹配tab制表符

const INDENT_MULTILINE_REGEX = /^\t/mg;

// 匹配非大小写字母$_开头

const IDENTIFIER_NAME_REPLACE_REGEX = /^[^a-zA-Z$_]/;

// 匹配非大小写字母数字$_

const IDENTIFIER_ALPHA_NUMERIC_NAME_REPLACE_REGEX = /[^a-zA-Z0-9$_]/g;

// 神奇的字符 已经不知道匹配的是啥了

const PATH_NAME_NORMALIZE_REPLACE_REGEX = /[^a-zA-Z0-9_!§$()=\-^°]+/g;

// 匹配以-开始或结尾

const MATCH_PADDED_HYPHENS_REPLACE_REGEX = /^-|-$/g;
大部分都非常简单,有两个比较特殊,一个是匹配函数内容,这个需要配合静态方法来讲解。
另一个就是PATH_NAME_NORMALIZE_REPLACE_REGEX,里面有几个字符可能这辈子在代码里都不会看到吧……
静态方法
class Template extends Tapable {

    constructor(outputOptions) { /**/ };

    // 抽取函数内容

    static getFunctionContent(fn) {

        return fn.toString().replace(FUNCTION_CONTENT_REGEX, "").replace(INDENT_MULTILINE_REGEX, "");

    };

    // 头部数字、所有的特殊字符置换为'_'

    static toIdentifier(str) {

        if (typeof str !== "string") return "";

        return str.replace(IDENTIFIER_NAME_REPLACE_REGEX, "_").replace(IDENTIFIER_ALPHA_NUMERIC_NAME_REPLACE_REGEX, "_");

    };

    // 特殊字符置换为'-'

    // 去掉头尾的'-'

    static toPath(str) {

        if (typeof str !== "string") return "";

        return str.replace(PATH_NAME_NORMALIZE_REPLACE_REGEX, "-").replace(MATCH_PADDED_HYPHENS_REPLACE_REGEX, "");

    };

    // 数字转换为字母

    static numberToIdentifer(n) {

        // n ∈ [0,26) 返回 a-z

        if (n < DELTA_A_TO_Z) return String.fromCharCode(START_LOWERCASE_ALPHABET_CODE + n);

        // n ∈ [26,52) 返回 A-Z

        n -= DELTA_A_TO_Z;

        if (n < DELTA_A_TO_Z) return String.fromCharCode(START_UPPERCASE_ALPHABET_CODE + n);

        // n ∈ [52,正无穷大) 返回 '_ + (n-52)'

        n -= DELTA_A_TO_Z;

        return "_" + n;

    }

}
也非常的简单,这里每一个都举个小例子:
1、getFunctionContent
const fn1 = function() {

    console.log(1);

};

// console.log(1)

const result = Template.getFunctionContent(fn1.toString());
这个方法就是抽取出函数内容,注意,必须是函数表达式,使用箭头函数或者具名函数将失效。
const fn1 = () => {

    console.log(1);

};

/*  失败

    () => {

        console.log(1);

    }

*/

const result = Template.getFunctionContent(fn1.toString());
const fn1 = function fn1() {

    console.log(1);

};

/*  失败

    function fn1() {

        console.log(1);

    }

*/

const result = Template.getFunctionContent(fn1.toString());
2、toIdentifier
// __1_2_3_4_5_6

const result = Template.toIdentifier('0/1.2,3;4[5]6');
3、toPath
// d-workspace-doc

const result = Template.toPath('d://workspace//doc//');
4、numberToIdentifer
// a

const result = Template.numberToIdentifer(0);

// E

const result2 = Template.numberToIdentifer(30);

// _48

const result3 = Template.numberToIdentifer(100);
简单易懂,包教包会!
工具方法
class Template {

    indent(str) {

        // 数组map处理

        if (Array.isArray(str)) {

            return str.map(this.indent.bind(this)).join("\n");

        } else {

            // 去除右空白 实验性方法

            str = str.trimRight();

            if (!str) return "";

            var ind = (str[0] === "\n" ? "" : "\t");

            // 两个制表符

            return ind + str.replace(/\n([^\n])/g, "\n\t$1");

        }

    }

    prefix(str, prefix) {

        // 传入数组换行拼接

        if (Array.isArray(str)) {

            str = str.join("\n");

        }

        // 去除两侧空白

        str = str.trim();

        if (!str) return "";

        const ind = (str[0] === "\n" ? "" : prefix);

        // 加前缀

        return ind + str.replace(/\n([^\n])/g, "\n" + prefix + "$1");

    }

    asString(str) {

        // 数组换行拼接或返回原字符串

        if (Array.isArray(str)) {

            return str.join("\n");

        }

        return str;

    }

}
前三个比较简单,直接看源码就懂了。
1、indent
这个方法简单讲解就是把每行往后推两个制表符,如果传入字符数组则如下所示:
const tmp = new Template();

const str = ['a', 'b', 'c'];

/*

        a

        b

        c

*/

const result = tmp.indent(str);
2、prefix
简单讲就是给字符串加前缀:
const tmp = new Template();

// -a

const result = tmp.prefix(`a`, `-`);
3、asString
传入数组会分别进行换行拼接,非数组直接返回:
const tmp = new Template();

/*

a

b

c

*/

const result = tmp.asString(['a', 'b', 'c']);
4、getModulesArrayBounds
Template.prototype.getModulesArrayBounds = (modules) => {

    // typeof module.id === 'number'

    if (!modules.every(moduleIdIsNumber))

        return false;

    var maxId = -Infinity;

    var minId = Infinity;

    // 获取modules中的最大与最小id

    // 一个模块对应一个id

    modules.forEach(function(module) {

        if (maxId < module.id) maxId = module.id;

        if (minId > module.id) minId = module.id;

    });

    // 当最小id小于16 + 位数 置0

    if (minId < 16 + ("" + minId).length) {

        // add minId x ',' instead of 'Array(minId).concat(...)'

        minId = 0;

    }

    // map返回每一个module.id位数+2

    // reduce将数组元素相加 起始值为-1

    var objectOverhead = modules.map(function(module) {

        var idLength = (module.id + "").length;

        return idLength + 2;

    }).reduce(function(a, b) {

        return a + b;

    }, -1);

    // 这里的应用到实际调用的时候再看吧

    var arrayOverhead = minId === 0 ? maxId : 16 + ("" + minId).length + maxId;

    return arrayOverhead < objectOverhead ? [minId, maxId] : false;

}
这个函数并不复杂,但是不懂是如何应用的。
5、renderChunkModules
这个没法单独讲,调用的时候做讲解。
内部函数
// 这是按字符串排序

// 即 2 > 11

function stringifyIdSortPredicate(a, b) {

    var aId = a.id + "";

    var bId = b.id + "";

    if (aId < bId) return -1;

    if (aId > bId) return 1;

    return 0;

}

// 这个工具方法有使用

function moduleIdIsNumber(module) {

    return typeof module.id === "number";

}
比较简单。
至此,该模块内容基本完事,有一个方法需要在用的时候做解析。
接下来几节就将正式进入编译阶段。
.20-浅析webpack源码之compile流程-Template模块的更多相关文章
- .17-浅析webpack源码之compile流程-入口函数run
本节流程如图: 现在正式进入打包流程,起步方法为run: Compiler.prototype.run = (callback) => { const startTime = Date.now( ...
- .18-浅析webpack源码之compile流程-rules参数处理(1)
Tips:写到这里,需要对当初的规则进行修改.在必要的地方,会在webpack.config.js中设置特殊的参数来跑源码,例如本例会使用module:{rules:[...]}来测试,基本上测试参数 ...
- .19-浅析webpack源码之compile流程-rules参数处理(2)
第一步处理rule为字符串,直接返回一个包装类,很简单看注释就好了. test/include/exclude 然后处理test.include.exclude,如下: if (rule.test | ...
- 从Webpack源码探究打包流程,萌新也能看懂~
简介 上一篇讲述了如何理解tapable这个钩子机制,因为这个是webpack程序的灵魂.虽然钩子机制很灵活,而然却变成了我们读懂webpack道路上的阻碍.每当webpack运行起来的时候,我的心态 ...
- .29-浅析webpack源码之Resolver.prototype.resolve
在上一节中,最后返回了一个resolver,本质上就是一个Resolver对象: resolver = new Resolver(fileSystem); 这个对象的构造函数非常简单,只是简单的继承了 ...
- .29-浅析webpack源码之doResolve事件流(1)
在上一节中,最后返回了一个resolver,本质上就是一个Resolver对象: resolver = new Resolver(fileSystem); 这个对象的构造函数非常简单,只是简单的继承了 ...
- .30-浅析webpack源码之doResolve事件流(1)
这里所有的插件都对应着一个小功能,画个图整理下目前流程: 上节是从ParsePlugin中出来,对'./input.js'入口文件的路径做了处理,返回如下: ParsePlugin.prototype ...
- .34-浅析webpack源码之事件流make(3)
新年好呀~过个年光打游戏,function都写不顺溜了. 上一节的代码到这里了: // NormalModuleFactory的resolver事件流 this.plugin("resolv ...
- .30-浅析webpack源码之doResolve事件流(2)
这里所有的插件都对应着一个小功能,画个图整理下目前流程: 上节是从ParsePlugin中出来,对'./input.js'入口文件的路径做了处理,返回如下: ParsePlugin.prototype ...
随机推荐
- bootstrap table 前端搜索
1.bootstrap-table对于前端的搜索可以通过官网设置,但发现前端搜索出现bug,网上找到一个bootstrap-table的扩充js bootstrap-table-mytoolbar. ...
- day08_雷神_模块一
# day08 一.模块 回顾相关: 取值顺序: 在局部调用:局部命名空间->全局命名空间->内置命名空间 在全局调用:全局命名空间->内置命名空间 内置函数: globals(), ...
- 点聚weboffice插件自定义菜单
https://blog.csdn.net/u014547764/article/details/53818637 1.在jsp中引用excel插件:首先项目中要有:WebOffice.zip.web ...
- Linux-用户及权限
1. 用户组 RHEL 7/CentOS 7系统中的用户组有如下3类: 超级用户,UID 0:系统的超级用户. 系统用户,UID 1-999:系统中系统服务由不同用户运行,更加安全,默认被限制不能登录 ...
- selenium在操作隐藏元素时会报错,怎么判断元素是隐藏的?
首先页面元素隐藏有五种方法: 1. opacity: 0; opacity 属性的意思是设置一个元素的透明度.它不是为改变元素的边界框(bounding box)而设计的.这意味着将 opacity ...
- C# 加特效
public class BulletMove : MonoBehaviour { public float Speed = 5f; public Transform Fx; // Use this ...
- 动态执行 VB.NET 和 C# 代码
有时候我们需要尝试动态地与一些代码进行交互,而不是只能执行程序内已编死的代码,那该怎么办呢?我首先推荐各种脚本语言,如Javascript.Lua.Python等等,这些脚本语言有很多优秀的第三方类库 ...
- AEAI DP开发统计分析
1 背景概述 平时做统计分析都是调rest服务,给前台提供数据,然后在管理控制台里配置portlet.但并不是所有的项目都会用到portal,这时就需要在AEAI DP应用开发平台里开发统计分析了,下 ...
- ping端口是否开放(windows,macos,linux)
windows中ping端口:tcping命令 1. tcping 非自带命令,首先安装tcping命令,也可以去官网:http://www.elifulkerson.com/projects/tcp ...
- Windows Phone开发手记-WinRT下分组拼音的实现
Windows Phone版本号自升入8.1以来,开发者就多了一个选项,开发基于WinRT架构的WP或者Universal Windows App.然而开发框架转为WinRT后,很多原有的WP8基于S ...