abp(net core)+easyui+efcore实现仓储管理系统——入库管理之十二(四十八)
abp(net core)+easyui+efcore实现仓储管理系统目录
abp(net core)+easyui+efcore实现仓储管理系统——EasyUI前端页面框架 (十八)
在上面文章abp(net core)+easyui+efcore实现仓储管理系统——入库管理之十一(四十七)的学习之后,我们已经实现了入库单前端的关于实现库位的功能,今天我们来学习如何在后台实现添加库位的功能。接上文。
6. 在Visual Studio 2017的“解决方案资源管理器”中,左键单击“ABP.TPLMS.Application”项目,打开“InStocks\Dto”文件夹,找到InStockOrderDto与CreateUpdateInStockOrderDto两个类,分别添加一行代码。代码如下。
public List<InStockOrderDetailLocDto> InStockOrderDetailLoc { get; set; }
7. 在Visual Studio 2017的“解决方案资源管理器”中,右键单击在领域层“ABP.TPLMS.Web.Mvc”项目中的Controller目录。 找到InStockController.cs文件中输入如下代码,通过构造函数注入对应的服务类实例。
namespace ABP.TPLMS.Web.Controllers

{

    public class InStockController : TPLMSControllerBase

    {

        private readonly IInStockOrderAppService _inSOAppService;

        private readonly IInStockOrderDetailAppService _inSODAppService;

        private readonly IInStockOrderDetailLocAppService _inSODLAppService;

        private const int MAX_COUNT = ;

        public InStockController(IInStockOrderAppService InSOAppService,IInStockOrderDetailAppService InSODAppService,

            IInStockOrderDetailLocAppService InSODLAppService)

        {

            _inSOAppService = InSOAppService;

            _inSODAppService = InSODAppService;

            _inSODLAppService = InSODLAppService;

        }

       //省略见前文

 [HttpPost]

        [DisableValidation]

        public string Update(InStockOrderDto iso)

        {

            string result = "NO";

            List<InStockOrderDetailDto> list = new List<InStockOrderDetailDto>();

            List<InStockOrderDetailLocDto> listLoc = new List<InStockOrderDetailLocDto>();

            try

            {

                string head = Request.Form["postdata"];

                if (!string.IsNullOrEmpty(head))

                {

                    //把json字符串转换成对象

                    iso = JsonHelper.Instance.Deserialize<InStockOrderDto>(head);

                }

                list = GetDetailDtos();

                listLoc = GetDetailLocDtos();

                if (iso == null)

                {

                    return "没有表头!";

                }

                iso.InStockOrderDetail = list;

                iso.InStockOrderDetailLoc = listLoc;

                result = _inSOAppService.Save(iso);

            }

            catch

            {

            }

            if (result == "OK")

            {

                return "更新成功!";

            }

            else

                return "更新失败!";

        }

        private List<InStockOrderDetailDto> GetDetailDtos()

        {

            List<InStockOrderDetailDto> list = new List<InStockOrderDetailDto>();

            string deleted = Request.Form["deleted"];

            string inserted = Request.Form["inserted"];

            string updated = Request.Form["updated"];

            // TODO: Add update logic here

            if (!string.IsNullOrEmpty(deleted))

            {

                //把json字符串转换成对象

                List<InStockOrderDetailDto> listDeleted = JsonHelper.Instance.Deserialize<List<InStockOrderDetailDto>>(deleted);

                //TODO 下面就可以根据转换后的对象进行相应的操作了

                if (listDeleted != null && listDeleted.Count > )

                {

                    list.AddRange(listDeleted.ToArray());

                }

            }

            if (!string.IsNullOrEmpty(inserted))

            {

                //把json字符串转换成对象

                List<InStockOrderDetailDto> listInserted = JsonHelper.Instance.Deserialize<List<InStockOrderDetailDto>>(inserted);

                if (listInserted != null && listInserted.Count > )

                {

                    list.AddRange(listInserted.ToArray());

                }

            }

            if (!string.IsNullOrEmpty(updated))

            {

                //把json字符串转换成对象

                List<InStockOrderDetailDto> listUpdated = JsonHelper.Instance.Deserialize<List<InStockOrderDetailDto>>(updated);

                if (listUpdated != null && listUpdated.Count > )

                {

                    list.AddRange(listUpdated.ToArray());

                }

            }

            return list;

        }

         private List<InStockOrderDetailLocDto> GetDetailLocDtos()

        {

            List<InStockOrderDetailLocDto> listLoc = new List<InStockOrderDetailLocDto>();

            string locDel = Request.Form["locsDeleted"];

            string locIns = Request.Form["locsInserted"];

            string locUpd = Request.Form["locsUpdated"];

            // TODO: Add update logic here

            if (!string.IsNullOrEmpty(locDel))

            {

                //把json字符串转换成对象

                List<InStockOrderDetailLocDto> listLocDeleted = JsonHelper.Instance.Deserialize<List<InStockOrderDetailLocDto>>(locDel);

                //TODO 下面就可以根据转换后的对象进行相应的操作了

                if (listLocDeleted != null && listLocDeleted.Count > )

                {

                    listLoc.AddRange(listLocDeleted.ToArray());

                }

            }

            if (!string.IsNullOrEmpty(locIns))

            {

                //把json字符串转换成对象

                List<InStockOrderDetailLocDto> listLocInserted = JsonHelper.Instance.Deserialize<List<InStockOrderDetailLocDto>>(locIns);

                if (listLocInserted != null && listLocInserted.Count > )

                {

                    listLoc.AddRange(listLocInserted.ToArray());

                }

            }

            if (!string.IsNullOrEmpty(locUpd))

            {

                //把json字符串转换成对象

                List<InStockOrderDetailLocDto> listLocUpdated = JsonHelper.Instance.Deserialize<List<InStockOrderDetailLocDto>>(locUpd);

                if (listLocUpdated != null && listLocUpdated.Count > )

                {

                    listLoc.AddRange(listLocUpdated.ToArray());

                }

            }

            return listLoc;

        }

[DontWrapResult]

        public string GetLocs(string Id)

        {

            int inodId;

            int.TryParse(Id, out inodId);

            PagedInStockDetailLocResultRequestDto paged = new PagedInStockDetailLocResultRequestDto();

            paged.MaxResultCount = MAX_COUNT;

            paged.InStockOrderDetailId = inodId;

            var iodlList = _inSODLAppService.GetAll(paged).GetAwaiter().GetResult().Items; ;

            var json = JsonEasyUI(iodlList);

            return json;

        }

    }

}
8.在Visual Studio 2017的“解决方案资源管理器”中,右键单击在领域层“ABP.TPLMS.Application”项目中的InStocks目录。 找到InStockOrderAppService.cs文件中的Save方法,修改如下。
 public string Save(InStockOrderDto iso)

        {

            try

            {

                CreateUpdateInStockOrderDto order = ObjectMapper.Map<CreateUpdateInStockOrderDto>(iso);

                foreach (var item in order.InStockOrderDetail)

                {

                    CreateUpdateInStockOrderDetailDto isod = ObjectMapper.Map<CreateUpdateInStockOrderDetailDto>(item);

                    if (isod.Id > )

                    {

                        isodApp.Update(isod);

                    }

                    else

                        isodApp.Create(isod);

                }

                foreach (var loc in iso.InStockOrderDetailLoc)

                {

                    CreateUpdateInStockOrderDetailLocDto isodLoc = ObjectMapper.Map<CreateUpdateInStockOrderDetailLocDto>(loc);

                    if (isodLoc.Id > )

                    {

                        isodLocApp.Update(isodLoc);

                    }

                    else

                        isodLocApp.Create(isodLoc);

                }

                order.InStockOrderDetail = null;

                order.InStockOrderDetail = null;

                order.Status =  ;

                Update(order);

            }

            catch (Exception ex)

            {

                throw ex;

            }

            return "OK";

        }
9.在Visual Studio 2017的按F5运行。在主界面的菜单中,选择“Business->入库管理”菜单项,浏览器中呈现一个组织信息列表与五个按钮。
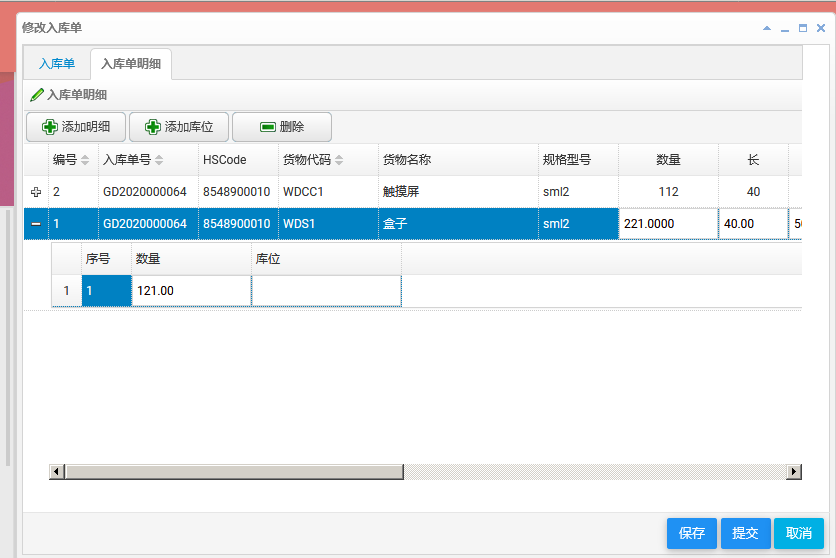
10.在“入库单管理”列表中选择一条入库单记录,然后点击“修改”按钮。弹出一个入库单修改界面,在界面中选择“入库单明细”,选中一条入库单明细。如下图。

11.选中序号为1的库位信息,我们发现库位这个单元格的数据不可见。如下图。
12. 在单元格上,点击鼠标右键,在弹出菜单中选择“查看元素”。如下图。

13.在修改文本框的样式,添加颜色。单元格中的数字立即可见。如下图。
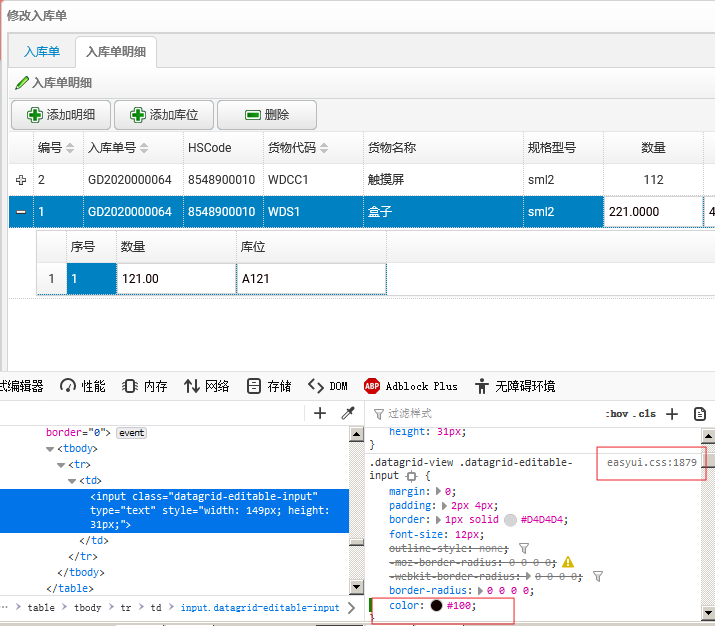
14.我们找到“easyui-1.8\themes\bootstrap\easyui.css”文件,找到1879行,在这个样式中添加颜色(“color:#100”)。如下图。

15.使用鼠标左键点击“添加库位”按钮。如下图。
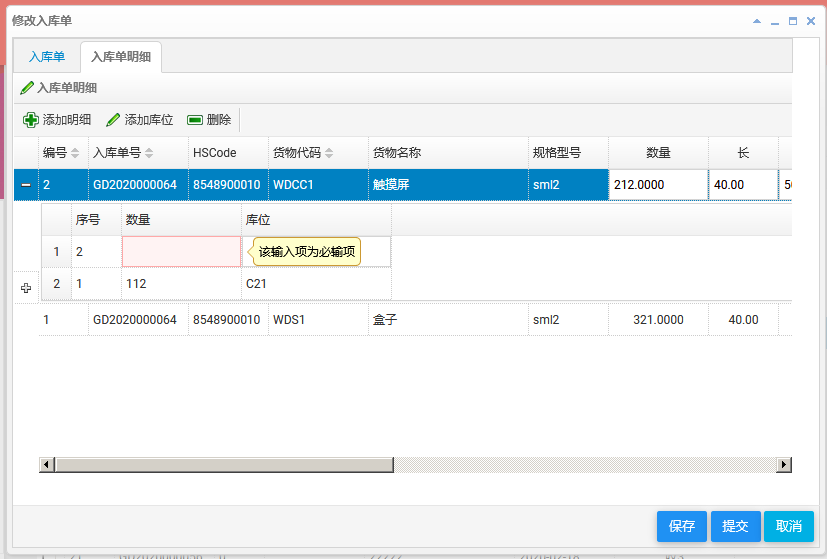
16.对于入库单的库位信息进行修改完成之后,点击“保存”按钮,弹出一个“您确认要修改吗?”对话框。点击对话框中的“确定”按钮。然后会出现修改入库单界面,如下图。

17.如果修改成功,会有一个“更新成功”的提示信息,同时更新入库单管理列表。如下图。

最后,我发现一个bug,偶尔出现,或是在第一次点保存按钮时出现。我暂时没找到原因。如果有知道如何解决的请留言。具体情况如下面三张图。图1,我添加了一条库位信息,点击保存按钮。见图2,实际上并没有把这个库位信息的数据传递到后台。最后的结果如图3。
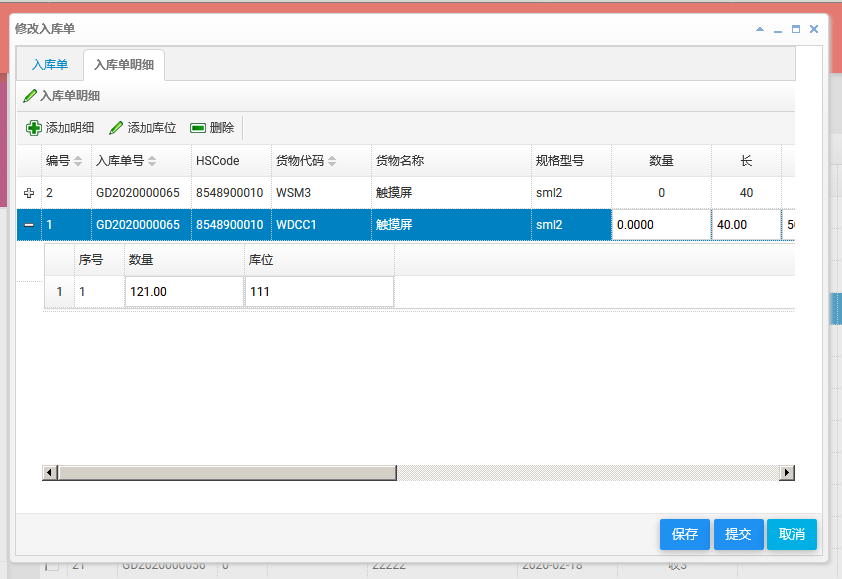
图1

图2

图3
abp(net core)+easyui+efcore实现仓储管理系统——入库管理之十二(四十八)的更多相关文章
- abp(net core)+easyui+efcore实现仓储管理系统——入库管理之四(四十)
abp(net core)+easyui+efcore实现仓储管理系统目录 abp(net core)+easyui+efcore实现仓储管理系统——ABP总体介绍(一) abp(net core)+ ...
- abp(net core)+easyui+efcore实现仓储管理系统——入库管理之五(四十一)
abp(net core)+easyui+efcore实现仓储管理系统目录 abp(net core)+easyui+efcore实现仓储管理系统——ABP总体介绍(一) abp(net core)+ ...
- abp(net core)+easyui+efcore实现仓储管理系统——入库管理之六(四十二)
abp(net core)+easyui+efcore实现仓储管理系统目录 abp(net core)+easyui+efcore实现仓储管理系统——ABP总体介绍(一) abp(net core)+ ...
- abp(net core)+easyui+efcore实现仓储管理系统——入库管理之七(四十三)
abp(net core)+easyui+efcore实现仓储管理系统目录 abp(net core)+easyui+efcore实现仓储管理系统——ABP总体介绍(一) abp(net core)+ ...
- abp(net core)+easyui+efcore实现仓储管理系统——入库管理之八(四十四)
abp(net core)+easyui+efcore实现仓储管理系统目录 abp(net core)+easyui+efcore实现仓储管理系统——ABP总体介绍(一) abp(net core)+ ...
- abp(net core)+easyui+efcore实现仓储管理系统——入库管理之九(四十五)
abp(net core)+easyui+efcore实现仓储管理系统目录 abp(net core)+easyui+efcore实现仓储管理系统——ABP总体介绍(一) abp(net core)+ ...
- abp(net core)+easyui+efcore实现仓储管理系统——入库管理之十(四十六)
abp(net core)+easyui+efcore实现仓储管理系统目录 abp(net core)+easyui+efcore实现仓储管理系统——ABP总体介绍(一) abp(net core)+ ...
- abp(net core)+easyui+efcore实现仓储管理系统——入库管理之十一(四十七)
abp(net core)+easyui+efcore实现仓储管理系统目录 abp(net core)+easyui+efcore实现仓储管理系统——ABP总体介绍(一) abp(net core)+ ...
- abp(net core)+easyui+efcore实现仓储管理系统——入库管理之一(三十七)
abp(net core)+easyui+efcore实现仓储管理系统目录 abp(net core)+easyui+efcore实现仓储管理系统——ABP总体介绍(一) abp(net core)+ ...
随机推荐
- Python基础之语言简介
python是什么 Python 是一个高层次的结合了解释性.编译性.互动性和面向对象的脚本语言,其设计具有很强的可读性,相比其他语言经常使用英文关键字,其他语言的一些标点符号,它具有比其他语言更有特 ...
- Pycharm 操作数据库
view--->Tool Buttons,点击Pycharm右侧的Database 1.连接数据库 2.建立一个表,添加数据 通过以上操作把用户名和密码储存到了数据库中 3.连 ...
- docker(1)
什么是Docker? Docker 最初是dotCloud公司创始人Solomon Hykes在法国期间发起的一个公司内部项目,它是基于dotCloud公司多年云服务技术的一次革新. Docker使用 ...
- 理解分布式一致性:Raft协议
理解分布式一致性:Raft协议 什么是分布式一致性 Leader选举 日志复制流程 term选举周期 timeout 选举和选举timeout 选举分裂 日志复制和心跳timeout 在分布式系统中, ...
- 计算2的n次幂htm代码
<!DOCTYPE html> <html lang="en"> <head> <meta charset="UTF-8&quo ...
- var、let、const
var.let.const之间的区别和使用 1.var声明变量可以重复声明,而let不可以重复声明 let a = 1; let a = 2; var b = 3; var b = 4; a // I ...
- Java 类类型之 String 类型
类类型 引用数据类型存的都是地址,通过地址指向对象: 基本数据类型存的都是具体值: 字符串 (String) 类型 特点: 1.字符创都是对象: 2.一旦初始化,不能被更改,字符串缓冲区支持可变的字符 ...
- 第K短路+严格第K短路
所谓K短路,就是从s到t的第K短的路,第1短就是最短路. 如何求第K短呢?有一种简单的方法是广度优先搜索,记录t出队列的次数,当t第k次出队列时,就是第k短路了.但点数过大时,入队列的节点过多,时间和 ...
- Pthon学习相关
1. Cython入门教程:https://www.jianshu.com/p/cfcc2c04a6f5
- socket编程之并发回射服务器3
在socket编程之并发回射服务器一文中,服务器采用多进程的方式实现并发,本文采用多线程的方式实现并发. 多线程相关API: // Compile and link with -pthread int ...