ASP.NET Core Blazor Webassembly 之 组件
关于组件
现在前端几大轮子全面组件化。组件让我们可以对常用的功能进行封装,以便复用。组件这东西对于搞.NET的同学其实并不陌生,以前ASP.NET WebForm的用户控件其实也是一种组件。它封装html代码,封装业务逻辑,对外提供属性事件等信息,它完完全全就是个组件,只是用户控件跑在服务端,而现在的组件大多数直接跑在前端。现在Blazor Webassembly微软正式把组件带到前端,让我们看看它是怎么玩的。
第一个组件
废话不多说下面开始构建第一个组件。这个组件很简单就是绿色的面板加一个标题的容器,我们就叫它GreenPanel吧。
新建Blazor Webassembly项目
前几天的build大会,Blazor Webassembly已经正式release了。我们更新最新版的Core SDK就会安装正式版的模板。

新建项目选Blazor Webassembly App项目模板
新建GreenPanel组件
在pages命令下新建一个文件夹叫做components,在文件夹下新建一个razor组件,命名为GreenPanel.razor。
注意:组件的命名必须大写字母开头

添加代码如下:
<div class="green-panel">

    <div class="title">

        Green panel

    </div>

    <div class="content">

    </div>

</div>

<style>

    .green-panel{

        background-color: green;

        height:400px;

        width:400px;

    }

    .green-panel .title {

        border-bottom:1px solid #333;

        height:30px;

    }

    .green-panel .content {

    }

</style>

@code { override void OnInitialized()

        {

            base.OnInitialized();

        }

}
一个组件主要是由html,style ,code等组成。html,style用来控制ui表现层,code用来封装逻辑。
注意:Blazor目前没有样式隔离技术,所以写在组件内的style有可能会影响其他html元素
使用组件
使用组件跟其他框架大体是相同的,直接在需要使用的地方使用以我们组件名作为一个html元素插入:
如果不在同一层目录下,则需要导入命名空间。在_Imports.razor文件内引用组件的命名空间:
...

@using BlazorWasmComponent.Components
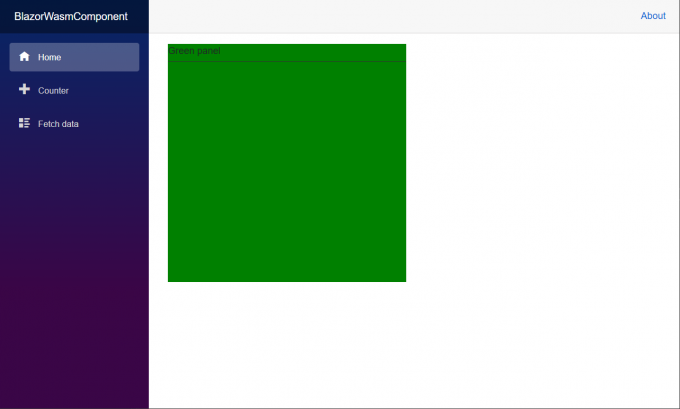
在index页面使用组件:
<GreenPanel></GreenPanel>
运行一下:
组件类
每个组件最后都会编译成一个C#类,让我们用ILSPy看看一眼长啥样:
// BlazorWasmComponent.Components.GreenPanel

using Microsoft.AspNetCore.Components;

using Microsoft.AspNetCore.Components.Rendering;

public class GreenPanel : ComponentBase

{

	protected override void BuildRenderTree(RenderTreeBuilder __builder)

	{

		__builder.AddMarkupContent(0, "<div class=\"green-panel\">\r\n    <div class=\"title\">\r\n        Green panel\r\n    </div>\r\n    <div class=\"content\">\r\n    </div>\r\n</div>\r\n\r\n");

		__builder.AddMarkupContent(1, "<style>\r\n    .green-panel{\r\n        background-color: green;\r\n        height:400px;\r\n        width:400px;\r\n    }\r\n    .green-panel .title {\r\n        border-bottom:1px solid #333;\r\n        height:30px;\r\n    }\r\n    .green-panel .content {\r\n    }\r\n</style>");

	}

	protected override void OnInitialized()

	{

		base.OnInitialized();

	}

}
GreenPanel组件会编译成一个GreenPanel类,继承自ComponentBase基类。里面有几个方法:
- BuildRenderTree 用来构建html,css等ui元素
- 其它code部分会也会被合并到这个类里面
生命周期
了解组件声明周期对我们使用组件有很大的帮助。一个组件的声周期主要依次以下几个阶段:
- OnInitialized、OnInitializedAsync
- OnParametersSet、OnParametersSetAsync
- OnAfterRender、OnAfterRenderAsync
- Dispose
如果要在每个生命阶段插入特定的逻辑,请重写这些方法:
@implements IDisposable

@code {

    protected override void OnInitialized()

    {

        Console.WriteLine("OnInitialized");

        base.OnInitialized();

    }

    protected override Task OnInitializedAsync()

    {

        Console.WriteLine("OnInitializedAsync");

        return base.OnInitializedAsync();

    }

    protected override void OnParametersSet()

    {

        Console.WriteLine("OnParametersSet");

        base.OnParametersSet();

    }

    protected override Task OnParametersSetAsync()

    {

        Console.WriteLine("OnParametersSetAsync");

        return base.OnParametersSetAsync();

    }

    protected override void OnAfterRender(bool firstRender)

    {

        Console.WriteLine("OnAfterRender");

        base.OnAfterRender(firstRender);

    }

    protected override Task OnAfterRenderAsync(bool firstRender)

    {

        Console.WriteLine("OnAfterRenderAsync");

        return base.OnAfterRenderAsync(firstRender);

    }

    public void Dispose()

    {

        Console.WriteLine("Dispose");

    }

}
注意:组件默认并不继承IDisposable接口,如果要重写Dispose方法请手工使用@implements方法继承接口IDisposable
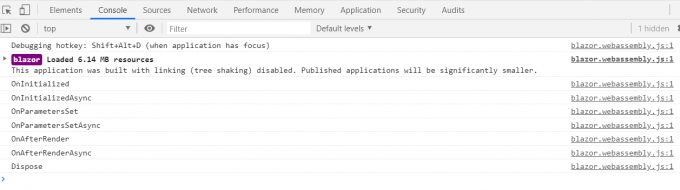
运行一下,并且切换一下页面,使组件销毁,可以看到所有生命周期方法依次执行:
组件属性
我们定义组件总是免不了跟外部进行交互,比如从父组件接受参数,或者把自身的数据对外暴露。我们可以使用[Parameter]来定义一个组件的属性。这里叫做Parameter,估计是为了跟C#里的属性(property,attribute)进行区分。
对我们的GreenPanel组件进行改进,支持从外部定义标题的内容:
<div class="green-panel">

    <div class="title">

        @Title

    </div>

    <div class="content">

    </div>

</div>

<style>

    .green-panel {

        background-color: green;

        height: 400px;

        width: 400px;

    }

        .green-panel .title {

            border-bottom: 1px solid #333;

            height: 30px;

        }

        .green-panel .content {

        }

</style>

@code {

    [Parameter]

    public string Title { get; set; }

    protected override void OnInitialized()

    {

        base.OnInitialized();

    }

}
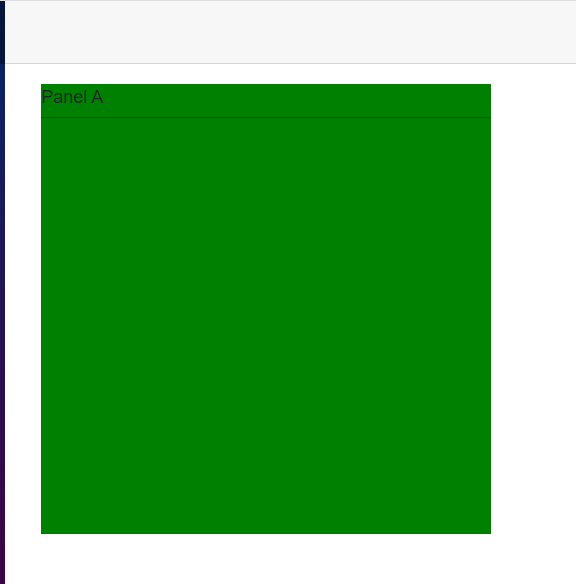
在父组件使用:
@page "/"

<GreenPanel Title="Panel A"></GreenPanel>
运行一下:
上面传递的是简单类型String,下面让我们试试传递复杂类型的数据进去。我们继续对GreenPanel改造。改造成ColorPanel,它接受一个Setting对象来设置标题跟背景颜色。
定义Setting类:
  public class PanelSetting

    {

        public string Title { get; set; }

        public string BgColor { get; set; }

    }
定义ColorPanel:
<div class="green-panel">

    <div class="title">

        @Setting.Title

    </div>

    <div class="content">

    </div>

</div>

<style>

    .green-panel {

        background-color: @Setting.BgColor;

        height: 400px;

        width: 400px;

    }

        .green-panel .title {

            border-bottom: 1px solid #333;

            height: 30px;

        }

        .green-panel .content {

        }

</style>

@using BlazorWasmComponent.models;

@code {

    [Parameter]

    public PanelSetting Setting { get; set; }

    protected override void OnInitialized()

    {

        base.OnInitialized();

    }

}
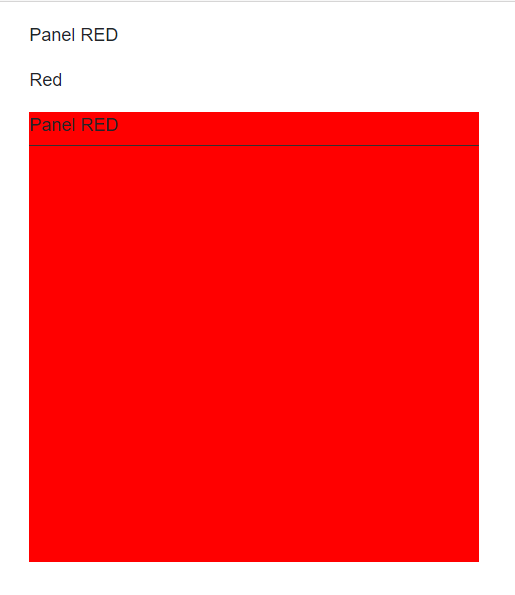
在父组件使用:
@page "/"

<p>@PanelSetting.Title</p>

<p>@PanelSetting.BgColor</p>

<ColorPanel Setting="PanelSetting"></ColorPanel>

@using BlazorWasmComponent.models;

@code{

    public PanelSetting PanelSetting { get; set; }

    protected override void OnInitialized()

    {

        PanelSetting = new PanelSetting

        {

            BgColor = "Red",

            Title = "Panel RED"

        };

        base.OnInitialized();

    }

}
运行一下:
注意:上一篇WebAssembly初探里有个错误,当时认为这个属性是单向数据流,经过试验子组件对父组件传入的数据源进行修改的时候其实是会反应到父组件的,只是如果你使用@符号绑定数据的时候并不会像angularjs,vue等立马进行刷新。关于这个事情感觉可以单独写一篇,这里就不细说了。
组件事件
我们的组件当然也可以提供事件,已供外部订阅,然后从内部激发来通知外部完成业务逻辑,实现类似观察者模式。继续改造ColorPanel,当点击时候对外抛出事件。
使用EventCallback、EventCallback< T > 来定义事件:
<div class="green-panel" @onclick="DoClick">

    <div class="title">

        @Setting.Title

    </div>

    <div class="content">

    </div>

</div>

<style>

    .green-panel {

        background-color: @Setting.BgColor;

        height: 400px;

        width: 400px;

    }

        .green-panel .title {

            border-bottom: 1px solid #333;

            height: 30px;

        }

        .green-panel .content {

        }

</style>

@using BlazorWasmComponent.models;

@code {

    [Parameter]

    public PanelSetting Setting { get; set; }

    [Parameter]

    public EventCallback OnClick { get; set; }

    protected override void OnInitialized()

    {

        base.OnInitialized();

    }

    public void DoClick()

    {

        OnClick.InvokeAsync(null);

    }

}
父组件订阅事件:
@page "/"

<p>

    子组件点击次数:@ClickCount

</p>

<ColorPanel Setting="PanelSetting" OnClick="HandleClick"></ColorPanel>

@using BlazorWasmComponent.models;

@code{

    public PanelSetting PanelSetting { get; set; }

    public int ClickCount { get; set; }

    protected override void OnInitialized()

    {

        PanelSetting = new PanelSetting

        {

            BgColor = "Red",

            Title = "Panel RED"

        };

        base.OnInitialized();

    }

    private void HandleClick()

    {

        ClickCount++;

    }

}
运行一下,并点击子组件,父组件的计数器会被+1:
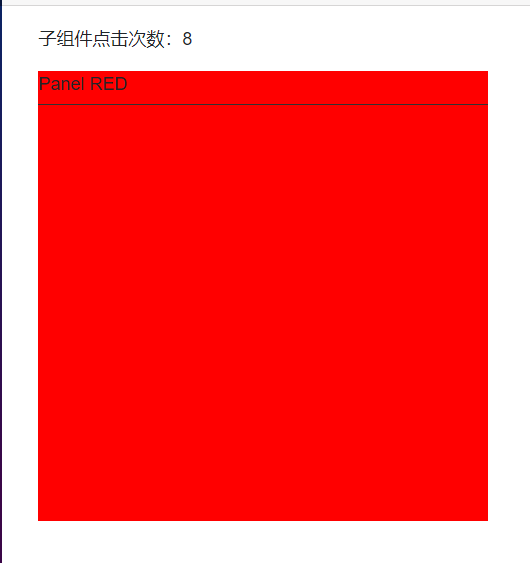
子内容
当我们定义容器级别的组件时往往需要往组件内传递子内容。比如我们的ColorPanel明显就有这种需求,这个Panel内部会被放上其它元素或者其它组件,这个时候我们可以使用ChildContent属性来实现。
<div class="green-panel" @onclick="DoClick">

    <div class="title">

        @Setting.Title

    </div>

    <div class="content">

        @ChildContent

    </div>

</div>

<style>

    .green-panel {

        background-color: @Setting.BgColor;

        height: 400px;

        width: 400px;

    }

        .green-panel .title {

            border-bottom: 1px solid #333;

            height: 30px;

        }

        .green-panel .content {

        }

</style>

@using BlazorWasmComponent.models;

@code {

    [Parameter]

    public PanelSetting Setting { get; set; }

    [Parameter]

    public EventCallback OnClick { get; set; }

    [Parameter]

    public RenderFragment ChildContent { get; set; }

    protected override void OnInitialized()

    {

        base.OnInitialized();

    }

    public void DoClick()

    {

        OnClick.InvokeAsync(null);

    }

}
定义一个类型为RenderFragment名称为ChildContent的属性,然后在html内使用@ChildContent来指代它。这样子内容就会被替换到指定的位置。
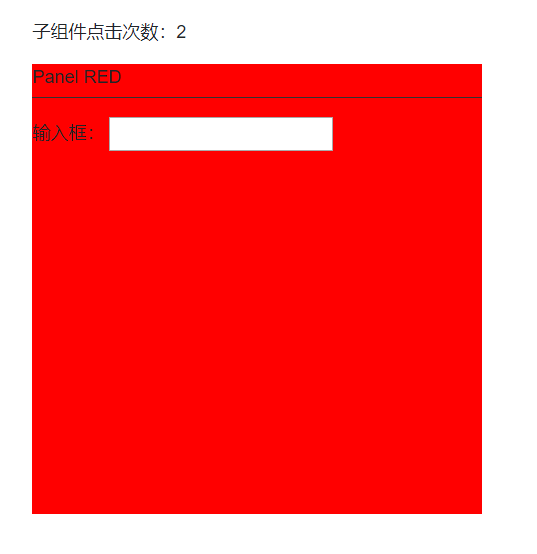
父组件使用,我们给ColorPanel的内部设置一个文本框吧:
@page "/"

<p>

    子组件点击次数:@ClickCount

</p>

<ColorPanel Setting="PanelSetting" OnClick="HandleClick">

   输入框: <input />

</ColorPanel>

@using BlazorWasmComponent.models;

@code{

    public PanelSetting PanelSetting { get; set; }

    public int ClickCount { get; set; }

    protected override void OnInitialized()

    {

        PanelSetting = new PanelSetting

        {

            BgColor = "Red",

            Title = "Panel RED"

        };

        base.OnInitialized();

    }

    private void HandleClick()

    {

        ClickCount++;

    }

}
运行一下看看我们的文本框会不会出现在panel内部:
@ref
因为我们的组件使用是在html内,当你在@code内想要直接通过代码操作子组件的时候可以给子组件设置@ref属性来直接获取到子组件的对象。继续改造ColorPanel,在它初始化的时候生产一个ID。
<div class="green-panel" @onclick="DoClick">

    <div class="title">

        @Setting.Title

    </div>

    <div class="content">

        @ChildContent

    </div>

</div>

<style>

    .green-panel {

        background-color: @Setting.BgColor;

        height: 400px;

        width: 400px;

    }

        .green-panel .title {

            border-bottom: 1px solid #333;

            height: 30px;

        }

        .green-panel .content {

        }

</style>

@using BlazorWasmComponent.models;

@code {

    public string ID { get; set; }

    [Parameter]

    public PanelSetting Setting { get; set; }

    [Parameter]

    public EventCallback OnClick { get; set; }

    [Parameter]

    public RenderFragment ChildContent { get; set; }

    protected override void OnInitialized()

    {

        ID = Guid.NewGuid().ToString();

        base.OnInitialized();

    }

    public void DoClick()

    {

        OnClick.InvokeAsync(null);

    }

}
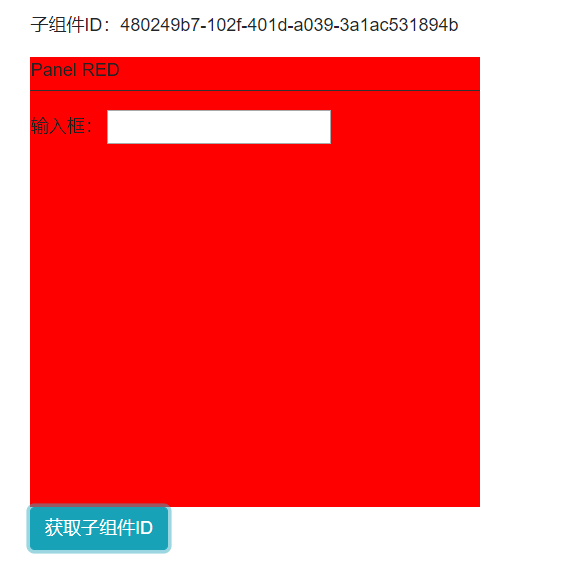
修改父组件,添加一个按钮,当点击的时候直接获取子组件的Id:
@page "/"

<p>

    子组件ID:@subId

</p>

<ColorPanel Setting="PanelSetting" OnClick="HandleClick" @ref="colorPanel">

   输入框: <input />

</ColorPanel>

<button @onclick="GetSubComponentId" class="btn btn-info">获取子组件ID</button>

@using BlazorWasmComponent.models;

@code{

    private string subId;

    private ColorPanel colorPanel;

    public PanelSetting PanelSetting { get; set; }

    public int ClickCount { get; set; }

    protected override void OnInitialized()

    {

        PanelSetting = new PanelSetting

        {

            BgColor = "Red",

            Title = "Panel RED"

        };

        base.OnInitialized();

    }

    private void HandleClick()

    {

        ClickCount++;

    }

    private void GetSubComponentId ()

    {

        this.subId = colorPanel.ID;

    }

}
运行一下:
@key
当使用循环渲染组件的时候请在组件上使用@key来加速Blazor的diff算法。有了key就可以快速的区分哪些组件是可以复用的,哪些是要新增或删除的,特别是在对循环列表插入对象或者删除对象的时候特别有用。如果使用过vue就应该很容易明白有了key可以降低虚拟dom算法的复杂度,在这里猜测blazor内部应该也是类似的算法。
@page "/"

@foreach (var key in List)

{

    <ColorPanel @key="key" Setting="PanelSetting"></ColorPanel>

}

@using BlazorWasmComponent.models;

@code{

    public List<String> List = new List<string>

    {

        Guid.NewGuid().ToString(),

         Guid.NewGuid().ToString(),

          Guid.NewGuid().ToString()

    };

    public PanelSetting PanelSetting { get; set; }

    protected override void OnInitialized()

    {

        PanelSetting = new PanelSetting

        {

            BgColor = "Red",

            Title = "Panel RED"

        };

        base.OnInitialized();

    }

}
太晚了就这样吧,喜欢的话请点个赞,谢谢!
相关内容:
ASP.NET Core Blazor 初探之 Blazor WebAssembly
ASP.NET Core Blazor 初探之 Blazor Server
ASP.NET Core Blazor Webassembly 之 组件的更多相关文章
- ASP.NET Core Blazor Webassembly 之 路由
web最精妙的设计就是通过url把多个页面串联起来,并且可以互相跳转.我们开发系统的时候总是需要使用路由来实现页面间的跳转.传统的web开发主要是使用a标签或者是服务端redirect来跳转.那今天来 ...
- ASP.NET Core Blazor Webassembly 之 数据绑定
上一次我们学习了Blazor组件相关的知识(Asp.net Core Blazor Webassembly - 组件).这次继续学习Blazor的数据绑定相关的知识.当代前端框架都离不开数据绑定技术. ...
- [Asp.Net Core] Blazor WebAssembly - 工程向 - 如何在欢迎页面里, 预先加载wasm所需的文件
前言, Blazor Assembly 需要最少 1.9M 的下载量. ( Blazor WebAssembly 船新项目下载量测试 , 仅供参考. ) 随着程序越来越复杂, 引用的东西越来越多, ...
- ASP.NET Core Blazor WebAssembly 之 .NET JavaScript互调
Blazor WebAssembly可以在浏览器上跑C#代码,但是很多时候显然还是需要跟JavaScript打交道.比如操作dom,当然跟angular.vue一样不提倡直接操作dom:比如浏览器的后 ...
- ASP.NET Core Blazor Webassembly 之 渐进式应用(PWA)
Blazor支持渐进式应用开发也就是PWA.使用PWA模式可以使得web应用有原生应用般的体验. 什么是PWA PWA应用是指那些使用指定技术和标准模式来开发的web应用,这将同时赋予它们web应用和 ...
- ASP.NET Core Blazor WebAssembly实现一个简单的TODO List
基于blazor实现的一个简单的TODO List 最近看到一些大佬都开始关注blazor,我也想学习一下.做了一个小的demo,todolist,仅是一个小示例,参考此vue项目的实现http:// ...
- ASP.NET Core Blazor 用Inspinia静态页模板搭建简易后台(实现菜单选中)
Blazor 是一个用于使用 .NET 生成交互式客户端 Web UI 的框架: 使用 C# 代替 JavaScript 来创建丰富的交互式 UI. 共享使用 .NET 编写的服务器端和客户端应用逻辑 ...
- ASP.NET Core Blazor 初探之 Blazor Server
上周初步对Blazor WebAssembly进行了初步的探索(ASP.NET Core Blazor 初探之 Blazor WebAssembly).这次来看看Blazor Server该怎么玩. ...
- 学习ASP.NET Core Blazor编程系列二——第一个Blazor应用程序(中)
学习ASP.NET Core Blazor编程系列一--综述 学习ASP.NET Core Blazor编程系列二--第一个Blazor应用程序(上) 四.创建一个Blazor应用程序 1. 第一种创 ...
随机推荐
- #if 和#ifdef的区别
转自:https://blog.csdn.net/zhangchiytu/article/details/7563329 先看个例子:#define TARGET_LITTLE_ENDINA 1#de ...
- RF(三层封装设计)
一.用例分层思想 元素层:需要导入 Selenium2Library 库 包含所有的元素定位 流程层:需要导入 元素层.txt 资源 封装用例流程 案例层:需要导入 流程层.txt 资源 输出用例,传 ...
- python-format方法记录
今天写脚本,遇到了这种情况:需要上一个脚本的回参作为一个路径参数,我用的os.path.join()处理,因为这个路径参数在最后一位,但是没有考虑到如果路径参数在中间的话,这样的拼接就只能把后面的 ...
- Linux安装Git-两种方式详细教程)
一.Git介绍 Git --- The stupid content tracker, 傻瓜内容跟踪器.Linus Torvalds 是这样给我们介绍 Git 的. Git 是用于 Linux内核开发 ...
- 2019国防科大校赛 B Escape LouvreⅡ
https://ac.nowcoder.com/acm/contest/878/B 这个题目是一个网络流,但是建图却没有那么好建,首先我们都会把每一个人与源点相连,每一个洞口和汇点相连. 然后人和洞口 ...
- 在web项目中使用shiro(认证、授权)
一.在web项目中实现认证 第一步,在web项目中导入shiro依赖的包 第二步,在web.xml中声明shiro拦截权限的过滤器 <filter> <filter-name> ...
- 【Kafka】Producer API
Producer API Kafka官网文档给了基本格式 地址:http://kafka.apachecn.org/10/javadoc/index.html?org/apache/kafka/cli ...
- pyltp安装教程及简单使用
1.pyltp简介 pyltp 是哈工大自然语言工作组推出的一款基于Python 封装的自然语言处理工具(轮子),提供了分词,词性标注,命名实体识别,依存句法分析,语义角色标注的功能. 2.pyltp ...
- FAXCOM和FXSCOMEX 传真编程
需要引用的dl,如下信息,早起使用的是FXSCOM.DLL,现在微软提供了相应的扩展,其程序集为,FXSCOMEX.dll FXSCOMEX.dll 提供跟加健全的方法,可以说所有关于传真的操作都在这 ...
- Golang遍历删除数组
Golang 做数字切片 package main import "fmt" /*遍历删除数组示例*/ func main() { //定义一个数组 a1 := []int{1, ...