吴裕雄--天生自然JAVA SPRING框架开发学习笔记:Spring基于Annotation装配Bean
在 Spring 中,尽管使用 XML 配置文件可以实现 Bean 的装配工作,但如果应用中 Bean 的数量较多,会导致 XML 配置文件过于臃肿,从而给维护和升级带来一定的困难。

Java 从 JDK 5.0 以后,提供了 Annotation(注解)功能,Spring 也提供了对 Annotation 技术的全面支持。Spring3 中定义了一系列的 Annotation(注解),常用的注解如下。

1)@Component

可以使用此注解描述 Spring 中的 Bean,但它是一个泛化的概念,仅仅表示一个组件(Bean),并且可以作用在任何层次。使用时只需将该注解标注在相应类上即可。

2)@Repository

用于将数据访问层(DAO层)的类标识为 Spring 中的 Bean,其功能与 @Component 相同。

3)@Service

通常作用在业务层(Service 层),用于将业务层的类标识为 Spring 中的 Bean,其功能与 @Component 相同。

4)@Controller

通常作用在控制层(如 Struts2 的 Action),用于将控制层的类标识为 Spring 中的 Bean,其功能与 @Component 相同。

5)@Autowired

用于对 Bean 的属性变量、属性的 Set 方法及构造函数进行标注,配合对应的注解处理器完成 Bean 的自动配置工作。默认按照 Bean 的类型进行装配。

6)@Resource

其作用与 Autowired 一样。其区别在于 @Autowired 默认按照 Bean 类型装配,而 @Resource 默认按照 Bean 实例名称进行装配。

@Resource 中有两个重要属性:name 和 type。

Spring 将 name 属性解析为 Bean 实例名称,type 属性解析为 Bean 实例类型。如果指定 name 属性,则按实例名称进行装配;如果指定 type 属性,则按 Bean 类型进行装配。

如果都不指定,则先按 Bean 实例名称装配,如果不能匹配,则再按照 Bean 类型进行装配;如果都无法匹配,则抛出 NoSuchBeanDefinitionException 异常。

7)@Qualifier

与 @Autowired 注解配合使用,会将默认的按 Bean 类型装配修改为按 Bean 的实例名称装配,Bean 的实例名称由 @Qualifier 注解的参数指定。
1. 创建 DAO 层接口

在 src 目录下创建一个名为 com.mengma.annotation 的包,在该包下创建一个名为 PersonDao 的接口,并添加一个 add() 方法,如下所示。

package com.mengma.annotation;

public interface PersonDao {

    public void add();

}

2. 创建 DAO 层接口的实现类

在 com.mengma.annotation 包下创建 PersonDao 接口的实现类 PersonDaoImpl,编辑后如下所示。

package com.mengma.annotation;

import org.springframework.stereotype.Repository;

@Repository("personDao")

public class PersonDaoImpl implements PersonDao {

    @Override

    public void add() {

        System.out.println("Dao层的add()方法执行了...");

    }

}

上述代码中,首先使用 @Repository 注解将 PersonDaoImpl 类标识为 Spring 中的 Bean,其写法相当于配置文件中 <bean id="personDao"class="com.mengma.annotation.PersonDaoImpl"/> 的书写。然后在 add() 方法中输出一句话,用于验证是否成功调用了该方法。
3. 创建 Service 层接口

在 com.mengma.annotation 包下创建一个名为 PersonService 的接口,并添加一个 add() 方法,如下所示。

package com.mengma.annotation;

public interface PersonService {

    public void add();

}

4. 创建 Service 层接口的实现类

在 com.mengma.annotation 包下创建 PersonService 接口的实现类 PersonServiceImpl,编辑后如下所示。

package com.mengma.annotation;

import javax.annotation.Resource;

import org.springframework.stereotype.Service;

@Service("personService")

public class PersonServiceImpl implements PersonService {

    @Resource(name = "personDao")

    private PersonDao personDao;

    public PersonDao getPersonDao() {

        return personDao;

    }

    @Override

    public void add() {

        personDao.add();// 调用personDao中的add()方法

        System.out.println("Service层的add()方法执行了...");

    }

}

上述代码中,首先使用 @Service 注解将 PersonServiceImpl 类标识为 Spring 中的 Bean,其写法相当于配置文件中 <bean id="personService"class="com.mengma.annotation.PersonServiceImpl"/> 的书写。

然后使用 @Resource 注解标注在属性 personDao 上(也可标注在 personDao 的 setPersonDao() 方法上),这相当于配置文件中 <property name="personDao"ref="personDao"/> 的写法。最后在该类的 add() 方法中调用 personDao 中的 add() 方法,并输出一句话。
5. 创建 Action

在 com.mengma.annotation 包下创建一个名为 PersonAction 的类,编辑后如下所示。

package com.mengma.annotation;

import javax.annotation.Resource;

import org.springframework.stereotype.Controller;

@Controller("personAction")

public class PersonAction {

    @Resource(name = "personService")

    private PersonService personService;

    public PersonService getPersonService() {

        return personService;

    }

    public void add() {

        personService.add(); // 调用personService中的add()方法

        System.out.println("Action层的add()方法执行了...");

    }

}

上述代码中,首先使用 @Controller 注解标注 PersonAction 类,其写法相当于在配置文件中编写 <bean id="personAction"class="com.mengma.annotation.PersonAction"/>。

然后使用了 @Resource 注解标注在 personService 上,这相当于在配置文件内编写 <property name="personService"ref="personService"/>。

最后在其 add() 方法中调用了 personService 中的 add() 方法,并输出一句话。
6. 创建 Spring 配置文件

在 com.mengma.annotation 包下创建一个名为 applicationContext.xml 的配置文件,如下所示。

<?xml version="1.0" encoding="UTF-8"?>

<beans xmlns="http://www.springframework.org/schema/beans"

    xmlns:xsi="http://www.w3.org/2001/XMLSchema-instance"

    xmlns:aop="http://www.springframework.org/schema/aop"

    xmlns:p="http://www.springframework.org/schema/p"

    xmlns:tx="http://www.springframework.org/schema/tx"

    xmlns:context="http://www.springframework.org/schema/context"

    xsi:schemaLocation="

            http://www.springframework.org/schema/beans

            http://www.springframework.org/schema/beans/spring-beans-2.5.xsd

            http://www.springframework.org/schema/aop

            http://www.springframework.org/schema/aop/spring-aop-2.5.xsd

            http://www.springframework.org/schema/tx

            http://www.springframework.org/schema/tx/spring-tx-2.5.xsd

            http://www.springframework.org/schema/context

            http://www.springframework.org/schema/context/spring-context.xsd">

    <!--使用context命名空间,通知spring扫描指定目录,进行注解的解析-->

    <context:component-scan base-package="com.mengma.annotation"/>

</beans>

与之前的配置文件相比,上述代码的<beans>元素中增加了第 7 行、第 15 行和第 16 行中包含有 context 的代码,然后在第 18 行代码中,使用 context 命名空间的 component-scan 元素进行注解的扫描,其 base-package 属性用于通知 spring 所需要扫描的目录。
7. 创建测试类

在 com.mengma.annotation 包下创建一个名为 AnnotationTest 的测试类,编辑后如下所示。

package com.mengma.annotation;

import org.junit.Test;

import org.springframework.context.ApplicationContext;

import org.springframework.context.support.ClassPathXmlApplicationContext;

public class AnnotationTest {

    @Test

    public void test() {

        // 定义Spring配置文件路径

        String xmlPath = "com/mengma/annotation/applicationContext.xml";

        // 初始化Spring容器,加载配置文件,并对bean进行实例化

        ApplicationContext applicationContext = new ClassPathXmlApplicationContext(

                xmlPath);

        // 获得personAction实例

        PersonAction personAction = (PersonAction) applicationContext

                .getBean("personAction");

        // 调用personAction中的add()方法

        personAction.add();

    }

}

上述代码中,首先通过加载配置文件并获取 personAction 的实例,然后调用该实例的 add() 方法。
8. 运行程序并查看结果
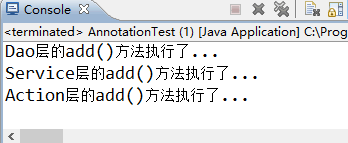
使用 JUnit 测试运行 test() 方法,运行成功后,输出结果如图
吴裕雄--天生自然JAVA SPRING框架开发学习笔记:Spring基于Annotation装配Bean的更多相关文章
- 吴裕雄--天生自然JAVA面向对象高级编程学习笔记:继承的应用
class Array{ // 表示数组 private int temp[] ; // 整型数组 private int foot ; // 定义添加位置 public Array(int len) ...
- 吴裕雄--天生自然JAVA面向对象高级编程学习笔记:匿名内部类
interface A{ public void printInfo() ; // } class B implements A{ // 实现接口 public void printInfo(){ S ...
- 吴裕雄--天生自然JAVA面向对象高级编程学习笔记:包装类
public class WrapperDemo01{ public static void main(String args[]){ int x = 30 ; // 基本数据类型 Integer i ...
- 吴裕雄--天生自然JAVA面向对象高级编程学习笔记:Object类
class Demo{ // 定义Demo类,实际上就是继承了Object类 }; public class ObjectDemo01{ public static void main(String ...
- 吴裕雄--天生自然JAVA面向对象高级编程学习笔记:宠物商店实例分析
interface Pet{ // 定义宠物接口 public String getName() ; public String getColor() ; public int getAge() ; ...
- 吴裕雄--天生自然JAVA面向对象高级编程学习笔记:抽象类与接口的应用
abstract class A{ // 定义抽象类A public abstract void print() ; // 定义抽象方法print() }; class B extends A { / ...
- 吴裕雄--天生自然JAVA面向对象高级编程学习笔记:instanceof关键字
class A{ // 定义类A public void fun1(){ // 定义fun1()方法 System.out.println("A --> public void fun ...
- 吴裕雄--天生自然JAVA面向对象高级编程学习笔记:对象的多态性
class A{ // 定义类A public void fun1(){ // 定义fun1()方法 System.out.println("A --> public void fun ...
- 吴裕雄--天生自然JAVA面向对象高级编程学习笔记:接口的基本实现
interface A{ // 定义接口A public static final String AUTHOR = "李兴华" ; // 全局常量 public abstract ...
- 吴裕雄--天生自然JAVA面向对象高级编程学习笔记:final关键字
final class A{ // 使用final定义类,不能有子类 }; class B extends A{ // 错误,不能被继承 }; class A{ public final void p ...
随机推荐
- 攻防世界web新手练习区(2)
弱认证:http://111.198.29.45:43769/ 打开是这个页面: 用户名输入1,密码输入2,试试看.会提示你用户名为admin.接下来用burp对密码进行爆破,发现弱口令0123456 ...
- hdu 1533 Going Home 最小费用最大流 (模板题)
Going Home Time Limit: 10000/5000 MS (Java/Others) Memory Limit: 65536/32768 K (Java/Others)Total ...
- AC自动机 (模板)
AC自动机是用来干什么的: AC自动机是用来解决多模匹配问题,例如有单词s1,s2,s3,s4,s5,s6,问:在文本串ss中有几个单词出现过,类似. AC自动机实现这个功能需要三个部分: 1.将所有 ...
- greenplum 存储过程 输出信息
raise notice 'just a simple output msg';
- NFS PersistentVolume【转】
上一节我们介绍了 PV 和 PVC,本节通过 NFS 实践. 作为准备工作,我们已经在 k8s-master 节点上搭建了一个 NFS 服务器,目录为 /nfsdata: 下面创建一个 PV mypv ...
- 【pwnable.tw】 death_note
题目逻辑比较简单,大概增加和删除和打印三个功能: show函数中,打印各日记内容,由于这题没有给出libc文件,应该不需要泄露地址,估计用处不大: delete函数中,正常的free,然后指针修改为n ...
- jenkins#安装jenkins
1. 访问官网下载地址https://jenkins.io/zh/download/ 2. 选择自己的平台,然后按照文档进行操作: 主要按照文档来,下面是我按照文档按照的一个记录 #访问 https: ...
- 139. Word Break 以及 140.Word Break II
139. Word Break Given a non-empty string s and a dictionary wordDict containing a list of non-empty ...
- python多进程编程中常常能用到的几种方法
python中的多线程其实并不是真正的多线程,如果想要充分地使用多核CPU资源,在python中大部分情况需要使用多进程.python提供了非常好用的多进程包Multiprocessing,只需要定义 ...
- css3的伪(伪类和伪元素)大合集
本文讲css3的伪,不是讲它有多虚伪,而是说它的伪元素样式.不得不说以前虽知html伪元素,但很少用,后得知借助css3伪元素可以发挥极大的便利.故总结css3的伪如下: CSS中存在一些比较特殊的属 ...