
iOS UICollectionView(转二)
UICollectionView的布局是可以自己定义的,在这篇博客中先在上篇博客的基础上进行扩充,我们先使用UICollectionViewFlowLayout,然后好好的介绍一下UICollectionView的一些回调方法,主要包括UICollectionViewDataSource,UICollectionViewDelegateFlowLayout,UICollectionViewDelegate相关回调方法,并通过实例来介绍每个回调的用法。并且给每个Section添加定制的Header和Footer,好废话少说进入今天的正题。
一、Demo总览
下图是本篇博客中Demo的最终运行效果,下面是我们要做的事情:
1. 给每个Section添加自定义的重用Header和Footer
2.调整第一个Section的上左下右的边距(UIEdgeInsets)
3.给UICollectioinView设置多选
4.处理Cell的高亮事件
5.处理Cell的选中事件
6.调整Cell的上下左右边距
7.对Cell进行编辑
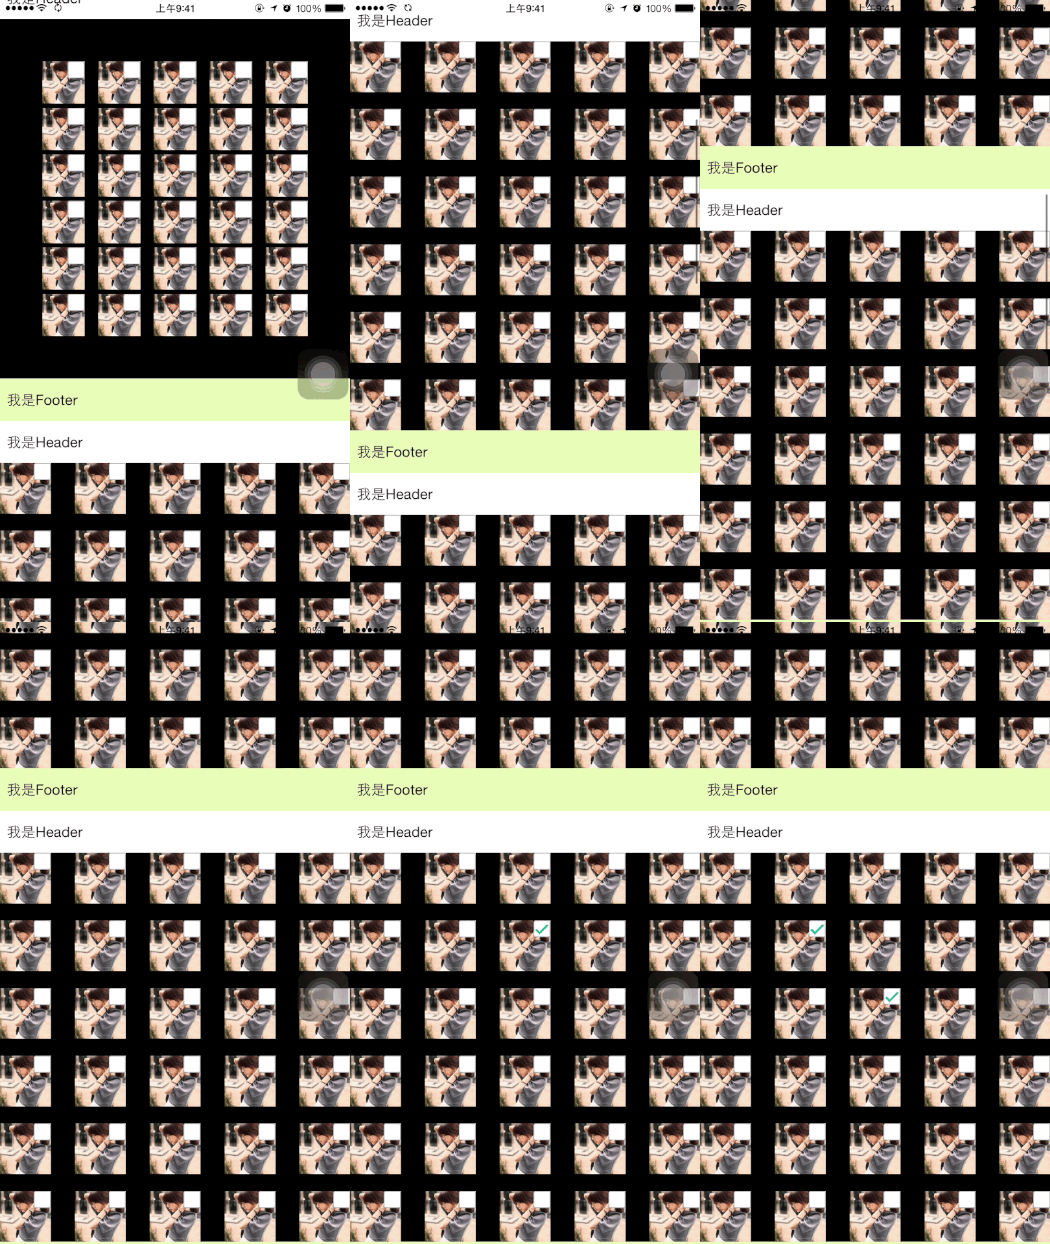
二、UICollectionViewDataSource介绍
1、在UICollectionViewDataSource回调方法中有一个返回Section数量的方法,如下所示,该方法和UITableView中的用法一致。在这儿我们返回5个Section,如下所示:

1 #pragma mark <UICollectionViewDataSource>

2

3 /**

4  * 返回Section的个数

5  */

6 - (NSInteger)numberOfSectionsInCollectionView: (UICollectionView *)collectionView {

7     return 5;

8 }
2、在UICollectionViewDataSource的回调方法中,还有一个是返回每个Section中Cell的数量的方法,在这我们返回30个Cell, 如下代码所示:
1 /**

2  * 返回每个Section中Cell的个数

3  */

4 - (NSInteger)collectionView: (UICollectionView *)collectionView

5      numberOfItemsInSection: (NSInteger)section {

6

7     return 30;

8 }
3、在UICollectionViewDataSource还有一个必须实现的方法, 就是选择我们CollectionView中所使用的Cell, 在这里我们所使用的Cell是在Storyboard上实现的,所以不需要在我们的代码中注册Cell, 之间使用重用标示符就可以获取Cell的对象,如下所示:
 1 /**

 2  * 返回Cell种类

 3  */

 4 - (UICollectionViewCell *)collectionView: (UICollectionView *)collectionView

 5                   cellForItemAtIndexPath: (NSIndexPath *)indexPath {

 6

 7     //通过Cell重用标示符来获取Cell

 8     CollectionViewCell *cell = [collectionView dequeueReusableCellWithReuseIdentifier: reuseIdentifier

 9                                                                          forIndexPath: indexPath];

10

11     return cell;

12 }
4、在UICollectionViewDataSource方法中有一个可选的方法就是为我们的Section添加Supplementary View(追加视图),下面是添Supplementary View(追加视图)的步骤。在UICollectionView中的Section中我们可以为其增加Header View和Footer View, 也就是官方文档上提到的Supplementary View(追加视图)。追加视图是可以重用的,也就是UICollectionReusableView。我们可以创建两个UICollectionReusableView的子类,一个是Header View, 另一个是Footer View。
(1)创建UICollectionReusableView
追加视图可以在Storyboard上添加,然后设置重用标示符,在代码中使用即可。这里我们是从xib文件来加载的Supplementary View, 先创建两个UICollectionReusableView子类,在创建该子类的同时创建相应的xib文件,如下所示:
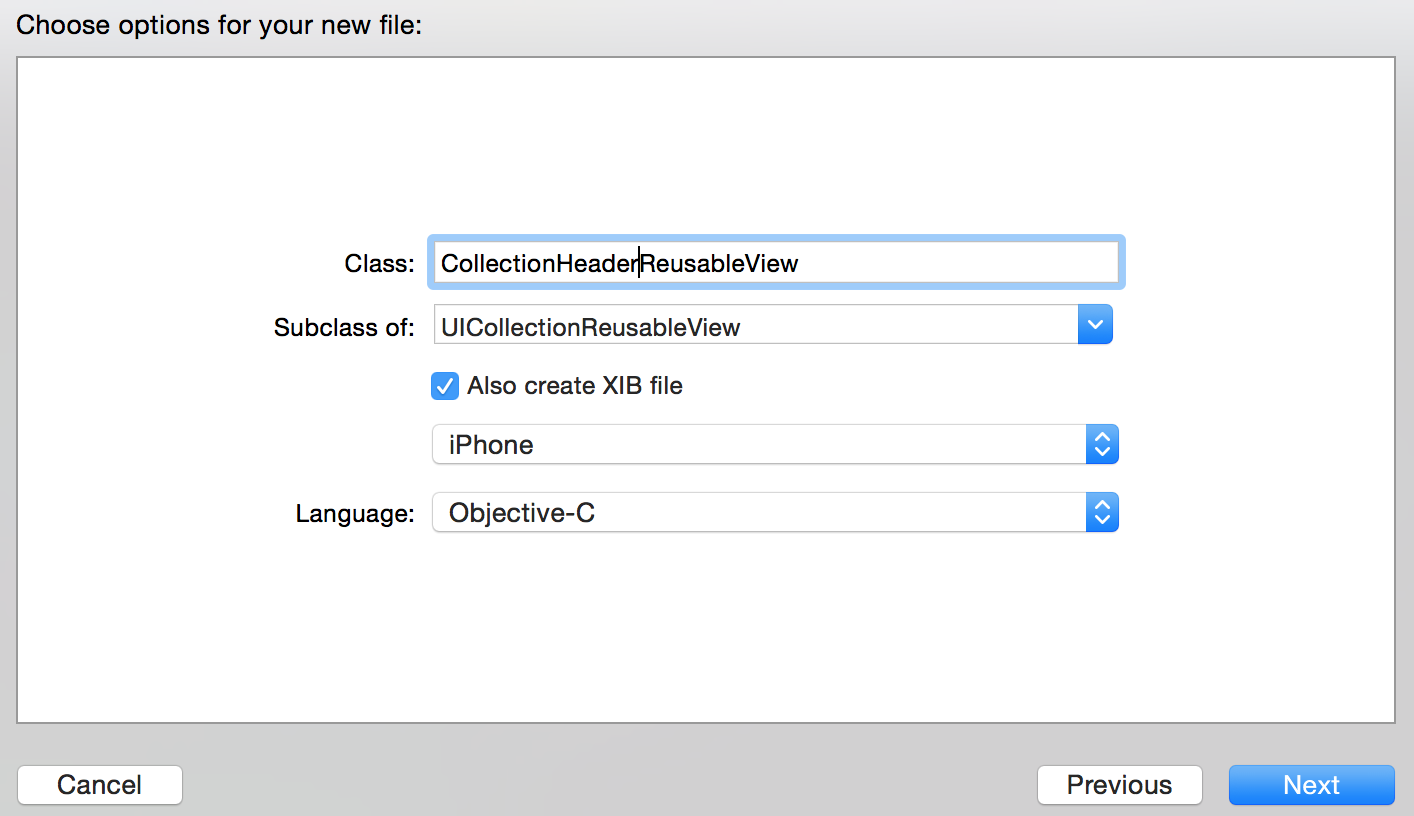
创建Header View和Footer View的UICollectionReusableView,创建后的文件目录如下:
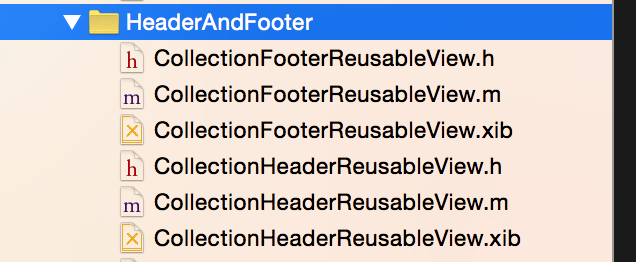
(2) 因为我们是从xib文件中加载的UICollectionReusableView,所以需要在相应的UICollectionView上进行注册。如果你是使用的Storyboard, 只需要在Storyboard中指定重用标示符即可。下面的代码就是在ViewDidLoad中调用注册UICollectionReusableView的方法。
 1 /**

 2  * 注册Header和FooterView

 3  * 便于在UICollectionViewDataSource中使用

 4  */

 5 - (void) registerHeaderAndFooterView {

 6     //注册headerView

 7     //获取含有UICollectionReusableView的Nib文件。

 8     UINib *headerNib = [UINib nibWithNibName: @"CollectionHeaderReusableView"

 9                                       bundle: [NSBundle mainBundle]];

10

11     //注册重用View

12     [self.collectionView registerNib: headerNib

13           forSupplementaryViewOfKind: UICollectionElementKindSectionHeader

14                  withReuseIdentifier: @"CollectionHeaderReusableView"];

15

16

17     //注册FooterView

18     UINib *footerNib = [UINib nibWithNibName: @"CollectionFooterReusableView"

19                                       bundle:[ NSBundle mainBundle]];

20

21     [self.collectionView registerNib: footerNib

22           forSupplementaryViewOfKind: UICollectionElementKindSectionFooter

23                  withReuseIdentifier: @"CollectionFooterReusableView"];

24

25 }
(3)在UICollectionViewDataSource中的设置Supplementary View的方法中通过Header View和Footer View的重用标示符来为我们的Section设置Supplementary View,具体代码如下所示:
 1 /**

 2  * 设置Setion的Header和Footer(Supplementary View)

 3  */

 4 - (UICollectionReusableView *)collectionView: (UICollectionView *)collectionView

 5            viewForSupplementaryElementOfKind: (NSString *)kind

 6                                  atIndexPath: (NSIndexPath *)indexPath{

 7

 8     //设置SectionHeader

 9     if ([kind isEqualToString: UICollectionElementKindSectionHeader]) {

10

11         UICollectionReusableView *view = [collectionView dequeueReusableSupplementaryViewOfKind:UICollectionElementKindSectionHeader withReuseIdentifier:@"CollectionHeaderReusableView" forIndexPath:indexPath];

12

13         return view;

14     }

15

16     //设置SectionFooter

17     UICollectionReusableView *view = [collectionView dequeueReusableSupplementaryViewOfKind:UICollectionElementKindSectionFooter withReuseIdentifier:@"CollectionFooterReusableView" forIndexPath:indexPath];

18     return view;

19

20 }
UICollectionViewDataSource中的四个方法在上面都进行了实现,UICollectionViewDataSource主要是负责加载数据源的,包括Section的个数,每个Section中Cell的个数,每个Section中Supplementary View的种类。
三.UICollectionViewDelegateFlowLayout回调实现
UICollectionViewDelegateFlowLayout主要是负责显示的,比如Secion的大小、边距,Cell的大小边距,headerView的大小已经FooterView的大小,都是在UICollectionViewDelegateFlowLayout的相应协议的方法来实现的。接下来详细的介绍一下UICollectionViewDelegateFlowLayout协议中的方法。
1.同一个Section中同一种Cell(通过同一个Cell重用标示符获取的对象)可以有不同的尺寸,下面的代码是给Cell定制尺寸。代码的具体意思是第一个Section中的所有Cell的尺寸是(50,50)。 其余的时(60,60)。
 1 #pragma mark <UICollectionViewDelegateFlowLayout>

 2 /**

 3  * 改变Cell的尺寸

 4  */

 5 - (CGSize)collectionView: (UICollectionView *)collectionView

 6                   layout: (UICollectionViewLayout*)collectionViewLayout

 7   sizeForItemAtIndexPath: (NSIndexPath *)indexPath{

 8

 9     if (indexPath.section == 0) {

10         return CGSizeMake(50, 50);

11     }

12

13     return CGSizeMake(60, 60);

14 }
2.改变Section的上下左右边距--UIEdgeInsetsMake(上, 左, 下, 右),逆时针旋转。第一个Section的上左下右的边距都是50, 其余的Section上左下右的边距是0。具体实现看如下代码:
 1 /**

 2  * Section的上下左右边距--UIEdgeInsetsMake(上, 左, 下, 右);逆时针

 3  */

 4 - (UIEdgeInsets)collectionView: (UICollectionView *)collectionView

 5                         layout: (UICollectionViewLayout*)collectionViewLayout

 6         insetForSectionAtIndex: (NSInteger)section{

 7

 8     if (section == 0) {

 9         return UIEdgeInsetsMake(50, 50, 50, 50);

10     }

11     return UIEdgeInsetsMake(0, 0, 0, 0);

12 }
3.设置每个Cell的上下边距的回调如下所示,第一个Section的Cell上下边距是5.0f, 其余的为20.0f。
 1 /**

 2  * Section中每个Cell的上下边距

 3  */

 4 - (CGFloat)collectionView: (UICollectionView *)collectionView

 5                    layout: (UICollectionViewLayout*)collectionViewLayout

 6 minimumLineSpacingForSectionAtIndex: (NSInteger)section{

 7     if (section == 0) {

 8         return 5.0f;

 9     }

10     return 20.0f;

11 }
4.设置Cell的左右边距,第一个Section的Cell左右边距是5.0f, 其余的为20.0f。
 1 /**

 2  * Section中每个Cell的左右边距

 3  */

 4 - (CGFloat)collectionView: (UICollectionView *)collectionView

 5                    layout: (UICollectionViewLayout*)collectionViewLayout

 6 minimumInteritemSpacingForSectionAtIndex: (NSInteger)section{

 7     if (section == 0) {

 8         return 5.0f;

 9     }

10     return 20.0f;

11 }
5.设置Header View和Footer View的大小的回调如下。
 1 /**

 2  * headerView的大小

 3  */

 4 - (CGSize)collectionView: (UICollectionView *)collectionView

 5                   layout: (UICollectionViewLayout*)collectionViewLayout

 6 referenceSizeForHeaderInSection: (NSInteger)section{

 7     return CGSizeMake(200, 50);

 8 }

 9

10 /**

11  * footerView的大小

12  */

13 - (CGSize)collectionView: (UICollectionView *)collectionView

14                   layout: (UICollectionViewLayout*)collectionViewLayout

15 referenceSizeForFooterInSection: (NSInteger)section{

16     return CGSizeMake(200, 50);

17 }
上面的方法就是UICollectionViewDelegateFlowLayout中所有的方法了,负责布局显示的。
四、UICollectionViewDelegate回调实现
UICollectionViewDelegate中的代理方法主要是负责Cell的交互的,比如是否高亮,是否选,是否可编辑等,接下来要为大家详细的介绍UICollectionViewDelegate中的代理方法。
1.为了这部分的效果展示,我们需要对Cell添加一些控件,并且设置其Highlight和Selected的一些状态。为Cell添加上ImageView, Cell的高亮状态和非高亮状态对应的ImageView上的图片是不同的。再添加一个Button, 并为Button设置Selected和Default状态下的图片,Button的选中和默认状态由Cell的选中状态来定。Cell中改变ImageView的图片的代码如下所示,函数传入的参数是当前Cell的高亮状态,根据高亮状态来设置ImageView上的Image。(有的小伙伴会问为什么给ImageView在Default状态和Highlight下设置不同的图片,然后直接改变ImageView的高亮状态即可。你可以试一下,达不到预期的效果)
 1 - (void) changeHighLightWithBool: (BOOL) highlight{

 2

 3     NSString *imageName = @"003.jpg";

 4

 5     if (highlight) {

 6         imageName = @"002.jpg";

 7     }

 8

 9     [_highlightImage setImage: [UIImage imageNamed:imageName]];

10 }
2.设置Cell可以高亮, 返回YES代表Cell可以高亮,返回NO代表Cell不可高亮。高亮就是触摸Cell时该Cell变为高亮状态,在代码中的反应就是Cell的Highligth属性变为YES。而触摸结束时,Cell的Highligth属性就变为NO。
 1 #pragma mark <UICollectionViewDelegate>

 2

 3 /**

 4  * Cell是否可以高亮

 5  */

 6 - (BOOL)collectionView: (UICollectionView *)collectionView

 7 shouldHighlightItemAtIndexPath: (NSIndexPath *)indexPath{

 8

 9     return YES;

10

11 }
3.下面这个方法是自己写的,用来在界面上反应Cell的高亮状态。 ImageView在当前Cell高亮状态下和非高亮状态下所加载的图片不同,所以可以看出Cell高亮和非高亮。
 1 /**

 2  * 根据高亮状态修改背景图片

 3  */

 4 - (void) changeHighlightCellWithIndexPaht: (NSIndexPath *) indexPath{

 5     //获取当前变化的Cell

 6     CollectionViewCell *currentHighlightCell = (CollectionViewCell *)[self.collectionView cellForItemAtIndexPath:indexPath];

 7

 8     [currentHighlightCell changeHighLightWithBool:currentHighlightCell.highlighted];

 9

10     if (currentHighlightCell.highlighted == YES){

11

12         NSLog(@"第%ld个Section上第%ld个Cell变为高亮",indexPath.section ,indexPath.row);

13         return;

14     }

15

16     if (currentHighlightCell.highlighted == NO){

17         NSLog(@"第%ld个Section上第%ld个Cell变为非高亮",indexPath.section ,indexPath.row);

18     }

19

20

21 }
4.Cell从非高亮变为高亮状态时回调用下面的方法,为了反映Cell的高亮状态,我们去改变一下Cell上ImageView的图片。
 1 /**

 2  * 如果Cell可以高亮,Cell变为高亮后调用该方法

 3  */

 4 - (void)collectionView: (UICollectionView *)collectionView

 5 didHighlightItemAtIndexPath: (NSIndexPath *)indexPath{

 6

 7     [self changeHighlightCellWithIndexPath:indexPath];

 8 }

 9

10

11 /**

12  * 如果Cell可以高亮,Cell从高亮变为非高亮调用该方法

13  */

14 - (void)collectionView: (UICollectionView *)collectionView

15 didUnhighlightItemAtIndexPath: (NSIndexPath *)indexPath{

16

17     [self changeHighlightCellWithIndexPath:indexPath];

18

19 }
5.设定Cell是否可选的回调如下所示,Cell被选中时该Cell的Selected为YES, 取消选中Selected为NO;
1 /**

2  * Cell是否可以选中

3  */

4 - (BOOL)collectionView:(UICollectionView *)collectionView shouldSelectItemAtIndexPath:(NSIndexPath *)indexPath{

5     return YES;

6 }
6. 如果想让你的Cell支持多选,就需要设定一下CollectionView的allowsMultipleSelection属性,下面的代码是在ViewDidLoad中添加的,如下所示:
1     //设置Cell多选

2     self.collectionView.allowsMultipleSelection = YES;
7.如果在多选状态下需要支持取消Cell的多选,那么就去执行下面的方法,并返回YES。就是支持在多选状态下取消选中状态。
1 /**

2  * Cell多选时是否支持取消功能

3  */

4 - (BOOL)collectionView:(UICollectionView *)collectionView shouldDeselectItemAtIndexPath:(NSIndexPath *)indexPath{

5     return YES;

6 }
8.下面这个方法是自己封装的,用来根据Cell的选中状态来改变Cell上Button的选中状态,具体代码实现如下:
 1 /**

 2  * Cell根据Cell选中状态来改变Cell上Button按钮的状态

 3  */

 4 - (void) changeSelectStateWithIndexPath: (NSIndexPath *) indexPath{

 5     //获取当前变化的Cell

 6     CollectionViewCell *currentSelecteCell = (CollectionViewCell *)[self.collectionView cellForItemAtIndexPath:indexPath];

 7

 8     currentSelecteCell.selectButton.selected = currentSelecteCell.selected;

 9

10     if (currentSelecteCell.selected == YES){

11         NSLog(@"第%ld个Section上第%ld个Cell被选中了",indexPath.section ,indexPath.row);

12         return;

13     }

14

15     if (currentSelecteCell.selected == NO){

16         //NSLog(@"第%ld个Section上第%ld个Cell取消选中",indexPath.section ,indexPath.row);

17     }

18

19 }
9.在Cell选中和取消选中时都会调用上面的方法来改变Button的选中状态,下面是Cell在选中时以及取消选中时所调用的方法:
 1 /**

 2  * Cell选中调用该方法

 3  */

 4 - (void)collectionView: (UICollectionView *)collectionView

 5 didSelectItemAtIndexPath: (NSIndexPath *)indexPath{

 6

 7     [self changeSelectStateWithIndexPath:indexPath];

 8 }

 9

10 /**

11  * Cell取消选中调用该方法

12  */

13 - (void)collectionView: (UICollectionView *)collectionView didDeselectItemAtIndexPath: (NSIndexPath *)indexPath{

14

15     [self changeSelectStateWithIndexPath:indexPath];

16 }
10.下方四个方法是Cell将要出现,Cell出现后,Supplementary View将要出现以及Supplementary View已经出现所调用的方法,具体信息请看下方代码实现:
 1 /**

 2  * Cell将要出现的时候调用该方法

 3  */

 4 - (void)collectionView:(UICollectionView *)collectionView willDisplayCell:(UICollectionViewCell *)cell forItemAtIndexPath:(NSIndexPath *)indexPath NS_AVAILABLE_IOS(8_0){

 5     NSLog(@"第%ld个Section上第%ld个Cell将要出现",indexPath.section ,indexPath.row);

 6 }

 7

 8 /**

 9  * Cell出现后调用该方法

10  */

11 - (void)collectionView:(UICollectionView *)collectionView didEndDisplayingCell:(UICollectionViewCell *)cell forItemAtIndexPath:(NSIndexPath *)indexPath{

12     NSLog(@"第%ld个Section上第%ld个Cell已经出现",indexPath.section ,indexPath.row);

13 }

14

15

16 /**

17  * headerView或者footerView将要出现的时候调用该方法

18  */

19 - (void)collectionView:(UICollectionView *)collectionView willDisplaySupplementaryView:(UICollectionReusableView *)view forElementKind:(NSString *)elementKind atIndexPath:(NSIndexPath *)indexPath NS_AVAILABLE_IOS(8_0){

20

21     NSLog(@"第%ld个Section上第%ld个扩展View将要出现",indexPath.section ,indexPath.row);

22

23 }

24

25 /**

26  * headerView或者footerView出现后调用该方法

27  */

28 - (void)collectionView:(UICollectionView *)collectionView didEndDisplayingSupplementaryView:(UICollectionReusableView *)view forElementOfKind:(NSString *)elementKind atIndexPath:(NSIndexPath *)indexPath{

29

30     NSLog(@"第%ld个Section上第%ld个扩展View已经出现",indexPath.section ,indexPath.row);

31

32 }
在UICollectionViewDelegate回调方法中还有三个回调方法是关于Cell编辑的,比如copy, past, cut等操作,具体代码就不在此赘述了。在Demo中给出了实现方式,主要涉及到UIPasteboard的操作,本篇博客的整体的Demo回分享到Github上,下方是Github上的分享链接,感兴趣的小伙伴可以进行Clone。
Github分享链接:https://github.com/lizelu/CollectionViewControllerDemo
作者:青玉伏案
出处:http://www.cnblogs.com/ludashi/
本文版权归作者和共博客园共有,欢迎转载,但未经作者同意必须保留此段声明,且在文章页面明显位置给出原文连接,否则保留追究法律责任的权利。
如果文中有什么错误,欢迎指出。以免更多的人被误导。
iOS UICollectionView(转二)的更多相关文章
- iOS UICollectionView之二(垂直滚动)
#import <UIKit/UIKit.h> @interface AppDelegate : UIResponder <UIApplicationDelegate> @pr ...
- 微信连WiFi关注公众号流程更新 解决ios微信扫描二维码不关注就能上网的问题
前几天鼓捣了一下微信连WiFi功能,设置还蛮简单的,但ytkah发现如果是ios版微信扫描微信连WiFi生成的二维码不用关注公众号就可以直接上网了,而安卓版需要关注公众号才能上网,这样就少了很多ios ...
- XMPPFrameWork IOS 开发(二)- xcode配置
原始地址:XMPPFrameWork IOS 开发(二) 译文地址: Getting started using XMPPFramework on iOS 介绍 ios上的XMPPFramewor ...
- 【HELLO WAKA】WAKA iOS客户端 之二 架构设计与实现篇
上一篇主要做了MAKA APP的需求分析,功能结构分解,架构分析,API分析,API数据结构分析. 这篇主要讲如何从零做iOS应用架构. 全系列 [HELLO WAKA]WAKA iOS客户端 之一 ...
- iOS runtime探究(二): 从runtime開始深入理解OC消息转发机制
你要知道的runtime都在这里 转载请注明出处 http://blog.csdn.net/u014205968/article/details/67639289 本文主要解说runtime相关知识, ...
- 苹果IOS内购二次验证返回state为21002的坑
项目是三四年前的老项目,之前有IOS内购二次验证的接口,貌似很久都没用了,然而最近IOS的妹子说接口用不了,让我看看啥问题.接口流程时很简单的,就是前端IOS在购买成功之后,接收到receipt后进行 ...
- iOS UICollectionView 长按移动cell
ref:http://www.jianshu.com/p/31d07bf32d62 iOS 9之后: 示例如下 效果 前言: 看完你可以学到哪些呢? 就是文章标题那么多, 只有那么多. . 手残效果图 ...
- iOS UICollectionView(转三)
上篇博客的实例是自带的UICollectionViewDelegateFlowLayout布局基础上来做的Demo, 详情请看<iOS开发之窥探UICollectionViewControlle ...
- iOS UICollectionView(转一) XIB+纯代码创建:cell,头脚视图 cell间距
之前用CollectionViewController只是皮毛,一些iOS从入门到精通的书上也是泛泛而谈.这几天好好的搞了搞苹果的开发文档上CollectionViewController的内容,亲身 ...
随机推荐
- app打包常用操作
1.修改appId android:打开build.gradle文件 找到defaultConfig{applicationId 'ceshi'} 修改测试.android studio会提示. Gr ...
- 基于socket.io打造hybrid调试页面
前言 参考的钉钉调试页面实现,仅供学习! 功能为: PC端编写代码,手机端执行 解决的痛点是: 避免了调试hybrid应用时重复写各种测试页面 源码与示例 源码 https://github.com/ ...
- Android Imageview 图片居左居右,自定义圆角
android:scaleType="fitStart" 图片靠左不变形显示, android:scaleType=”fitEnd” 图片靠右显示,不变形. 半透明andr ...
- 在LwIP 协议栈移植 Snap 7
本文欢迎引用,转载. 引用,转载请标明出处! 调试完毕源码将上传到GitHub 为了嵌入式系统与STEP 7 PLC 通过S7 协议通讯,尝试移植 Snap 7 到STM32F407 cpu 上. 今 ...
- JSP6(JSP 指令与JSP 动作元素)
一.JSP指令用来设置整个JSP页面相关的属性 指令可以有很多个属性,它们以键值对的形式存在,并用逗号隔开. JSP中的三种指令标签: Page指令 Page指令为容器提供当前页面的使用说明.一个JS ...
- Java数据结构和算法(五)——队列
前面一篇博客我们讲解了并不像数组一样完全作为存储数据功能,而是作为构思算法的辅助工具的数据结构——栈,本篇博客我们介绍另外一个这样的工具——队列.栈是后进先出,而队列刚好相反,是先进先出. 1.队列的 ...
- 基于UDP协议的socket编程
UDP协议特点: 1.无连接.服务端与客户端传输数据之前不需要进行连接,且没有超时重发等机制,只是把数据通过网络发送出去.也正是因为此特点,所以基于UDP协议的socket的客户端在启动之前不需要先启 ...
- Hibernate框架进阶(上篇)
导读 前面一片文章介绍了Hibernate框架的入门,主要是讲解Hibernate的环境搭建和简单测试,有兴趣的童鞋出门左转.本文在入门的基础上进行Hibernate的进阶讲解,分为上中下三篇,本篇为 ...
- .NET版支付宝商户会员卡接入
最近公司计划对接支付宝会员卡功能,而任务恰巧由领导安排给我这边,小弟之前也未做过支付宝接口,研究了三天,终于将支付宝会员卡API接口大体上调通了,现将其整理下,以供参考. 蚂蚁金服开发平台-商户会员卡 ...
- Scala入门系列(十):函数式编程之集合操作
1. Scala的集合体系结构 Scala中的集合体系主要包括(结构跟Java相似): Iterable(所有集合trait的根trait) Seq(Range.ArrayBuffer.List等) ...