MyEclipse10.6 安装SVN插件方法及插件下载地址
今天MyEclipse10.6出了点问题,所以重装了它,同一时候也把svn的插件重装了一次,把网上资源和自己的经历顺便在博客这里记录一下。建议直接看方法一好了,简单方便,不必要折腾太多。
下来
方法一:直接解压法
下载地址:http://subclipse.tigris.org/servlets/ProjectDocumentList?folderID=2240
下载SVN插件:site-1.8.22.zip
解压后将其所有文件拷贝至:D:\MyEclipse\MyEclipse 10.6\dropins(MyEclipse的安装文件夹)
重新启动MyEclipse就可以出现SVN!
(补充说明一下,把下载到svn插件里面的文件(含有features等文件)copy到上面举样例的文件夹,重新启动MyEclipse后能在import项目那里看到例如以下类似例如以下图的“SVN”。呵呵,那就恭喜你,你安装插件成功了)
watermark/2/text/aHR0cDovL2Jsb2cuY3Nkbi5uZXQveWFuZ19iZXN0/font/5a6L5L2T/fontsize/400/fill/I0JBQkFCMA==/dissolve/70/gravity/Center" alt="">
方法二:link安装
安装subclipse, MyEclipse9.0 SVN插件
1、从官网下载site-1.6.10.zip文件,网址是:subclipse.tigris.org,
2、从中解压出features与 plugins目录,拷贝到E:\MyEclipse\myPlugin\svn里面,其他的*.xml文件不要。
3、在 E:\MyEclipse\MyEclipse9.0\dropins下新建文件svn.link,内容是:path=E:\\MyEclipse \\myPlugin\\svn保存。
4、(唛呆儿:这一步不确定,先不要删除)删除E:\MyEclipse\MyEclipse8.5\configuration \org.eclipse.update目录
5、重新启动myeclipse就一切正常了。
[/size]
以上两种方法都尝试成功
方法三:在线安装
1.打开HELP->MyEclipse Configuration
Center。切换到SoftWare标签页。
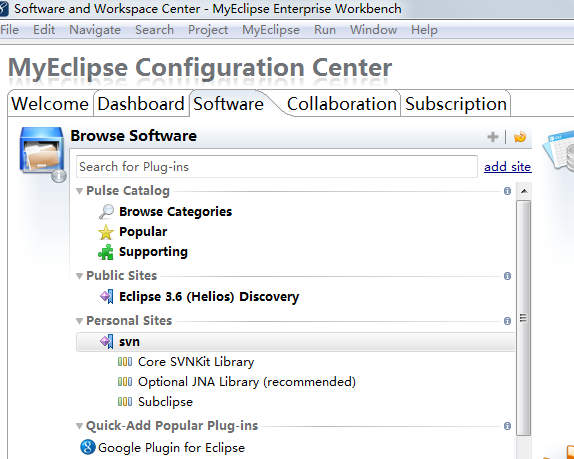
2.点击Add Site 打开对话框。在对话框Name输入Svn。URL中输入:http://subclipse.tigris.org/update_1.6.x
3.在左边栏中找到Personal Site中找到SVN展开。将Core SVNKit Library和Optional JNA
Library加入(右键Add to Profile),Subclipse以下的Subclipse Integration for Mylyn
3.0能够不加入(特别注意,此处不要加入)。
4.在右下角窗格(Pending Changes )中点击Apply。安装重新启动后MyEclipse就可以。
方法四:肯定可行的方法
1、下载最新的SVN包:
http://subclipse.tigris.org/servlets/ProjectDocumentList?folderID=2240
2、在你的磁盘上任何位置创建目录:“myplugins/svn”。名字能够任取。为了方便插件管理。建议名称为“myplugins”。
3、将解压的svn里的两个目录复制到“myplugins/svn”下。
4、复制下列java代码,改动路径并运行:
package app;
import java.io.File;
import java.util.ArrayList;
import java.util.List;
/**
* MyEclipse9 插件配置代码生成器
*
*
*/
public class PluginConfigCreator
{
public PluginConfigCreator()
{
}
public void print(String path)
{
List<String> list = getFileList(path);
if (list == null)
{
return;
}
int length = list.size();
for (int i = 0; i < length; i++)
{
String result = "";
String thePath = getFormatPath(getString(list.get(i)));
File file = new File(thePath);
if (file.isDirectory())
{
String fileName = file.getName();
if (fileName.indexOf("_") < 0)
{
print(thePath);
continue;
}
String[] filenames = fileName.split("_");
String filename1 = filenames[0];
String filename2 = filenames[1];
result = filename1 + "," + filename2 + ",file:/" + path + "/"
+ fileName + "//,4,false";
System.out.println(result);
} else if (file.isFile())
{
String fileName = file.getName();
if (fileName.indexOf("_") < 0)
{
continue;
}
int last = fileName.lastIndexOf("_");// 最后一个下划线的位置
String filename1 = fileName.substring(0, last);
String filename2 = fileName.substring(last + 1, fileName
.length() - 4);
result = filename1 + "," + filename2 + ",file:/" + path + "/"
+ fileName + ",4,false";
System.out.println(result);
}
}
}
public List<String> getFileList(String path)
{
path = getFormatPath(path);
path = path + "/";
File filePath = new File(path);
if (!filePath.isDirectory())
{
return null;
}
String[] filelist = filePath.list();
List<String> filelistFilter = new ArrayList<String>();
for (int i = 0; i < filelist.length; i++)
{
String tempfilename = getFormatPath(path + filelist[i]);
filelistFilter.add(tempfilename);
}
return filelistFilter;
}
public String getString(Object object)
{
if (object == null)
{
return "";
}
return String.valueOf(object);
}
public String getFormatPath(String path)
{
path = path.replaceAll("////", "/");
path = path.replaceAll("//", "/");
return path;
}
public static void main(String[] args)
{
/*你的插件的安装文件夹*/
String plugin = "改成安装文件夹//Genuitec//svn";
new PluginConfigCreator().print(plugin);
}
}
这里须要注意的是改动成为刚才svn所在路径。建议改为绝对路径。
比方d:/myplugins/svn/。
。。
5、 找到“$myeclipse_home/configuration /org.eclipse.equinox.simpleconfigurator/”,打开当中的“bundles.inf”文件,为了防止分不清是不 是我们自己后加的东西,在最后面多回几次车,然后粘贴第4步执行后的代码,保存
6、重新启动myeclipse
亲測方法一多次,屡试成功。祝团队协作开发愉快!
MyEclipse10.6 安装SVN插件方法及插件下载地址的更多相关文章
- LINUX安装SVN+添加自动同步+远程下载最新代码
LINUX安装SVN+添加自动同步+远程下载最新代码---------------------1. 新建一个用户:svnroot ,以下操作非特别说明皆为root用户操作--------------- ...
- MyEclipse 安装SVN插件方法及插件下载地址
直接解压法 下载地址:http://subclipse.tigris.org/servlets/ProjectDocumentList?folderID=2240下载SVN插件:site-1.x.x. ...
- Eclipse 下安装 SVN的方法
http://welcome66.iteye.com/blog/1845176 eclipse里安装SVN插件,一般来说,有两种方式: 直接下载SVN插件,将其解压到eclipse的对应目录里 使用e ...
- 【转】Eclipse插件大全介绍及下载地址
转载地址:http://developer.51cto.com/art/200906/127169.htm 尚未一一验证. eclipse插件大全介绍,以及下载地址 Eclipse及其插件下载网址大全 ...
- Flash Activex NPAPI PPAPI 各种网页插件完整安装包下载地址
内容全部是自己手工原创写作的参考内容,完全排除从其他网站COPY的内容信息.如有雷同实属巧合. 奉献给有需求的人士,也给各位解决FLASH安装头疼的问题,正常在线下载安装运气不好的安装半天.运气好 ...
- Genymotion的安装与使用(附百度云盘下载地址,全套都有,无需注册Genymotion即可使用)
http://blog.csdn.net/scythe666/article/details/70216144 附百度云盘下载地址 :http://pan.baidu.com/s/1jHPG7h8 1 ...
- 安装ORACLE时 各Linux版本下载地址
oracle linux :https://edelivery.oracle.com/osdc/faces/SearchSoftware 需要注册oracle账号 redhat官方下载 https:/ ...
- win10 安装oracle 11gR2_database(内附下载地址)
前言:想要为了后续开展项目做准备,而且打算使用oracle,所以必须先安装oracle.本机 win 10 64位系统. 第一步,下载 oracle 下载地址,官网(需要登录注册): http://d ...
- myeclipse9或myeclipse10安装svn的方法
下载最新的SVN包 site-1.6.5.zip 从中解压出features与plugins文件夹,复制到C:\toBeInstalledSVN 里面,其它的*.xml文件不要 复制下列java代 ...
随机推荐
- MySQL学习总结(二)数据库以及表的基本操作
上一节中详细的介绍了关于MySQL数据库的安装过程,接下来我们就该对数据库以及表进行一些基本的操作了. 1.数据类型 MySQL数据库中提供了整数类型.浮点数类型.定点数类型.日期和时间类型.字符串类 ...
- EMQ --集成搭建
集群方式接受 Erlang/OTP 最初是爱立信为开发电信设备系统设计的编程语言平台,电信设备(路由器.接入网关.…)典型设计是通过背板连接主控板卡与多块业务板卡的分布式系统. Erlang/OTP ...
- c#+mysql 中文乱码
c#+mysql 中文乱码 遇到一个奇怪的问题,C#读取mysql中文正常,写入时发生乱码 网上查阅原因,发现如下信息 ---------------------------------------- ...
- 摘: VS2010 C++ 调用 DLL (C++编写)
一.为什么需要dll 代码复用是提高软件开发效率的重要途径.一般而言,只要某部分代码具有通用性,就可将它构造成相对独立的功能模块并在之后的项目中重复使用. 比较常见的例子是各种应用程序框架,如ATL. ...
- 使用URLConnection下载文件或图片并保存到本地
有时候需要从网络上面下载图片到本地进行保存,代码如下: package com.jointsky.jointframe.test; import java.io.FileOutputStream; i ...
- centos gnome桌面放大
我不知道gnome 为什么要这么做.但是真的有效: gsettings set org.gnome.desktop.interface scaling-factor # 放大2倍
- CentOS-6.5下安装navicat for mysql
一.安装前准备 安装epel源 安装wine 如果不安装wine,则可能会出现安装完navicat for mysql后无法启动的情况. 二.安装epel源 cd /tmp ...
- ubuntu下禁用和恢复触摸板
1.一般禁用选项在 settings > mouse and touchpad 中.(16.04通过实验)如果无法禁用或者希望恢复,向下看. 2.命令行键入: xinput ,插卡touchpa ...
- Xilinx-7Series-FPGA高速收发器使用学习—TX发送端介绍
每一个收发器拥有一个独立的发送端,发送端有PMA(Physical Media Attachment,物理媒介适配层)和PCS(PhysicalCoding Sublayer,物理编码子层)组成,其中 ...
- C# 文件与二进制互转数据库写入读出
//这个方法是浏览文件对象 private void button1_Click(object sender, EventArgs e) { //用户打开文件浏览 using (OpenFileDia ...