三、使用maven创建scala工程(scala和java混一起)
本文先叙述如何配置eclipse中maven+scala的开发环境,之后,叙述如何实现spark的本地运行。最后,成功运行scala编写的spark程序。
刚开始我的eclipse+maven环境是配置好的。
系统:win7
eclipse版本:Luna Release(4.4.0)
maven是从EclipseMarket中安装的,如图1。
当初构建eclipse+maven环境时,仅仅安装了第一个。
这里可以先不用急着安装maven,下面在安装maven for scala时,也提供了maven for eclipse。

图1-eclipse安装的m2e插件
一、配置eclipse + maven + scala环境
1. 在Eclipse Market中安装Scala IDE

图2-eclipse安装Scala IDE
2. 安装m2e-scala
如图3,图中的url是:http://alchim31.free.fr/m2e-scala/update-site/
从图3中搜索到的插件名称中可以看到,这里同时也配置了m2e,也即eclipse需要的maven插件。如果eclipse没有eclipse插件,则可以全部选中安装;若已经有了可以单独安装第三个Maven Integration for Scala IDE。
安装完成了MavenIntegration for Scala IDE之后,再输入上面的url,可安装列表里就没有Maven Integration for Scala IDE这一项了。
(PS:此处我是将MavenIntegration for Scala IDE卸载了之后重新截图的)
(PS:如果再看图1,除了第一个MavenIntegration for Eclipse(Luna and newer)1.5之外,还有一个MavenIntegration for Eclipse(Luna)1.5.0,。这是我在使用上述 url安装m2e-scala时,没有注意其中还包含了MavenIntegration for Eclipse,导致安装了两个版本的Maven Integration for Eclipse)
(PS:虽然我已经安装上述url中的MavenIntegration for Eclipse,并且并没有卸载,而图3中依然显示了Maven Integration for Eclipse的选项,是因为其版本有了更新。可以从其中看到其最新的版本是1.5.1,此时若继续安装该Maven Integration for Eclipse,则是对版本进行更新。)
(PS:图1中还有一个MavenIntegration for Eclipse WTP(Juno)1.0.1暂时不知道是怎么安装上去的)

图3-安装m2e-scala
二、测试eclipse+maven+scala的运行环境
1. 先来简单测试一下eclipse+scala
新建一个名为Scala Project,右键工程添加一个名为test的Scala Object,代码如下:
package test object test { def main(args : Array[String]) { println("hello world") } }
最终如图4、5所示。

图4-新建scalaproject
、

图5-scala工程目录
右键test.scala,Run as…-> Scala Application,在终端成功输出了hello world。
从图5中可以看到,我们安装的ScalaIDE中自带的scala版本是2.11.5的。
(PS:如果不在终端以命令行的形式使用scala的话,似乎可以不用单独下载scala包并设置环境变量)
2. 再来测试一下ecliipse+scala+maven
本来新建一个scala+maven的流程可以是这样的,如图6所示。
新建maven工程,不勾选Createa simple project,选择与scala有关的archetype。
eclipse的archetype是一种模板,给人的感觉就是其中的目录架构及相关文件(比如说pom.xml)都是按照某种模式(如scala maven)构造好的。如果选择如图6中的1.2版本的scala相关archetype,则新建的maven工程就有了scala maven工程的目录结构,pom.xml也是配置好的,并且还有几个scala的代码文件。
但是,有一些错误,编译无法通过。我想,这主要是因为scala的版本问题,从工程中的pom.xml中可以看到,这个模板是基于scala 2.7.0构建的。而我们安装的scala IDE是基于scala 2.11.5。

图6-新建scala maven工程
scala的新版本对老版本的兼容似乎并不好。这里可以自己修正pom.xml文件,不过估计代码可能也要修改。
我这里是从git上下载了一个现成的基于scala2.11.5的maven工程。
git网址:https://github.com/scala/scala-module-dependency-sample
使用git clone下来之后,在eclipse中导入maven工程(maven-sample)。
从其pom.xml中可以看到,是基于scala-2.11.5的。其中只有一个代码文件,即是XMLHelloWorld.scala。只要能够顺利的拉取到pom.xml中的依赖包,就可以直接右键XMLHelloWorld.scala, Run as -> Scala Application。
至此,ecipse+scala+maven就搭建好了。接下来配置spark的本地运行环境。
三、配置spark的本地运行
1. 配置所需依赖包
这里我是在maven-sample工程的基础上配置spark的。
在pom.xml中添加spark-core。
<dependency>

<groupId>org.Apache.spark</groupId>

<artifactId>spark-core_2.11</artifactId>     <version>1.2.1</version>

</dependency>
在default package中添加scala object – SimpleApp。代码如下:
/* SimpleApp.scala */

import org.apache.spark.SparkContext

import org.apache.spark.SparkContext._

import org.apache.spark.SparkConf

object SimpleApp {

def main(args: Array[String]) {

val logFile = "test.txt"

// Should be some file on your system

val conf = new SparkConf().setAppName("Simple Application").setMaster("local[2]")

val sc = new SparkContext(conf)

val logData = sc.textFile(logFile, 2).cache()

val numAs = logData.filter(line => line.contains("a")).count()

val numBs = logData.filter(line => line.contains("b")).count()
println("Lines with a: %s, Lines with b: %s".format(numAs, numBs))   }

}
此时,编译已经通过了,但是如果Run as–> Scala Application的话,会有ClassDefNotFound的异常。
这是因为spark-core其实需要依赖很多其他的jar包来运行,但这些包在spark-core包中并没有,并且在我们的classpath中也没有。
我们可以方便的从在线maven库里找到spark-core包。
-------------------------------------------------------------------------------------------------------------------------------
项目需求:我们采用spark开发项目,使用的开发语言采用java和scala的混合,这个时候我们的项目需要支持java和scala,一般方法两种
(1)通过IDEA开发工具,下载SBT安装包,通过SBT创建项目,自动支持java和scala比较方便,但包的下载很慢
(2)项目我们使用IDEA开发工具,通过maven来完成java和scala混合项目
下面我们专门介绍如何通过maven来支持Java和Scala语言的项目,主要涉及的内容如下
1、执行创建语句(命令行模式下执行)
mvn archetype:generate -DarchetypeGroupId=org.scala-tools.archetypes -DarchetypeArtifactId=scala-archetype-simple -DremoteRepositories=http://scala-tools.org/repo-releases
执行过程中需要让您输入以下参数,根据步骤输入即可
Define value for property 'groupId': :
Define value for property 'artifactId': :
Define value for property 'version': 1.0-SNAPSHOT: :
Define value for property 'package': : :
输入完成后,通过回车结束,然后就可以创建成功了(紧scala项目)
2、项目结构
说明:
bigdata-user-profile 父目录(在pom.xml 中,通过model方式引入)
userprofile-db 子工程
userprofile-es 子工程

3、手动方式添加java目录(两个项目)

4、介绍一下3个工程pom.xml 配置
4.1 bigdata-user-profile 的pom.xml配置
<?xml version="1.0" encoding="UTF-8"?>

<project xmlns="http://maven.apache.org/POM/4.0.0" xmlns:xsi="http://www.w3.org/2001/XMLSchema-instance" xsi:schemaLocation="http://maven.apache.org/POM/4.0.0 http://maven.apache.org/maven-v4_0_0.xsd">

    <modelVersion>4.0.0</modelVersion>

    <groupId>com.demo.userprofile</groupId>

    <artifactId>bigdata-user-profile</artifactId>

    <packaging>pom</packaging>

    <version>1.0-SNAPSHOT</version>

    <modules>

        <module>userprofile-db</module>

    <module>userprofile-es</module>

    </modules>

    <properties>

        <encoding>UTF-8</encoding>

        <scala.version>2.10.5</scala.version>

    </properties>

    <dependencies>

        <dependency>

            <groupId>org.apache.spark</groupId>

            <artifactId>spark-core_2.10</artifactId>

            <version>1.6.0</version>

        </dependency>

        <dependency>

            <groupId>org.apache.spark</groupId>

            <artifactId>spark-sql_2.10</artifactId>

            <version>1.6.0</version>

        </dependency>

        <dependency>

            <groupId>org.scala-lang</groupId>

            <artifactId>scala-library</artifactId>

            <version>${scala.version}</version>

            <scope>compile</scope>

        </dependency>

        <dependency>

            <groupId>org.scala-lang</groupId>

            <artifactId>scala-compiler</artifactId>

            <version>${scala.version}</version>

            <scope>compile</scope>

        </dependency>

        <dependency>

            <groupId>junit</groupId>

            <artifactId>junit</artifactId>

            <version>4.8.1</version>

            <scope>test</scope>

        </dependency>

    </dependencies>

    <build>

        <pluginManagement>

            <plugins>

                <plugin>

                    <groupId>net.alchim31.maven</groupId>

                    <artifactId>scala-maven-plugin</artifactId>

                    <version>3.2.1</version>

                </plugin>

                <plugin>

                    <groupId>org.apache.maven.plugins</groupId>

                    <artifactId>maven-compiler-plugin</artifactId>

                    <version>2.0.2</version>

                </plugin>

            </plugins>

        </pluginManagement>

        <plugins>

            <plugin>

                <groupId>net.alchim31.maven</groupId>

                <artifactId>scala-maven-plugin</artifactId>

                <executions>

                    <execution>

                        <id>scala-compile-first</id>

                        <phase>process-resources</phase>

                        <goals>

                            <goal>add-source</goal>

                            <goal>compile</goal>

                        </goals>

                    </execution>

                    <execution>

                        <id>scala-test-compile</id>

                        <phase>process-test-resources</phase>

                        <goals>

                            <goal>testCompile</goal>

                        </goals>

                    </execution>

                </executions>

            </plugin>

            <plugin>

                <groupId>org.apache.maven.plugins</groupId>

                <artifactId>maven-compiler-plugin</artifactId>

                <executions>

                    <execution>

                        <phase>compile</phase>

                        <goals>

                            <goal>compile</goal>

                        </goals>

                    </execution>

                </executions>

            </plugin>

            <plugin>

                <groupId>org.apache.maven.plugins</groupId>

                <artifactId>maven-shade-plugin</artifactId>

                <version>1.4</version>

                <executions>

                    <execution>

                        <phase>package</phase>

                        <goals>

                            <goal>shade</goal>

                        </goals>

                        <configuration>

                            <filters>

                                <filter>

                                    <artifact>*:*</artifact>

                                    <excludes>

                                        <exclude>META-INF/*.SF</exclude>

                                        <exclude>META-INF/*.DSA</exclude>

                                        <exclude>META-INF/*.RSA</exclude>

                                    </excludes>

                                </filter>

                            </filters>

                        </configuration>

                    </execution>

                </executions>

            </plugin>

        </plugins>

    </build>

</project>
4.2 user-profile-db 的pom.xml配置(user-profile-es 中pom.xml 同user-profile-db,不在介绍)
<project xmlns="http://maven.apache.org/POM/4.0.0" xmlns:xsi="http://www.w3.org/2001/XMLSchema-instance"

         xsi:schemaLocation="http://maven.apache.org/POM/4.0.0 http://maven.apache.org/maven-v4_0_0.xsd">

    <parent>

        <groupId>com.demo.userprofile</groupId>

        <artifactId>bigdata-user-profile</artifactId>

        <version>1.0-SNAPSHOT</version>

    </parent>

    <modelVersion>4.0.0</modelVersion>

    <groupId>com.demo.userprofile</groupId>

    <artifactId>userprofile-db</artifactId>

    <version>1.0-SNAPSHOT</version>

    <name>${project.artifactId}</name>

    <dependencies>

        <dependency>

            <groupId>org.mongodb</groupId>

            <artifactId>bson</artifactId>

            <version>3.0.4</version>

        </dependency>

        <dependency>

            <groupId>org.mongodb</groupId>

            <artifactId>mongo-java-driver</artifactId>

            <version>3.0.4</version>

        </dependency>

        <dependency>

            <groupId>org.json</groupId>

            <artifactId>json</artifactId>

            <version>20141113</version>

        </dependency>

        <dependency>

            <groupId>com.google.code.gson</groupId>

            <artifactId>gson</artifactId>

            <version>2.3</version>

        </dependency>

    </dependencies>

</project>
5、编写测试代码
分别在java和scala目录下创建测试代码,主要测试打包是否完整,具体结构如图所示

6、执行maven的命令
mvn clean compile package
直到出现下面的命令表示成功
[INFO] Replacing D:\demo\user_profiles\bigdata-user-profile\userprofile-es\target\userprofile-es-1.0-SNAPSHOT.jar with D:\demo\user_profiles\bigdata-user-p

rofile\userprofile-es\target\userprofile-es-1.0-SNAPSHOT-shaded.jar

[INFO] ------------------------------------------------------------------------

[INFO] Reactor Summary:

[INFO]

[INFO] bigdata-user-profile ............................... SUCCESS [ 33.012 s]

[INFO] userprofile-db ..................................... SUCCESS [ 33.083 s]

[INFO] userprofile-es ..................................... SUCCESS [ 31.985 s]

[INFO] ------------------------------------------------------------------------

[INFO] BUILD SUCCESS

[INFO] ------------------------------------------------------------------------

[INFO] Total time: 01:38 min

[INFO] Finished at: 2016-09-26T11:34:38+08:00

[INFO] Final Memory: 84M/857M

[INFO] ------------------------------------------------------------------------
7、通过编译工具查看是否把java和scala代码打包成功
实际测试工程中已经ok

到这里我们使用maven创建scala和java混合项目就成功了,以后再开发Spark项目时候,就可以使用这种方式替代sbt方式了
------------------------------------------------------------------------------------------------------------------------
上面的“MavenIntegration for Scala IDE”我没有下载成功,直接使用maven命令行创建scala工程如下命令:
1、安装maven及配置环境变量
2、要装Scala IDE即eclipse中的插件。
3、跳过m2e-scala这个插件 http://alchim31.free.fr/m2e-scala/update-site/
4、cd到要创建项目的目录,再输入如下命令创建:
mvn archetype:generate -DarchetypeGroupId=net.alchim31.maven
-DarchetypeArtifactId=scala-archetype-simple
-DremoteRepositories=http://scala-tools.org/repo-releases
-DgroupId=com.sf
-DartifactId=scalademo3
-Dversion=1.0-SNAPSHOT
创建成功后,导入到eclipse中结果如下:
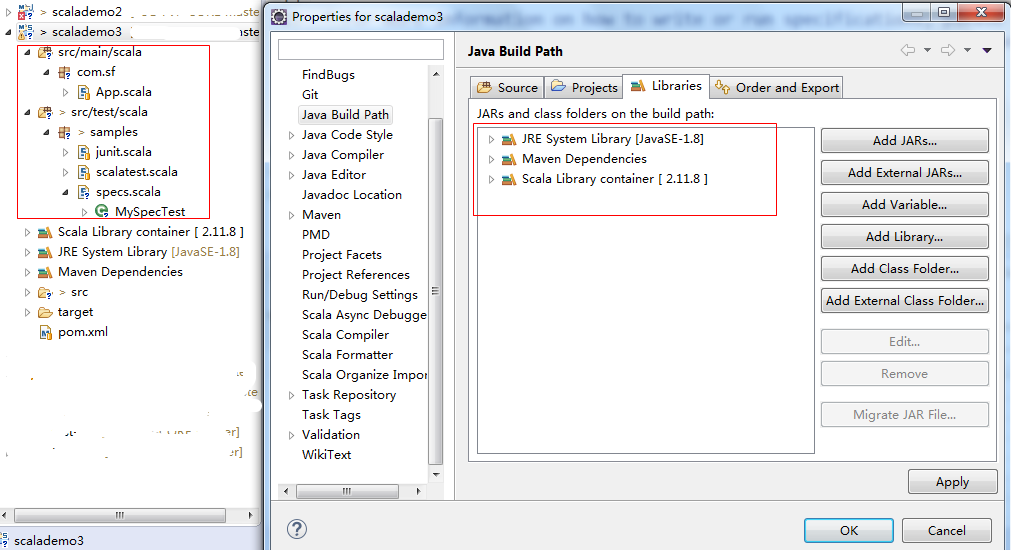
在src的scala下,创建一个scala object
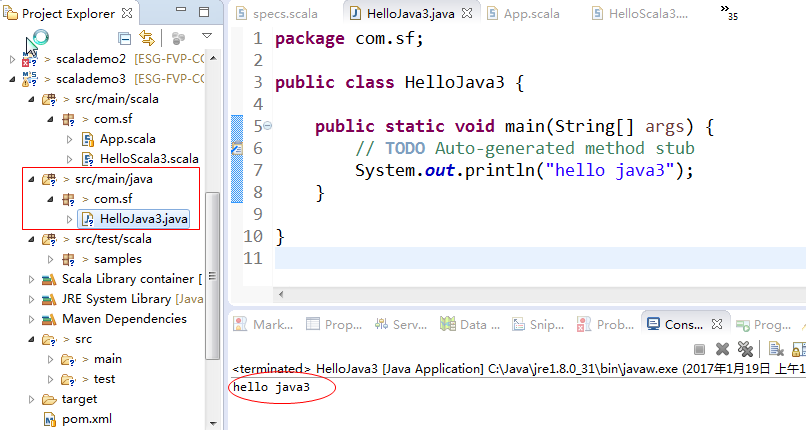
在src下创建一个"java"的package,在下面创建一个java class
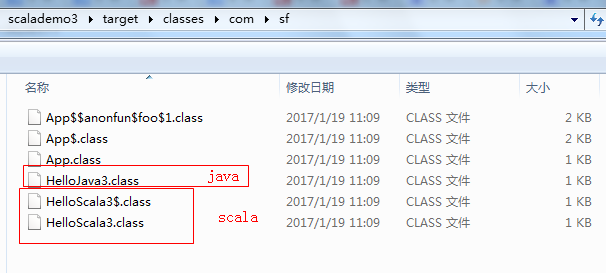
在target目录下生产的文件如下:
三、使用maven创建scala工程(scala和java混一起)的更多相关文章
- maven创建web工程Spring配置文件找不到问题解决方案
使用maven创建web工程,将Spring配置文件applicationContext.xml放在src/resource下,用eclipse编译时提示class path resource [ap ...
- 设置通过Maven创建的工程的JDK版本—一劳永逸
设置通过Maven创建的工程的JDK版本—一劳永逸 [1]打开settings.xml文件 [2]找到profiles标签 [3]加入一下配置 <profile> <id> ...
- maven创建web工程Spring配置文件找不到
使用maven创建web工程,将Spring配置文件applicationContext.xml放在src/resource下,用eclipse编译时提示class path resource [ap ...
- 在Eclipse中使用Maven创建Web工程
在Eclipse中使用Maven创建Web工程 1.创建maven Project工程,使用maven-archetype-webapp 2.在pom.xml文件中,设置打包类型为war <pa ...
- 设置通过Maven创建的工程的JDK的版本,更改conf/settings.xml
eclipse提示警告如下: Build path specifies execution environment J2SE-1.5. There are no JREs installed in t ...
- 初次使用maven创建web工程发现只有一个idea目录,src,webapp目录都不见了,解决方案
修bug系列2之 初次使用maven创建web项目的src目录不知所踪 窗外下着下雨,屋内的我学着maven,本以为轻轻松松,没想到还是遇到了bug.好了不说了,来看看我是怎么解决的. 在初次使用ma ...
- maven创建web工程,并导入到eclipse中
maven版本:3.1.0,eclipse版本:4.3 JDK:1.7 创建工程名是sa的maven工程 mvn archetype:create -DgroupId=com.bing-Dartifa ...
- Maven创建父子工程(简单、完整)
Eclipse创建Maven父子工程(书中有的叫聚合工程,因为看了网上很多教程,实际操作总会有这样那样的小问题,有时候包结构还不对,创建成功后索性就自己写一篇帮助小白,有不对请指教) 1 file-n ...
- 用maven创建web工程
1.打开eclipse,选择File->New->Other菜单,弹出下面的对话框,在Wizards中输入maven,会过滤出和maven相关的菜单,选中Maven Project菜单,然 ...
- SpringCloud Alibaba+New搭建企业级开发框架(三):创建New工程
1.创建父工程:File > New > Project...,选择Maven,Create from archetype不要勾选,点击Next进入下一步,填写工程信息. image. ...
随机推荐
- 如何判断移动终端访问还是PC访问?
我们经常需要知道访问网站的设备是移动终端还是PAD还是PC,下面给出判断的java代码供参考.实现的原理就是获取HTTP消息头里User-Agent和x-wap-profile,User-下面是Use ...
- 数组中去除重复的对象的简单方法and&&的使用
const arr = [ { name:'tom', age:15 }, { name:'rose', age:17 }, { name:'tom', age:11 }, { name:'rose' ...
- python 局部local和全局global变量
global和local变量 虽然简单,但是还是记录一下,主要是转载 转载自:http://blog.sina.com.cn/s/blog_436992740102ux8z.html 先看一段代码 ...
- windows中检查端口占用
在cmd中怎么输入netstat -aon|findstr "9080" 返回: UDP 0.0.0.0:8001 *.* 其中的4220为进城PID
- curl使用说明
默认curl使用get请求,可以使用-d方式指定使用post方式传递数据 https://www.cnblogs.com/gbyukg/p/3326825.html
- flex 特性
flex grow 分配的比例是对整体,比如 A grow 3 B grow 4,A连同margin一块是3
- leetcode 901. Online Stock Span
Write a class StockSpanner which collects daily price quotes for some stock, and returns the span of ...
- 中美贸易战再次开启,世界两极化进程正在加快形成!..... Copyright: 1688澳洲新闻网 Read more at: https://www.1688.com.au/world/international/2018/06/17/369368/
中美贸易战再次开启,世界两极化进程正在加快形成! https://www.1688.com.au/world/international/2018/06/17/369368/
- html转义字符及css清除
1. [代码][Java]代码 import java.util.HashMap;import java.util.Map; import org.apache.commons.lang3. ...
- BZOJ 1597 [Usaco2008 Mar]土地购买:斜率优化dp
题目链接:http://www.lydsy.com/JudgeOnline/problem.php?id=1597 题意: 有n块矩形土地,长为a[i],宽为b[i]. FJ想要将这n块土地全部买下来 ...