Building Web Apps with SignalR, Part 1
Building Web Apps with SignalR, Part 1
In the first installment of app-building with SignalR, learn how to build a real-time chat application.
- By Eric Vogel
- 01/22/2013
Are you sick of that dreaded page refresh? Want to turn your Web application up to 11? If you've answered yes to either question, SignalR is for you. With SignalR, you can provide content to your users in real-time, all from ASP.NET. Most importantly, it's compatible with browsers ranging all the way back to IE6! SignalR uses WebSockets on supported browsers and will fall back to server-side events, Forever Frame, or AJAX long polling if needed. This means you can use a single library and not have to worry about that minutia.
There are two approaches you can use with SignalR to achieve real-time communications: a persistent connection or a hub. The persistent connection API allows you to keep open a persistent connection between the client and server to send and receive data. The hub API is an abstraction above the persistent connection API, and is suitable for remote procedure calls (RPC).
This article will focus on the persistent connection API. I believe the best way to learn a new technology is to build something useful with it, so we'll create a chat client using SignalR. To get started, create a new C# ASP.NET MVC 4 project from Visual Studio 2012, then select the Web API option for your project type. Next, install the Microsft SignalR pre-release NuGet package through the NuGet Package Manager (Figure 1).
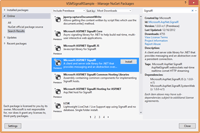 [Click on image for larger view.] |
| Figure 1. Installing the SignalR pre-release NuGet package. |
In order to support IE 6 and 7, install the JSON-js-json2 NuGet Package as well, as shown inFigure 2.
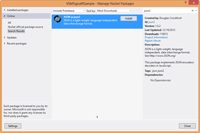 [Click on image for larger view.] |
| Figure 2. JSON2 NuGet package installation. |
Without further ado, let's get started on this app. First create a new folder in the project named Chat. Then create a new class named ChatConnection within the Chat directory that inherits from PersistentConnection. You'll need to add a using statement for the Microsoft.AspNet.SignalR namespace.
Now open up the RouteConfig class under the App_Start folder in the project. Add a using statement for the Microsoft.Asp.Net.Signal namespace to the RouteConfig class:
using Microsoft.AspNet.SignalR;
Next, register the ChatConnection class to the "chat" route in the RegisterRoutes method in the RouteConfig class:
RouteTable.Routes.MapConnection<ChatConnection>("chat","chat/{*operation}");
Your completed RouteConfig class should resemble Listing 1.
Now to create the ChatData data structure that will be used to interchange data between the client and the server. Create a new class named ChatData with Message and Name string data type properties:
namespace VSMSignalRSample.Chat

{

    public class ChatData

    {

        public string Name { get; set; }

        public string Message { get; set; }

        public ChatData()

        {

        }

        public ChatData(string name, string message)

        {

            Name = name;

            Message = message;

        }

    }

}
Now it's time to finish implementing the ChatConnection class, which will receive and broadcast chat messages. Add using statements for the System.Threading.Tasks and Newtonsoft.Json namespaces. Next, add a private Dictionary<string, string> to store the clients that connect to the chat room:
private Dictionary<string, string> _clients = new Dictionary<string, string>();
The PersistentConnection base class includes functionality for dealing asynchronously with a few critical server-side events such as a new connection, disconnection, reconnection and data retrieval. Let's implement the OnConnectedAsync event handler first. When a new user first joins the room, they're added to the _clients Dictionary object, which will be used to map the user's chosen chat name with their connectionId. Then a broadcast message is sent to all users, letting them know a new user has joined the chat room:
protected override Task OnConnectedAsync(IRequest request, string connectionId)

{

    _clients.Add(connectionId, string.Empty);

    ChatData chatData = new ChatData("Server", "A new user has joined the room.");

    return Connection.Broadcast(chatData);

}
Now it's time to tackle data retrieval from a connected client through the OnReceivedAsync event handler. First, the JSON data object from the client is desterilized into a ChatData object through JSON.NET. Then the user's name is stored in the _clients dictionary. Finally, the user's ChatData is broadcast to all users:
protected override Task OnReceivedAsync(IRequest request, string connectionId, string data)

{

    ChatData chatData = JsonConvert.DeserializeObject<ChatData>(data);

    _clients[connectionId] = chatData.Name;

    return Connection.Broadcast(chatData);

}
The last event to handle is client disconnection, via the OnDisconnectedAsync method. When a user disconnects, he or she is removed from the _clients dictionary. Then a message is broadcast to all users, letting them know a user has left the room:
protected override Task OnDisconnectAsync(IRequest request, string connectionId)

{

    string name = _clients[connectionId];

    ChatData chatData = new ChatData("Server", string.Format("{0} has left the room.", name));

    _clients.Remove(connectionId);

    return Connection.Broadcast(chatData);

}
Now it's time to create the client-side JavaScript that will communicate with the persistent chat connection to display incoming chat messages and chat room events to the user. Create a new JavaScript file named ChatR.js within the Scripts folder. The first step is to retrieve the server chat connection object through the SignalR JavaScript plug-in:
var myConnection = $.connection("/chat");
Next, the received event is set up to display a received chat message as a new list item element in the messages unordered list DOM element:
myConnection.received(function (data) {

        $("#messages").append("<li>" + data.Name + ': ' + data.Message + "</li>");

    });
After that, the error handler for the connection is set up to display a console warning. This is mainly to ease debugging of the chat connection:
myConnection.error(function (error) {

        console.warn(error);

    });
Lastly, a connection is initiated to the chat server and a continuation is set up to handle the message send button-click event. Within the button-click event handler, the user's name and message are retrieved from the name and message text boxes, respectively. Then the user's name and message are sent to the chat server as a JSON object, as shown in Listing 2.
Now it's time to set up the UI for the Web application. Add a new MVC View class to the Home directory, named ChatR, that binds to the Chat.ChatData model. In the bottom of the view add a script reference to the ~/Sciprts/ChatR.js script created earlier:
@{

    ViewBag.Title = "Chat";

}

<h2>Chat</h2>

@using (Html.BeginForm()) {

    @Html.EditorForModel();

<input id="send" value="send" type="button" />

<ul id="messages" style="list-style:none;"></ul>

}

@section Scripts { <script src="~/Scripts/ChatR.js"></script> }
Now, add a controller action method named ChatR to the HomeController that returns a new view bound to an empty Chat.ChatData object:
public ActionResult ChatR()

 {

     var vm = new Chat.ChatData();

     return View(vm);

 }
That's it: sit back, relax and invite a few friends to try out your new chat app, shown in Figure 3.
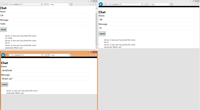 [Click on image for larger view.] |
| Figure 3. The completed real-time chat application. |
As you can, see SignalR is quite easy to work with and the PersistentConnection API is very flexible. With SignalR, you can tackle a plethora of real-time Web app use cases from business to gaming. Stay tuned for the next installment, which covers how to use the SignalR Hub API to create a dynamic form.
About the Author
Eric Vogel is a Sr. Software Developer at Kunz, Leigh, & Associates in Okemos, MI. He is the president of the Greater Lansing User Group for .NET. Eric enjoys learning about software architecture and craftsmanship, and is always looking for ways to create more robust and testable applications. Contact him at vogelvision@gmail.com.
Building Web Apps with SignalR, Part 1的更多相关文章
- Building Modern Web Apps-构建现代的 Web 应用程序
Building Modern Web Apps-构建现代的 Web 应用程序 视频长度:1 小时左右 视频作者:Scott Hunter 和 Scott Hanselman 视频背景:Visual ...
- Isomorphic JavaScript: The Future of Web Apps
Isomorphic JavaScript: The Future of Web Apps At Airbnb, we’ve learned a lot over the past few years ...
- Why mobile web apps are slow
http://sealedabstract.com/rants/why-mobile-web-apps-are-slow/ I’ve had an unusual number of interest ...
- Isomorphic JavaScript: The Future of Web Apps(译)
Isomorp ...
- appium(4)-Automating mobile web apps
Automating mobile web apps If you’re interested in automating your web app in Mobile Safari on iOS o ...
- 在线文档预览方案-office web apps续篇
上一篇在线文档预览方案-office web apps发布后收到很多网友的留言提问,所以准备再写一篇,一来介绍一下域控服务器安装,总结一下大家问的多的问题,二来宣传预览服务安装与技术支持的事情. 阅读 ...
- 安装部署完office web apps 后,无法浏览Word
安装部署完office web apps 后,在sharepoint 2010浏览器中浏览Word提示:“由于出现意外错误,Word Web App 无法打开此 文档 进行查看. 要查看此 文档,请在 ...
- 在线文档预览方案-office web apps
最近在做项目时,要在手机端实现在线文档预览的功能.于是百度了一下实现方案,大致是将文档转换成pdf,然后在通过插件实现预览.这些方案没有具体实现代码,也没有在线预览的地址,再加上项目时间紧迫.只能考虑 ...
- 免费电子书:Azure Web Apps开发者入门
(此文章同时发表在本人微信公众号"dotNET每日精华文章",欢迎右边二维码来关注.) 题记:之前介绍过微软正在逐步出版一个名为Azure Essential的入门系列教程,最近刚 ...
随机推荐
- motan源码分析三:与spring框架的结合
在本文第一章,分析的demo中使用了代码加载的方式加载了相关的类,但在我们的实际工作中,使用spring来加载相关的类的情况会更多,本文将分析一下motan是如何与spring一起协同工作的,主要的原 ...
- 关于虚拟继承类的大小问题探索,VC++ 和 G++ 结果是有区别的
昨天笔试遇到个 关于类占用的空间大小的问题,以前没怎么重视,回来做个试验,还真发现了问题,以后各位笔试考官门,出题时请注明是用什么编译器. vc6/vc8 cl 和 Dev-C 的g++ 来做的测试: ...
- 从sockaddr中取得Ip地址和端口号
在socket编程中,服务器端accept()等待一个客户端的连接,当连接成功后,accept拷贝客户端的地址信息到sin_addr里面,我们如何从sin_addr取得此客户端的Ip地址和端口号呢? ...
- Java 编程的动态性,第3部分: 应用反射--转载
在 上个月的文章中,我介绍了Java Reflection API,并简要地讲述了它的一些基本功能.我还仔细研究了反射的性能,并且在文章的最后给出了一些指导方针,告诉读者在一个应用程序中何时应该使用反 ...
- Linux下multipath多路径配置
一.什么是多路径 普通的电脑主机都是一个硬盘挂接到一个总线上,这里是一对一的关系.而到了有光纤组成的SAN环境,或者由iSCSI组成的IPSAN环境,由于主机和存 储通过了光纤交换机或者多块网卡及IP ...
- PHP博客小项目之知识点(1)
一.博客系统介绍 Blog.Bloger.web log(网络日志) 博客主要发布一些文章.图片:博客一般都是个人博客: 博客的文章,一般都是按照时间倒序排列: 博客,仅音译,英文名为Blogger, ...
- java07循环结构
public class WhileTest { // while循环结构 public static void main(String[] args) { System.out.println(&q ...
- Page_Load基类,重写OnLoad
protected override void OnLoad(EventArgs e) { userid = PublicFun.GetSessionValue(HttpContext.Current ...
- clang: error: unable to execute command: Segmentation fault: 11
我在Archive的时候出现了上面这个错误, 解决方法很简单: After huge trying I have disabled the Bitcode in Project's Target-&g ...
- String的format方法
摘自:http://xiongzhenhui.iteye.com/blog/940416 http://blueram.iteye.com/blog/441683 一.常规类型.字符类型和数值类型的格 ...