嗯,我消失好几天了。那么,我都在做什么呢?没错,就是写这篇文章了。这篇文章写起来着实有些费神了。于是,如果你觉得这篇文章对你有帮助,不妨扫描文末的二维码,适量赞助一下哦~!

tcolorbox 宏包是 Thomas F. Sturm 开发的一个用于绘制彩色文本框的宏包。tcolorbox 底层基于 pgf,功能也是十分强大。

一个月前,有群友在群里问到如何制作下面这样的蓝色边框,于是这里借着实现这一边框的时机,简单讲讲 tcolorbox 的用法。

概述:安装与调用

和大多数宏包一样,tcolorbox 被 MiKTeX 和 TeX Live 都收录其中。因此,通常情况,你只需要用相应的宏包管理器安装就好。

使用起来,也很简单。和其他宏包一样,你需要在导言区,使用 \usepackage 命令调用这个宏包。

1
\usepackage{tcolorbox}

你可以在调用宏包时,用可选参数指明需要加载哪些程序库;也可以在调用 tcolorbox 之后,显式地使用 \tcbuselibrary 来调用 tcolorbox 提供的丰富程序库。比如,下面的代码调用了 skins, breakable, theorems 三个程序库。

1
2
\usepackage{tcolorbox}
\tcbuselibrary{skins, breakable, theorems}

每个程序库,都对应着一个 tcbXXX.code.tex 文件。实际上,使用 \tcbuselibrary 命令,就是调用了一个个这样的文件。以下是常见可用的 tcolorbox 程序库:

  • skins: 调用 tikz 宏包,提供丰富的文本框样式;
  • vignette: 提供一些装饰性的样式;
  • raster: 用以调整若干 tcolorbox 的排布样式
  • listings/listingsutf8/minted: 用以和对应的宏包联用,实现好看的代码清单
  • theorems: 用以生成定理类环境
  • breakable: 实现自动分页的文本框
  • magazine: 实现类似杂志的分段文本
  • fitting: 实现字体大小和文本框大小的自适应

tcolorbox 基础

基础环境和基础命令

tcolorbox 宏包提供了与宏包同名的环境,是整个宏包的基础环境,用于生成段落间的文本框。与之对应,宏包还提供了 \tcbox 命令,用于生成行内的文本框。

1
2
3
4
5
\begin{tcolorbox}[⟨options⟩]
⟨environment content⟩
\end{tcolorbox} \tcbox[⟨options⟩]{⟨box content⟩}

tcolorbox 环境和 \tcbox 命令都可以接收一组选项,用来控制文本框的样式。我们来看看下面的代码,及其相应的效果。

tcb-basic.tex

1
2
3
4
5
6
7
8
9
10
11
12
13
14
15
16
17
18
19
20
21
22
23
24
25
26
27
28
29
30
31
32
33
34
35
36
37
38
39
40
41
42
43
44
45
\documentclass{article}
\usepackage{tcolorbox}
\usepackage{colortbl}
\usepackage{geometry}
\geometry{margin = 1in}
\begin{document}
\begin{tcolorbox}
This is my first \textbf{tcolorbox}.
\end{tcolorbox} \begin{tcolorbox}
This is another \textbf{tcolorbox}.
\tcblower
Here, you see the lower part of the box.
\end{tcolorbox} \begin{tcolorbox}[title = {I Love Sophia}]
This is a \textbf{tcolorbox} with title.
\tcblower
Here, you see the lower part of the box.
\end{tcolorbox} \tcbset{colframe = blue!50!black, colback = white,
colupper = red!50!black, fonttitle = \bfseries,
nobeforeafter, center title} Text \tcbox[tcbox raise base]{Hello World}\hfill
%
\tcbox[left = 0mm, right = 0mm, top = 0mm, bottom = 0mm, boxsep = 0mm,
toptitle = 0.5mm, bottomtitle = 0.5mm, title = {My table}]
{\arrayrulecolor{blue!50!black}
\renewcommand{\arraystretch}{1.2}%
\begin{tabular}{r|c|l}
One & Two & Three \\
\hline\hline
Men & Mice & Lions \\\hline
Upper & Middle & Lower
\end{tabular}}\hfill
%
\tcbox[colback=blue!85!black,
left = 0mm, right = 0mm, top = 0mm, bottom = 0mm,
boxsep = 1mm, arc = 0mm, boxrule = 0.5pt, title = {My picture}]
{\includegraphics[width = 5cm]{example-image}} \end{document}

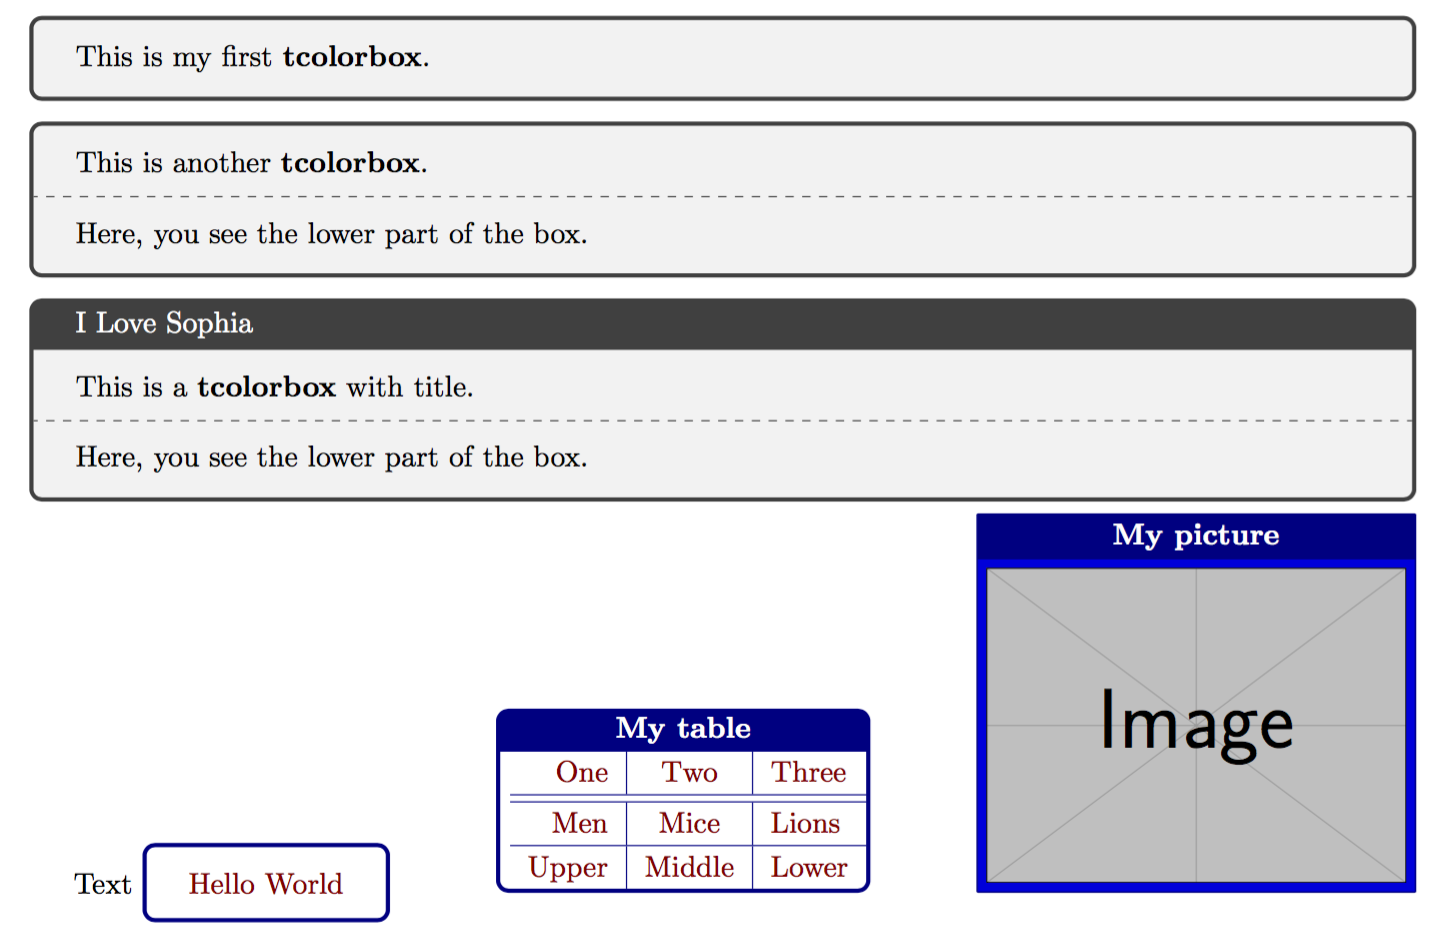
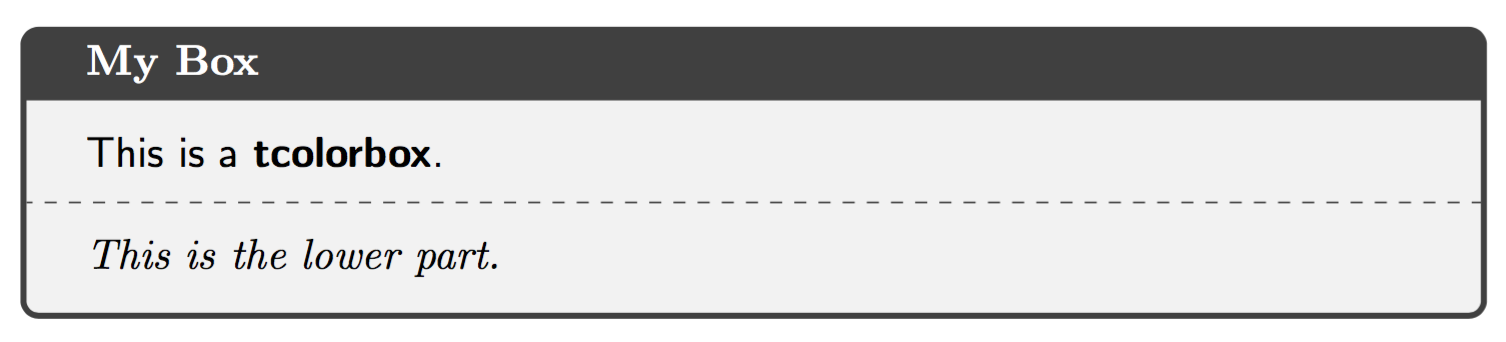
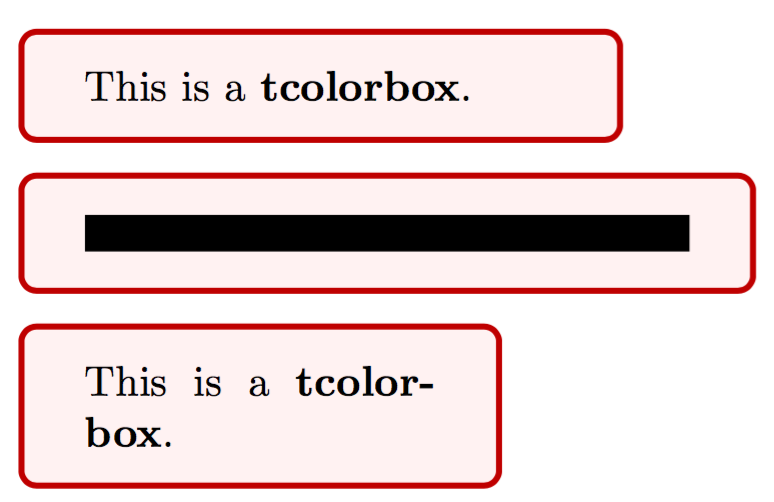
7 – 9 行是一个最朴素的 tcolorbox 环境。我们看到,在默认情况下,tcolorbox 输出了一个深灰色圆角边框、浅灰底色的文本框。

11 – 15 行则在上述最朴素的 tcolorbox 环境的基础上,增加了一条虚线。这条虚线由 \tcblower 控制,它将 tcolorbox 中的内容分成了上下两部分。

17 – 21 行则第一次指定了 tcolorbox 环境的选项。tcolorbox 环境和 \tcbox 都可以接受一串 key-value 的参数列表。这里,我们给 tcolorbox 环境传入了一个名为 title 的参数,它的值是 I Love Sophia。顾名思义,这给 tcolorbox 输出的文本框起了一个名字。默认情况下,这个名字会显示在文本框的头部。

23 – 25 行引入了一个新的命令——\tcbset。显而易见,tcb 是宏包名字的缩写,而 set 自然是「设置」的意思。\tcbset 也可以接受一串 key-value 参数列表,这些参数将对(同一个分组内) \tcbset 之后的所有 tcbcolorbox 环境和 \tcbox 命令生效。这里引入了一些参数,我们在此不深究它们的含义,且先看效果再说。

在 27 行,我们遇到了第一个 \tcbox 命令。在先前 \tcbset 设置的选项之外,这个 \tcbox 还显式地引入了 tcbox raise base 这一参数。结合效果,不难猜出这个选项调整了 \tcbox 生成盒子的基线(baseline)。

29 行和 40 行开头的两个 \tcbox 命令,一方面说明 tcolorbox 宏包提供了相当多的控制选项,因此文本框的样式是高度可定制的;另一方面说明了 \tcbox 内里可以装各种类型的文本——包括表格和图档。

定义和重定义新的 box

tcolorbox 宏包提供了 4 个命令,分别用来定义和重定义 tcolorbox 环境和 \tcbox 命令制作的文本框样式。

1
2
3
4
\newtcolorbox[⟨init options⟩]{⟨name⟩}[⟨number⟩][⟨default⟩]{⟨options⟩}
\renewtcolorbox[⟨init options⟩]{⟨name⟩}[⟨number⟩][⟨default⟩]{⟨options⟩}
\newtcbox[⟨init options⟩]{\⟨name⟩}[⟨number⟩][⟨default⟩]{⟨options⟩}
\renewtcbox[⟨init options⟩]{\⟨name⟩}[⟨number⟩][⟨default⟩]{⟨options⟩}

\newtcolorbox 类似 LaTeX 的 \newenvironment 命令,能够基于 tcolorbox 环境创建一个新的 box 环境;\renewcolorbox 则类似 LaTeX 的 \renewenvironment\newtcbox 类似 LaTeX 的 \newcommand 命令,能够基于 \tcbox 命令创建一个新的 box 命令;\renewtcbox 则类似 LaTeX 的 \renewcommand 命令。

在这里

  • ⟨init options⟩ 通常是用来控制计数器的,具体可以参见 tcolorbox 宏包说明手册的第 5 章
  • ⟨name⟩ 是环境或命令的名字
  • ⟨number⟩ 是环境或命令参数的个数
  • ⟨default⟩ 是环境或命令可选参数的默认值
  • ⟨options⟩ 接受类似 \tcbset 的 key-value 参数列表

tcb-env.tex

1
2
3
4
5
6
7
8
9
10
11
12
13
14
15
16
17
\documentclass{article}
\usepackage{tcolorbox}
\begin{document}
\newtcolorbox{mybox}{colframe = red!75!black}
\begin{mybox}
This is my own box.
\end{mybox} \renewtcolorbox{mybox}{colback = red!25!white, colframe = red!75!black}
\begin{mybox}
This is my own box.
\end{mybox} \begin{tcolorbox}[colback = red!25!white, colframe = red!75!black]
This is my own box.
\end{tcolorbox}
\end{document}

这里,在 5 – 7 行,我们用 \newtcolorbox 定义了名为 mybox 的环境;在 9 – 12 行,我们用 \renewtcolorbox 重新定义了名为 mybox 的环境;14 – 16 行则用原始的 tcolorbox 重复实现了 mybox 环境的效果。

tcb-env-complex.tex

1
2
3
4
5
6
7
8
9
10
11
12
13
14
\documentclass{article}
\usepackage{tcolorbox}
\tcbuselibrary{most}
\begin{document}
\newtcolorbox{mybox}[2][]
{colback = red!5!white, colframe = red!75!black, fonttitle = \bfseries,
colbacktitle = red!85!black, enhanced,
attach boxed title to top center={yshift=-2mm},
title=#2,#1}
\begin{mybox}[colback=yellow]{Hello there}
This is my own box with a mandatory title
and options.
\end{mybox}
\end{document}

在这里,我们用 \newtcolorbox 命令定义了一个稍微复杂的 mybox 环境。它接收两个参数,其中第一个参数是可选的,默认值为空;第二个参数则是必填的参数。第一个参数用作 tcolorbox 环境参数补充,第二个参数则是 box 的标题。另外值得注意的是,代码中引入了 most 这个程序库。most 会自动调取除 minted 和 documentation 之外所有的 tcolorbox 程序库。

tcb-command.tex

1
2
3
4
5
6
7
8
9
10
11
12
\documentclass{article}
\usepackage{tcolorbox}
\begin{document}
\newtcbox{\mybox}[1][red]
{on line, arc = 0pt, outer arc = 0pt,
colback = #1!10!white, colframe = #1!50!black,
boxsep = 0pt, left = 1pt, right = 1pt, top = 2pt, bottom = 2pt,
boxrule = 0pt, bottomrule = 1pt, toprule = 1pt} The \mybox[green]{quick} brown \mybox{fox}
\mybox[blue]{jumps} over the \mybox[green]{lazy} \mybox{dog}.
\end{document}

这里我们用 \newtcbox 命令定义了一个新的 \mybox 命令,它可以用来高亮选中的单词。

warp 既有环境

有的时候,我们希望将既有的 LaTeX 环境改造成带文本框样式的环境。这时候,可以使用 \tcolorboxenvironment环境。它的用法是

1
\tcolorboxenvironment{⟨name⟩}{⟨options⟩}

tex-env-redefine.tex

1
2
3
4
5
6
7
8
9
10
11
12
13
14
15
16
\documentclass{article}
\usepackage{tcolorbox}
\tcbuselibrary{most}
\newenvironment{myitemize}{\begin{itemize}}{\end{itemize}}
\tcolorboxenvironment{myitemize}
{blanker, before skip = 6pt, after skip = 6pt,
borderline west = {3mm}{0pt}{red}}
\begin{document}
Some text.
\begin{myitemize}
\item Alpha
\item Beta
\item Gamma
\end{myitemize}
More text.
\end{document}

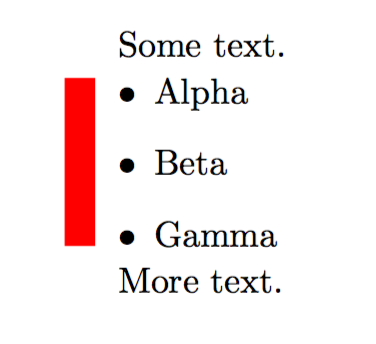
在这里,我们用 \tcolorboxenvironment 命令,在 myitemize 环境外重新 wrap 了一层。新的 myitemize 环境在左侧有一道宽为 3mm 的红色提示线。不难发现,\tcolorboxenvironment 命令可以在(几乎)不改变原有环境效果的情况下,定义一个新的文本框环境。这种功能十分实用。

常用选项

这里列一些常用的选项,用来控制 tcolorbox 环境和 \tcbox 命令的效果。其它未尽选项和效果,可以查看 tcolorbox 的说明手册。

标题的内容控制

  • title: 设置标题内容,默认为空。
  • adjusted title: 设置标题内容,默认为空。使用 title 生成的标题,标题栏会根据标题内容的高低自动调整;而使用 adjusted title 生成的标题,标题栏的高度由当前行文本框中,标题占据高度最高的文本框决定。
  • squeezed title: 设置标题内容,默认为空。使用 squeezed title 生成的标题,如果超过允许的长度,不会换行,而是会在横向进行压缩。
  • squeezed title*: 设置标题内容,默认为空。合并了 adjusted title 和 squeezed title 的效果。

tcb-titles.tex

1
2
3
4
5
6
7
8
9
10
11
12
13
14
15
16
17
18
19
20
21
22
23
24
25
26
27
28
29
30
31
32
33
34
35
36
\documentclass{article}
\usepackage{tcolorbox}
\tcbuselibrary{most} \begin{document}
\tcbset{colback=white,arc=0mm,width=(\linewidth-4pt)/4,
equal height group=AT,before=,after=\hfill,fonttitle=\bfseries} \noindent
\foreach \n in {xxx,ggg,AAA,\"Agypten}
{\begin{tcolorbox}[title=\n,colframe=red!75!black]
Some content.\end{tcolorbox}} \noindent
\foreach \n in {xxx,ggg,AAA,\"Agypten}
{\begin{tcolorbox}[adjusted title=\n,colframe=blue!75!black]
Some content.\end{tcolorbox}} \begin{tcbitemize}[raster columns=3,raster equal height,
colframe=red!75!black,colback=red!5!white,fonttitle=\bfseries]
\tcbitem[squeezed title={Short title}]
First box
\tcbitem[squeezed title={This is a very very long title}]
Second box
\tcbitem[squeezed title={This title is clearly to long for this application}] Third box
\end{tcbitemize} \begin{tcbitemize}[raster columns=3,raster equal height,
colframe=blue!75!black,colback=red!5!white,fonttitle=\bfseries]
\tcbitem[squeezed title*={Short title}]
First box
\tcbitem[squeezed title*={This is a very very long title}]
Second box
\tcbitem[squeezed title*={This title is clearly to long for this application}] Third box
\end{tcbitemize}
\end{document}

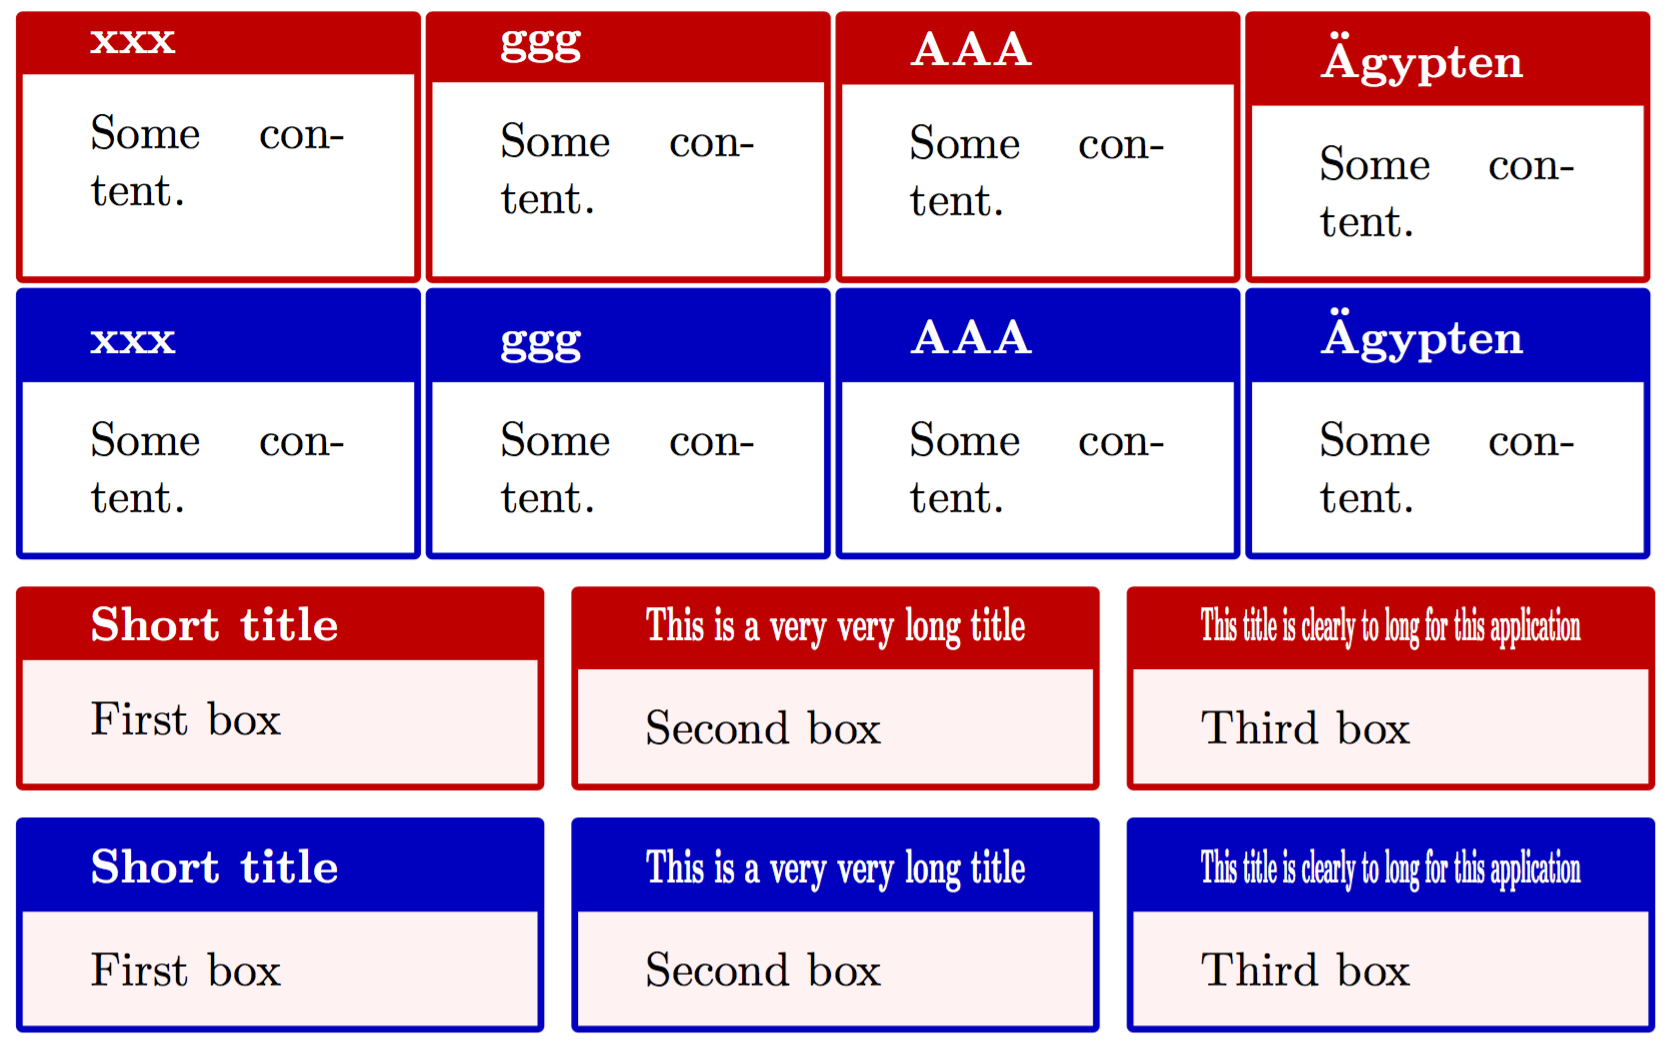
我们看到,两组红色的文本框,它们的标题分别由 title 和 squeezed title 指定。因此,标题占据的高度会随着标题本身的高度变化。两组蓝色的文本框,它们的标题则分别由 adjusted title 和 squeezed title* 指定。于是,标题占据的高度,会根据所处同一行的文本框中,标题所需高度最高的那个文本框来确定,看起来,就整齐多了。

后面两组文本框,他们的标题分别由 squeezed title 和 squeezed title* 指定。我们发现,当标题长度过长时,标题在水平方向上会被压缩。

标题位置

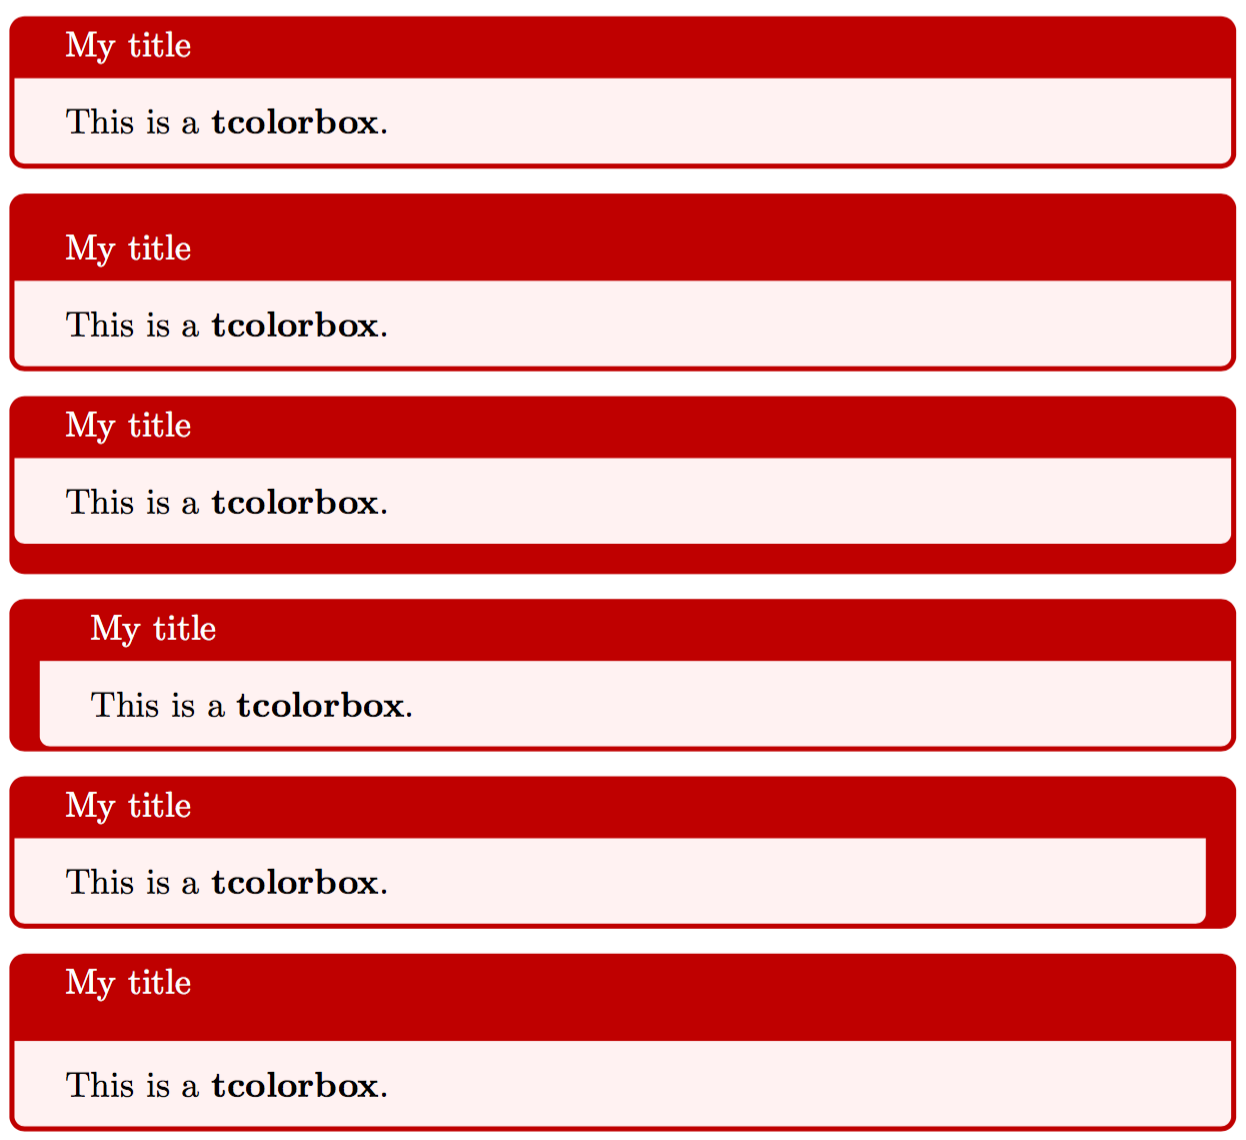
默认情况下,文本框的标题会附在文本框的上方。这一状态称为 attach。我们也可以将标题从默认位置上移开,这个动作称为 detachdetach 之后,我们就可以用 tcolorbox 提供的宏,将标题放在任意自己想要放的位置。其中,\tcbtitletext 储存了标题的文本内容,\tcbtitle 则储存了标题的文本及样式。

  • attach title: 默认样式,标题将显示在文本框上方的单独单元格里。
  • detach title: 取消文本框上方单独的单元格,标题需要用户手工指定位置。
  • attach title to upper = ⟨text⟩: 取消文本框上方单独的单元格,标题放在文本框 upper 部分的头部。

tcb-title-pos.tex

1
2
3
4
5
6
7
8
9
10
11
12
13
14
15
16
17
18
19
20
21
22
\documentclass{article}
\usepackage{tcolorbox}
\tcbuselibrary{most}
\begin{document}
\newtcolorbox{mybox}[2][]{colbacktitle=red!10!white, colback=blue!10!white,coltitle=red!70!black, title={#2},fonttitle=\bfseries,#1}
\begin{mybox}{My title}
This is a \textbf{tcolorbox}.
\end{mybox}
\begin{mybox}[detach title,before upper={\tcbtitle\quad}]{My title}
This is a \textbf{tcolorbox}.
\end{mybox}
\begin{mybox}[detach title,after upper={\par\hfill\tcbtitle}]{My title}
This is a \textbf{tcolorbox}.
\end{mybox} \begin{mybox}[attach title to upper={\ ---\ }]{My title}
This is a \textbf{tcolorbox}.
\end{mybox}
\begin{mybox}[attach title to upper,after title={:\ }]{My title}
This is a \textbf{tcolorbox}.
\end{mybox}
\end{document}

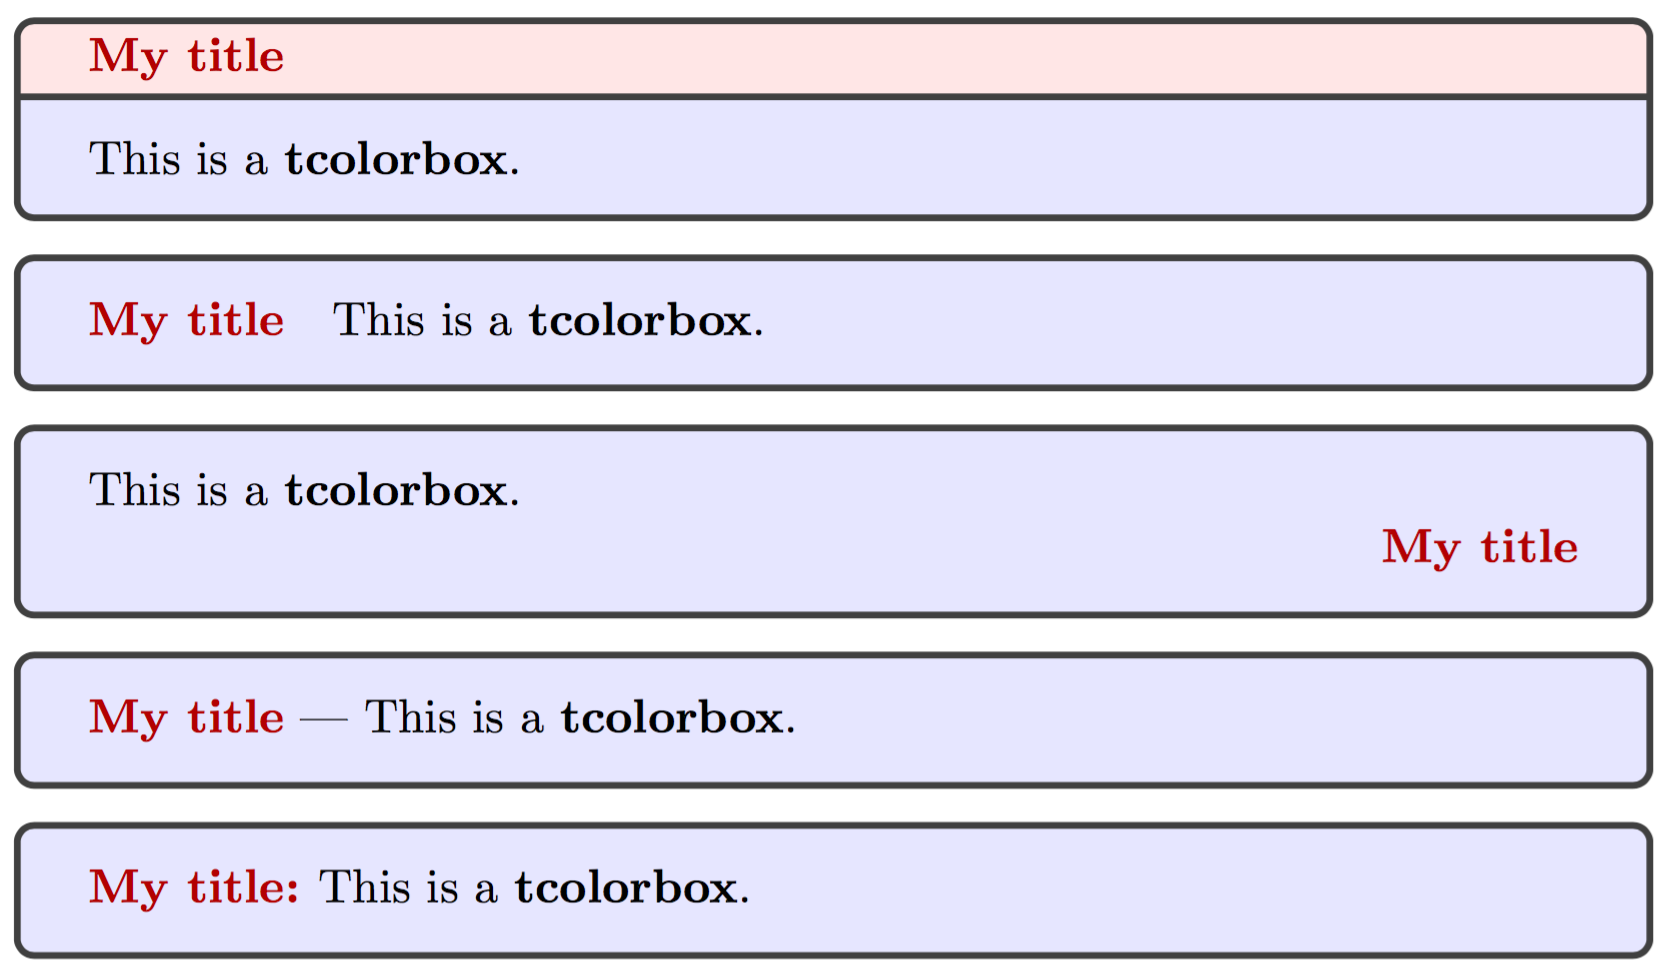
在这里,6 – 8 行是正常的情形;9 – 11 行是 detach 的情形,然后用 before upper 将 \tcbtitle 放在 upper 部分之前;12 – 14 行也是 detach 的情形,然后用 after upper 将 \tcbtitle 换行后放在 upper 部分的末尾;16 – 18 行和 19 – 21 行,都是 attach title to upper 的情形,前者直接给 attach title to upper 传入了标题后的分隔符,后者则使用 after title 传入分隔符——这两种方式的效果是一致的。

upper 和 lower 的状态

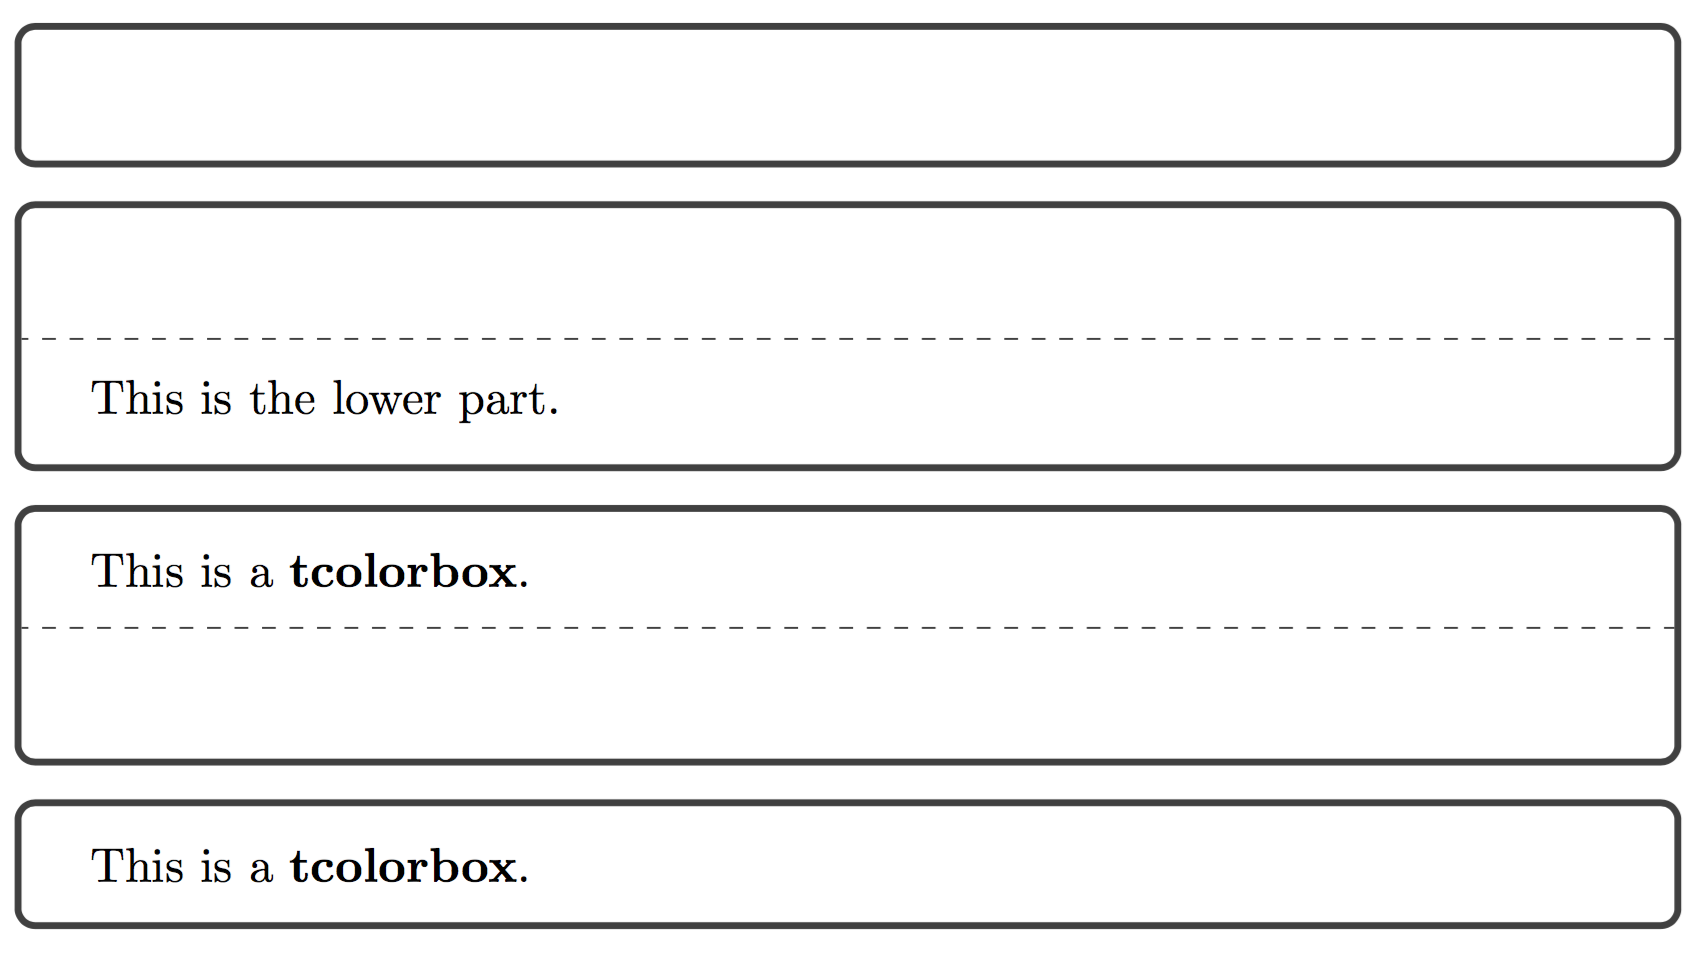
tcolorbox 宏包输出的文本框,在逻辑上可以分为 upper 和 lower 两个部分,在代码中用 \tcblower 命令分割 upper 和 lower 两部分——如果没有 \tcblower,则当前文本框只有 upper 部分,而没有 lower 部分。

upper 和 lower 部分都有可见 (visible) 和不可见 (invisible) 两种状态,lower 部分还有被忽略 (ignored) 这一额外的状态。

  • upperbox = ⟨visible|invisible⟩: 控制 upper 部分是否可见
  • lowerbox = ⟨visible|invisible|ignored⟩: 控制 lower 部分是否可见
  • visible: 同时控制 upper 和 lower 部分可见
  • invisible: 同时控制 upper 和 lower 部分不可见

下面的代码很容易理解,就不做详细解释了。

tcb-visible.tex

1
2
3
4
5
6
7
8
9
10
11
12
13
14
15
16
17
18
19
20
21
22
23
\documentclass{article}
\usepackage{tcolorbox}
\tcbuselibrary{most}
\begin{document}
\begin{tcolorbox}[upperbox=invisible,colback=white]
This is a \textbf{tcolorbox} (but invisible).
\end{tcolorbox}
\begin{tcolorbox}[upperbox=invisible,colback=white]
This is a \textbf{tcolorbox} (but invisible).
\tcblower
This is the lower part.
\end{tcolorbox}
\begin{tcolorbox}[lowerbox=invisible,colback=white]
This is a \textbf{tcolorbox}.
\tcblower
This is the lower part (but invisible).
\end{tcolorbox}
\begin{tcolorbox}[lowerbox=ignored,colback=white]
This is a \textbf{tcolorbox}.
\tcblower
This is the lower part (but ignored).
\end{tcolorbox}
\end{document}

upper 和 lower 部分的分隔

默认情况下,upper 和 lower 部分之间会有一个分隔,不过,我们也可以通过 lower separated 来控制是否显示这一分隔符。

  • lower separated = ⟨true|false⟩: 控制是否显示 upper 和 lower 两部分中间的分隔。

tcb-lower-separated.tex

1
2
3
4
5
6
7
8
9
10
11
12
13
14
15
16
17
18
19
20
21
22
23
24
25
26
27
28
29
30
31
32
33
34
35
36
37
38
39
40
41
\documentclass{article}
\usepackage{tcolorbox}
\tcbuselibrary{most}
\begin{document}
\begin{tcbraster}[colback=red!5!white,colframe=red!75!black,
fonttitle=\bfseries,fontlower=\itshape] %
\begin{tcolorbox}[title=Lower separated] This is the upper part.
\tcblower
This is the lower part.
\end{tcolorbox}
%
\begin{tcolorbox}[title=Lower not separated,lower separated=false]
This is the upper part.
\tcblower
This is the lower part.
\end{tcolorbox}
%
\begin{tcolorbox}[sidebyside,title=Lower separated]
This is the upper part.
\tcblower
This is the lower part.
\end{tcolorbox}
%
\begin{tcolorbox}[sidebyside,title=Lower not separated,lower separated=false] This is the upper part.
\tcblower
This is the lower part.
\end{tcolorbox}
%
\begin{tcolorbox}[beamer,title=Lower separated]
This is the upper part.
\tcblower
This is the lower part.
\end{tcolorbox}
%
\begin{tcolorbox}[beamer,title=Lower not separated,lower separated=false] This is the upper part.
\tcblower
This is the lower part.
\end{tcolorbox}
%
\end{tcbraster}
\end{document}

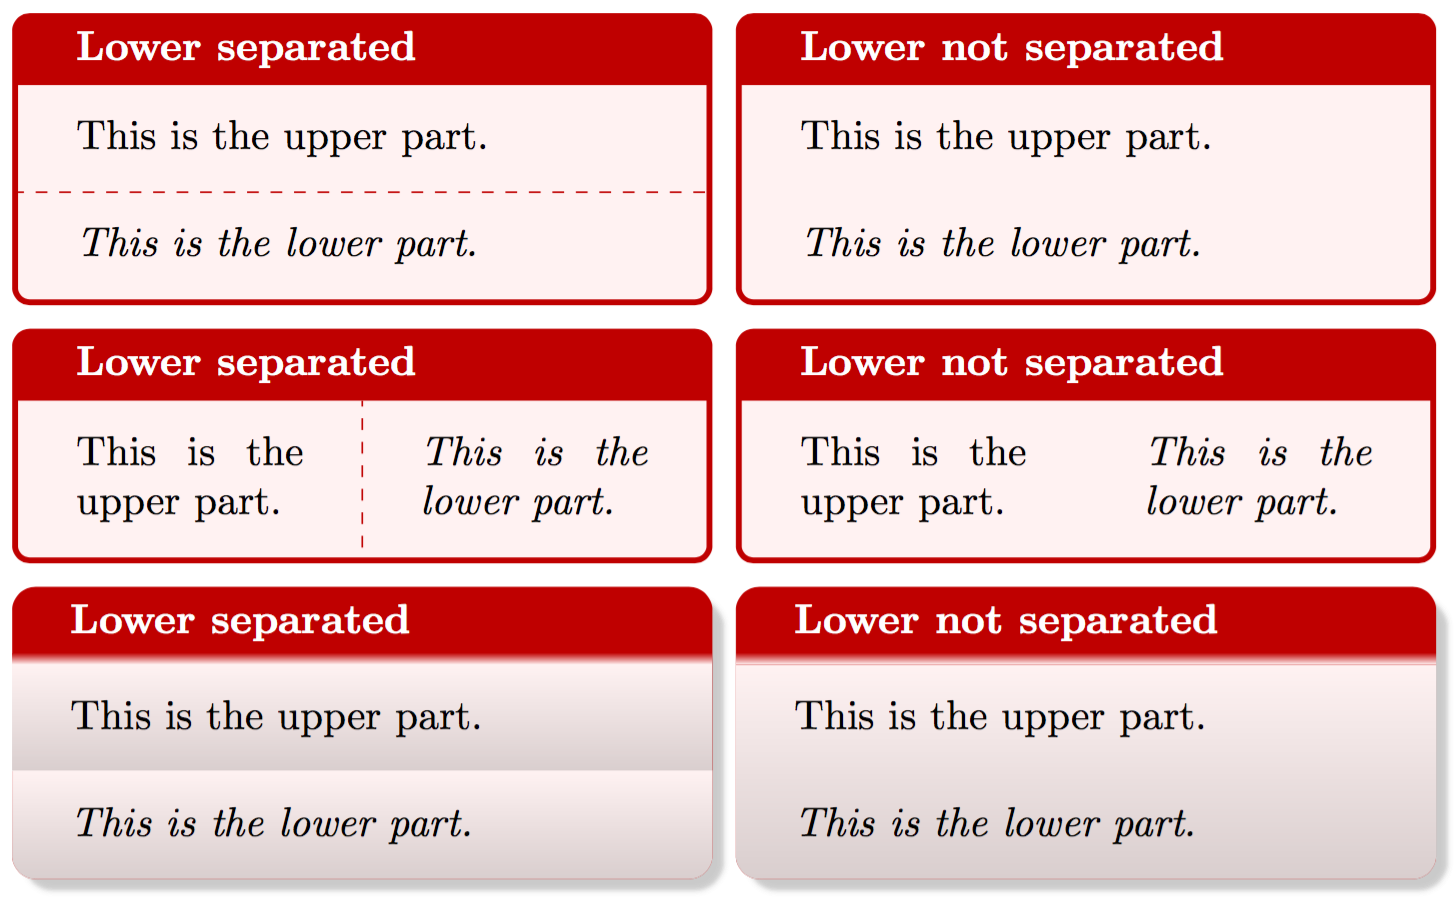
这里用 tcbraster 环境做了一个明显的左右对比。我们可以看到,当开启 lower separated=false 时,各个 skin 下的分隔都不见了。值得注意的是,中间一行中,我们使用了 sidebyside 选项,它能将 upper 和 lower 两个部分从上下的布局样式,改变成左右的布局样式。

颜色和字体控制

tcolorbox 提供了很多颜色控制选项,用来控制文本框各个部分的颜色效果。

  • colframe: 文本框框沿的颜色,默认是 black!75!white
  • colback: 文本框内的底色,默认是 black!5!white
  • colbacktitle: 文本框中标题框的底色,默认是 black!50!white
  • colupper: upper 部分文字的颜色。
  • collower: lower 部分文字的颜色。
  • coltext: 同时设置 upper 和 lower 部分文字的颜色。
  • coltitle: title 部分文字的颜色。

tcb-color.tex

1
2
3
4
5
6
7
8
9
10
11
12
13
14
\documentclass{article}
\usepackage{tcolorbox}
\tcbuselibrary{most}
\begin{document}
\begin{tcolorbox}[title = {My Box},
colframe = red!50!white, colback = green!50!white,
colbacktitle = green!30!white,
colupper = yellow!25!red, collower = yellow!75!red,
coltitle = black!90!white]
This is a \textbf{tcolorbox}.
\tcblower
This is the lower part.
\end{tcolorbox}
\end{document}

  • fontupper: 控制 upper 部分的字体
  • fontlower: 控制 lower 部分的字体
  • fonttitle: 控制 title 部分的字体

tcb-font.tex

1
2
3
4
5
6
7
8
9
10
11
\documentclass{article}
\usepackage{tcolorbox}
\tcbuselibrary{most}
\begin{document}
\begin{tcolorbox}[title = {My Box},
fonttitle = \bfseries, fontupper = \sffamily, fontlower = \itshape]
This is a \textbf{tcolorbox}.
\tcblower
This is the lower part.
\end{tcolorbox}
\end{document}

宽度控制

tcolorbox 宏包提供了三个选项对宽度进行最基本的控制,它们分别是:

  • width: 文本框的总宽度,默认是 \linewidth
  • textwidth: 文本框内文本的宽度。
  • add to width: 在现有设置的基础上,调整文本框的总宽度。

tcb-width.tex

1
2
3
4
5
6
7
8
9
10
11
12
13
14
15
\documentclass{article}
\usepackage{tcolorbox}
\tcbuselibrary{most}
\begin{document}
\tcbset{width=5cm, colback=red!5!white, colframe=red!75!black}
\begin{tcolorbox}
This is a \textbf{tcolorbox}.
\end{tcolorbox}
\begin{tcolorbox}[text width = 5cm]
\rule{5cm}{2ex}
\end{tcolorbox}
\begin{tcolorbox}[add to width = -1cm]
This is a \textbf{tcolorbox}.
\end{tcolorbox}
\end{document}

这里,我们首先将 width 设置为 5cm,然后将 text width 设置为 5cm,最后将 width 在 5cm 的基础上,用 add to width 减去 1cm

线条

tcolorbox 输出的文本框,其框线都可以设置宽度。

  • toprule/bottomrule/leftrule/rightrule: 分别设置文本框上、下、左、右的框线宽度。
  • titlerule: 设置标题框和内容框之间的框线宽度。
  • boxrule: 一口气设置上述 5 条框线的宽度。

tcb-rule.tex

1
2
3
4
5
6
7
8
9
10
11
12
13
14
15
16
17
18
19
20
21
22
23
24
25
\documentclass{article}
\usepackage{tcolorbox}
\tcbuselibrary{most}
\begin{document}
\tcbset{boxrule = 0.5mm, colback=red!5!white, colframe=red!75!black,
title = {My title}}
\begin{tcolorbox}
This is a \textbf{tcolorbox}.
\end{tcolorbox}
\begin{tcolorbox}[toprule = 3mm]
This is a \textbf{tcolorbox}.
\end{tcolorbox}
\begin{tcolorbox}[bottomrule = 3mm]
This is a \textbf{tcolorbox}.
\end{tcolorbox}
\begin{tcolorbox}[leftrule = 3mm]
This is a \textbf{tcolorbox}.
\end{tcolorbox}
\begin{tcolorbox}[rightrule = 3mm]
This is a \textbf{tcolorbox}.
\end{tcolorbox}
\begin{tcolorbox}[titlerule = 3mm]
This is a \textbf{tcolorbox}.
\end{tcolorbox}
\end{document}

这里我们首先用 boxrule = 0.5mm 将文本框所有的框线设置为 0.5mm,而后按照上下左右标题的顺序,依次设置相应的框线为 3mm

弧度

文本框的弧度也是可以定制的。并且,文本框的弧度,在 tcolorbox 中被细分为内弧和外弧,可以分别设置。默认情况下,外弧的弧度与内弧保持一致(auto outer arc)。

  • arc=⟨length⟩: 设置内弧的半径。
  • outer arc=⟨length⟩: 设置外弧的半径,可以与内弧不同。
  • auto outer arc: 让外弧的半径自动随着内弧的半径增减,默认启用。

tcb-arc.tex

1
2
3
4
5
6
7
8
9
10
11
12
13
14
15
16
17
18
\documentclass{article}
\usepackage{tcolorbox}
\tcbuselibrary{most}
\begin{document}
\tcbset{colback = red!5!white, colframe = red!75!black}
\begin{tcolorbox}[arc = 0mm]
This is a \textbf{tcolorbox}.
\end{tcolorbox}
\begin{tcolorbox}[arc = 3mm]
This is a \textbf{tcolorbox}.
\end{tcolorbox}
\begin{tcolorbox}[arc = 4mm, outer arc = 1mm]
This is a \textbf{tcolorbox}.
\end{tcolorbox}
\begin{tcolorbox}[arc = 1mm, outer arc = 4mm]
This is a \textbf{tcolorbox}.
\end{tcolorbox}
\end{document}

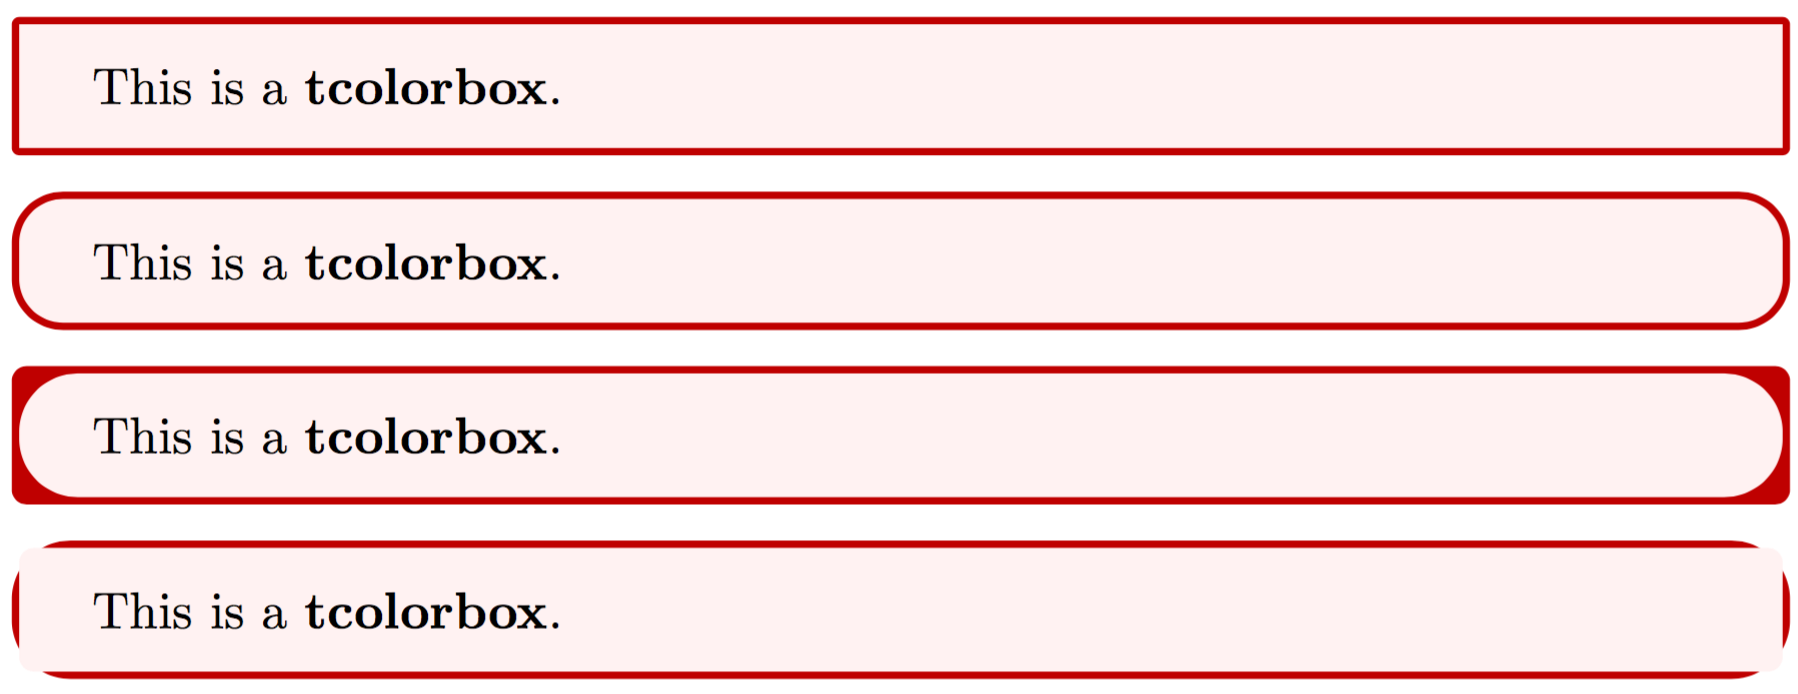
这里,第一个文本框,我们设置内弧的半径为 0mm,得到了一个直角;第二个文本框,我们设置内弧半径为 3mm,得到了一个比较圆润的边框;第三个文本框,我们设置内弧半径为 1mm,外弧半径为 4mm——与此同时,第四个文本框将内外弧半径调换,得到了两个有些另类的效果。

除了手工设置内外弧的半径之外,tcolorbox 还预定义了一些样式:circular arcbean arcoctogon arc

theorems 程序包

tcolorbox 宏包提供了 theorems 程序包来实现定理类的环境。theorems 程序包会自动加载 amsmath 宏包。加载调用的方法如前所述:

1
\tcbuselibrary{theorems}

基本用法

theorems 程序包提供了两个命令,来生成文本框样式的定理类环境。

  • \newtcbtheorem[⟨init options⟩]{⟨name⟩}{⟨display name⟩}{⟨options⟩}{⟨prefix⟩}
  • \renewtcbtheorem[⟨init options⟩]{⟨name⟩}{⟨display name⟩}{⟨options⟩}{⟨prefix⟩}

两个命令分别都有 4 个必需参数和 1 个可选参数。
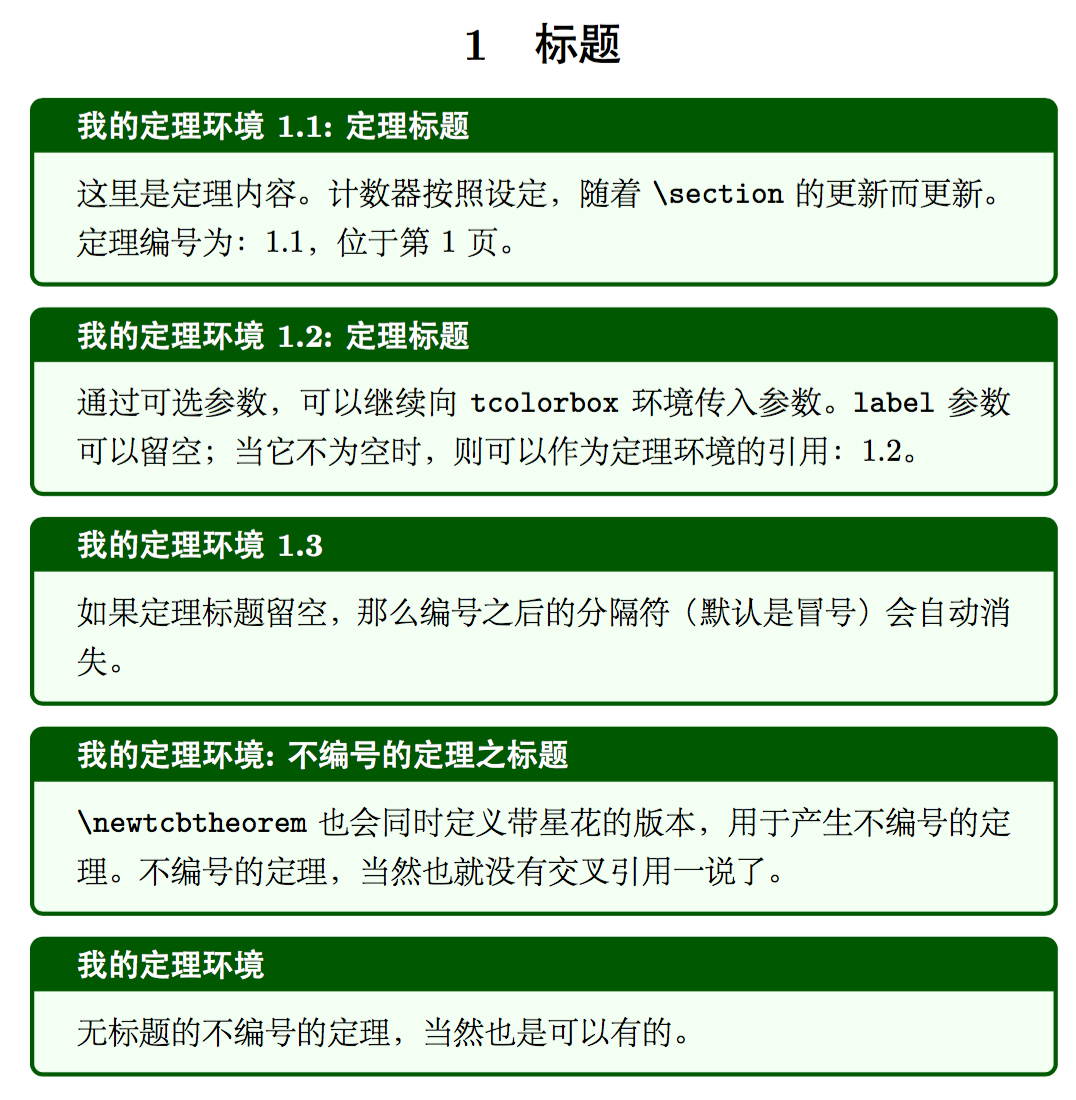
  • name: 创建的 LaTeX 环境名称
  • display name: 创建的环境的标题名称
  • options: 传入 tcolorbox 的参数
  • prefix: 用于生成环境的 label
  • init options: 用于控制编号

我们来看几个例子。

tcb-theorem-basic.tex

1
2
3
4
5
6
7
8
9
10
11
12
13
14
15
16
17
18
19
20
21
22
23
24
25
26
27
\documentclass[UTF8]{ctexart}
\usepackage{tcolorbox}
\tcbuselibrary{most}
\begin{document}
\section{标题}
\newtcbtheorem[number within=section]{mytheo}{我的定理环境}%
{colback=green!5,colframe=green!35!black,fonttitle=\bfseries}{th}
\begin{mytheo}{定理标题}{theoexample}
这里是定理内容。计数器按照设定,随着~\verb|\section|~的更新而更新。 定理编号为:\ref{th:theoexample},位于第~\pageref{th:theoexample}~页。
\end{mytheo}
\begin{mytheo}[label=myownlabel]{定理标题}{}
通过可选参数,可以继续向~\verb|tcolorbox|~环境传入参数。
\verb'label'~参数可以留空;当它不为空时,则可以作为定理环境的引用:\ref{myownlabel}。
\end{mytheo}
\begin{mytheo}{}{}
如果定理标题留空,那么编号之后的分隔符(默认是冒号)会自动消失。
\end{mytheo}
\begin{mytheo*}{不编号的定理之标题}
\verb'\newtcbtheorem'~也会同时定义带星花的版本,用于产生不编号的定理。
不编号的定理,当然也就没有交叉引用一说了。
\end{mytheo*}
\begin{mytheo*}{}
无标题的不编号的定理,当然也是可以有的。
\end{mytheo*}
\end{document}

选项

theorems 程序包也提供了诸多选项,用来控制生成的定理环境样式。

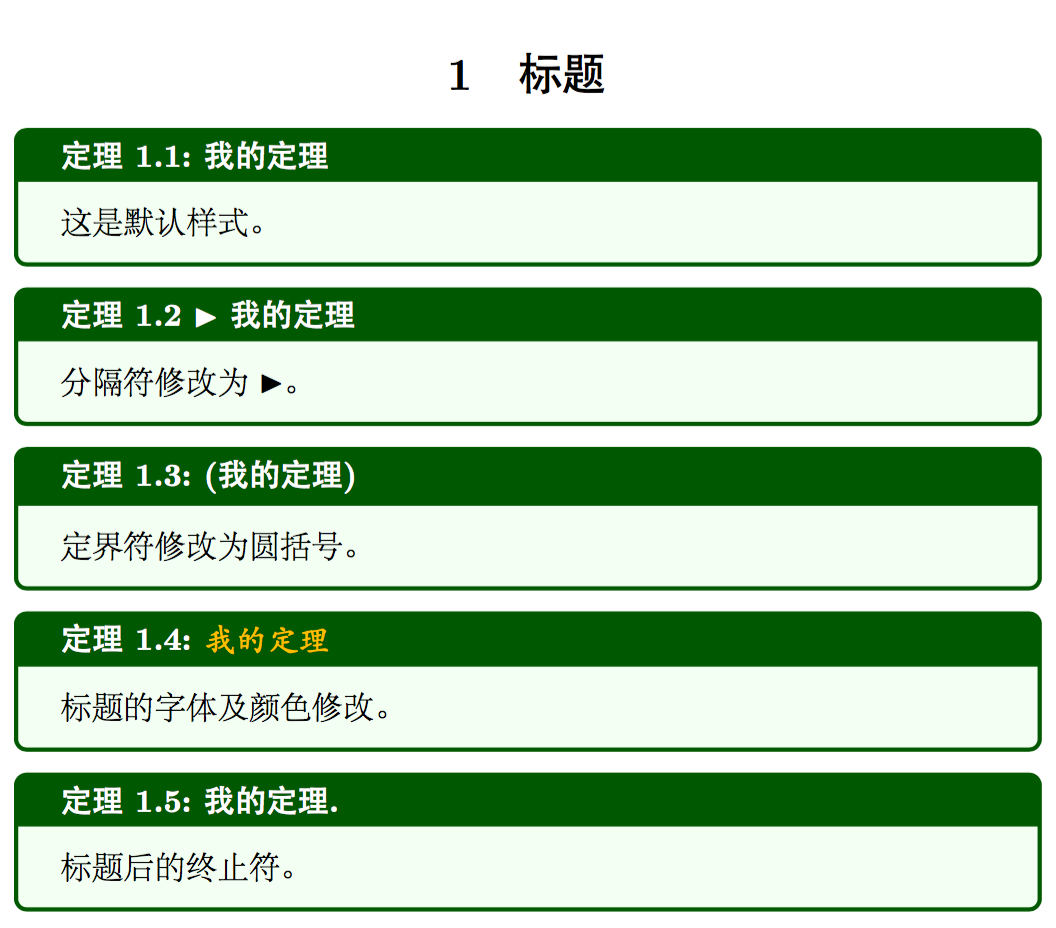
  • separator sign = ⟨sign⟩: 设置定理环境编号和标题之间的分隔符,默认是 :

    • separator sign colon: 相当于 separator sign = {:}
    • separator sign dash: 相当于 separator sign = {-}
    • separator sign none: 相当于 separator sign = {}
  • description delimiters={⟨left⟩}{⟨right⟩}: 设置定理标题左右的定界符,默认是空。
    • description delimiters parenthesis: 相当于 description delimiters = {(}{)}
    • description delimiters none: 相当于 description delimiters = {}{}
  • description color = ⟨color⟩: 设置定理标题的字体颜色。
  • description font = ⟨text⟩: 设置定理标题的字体。
  • terminator sign = ⟨sign⟩: 设置定理标题结束后的终止符。
    • terminator sign colon: 相当于 terminator sign = {:}
    • terminator sign dash: 相当于 terminator sign = {-}
    • terminator sign none: 相当于 terminator sign = {}

tcb-theorems-title.tex

1
2
3
4
5
6
7
8
9
10
11
12
13
14
15
16
17
18
19
20
21
22
23
24
25
\documentclass[UTF8]{ctexart}
\usepackage{tcolorbox}
\tcbuselibrary{most}
\usepackage{amsmath, amssymb}
\begin{document}
\section{标题}
\newtcbtheorem[number within=section]{mytheo}{定理}%
{colback=green!5,colframe=green!35!black,fonttitle=\bfseries}{th}
\begin{mytheo}{我的定理}{}
这是默认样式。
\end{mytheo}
\begin{mytheo}[separator sign = {\ $\blacktriangleright$}]{我的定理}{}
分隔符修改为 $\blacktriangleright$。
\end{mytheo}
\begin{mytheo}[description delimiters parenthesis]{我的定理}{}
定界符修改为圆括号。
\end{mytheo}
\begin{mytheo}[description color=red!25!yellow,
description font= {\mdseries\itshape}]{我的定理}{}
标题的字体及颜色修改。
\end{mytheo}
\begin{mytheo}[terminator sign={.}]{我的定理}{}
标题后的终止符。
\end{mytheo}
\end{document}

实际动手制作一个定理环境看看

tcb-theorem-final.tex

1
2
3
4
5
6
7
8
9
10
11
12
13
14
15
16
17
18
19
20
21
22
23
24
\documentclass[UTF8]{ctexart}
\usepackage{enumitem}
\usepackage{tcolorbox}
\tcbuselibrary{skins, breakable, theorems} \newtcbtheorem{question}{题~(理}%
{enhanced, breakable,
colback = white, colframe = cyan, colbacktitle = cyan,
attach boxed title to top left = {yshift = -2mm, xshift = 5mm},
boxed title style = {sharp corners},
fonttitle = \sffamily\bfseries, separator sign = {).~}}{qst} \begin{document}
\section{测试} \begin{question}{函数}{example}
已知函数 $ f(x) = (x - 2)\mathrm{e}^{2} + a (x - 1)^{2} $ 有两个零点.
\begin{enumerate}[label=(\arabic*)]
\item 求 $ a $ 的取值范围;
\item 设 $ x_{1} $, $ x_{2} $ 是 $ f(x) $ 的两个零点,证明 $ x_{1} + x_{2} < 2 $.
\end{enumerate}
\end{question} \end{document}

这里我们调用了 skins/breakable/theorems 三个程序包,其中 theorems 我们已经见过了。skins 程序包提供了各种「皮肤」,可以在基础 tcolorbox 的基础上扩展更多样式:attach boxed title to top left 这一效果就来自 skins 程序包中的 enhanced 主题。breakable 的效果则使得文本框能够跨页。

其他的参数很好理解,就不用展开讲了。

希望你看过这篇文章之后,能够用 tcolorbox 宏包,制作出自己喜欢的文本框。

俗话说,投资效率是最好的投资。 如果您感觉我的文章质量不错,读后收获很大,预计能为您提高 10% 的工作效率,不妨小额捐助我一下,让我有动力继续写出更多好文章。

tcolorbox 宏包简明教程的更多相关文章

  1. Python 简明教程 --- 17,Python 模块与包

    微信公众号:码农充电站pro 个人主页:https://codeshellme.github.io 正确的判断来源于经验,然而经验来源于错误的判断. -- Fred Brooks 目录 我们已经知道函 ...

  2. Lisp简明教程

    此教程是我花了一点时间和功夫整理出来的,希望能够帮到喜欢Lisp(Common Lisp)的朋友们.本人排版很烂还望多多海涵! <Lisp简明教程>PDF格式下载 <Lisp简明教程 ...

  3. 2013 duilib入门简明教程 -- 第一个程序 Hello World(3)

    小伙伴们有点迫不及待了么,来看一看Hello World吧: 新建一个空的win32项目,新建一个main.cpp文件,将以下代码复制进去: #include <windows.h> #i ...

  4. Docker简明教程

    Docker简明教程 [编者的话]使用Docker来写代码更高效并能有效提升自己的技能.Docker能打包你的开发环境,消除包的依赖冲突,并通过集装箱式的应用来减少开发时间和学习时间. Docker作 ...

  5. [原创][LaTex]LaTex学习笔记之框架及宏包

    0. 简介 LaTex在书写文档时的最基本单元就是首部的写作,变相的也可以说是头文件.本文章就来总结一下文档的基本格式和常用宏包. 1. 基本单元 基本单元需要对LaTex语法有一定的了解,这个很简单 ...

  6. Java8简明教程(转载)

    ImportNew注:有兴趣第一时间学习Java 8的Java开发者,欢迎围观<征集参与Java 8原创系列文章作者>. 以下是<Java 8简明教程>的正文. “Java并没 ...

  7. appium简明教程

    appium简明教程 什么是appium? 下面这段介绍来自于appium的官网. Appium is an open-source tool you can use to automate mobi ...

  8. Tips & Tricks:Apache log4j简明教程(一)

    Apache log4j的官方介绍是“log4j is a reliable, fast and flexible logging framework (APIs) written in Java, ...

  9. ArcGIS Pro 简明教程(4)工具和模型构建器

    ArcGIS Pro 简明教程(4)工具和模型构建器 by 李远祥 工具箱中的工具 ArcGIS Pro 在1.3版本基本上已经继承了ArcMap的所有工具,而且会不断加入一些它自身才有的工具,例如适 ...

随机推荐

  1. Elasticsearch之集群

    ElasticSearch集群 ES集群是一个 P2P类型(使用 gossip 协议)的分布式系统,除了集群状态管理以外,其他所有的请求都可以发送到集群内任意一台节点上,这个节点可以自己找到需要转发给 ...

  2. Kong 系列【六】添加插件---ip-restriction之黑白名单

    写在前边 本地postMan请求http://192.168.130.131:8000/test-route,可以正常访问,本地IP:192.168.130.1同样在虚拟机环境192.168.130. ...

  3. mysql 不能加载表问题

    记录一次 mysql 5.7 下,出现重启数据库后不能加载特定表的问题处理. 搜索了很多的类似的错误,大多都是说因为外键同名的索引丢失的情况.但在5.7这个版本下,会禁止更新外键关联的索引. 最后经过 ...

  4. idea 工具 听课笔记 首页

    maven 创建 javaWeb站点结构标准及异常权限调整 解决Intellij Idea下修改jsp页面不自动更新(链接 idea中使用github  提交 idea 从github.com上恢复站 ...

  5. Notability

    Notability 上课记笔记.听网课→Notability 有录音功能, 在原来笔记中新添加空白行(选中之后下移) Notability常用的功能总结 1.纸张有颜色2.荧光笔会盖住文字3.套索工 ...

  6. IDEA最新注册码 (亲测有效,可激活至 2089 年~)

    申明:本教程 IntelliJ IDEA 破解补丁.激活码均收集于网络,请勿商用,仅供个人学习使用,如有侵权,请联系作者删除. 分享IDEA最新注册码 (亲测有效,可激活至 2089 年~) 注意 本 ...

  7. P1001 A+B Problem(int,long long)

    题目描述 输入两个整数 a,b,输出它们的和(∣a∣,∣b∣≤109). 注意 Pascal 使用 integer 会爆掉哦! 有负数哦! C/C++ 的 main 函数必须是 int 类型,而且最后 ...

  8. poj 2528 线段树区间修改+离散化

    Mayor's posters POJ 2528 传送门 线段树区间修改加离散化 #include <cstdio> #include <iostream> #include ...

  9. Radmin Server v3.5.1 汉化破解绿色版 第四版

    下载:https://pan.baidu.com/s/1skOXffJ 使用方法:1.运行“安装.bat”,安装过程静默,安装后无托盘图标,不创建任何快捷方式.2.运行“设置.bat”,进入 radm ...

  10. 42.MySQL数据库安装,及驱动程序选择

    MySQL驱动程序安装: 我们使用Django来操作Mysql,实际上底层还是通过Python来操作的,因此我们想要使用Django来操作mysql,首先还是需要安装一个驱动程序,在Python3中, ...