
19-3 auth模块
参考:https://www.cnblogs.com/liwenzhou/p/9030211.html
一 auth使用django默认的user表
1 auth常用方法
1. authenticate()
2. login()
3. create_user()
4. create_superuser()
5. logout()
6. check_password()
7. set_password()
2 利用auth来实现登录和注册功能
登录例子:
在登录之前,在settings.py里面必须先设置
LOGIN_URL = '/login/' # 这里配置成你项目登录页面的路由
否则登录的时候默认会跳到http://127.0.0.1:8000/accounts/login/
from django.contrib import auth # 必须先导入auth

# 登录

def login(request):

    if request.method == "GET":

        return render(request, "login.html")

    else:

        next_url = request.GET.get("next")

        print(next_url)

        username = request.POST.get("username")

        pwd = request.POST.get("password")

        user_obj = auth.authenticate(request, username=username, password=pwd)

        if user_obj:

            auth.login(request, user_obj)  # # 给该次请求设置了session数据,并在响应中回写cookie

            if next_url:

                return redirect(next_url)

            else:

                return redirect("/book_list/")

        else:

            return render(request, "login.html", {"error_msg": "用户名或密码错误"})
html页面
 <!DOCTYPE html>

 <html lang="en">

 <head>

     <meta charset="UTF-8">

     <title>Title</title>

 </head>

 <body>

 <h1>登陆</h1>

 <a href="/reg/">注册</a>

 <form action="" method="post">

     {% csrf_token %}

     <p>

         <input type="text" name="username">

     </p>

     <p>

         <input type="password" name="password">

     </p>

     <p>

         <input type="submit">

         <span>{{ error_msg }}</span>

     </p>

 </form>

 </body>

 </html>
# 注册
from django.contrib.auth.models import User  # 创建用户auth自带

def reg(request):

    if request.method == "GET":

        return render(request, "reg.html")

    else:

        username = request.POST.get("username")

        pwd = request.POST.get("password")

        user_obj = User.objects.create_user(username=username, password=pwd)  # 用auth自带的去创建用户,这里用的是数据库自带的user表

        return redirect("/login/")
装饰器
要想用auth装饰器需要先导入:
from django.contrib.auth.decorators import login_required
然后在你想要装饰的页面上面加上  @login_required

二  auth使用自己定义的表
1 setting.py设置
AUTH_USER_MODEL="fault_reporting.Userinfo" # 告诉djanjo用我自己定义的用户表,点前面的是django的项目名字,点后面的是表名
2 models.py设置,增加两个字段
1. 必须继承AbstractUser
from django.contrib.auth.models import AbstractUser
class UserInfo(AbstractUser):

    phone=models.CharField(max_length=11)

    avatar=models.FileField(upload_to="avatars/",default="avatars/default.png")
3 运行两条创建的命令
python manage.py makemigrations --> 将models.py的改动记录在小本本上

python manage.py migrate
4 根据这个表去写个CMS项目
目录结构:
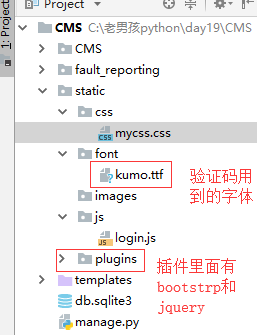
4.1登录--验证码功能
注意:在使用验证码之前必须安装pillow模块,pip install pillow,安装的时候如果报错就where pip查看你的pip安装在哪里,然后进去相应的目录再次安装即可
urls.py
  url(r'^login/$', views.LoginView.as_view()),

    url(r'^index/$', views.index),

    url(r'^vcode/$', views.vcode),   #验证码目录
views.py
 from django.shortcuts import render, redirect, HttpResponse

 from django import views

 from django.contrib import auth

 import random

 # Create your views here.

 class LoginView(views.View):

     def get(self, request):

         return render(request, "login.html")

     def post(self, request):

         next_url = request.GET.get("next","/index/")

         username = request.POST.get("username")

         pwd = request.POST.get("password")

         v_code=request.POST.get("vcode","").upper()  #如果用户不写验证码就是空

         if v_code==request.session.get("v_code"):

             user_obj = auth.authenticate(username=username, password=pwd)

             if user_obj:

                 auth.login(request, user_obj)  # auth认证登录

                 return redirect(next_url)

             else:

                 return render(request, "login.html", {"error_msg": "用户名或密码错误"})

         else:

             return render(request, "login.html", {"error_msg": "验证码错误"})

 # 首页

 def index(request):

     return render(request, "index.html")

 # 验证码路径

 def vcode(request):

     from PIL import Image, ImageDraw, ImageFont  # 导入绘图模块

     # 定义一个生成随机颜色代码的函数

     def random_color():

         return random.randint(0, 255), random.randint(0, 255), random.randint(0, 255)

     # 创建一个随机背景颜色的图片对象

     image_obj = Image.new(

         "RGB",

         (250, 35),  # 背景图片的长和宽

         random_color()

     )

     # 在该图片对象上生成一个画笔对象

     draw_obj = ImageDraw.Draw(image_obj)

     # 加载一个字体对象

     font_obj = ImageFont.truetype('static/font/kumo.ttf', 28)  # 字体大小

     tmp = []

     for i in range(5):

         l = chr(random.randint(97, 122))  # 生成随机的小写字母

         u = chr(random.randint(65, 90))  # 生成随机的大写字母

         n = str(random.randint(0, 9))  # 生成一个随机的数字

         # 从上面三个随机选一个

         r = random.choice([l, u, n])

         # 将选中过的那个字符写到图片上

         draw_obj.text((40 * i + 30, 0), r, fill=random_color(), font=font_obj)  # text指定的是从那开始写位置,fill是字体颜色

         tmp.append(r)

         v_code = "".join(tmp).upper()

         # 将生成的验证码保存

         request.session["v_code"] = v_code

         # 直接在内存中保存图片替代io操作

     from io import BytesIO

     f1 = BytesIO()

     image_obj.save(f1, format="PNG")  # 将背景图片保存到f1里面

     img_data = f1.getvalue()  # 去f1取图片

     return HttpResponse(img_data, content_type="image/png")
login.html
 <!DOCTYPE html>

 <html lang="en">

 <head>

     <meta charset="UTF-8">

     <title>登录</title>

     <link rel="stylesheet" href="/static/plugins/bootstrap-3.3.7/css/bootstrap.min.css">

     <link rel="stylesheet" href="/static/css/mycss.css">

 </head>

 <body>

 <div class="container">

     <div class="row">

         <div class="col-md-6 col-sm-offset-3 login-box">

             <h3>登录页面</h3>

             <form action="" method="post">

                 {% csrf_token %}

                 <div class="form-group">

                     <label for="id_username">用户名</label>

                     <input type="text" class="form-control" id="id_username" name="username" placeholder="用户名">

                 </div>

                 <div class="form-group">

                     <label for="id_password">密码</label>

                     <input type="password" class="form-control" id="id_password" name="password" placeholder="密码">

                 </div>

                 <div class="form-group">

                     <label for="id_vcode" style="display: block">验证码</label>

                     <input type="text" class="form-control" id="id_vcode" name="vcode" placeholder="验证码" style="width: 250px;display: inline-block">

                     <img src="/vcode/" id="v-code-img" style="width: 250px;height: 35px;display: inline-block;float: right">

                 </div>

                 <button type="submit" class="btn btn-success" id="login-button">登陆</button>

                 <p class="login-error">{{ error_msg }}</p>

             </form>

         </div>

     </div>

 </div>

 <script src="/static/plugins/jquery-3.3.1.min.js"></script>

 <script src="/static/js/login.js"></script>

 </body>

 </html>
login.js内容:
// 设置错误信息鼠标点击input自动消失

$(".login-box input").focus(function () {

    $(".login-error").text("");

    }

);

// 设置验证码点击变化

$("#v-code-img").click(function () {

    this.src+="?"

});
关于验证码的额外功能:加干扰线和干扰点
# # 加干扰线

    # width = 250  # 图片宽度(防止越界)

    # height = 35

    # for i in range(5):

    #     x1 = random.randint(0, width)

    #     x2 = random.randint(0, width)

    #     y1 = random.randint(0, height)

    #     y2 = random.randint(0, height)

    #     draw_obj.line((x1, y1, x2, y2), fill=random_color())

    #

    # # 加干扰点

    # for i in range(40):

    #     draw_obj.point([random.randint(0, width), random.randint(0, height)], fill=random_color())

    #     x = random.randint(0, width)

    #     y = random.randint(0, height)

    #     draw_obj.arc((x, y, x+4, y+4), 0, 90, fill=random_color())
19-3 auth模块的更多相关文章
- Django----认证系统和auth模块
COOKIE 与 SESSION 概念 cookie不属于http协议范围,由于http协议无法保持状态,但实际情况,我们却又需要“保持状态”,因此cookie就是在这样一个场景下诞生. cookie ...
- Django之auth模块(用户认证)
auth模块简介 auth模块是对登录认证方法的一种封装,之前我们获取用户输入的用户名及密码后需要自己从user表里查询有没有用户名和密码符合的对象, 而有了auth模块之后就可以很轻松的去验证用户的 ...
- Ansible运维自动化工具19个常用模块使用实例【转】
一.模块列表 1.setup 2.ping 3.file 4.copy 5.command 6.shell 7.script 8.cron 9.yum 10.service 11.group 12.u ...
- auth模块用户认证
一.auth模块什么 auth模块时django自带的用户认证模块 我们在开发一个网站的时候,无可避免的需要设计实现网站的用户系统.此时我们需要实现包括用户注册.用户登录.用户认证.注销.修改密码等功 ...
- Django自带的用户认证auth模块
一.介绍 基本上在任何网站上,都无可避免的需要设计实现网站的用户系统.此时我们需要实现包括用户注册.用户登录.用户认证.注销.修改密码等功能. 使用Django,我们可以不需要自己写这些功能,因为Dj ...
- Django之auth模块
http://www.cnblogs.com/liwenzhou/p/9030211.html 1.首先导入auth模块 from django.contrib import auth 2.创建aut ...
- Auth模块、Forms组件
Auth模块 auth模块是Django自带的用户认证模块: 我们在开发一个网站的时候,无可避免的需要设计实现网站的用户系统.此时我们需要实现包括用户注册.用户登录.用户认证.注销.修改密码等功能,这 ...
- Django 自带认证功能auth模块和User对象的基本操作
一.auth模块 from django.contrib import auth django.contrib.auth中提供了许多方法,这里主要介绍其中的三个: authenticate() ...
- 用户认证--------------auth模块
一.auth模块 from django.contrib import auth 1 .authenticate() :验证用户输入的用户名和密码是否相同 提供了用户认证,即验证用户名以及密码是否 ...
- 使用htpasswd及nginx auth模块对指定页面进行登录验证
某些时候,作为运维挂你人员会部署一些工具用于使用外网对内部服务器进行某些管理,比如phpmyadmin.gateone堡垒机等工具.但是这些软件 一旦部署之后,所有人都可以访问到我们的登录页面似乎并不 ...
随机推荐
- 读书笔记--Spring in Action 目录
1.Spring之旅 1.1 简化java 开发 1.1.1 激发pojo 的潜能 1.1.2 依赖注入1.1.3 应用切面1.1.4 使用模板消除样板式代码1.2 容纳你的bean1.2.1 与应用 ...
- HDU4578 Transformation (多操作线段树)
传送门 终于过了这道题.. 要注意标记之间的影响,和add操作时更新求和的顺序. same 区间每个数设置为x标记 mult 区间每个数乘x标记 add 区间每个数加x标记 ①:当打same标记时 ...
- [jnhs]教训之jsp页面无法用jstl取值的坑.真他妈的奇葩,实体类的属性名不能用大写
结果页面永远都是空 调试发现,数据正常的塞进去了 问题解决: https://zhidao.baidu.com/question/570584436.html 实体类的属性名,首字母不能大写,改成小写 ...
- 易语言调用外部DLL详细实例教程
一.准备工作 一.工具:易语言 二.准备一个DLL 1)打开易语言-新建一个Windows动态链接库 2)然后右键新建一个子程序或者用快捷键:Ctrl+N .然后写上代码.我这里写一个 2个字符串拼接 ...
- Django--登录功能
登录功能: 1.路由访问如果不加斜杠,内部会重定向加斜杠的路由 所有的html文件都默认卸载templates文件夹下面 所有的(css,js,前端第三方的类库)默认都放在static文件夹下 htm ...
- 在Linux系统下进入MySql数据库进行操作
例: ---- 1.进入mysql数据库 root@test:/home# mysql -uroot -proot <uroot是用户名,proot是密码> 2.查询所有的库 my ...
- java-异常进阶-包的使用
一 finally 1.1 异常执行的顺序 package test; public class Test { public static void main(String[] args) { Dem ...
- hdu 1671&& poj 3630 (trie 树应用)
Phone List Time Limit: 1000MS Memory Limit: 65536K Total Submissions: 25280 Accepted: 7678 Descr ...
- 入职9月,旷视孙剑106分钟讲述CV创业科研的5大区别
雷锋网按:本文为旷视科技首席科学家孙剑日前在 CCF-ADL上做的题为<如何在大公司和创业公司做好计算机视觉研究>的分享,主要介绍了近期计算机视觉的发展现状,ResNet基本原理和设计,旷 ...
- OpenCV灰度化图像
OpenCV2版本号非常多函数发生了变化.比如二值化,其演示样例: void CmyMFC2Dlg::OnBnClickedButton1() { // TODO: Add your control ...