(一)tensorflow-gpu2.0学习笔记之开篇(cpu和gpu计算速度比较)
摘要:
1.以动态图形式计算一个简单的加法
2.cpu和gpu计算力比较(包括如何指定cpu和gpu)
3.关于gpu版本的tensorflow安装问题,可以参考另一篇博文:https://www.cnblogs.com/liuhuacai/p/11684666.html
正文:
1.在tensorflow中计算3.+4.
##1.创建输入张量

a = tf.constant(2.)

b = tf.constant(4.)

##2.计算结果

print('a+b=',a+b)
输出:a+b= tf.Tensor(7.0, shape=(), dtype=float32)
总结:20版本在加法实现过程中简单了不少,所见即所得。(1.x的实现过程相对复杂)据说动态的实现也是后端转化成静态图实现的。
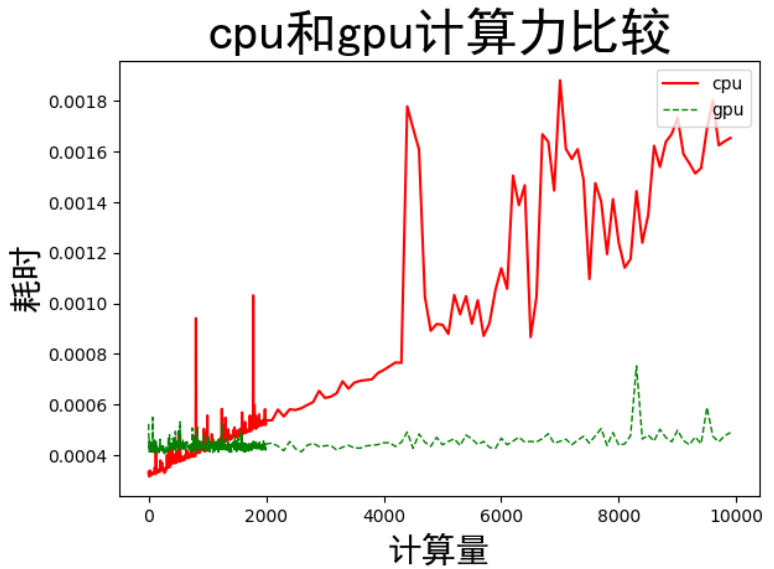
2.cpu和gpu计算力比较
说明:通过计算不同大小的矩阵乘法,获得计算时间。
1.指定cpu或gpu通过 with tf.device('/cpu:0'):或 with tf.device('/gpu:0'):指定,在需要加速的操作前添加即可(此处生成随机 数和矩阵乘法都加速)
2.统计计算时间的函数timeit.timeit需要导入import timeit【timeit.timeit(需计时的函数或语句,计算次数)】
3.计算量的大小与cpu和gpu计算时间的关系,计算量通过改变矩阵大小实现
import tensorflow as tf

import timeit

以矩阵A[10,n]和矩阵B[n,10]的乘法运算(分别在cpu和gpu上运行)来测试,

'''

with tf.device('/cpu:0'):                    ##指定操作用cpu计算

    cpu_a = tf.random.normal([10,n])        ##生成符合高斯分布的随机数矩阵,通过改变n大小,增减计算量

    cpu_b = tf.random.normal([n,10])

print(cpu_a.device,cpu_b.device)

with tf.device('/gpu:0'):

    gpu_a = tf.random.normal([100n])

    gpu_b = tf.random.normal([n,10])

print(gpu_a.device,gpu_b.device)

def cpu_run():

    with tf.device('/cpu:0'):               ##矩阵乘法,此操作采用cpu计算

        c = tf.matmul(cpu_a,cpu_b)

    return c

def gpu_run():

    with tf.device('/gpu:0'):              ##矩阵乘法,此操作采用gpu计算

        c = tf.matmul(gpu_a,gpu_b)

    return c

##第一次计算需要热身,避免将初始化时间计算在内

cpu_time = timeit.timeit(cpu_run,number=10)

gpu_time = timeit.timeit(gpu_run,number=10)

print('warmup:',cpu_time,gpu_time)

##正式计算10次,取平均值

cpu_time = timeit.timeit(cpu_run,number=10)

gpu_time = timeit.timeit(gpu_run,number=10)

print('run_time:',cpu_time,gpu_time)
通过改变矩阵大小,增加矩阵乘法的计算量:计算结果如下
结论:1.在计算量较小的情况下,cpu的计算速度比gpu计算速度快,但是都是微量级别的差异
2.随着计算量的增加,cpu的计算时间逐步增加,而gpu的计算时间相对平缓,在计算量达到一定程度之后,gpu的优势就出来了。
实现过程的完整代码:
import tensorflow as tf

import timeit

import matplotlib.pyplot as plt

'''

以矩阵A[10,n]和矩阵B[n,10]的乘法运算(分别在cpu和gpu上运行)来测试,

'''

def cpu_gpu_compare(n):

    with tf.device('/cpu:0'):                    ##指定操作用cpu计算

        cpu_a = tf.random.normal([10,n])        ##生成符合高斯分布的随机数矩阵,通过改变n大小,增减计算量

        cpu_b = tf.random.normal([n,10])

    print(cpu_a.device,cpu_b.device)

    with tf.device('/gpu:0'):

        gpu_a = tf.random.normal([10,n])

        gpu_b = tf.random.normal([n,10])

    print(gpu_a.device,gpu_b.device)

    def cpu_run():

        with tf.device('/cpu:0'):               ##矩阵乘法,此操作采用cpu计算

            c = tf.matmul(cpu_a,cpu_b)

        return c

    def gpu_run():

        with tf.device('/gpu:0'):              ##矩阵乘法,此操作采用gpu计算

            c = tf.matmul(gpu_a,gpu_b)

        return c

    ##第一次计算需要热身,避免将初始化时间计算在内

    cpu_time = timeit.timeit(cpu_run,number=10)

    gpu_time = timeit.timeit(gpu_run,number=10)

    print('warmup:',cpu_time,gpu_time)

    ##正式计算10次,取平均值

    cpu_time = timeit.timeit(cpu_run,number=10)

    gpu_time = timeit.timeit(gpu_run,number=10)

    print('run_time:',cpu_time,gpu_time)

    return cpu_time,gpu_time

n_list1 = range(1,2000,5)

n_list2 = range(2001,10000,100)

n_list = list(n_list1)+list(n_list2)

time_cpu =[]

time_gpu =[]

for n in n_list:

    t=cpu_gpu_compare(n)

    time_cpu.append(t[0])

    time_gpu.append(t[1])

plt.plot(n_list,time_cpu,color = 'red',label='cpu')

plt.plot(n_list,time_gpu,color='green',linewidth=1.0,linestyle='--',label='gpu')

plt.ylabel('耗时',fontproperties = 'SimHei',fontsize = 20)

plt.xlabel('计算量',fontproperties = 'SimHei',fontsize = 20)

plt.title('cpu和gpu计算力比较',fontproperties = 'SimHei',fontsize = 30)

plt.legend(loc='upper right')

plt.show()
(一)tensorflow-gpu2.0学习笔记之开篇(cpu和gpu计算速度比较)的更多相关文章
- DirectX 总结和DirectX 9.0 学习笔记
转自:http://www.cnblogs.com/graphics/archive/2009/11/25/1583682.html DirectX 总结 DDS DirectXDraw Surfac ...
- 一起学ASP.NET Core 2.0学习笔记(二): ef core2.0 及mysql provider 、Fluent API相关配置及迁移
不得不说微软的技术迭代还是很快的,上了微软的船就得跟着她走下去,前文一起学ASP.NET Core 2.0学习笔记(一): CentOS下 .net core2 sdk nginx.superviso ...
- SQL反模式学习笔记1 开篇
什么是“反模式” 反模式是一种试图解决问题的方法,但通常会同时引发别的问题. 反模式分类 (1)逻辑数据库设计反模式 在开始编码之前,需要决定数据库中存储什么信息以及最佳的数据组织方式和内在关联方式. ...
- vue2.0学习笔记之路由(二)路由嵌套+动画
<!DOCTYPE html> <html lang="en"> <head> <meta charset="UTF-8&quo ...
- vue2.0学习笔记之路由(二)路由嵌套
<!DOCTYPE html> <html lang="en"> <head> <meta charset="UTF-8&quo ...
- TensorFlow机器学习框架-学习笔记-001
# TensorFlow机器学习框架-学习笔记-001 ### 测试TensorFlow环境是否安装完成-----------------------------```import tensorflo ...
- hdcms v5.7.0学习笔记
hdcms v5.7.0学习笔记 https://note.youdao.com/ynoteshare1/index.html?id=c404d63ac910eb15a440452f73d6a6db& ...
- dhtmlxgrid v3.0学习笔记
dhtmlxgrid v3.0学习笔记 分类: dhtmlx JavaScript2012-01-31 15:41 1744人阅读 评论(0) 收藏 举报 stylesheetdatecalendar ...
- OAuth 2.0学习笔记
文章目录 OAuth的作用就是让"客户端"安全可控地获取"用户"的授权,与"服务商提供商"进行互动. OAuth在"客户端&quo ...
随机推荐
- docker命令总结(一)
个人简单总结: 参数 用途 语法 示例 search 在docker hub中搜索镜像 docker search 镜像名称 docker search nginx pull 在docker hub中 ...
- layui下select禁止点击
layui下拉选择框select禁止点击_设置禁用_设置不可操作的实现方法 直接上代码: <form class="layui-form"> <!-- 提示:如果 ...
- python面试的100题(11)
21.Python-遍历列表时删除元素的正确做法 遍历在新在列表操作,删除时在原来的列表操作 a = [1,2,3,4,5,6,7,8] print(id(a)) print(id(a[:])) fo ...
- Failed to start mysqld.service: Unit not found
输入命令 systemctl start mysql.service 要启动MySQL数据库是却是这样的提示 Failed to start mysqld.service: Unit not foun ...
- eclipse debug启动时tomcat报错
Class.getDeclaredConstructors0(boolean) line: not available [native method] tomcat debug启动突然启动不起来 停 ...
- Linux基础命令小结(超全!!)
Linux目录结构 1.bin 存放经常使用的指令比如ll,cp 2.sbin 系统管理员使用的系统管理指令 3.home 存放普通用户的住目录 4.root 系统管理员的用户主目录 5.boot 存 ...
- 【C语言】用C语言输出“心形”图案
在你们的世界里,是不是觉得程序猿一点浪漫都不懂?其实不是的,程序猿的世界也是很浪漫滴! 傻瓜版 int main() { printf("❤"); ; } 高级版 //版本一:单个 ...
- .net core各种修改环境变量的方式
除了修改系统变量,或者程序硬编码中修改,还有以下方法: 发布在IIS中,修改web.config <environmentVariables> <environmentVariabl ...
- 服务器安装mysql后配置远程访问权限
#登录mysql mysql -uroot -p: use mysql: #所有ip能访问 GRANT ALL PRIVILEGES ON *.* TO 'root'@'%' IDENTIFIED B ...
- 2.2 selenium:org.openqa.selenium.WebDriverException: f.QueryInterface is not a function
来源: http://blog.csdn.net/qiyueqinglian/article/details/47813271 URL中地址写不全的时候,就会报如题错误. url必须是完整的,比如ht ...