ASP.NET Core搭建多层网站架构【8.3-编写角色业务的增删改】
2020/01/29, ASP.NET Core 3.1, VS2019
摘要:基于ASP.NET Core 3.1 WebApi搭建后端多层网站架构【8.3-编写角色业务的增删改】
编写最简单的增删改业务,涉及到DI依赖注入的使用、AutoMapper的使用、工作单元与仓储的使用、雪花Id的生成
本章节介绍了编写最简单的增删改查业务,涉及到DI依赖注入的使用、AutoMapper的使用、工作单元与仓储的使用
类库添加引用
向MS.Services类库添加对MS.Models项目的引用
BaseService
在MS.Services类库中添加BaseService.cs类:
using AutoMapper;

using MS.Common.IDCode;

using MS.DbContexts;

using MS.UnitOfWork;

namespace MS.Services

{

    public interface IBaseService

    {

    }

    public class BaseService : IBaseService

    {

        public readonly IUnitOfWork<MSDbContext> _unitOfWork;

        public readonly IMapper _mapper;

        public readonly IdWorker _idWorker;

        public BaseService(IUnitOfWork<MSDbContext> unitOfWork, IMapper mapper, IdWorker idWorker)

        {

            _unitOfWork = unitOfWork;

            _mapper = mapper;

            _idWorker = idWorker;

        }

    }

}
说明:
- 新建了IBaseService接口,后面新建的服务接口都要继承自该接口
- 新建了BaseService类,实现了IBaseService接口
- 可以看到BaseService类中,使用构造函数的方式依赖注入得到了IUnitOfWork _unitOfWork、IMapper _mapper、IdWorker _idWorker,并且是public类型,所以继承BaseService的类都可以直接使用父类的这三个成员
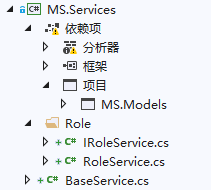
RoleService
在MS.Services类库中新建Role文件夹,在该文件夹下新建IRoleService.cs、RoleService.cs类,注意我这里两个类的命名空间都改为namespace MS.Services,而不是默认的namespace MS.Services.Role
IRoleService接口
修改IRoleService为public类型的interface接口,继承自IBaseService,并添加Create、Update、Delete三个方法:
using MS.Entities;

using MS.Models.ViewModel;

using MS.WebCore.Core;

using System.Threading.Tasks;

namespace MS.Services

{

    public interface IRoleService : IBaseService

    {

        Task<ExecuteResult<Role>> Create(RoleViewModel viewModel);

        Task<ExecuteResult> Update(RoleViewModel viewModel);

        Task<ExecuteResult> Delete(RoleViewModel viewModel);

    }

}
RoleService实现
修改RoleService为public类型,继承自BaseService和IRoleService接口,然后使用快速操作生成构造函数和实现接口

接下来开始实现新增Role的业务方法:
public async Task<ExecuteResult<Role>> Create(RoleViewModel viewModel)

{

    ExecuteResult<Role> result = new ExecuteResult<Role>();

    //检查字段

    if (viewModel.CheckField(ExecuteType.Create, _unitOfWork) is ExecuteResult checkResult && !checkResult.IsSucceed)

    {

        return result.SetFailMessage(checkResult.Message);

    }

    using (var tran = _unitOfWork.BeginTransaction())//开启一个事务

    {

        Role newRow = _mapper.Map<Role>(viewModel);

        newRow.Id = _idWorker.NextId();//获取一个雪花Id

        newRow.Creator = 1219490056771866624;//由于暂时还没有做登录,所以拿不到登录者信息,先随便写一个后面再完善

        newRow.CreateTime = DateTime.Now;

        _unitOfWork.GetRepository<Role>().Insert(newRow);

        await _unitOfWork.SaveChangesAsync();

        await tran.CommitAsync();//提交事务

        result.SetData(newRow);//添加成功,把新的实体返回回去

    }

    return result;

}
说明:
- 异步方法要加上async标记
- 执行添加之前,先进行了字段检查,如果不通过,则返回错误信息
- 使用了var tran = _unitOfWork.BeginTransaction()开启了事务,如果遇到异常,会自动回滚,如果不需要使用事务,可以去除,这里只是顺带演示下事务的使用方法
- 使用了_mapper.Map方法把字段从ViewModel映射到实体类中
- _idWorker.NextId()方法获取一个雪花Id
- 由于还没有做登录,所以没有创建者信息,所以先随便写了一个,等做了登录之后再修改
- 这里方法内部没有做trycatch捕获异常处理,之后会使用AOP拦截器,拦截业务层的每个方法,统一进行业务异常捕获处理
WebApi中调用Service
在MS.WebApi应用程序中,RoleController.cs类中,添加RoleService接口,并在Post中调用Create方法:
//using MS.Services;

//以上代码添加到using引用

public class RoleController : ControllerBase

{

    private readonly IRoleService _roleService;

    public RoleController(IRoleService roleService)

    {

        _roleService = roleService;

    }

    [HttpPost]

    public async Task<ExecuteResult> Post(RoleViewModel viewModel)

    {

        return await _roleService.Create(viewModel);

    }

}
说明:
- 这里依然使用了构造函数依赖注入获取一个接口服务
- 接口设计满足Restful规范
将接口服务添加到依赖注入
在MS.WebApi应用程序中,在Startup.cs类的ConfigureServices方法中追加:
//using MS.Services;

//以上代码添加到using

//注册IBaseService和IRoleService接口及对应的实现类

services.AddScoped<IBaseService, BaseService>();

services.AddScoped<IRoleService, RoleService>();
测试
完成后启动项目,打开Postman调试接口:
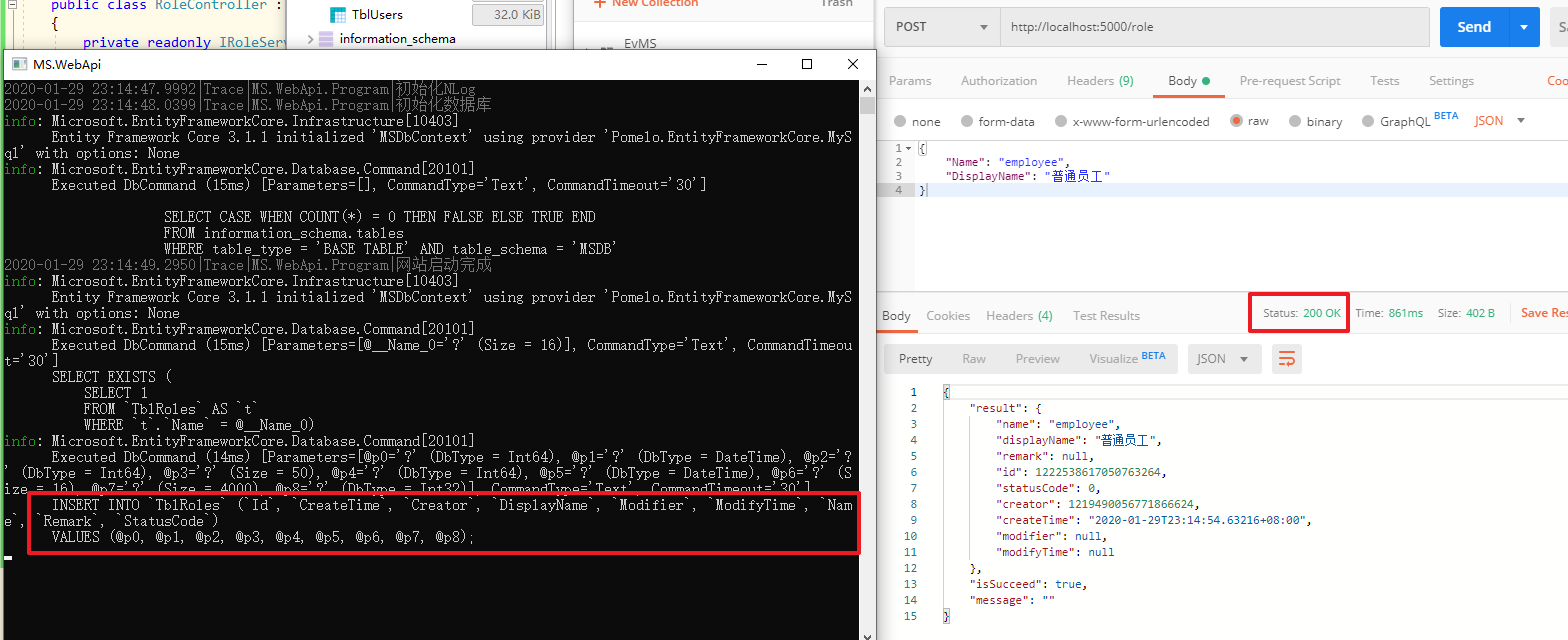
可以看到接口调用成功(也可以看到在控制台中有EntityFrameworkCore执行的sql语句)
在数据库中看到新增的记录:

再重复调用一次接口,则会提示角色名称已存在:

完整的增删改角色业务代码:
using AutoMapper;

using MS.Common.IDCode;

using MS.DbContexts;

using MS.Entities;

using MS.Models.ViewModel;

using MS.UnitOfWork;

using MS.WebCore.Core;

using System;

using System.Collections.Generic;

using System.Text;

using System.Threading.Tasks;

namespace MS.Services

{

    public class RoleService : BaseService, IRoleService

    {

        public RoleService(IUnitOfWork<MSDbContext> unitOfWork, IMapper mapper, IdWorker idWorker) : base(unitOfWork, mapper, idWorker)

        {

        }

        public async Task<ExecuteResult<Role>> Create(RoleViewModel viewModel)

        {

            ExecuteResult<Role> result = new ExecuteResult<Role>();

            //检查字段

            if (viewModel.CheckField(ExecuteType.Create, _unitOfWork) is ExecuteResult checkResult && !checkResult.IsSucceed)

            {

                return result.SetFailMessage(checkResult.Message);

            }

            using (var tran = _unitOfWork.BeginTransaction())//开启一个事务

            {

                Role newRow = _mapper.Map<Role>(viewModel);

                newRow.Id = _idWorker.NextId();//获取一个雪花Id

                newRow.Creator = 1219490056771866624;//由于暂时还没有做登录,所以拿不到登录者信息,先随便写一个后面再完善

                newRow.CreateTime = DateTime.Now;

                _unitOfWork.GetRepository<Role>().Insert(newRow);

                await _unitOfWork.SaveChangesAsync();

                await tran.CommitAsync();//提交事务

                result.SetData(newRow);//添加成功,把新的实体返回回去

            }

            return result;

        }

        public async Task<ExecuteResult> Delete(RoleViewModel viewModel)

        {

            ExecuteResult result = new ExecuteResult();

            //检查字段

            if (viewModel.CheckField(ExecuteType.Delete, _unitOfWork) is ExecuteResult checkResult && !checkResult.IsSucceed)

            {

                return checkResult;

            }

            _unitOfWork.GetRepository<Role>().Delete(viewModel.Id);

            await _unitOfWork.SaveChangesAsync();//提交

            return result;

        }

        public async Task<ExecuteResult> Update(RoleViewModel viewModel)

        {

            ExecuteResult result = new ExecuteResult();

            //检查字段

            if (viewModel.CheckField(ExecuteType.Update, _unitOfWork) is ExecuteResult checkResult && !checkResult.IsSucceed)

            {

                return checkResult;

            }

            //从数据库中取出该记录

            var row = await _unitOfWork.GetRepository<Role>().FindAsync(viewModel.Id);//在viewModel.CheckField中已经获取了一次用于检查,所以此处不会重复再从数据库取一次,有缓存

            //修改对应的值

            row.Name = viewModel.Name;

            row.DisplayName = viewModel.DisplayName;

            row.Remark = viewModel.Remark;

            row.Modifier = 1219490056771866624;//由于暂时还没有做登录,所以拿不到登录者信息,先随便写一个后面再完善

            row.ModifyTime = DateTime.Now;

            _unitOfWork.GetRepository<Role>().Update(row);

            await _unitOfWork.SaveChangesAsync();//提交

            return result;

        }

    }

}
完整的接口代码:
using Microsoft.AspNetCore.Mvc;

using MS.Models.ViewModel;

using MS.Services;

using MS.WebCore.Core;

using System.Threading.Tasks;

namespace MS.WebApi.Controllers

{

    [Route("[controller]")]

    [ApiController]

    public class RoleController : ControllerBase

    {

        private readonly IRoleService _roleService;

        public RoleController(IRoleService roleService)

        {

            _roleService = roleService;

        }

        [HttpPost]

        public async Task<ExecuteResult> Post(RoleViewModel viewModel)

        {

            return await _roleService.Create(viewModel);

        }

        [HttpPut]

        public async Task<ExecuteResult> Put(RoleViewModel viewModel)

        {

            return await _roleService.Update(viewModel);

        }

        [HttpDelete]

        public async Task<ExecuteResult> Delete(long id)

        {

            return await _roleService.Delete(new RoleViewModel { Id = id });

        }

    }

}
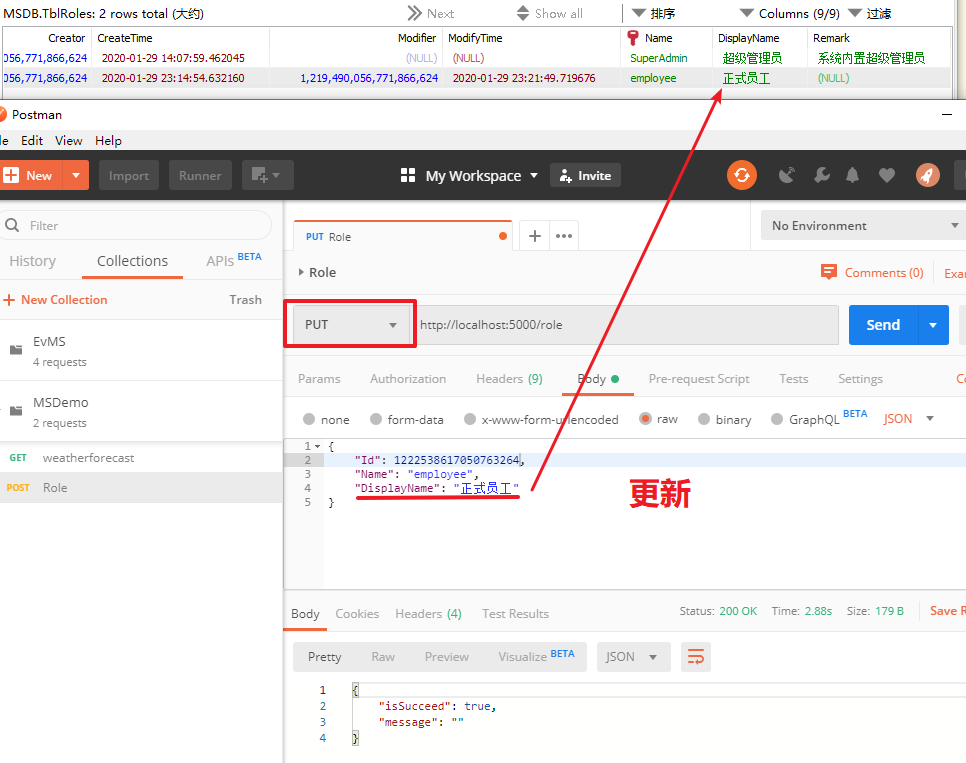
更新接口测试:
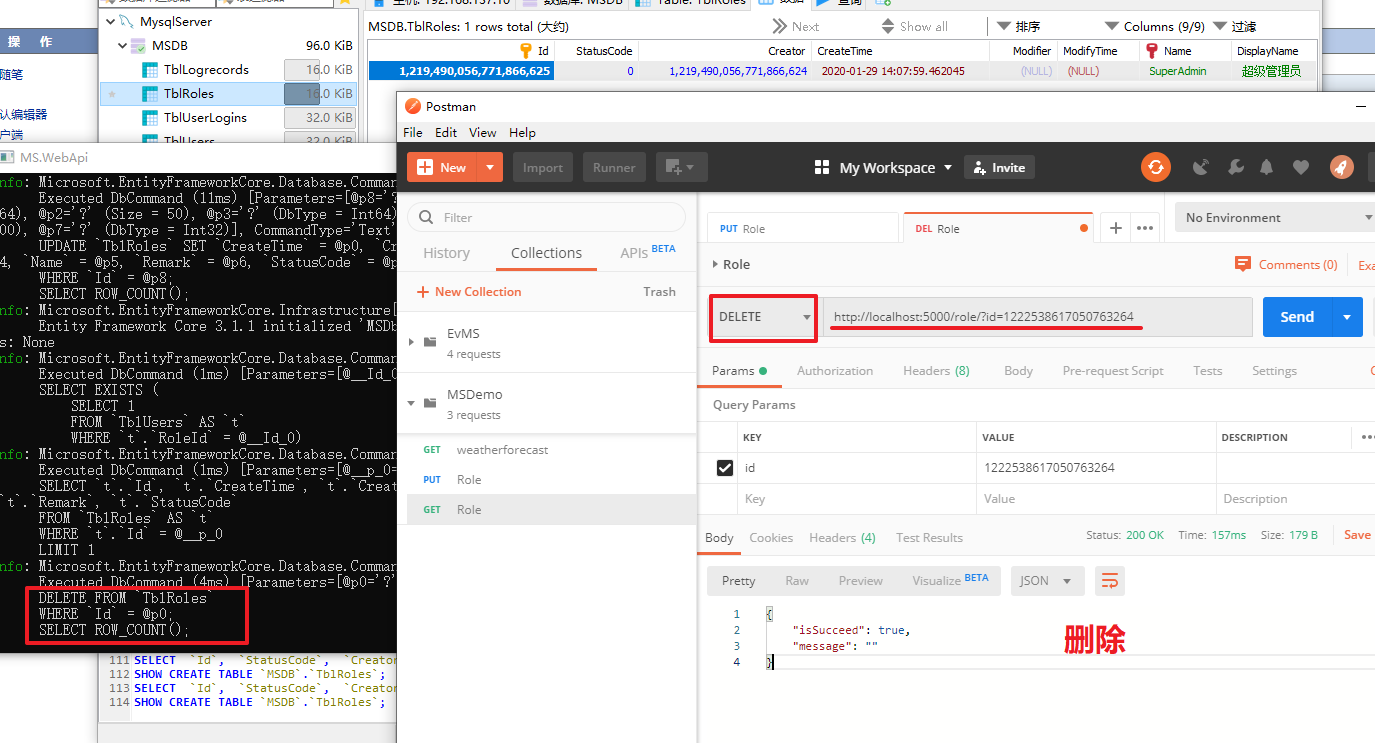
删除接口测试:
项目完成后,如下图所示
ASP.NET Core搭建多层网站架构【8.3-编写角色业务的增删改】的更多相关文章
- ASP.NET Core搭建多层网站架构【0-前言】
2020/01/26, ASP.NET Core 3.1, VS2019 摘要:基于ASP.NET Core 3.1 WebApi搭建后端多层网站架构 目录 0-前言 1-项目结构分层建立 2-公共基 ...
- ASP.NET Core搭建多层网站架构【1-项目结构分层建立】
2020/01/26, ASP.NET Core 3.1, VS2019 摘要:基于ASP.NET Core 3.1 WebApi搭建后端多层网站架构[1-项目结构分层建立] 文章目录 此分支项目代码 ...
- ASP.NET Core搭建多层网站架构【2-公共基础库】
2020/01/28, ASP.NET Core 3.1, VS2019,Newtonsoft.Json 12.0.3, Microsoft.AspNetCore.Cryptography.KeyDe ...
- ASP.NET Core搭建多层网站架构【3-xUnit单元测试之简单方法测试】
2020/01/28, ASP.NET Core 3.1, VS2019, xUnit 2.4.0 摘要:基于ASP.NET Core 3.1 WebApi搭建后端多层网站架构[3-xUnit单元测试 ...
- ASP.NET Core搭建多层网站架构【4-工作单元和仓储设计】
2020/01/28, ASP.NET Core 3.1, VS2019, Microsoft.EntityFrameworkCore.Relational 3.1.1 摘要:基于ASP.NET Co ...
- ASP.NET Core搭建多层网站架构【5-网站数据库实体设计及映射配置】
2020/01/29, ASP.NET Core 3.1, VS2019, EntityFrameworkCore 3.1.1, Microsoft.Extensions.Logging.Consol ...
- ASP.NET Core搭建多层网站架构【6-注册跨域、网站核心配置】
2020/01/29, ASP.NET Core 3.1, VS2019, NLog.Web.AspNetCore 4.9.0 摘要:基于ASP.NET Core 3.1 WebApi搭建后端多层网站 ...
- ASP.NET Core搭建多层网站架构【7-使用NLog日志记录器】
2020/01/29, ASP.NET Core 3.1, VS2019, NLog.Web.AspNetCore 4.9.0 摘要:基于ASP.NET Core 3.1 WebApi搭建后端多层网站 ...
- ASP.NET Core搭建多层网站架构【8.1-使用ViewModel注解验证】
2020/01/29, ASP.NET Core 3.1, VS2019 摘要:基于ASP.NET Core 3.1 WebApi搭建后端多层网站架构[8.1-使用ViewModel注解验证] 使用V ...
随机推荐
- laravel实现excel表的导入导出功能
1.这是个我去公司之后曾经折磨我很久很久的功能查阅了很多资料但是功夫不负有心人在本人的不懈努力下还是实现了这个功能 (ps看不懂我下面说讲述的可以参考这个laravel学院的官方文档 https:// ...
- Python与C语言基础对比(Python快速入门)
代码较长,建议使用电脑阅读本文. 10分钟入门Python 本文中使用的是Python3 如果你曾经学过C语言,阅读此文,相信你能迅速发现这两种语言的异同,达到快速入门的目的.下面将开始介绍它们的异同 ...
- 【译】用 `Wasmer` 进行插件开发 1
[译]用 Wasmer 进行插件开发 1 Using Wasmer for Plugins Part 1 译文 原文链接 https://wiredforge.com/blog/wasmer-plug ...
- APP 安全测试
http://www.cnblogs.com/wetest/p/6694529.html
- Flink系统配置
Flink 系统配置 Flink 提供了多个配置参数,用于调整Flink的行为与性能,所有参数均在flink-config.yaml 文件中.下面我们介绍一下几个主要配置. Java and Clas ...
- Servlet文件上传下载
今天我们来学习Servlet文件上传下载 Servlet文件上传主要是使用了ServletInputStream读取流的方法,其读取方法与普通的文件流相同. 一.文件上传相关原理 第一步,构建一个up ...
- Module build failed: TypeError: this.getResolve is not a function at Object.loader sass报错!(亲测有效!~~)
vue安装node-sass编译报错 在搭建vue脚手架 或者是在vue项目中,想使用sass的功能,需先安装如下 npm install node-sass --save-dev //安装node- ...
- Python结束当前运行的代码
import sys print(0) print(1) print(2) # 到此结束运行 sys.exit() # 已结束,以下不会执行 print(4) print(5)
- JS高级---把随机数对象暴露给window成为全局对象
通过自调用函数产生一个随机数对象, 在自调用函数外面, 调用该随机数对象方法产生随机数 把随机数对象暴露给window成为全局对象 全局变量 自调用一个函数 创建一个空的随机构造函数,给原型对 ...
- 修改vsftpd的默认根目录/var/ftp/pub到其他目录
修改ftp的根目录只要修改/etc/vsftpd/vsftpd.conf文件即可: 加入如下几行: local_root=/var/www/html chroot_local_user=YES ano ...