
spring4.0之二:@Configuration的使用
从Spring3.0,@Configuration用于定义配置类,可替换xml配置文件,被注解的类内部包含有一个或多个被@Bean注解的方法,这些方法将会被AnnotationConfigApplicationContext或AnnotationConfigWebApplicationContext类进行扫描,并用于构建bean定义,初始化Spring容器。
注意:@Configuration注解的配置类有如下要求:
- @Configuration不可以是final类型;
- @Configuration不可以是匿名类;
- 嵌套的configuration必须是静态类。
一、用@Configuration加载spring
1.1、@Configuration配置spring并启动spring容器
1.2、@Configuration启动容器+@Bean注册Bean
1.3、@Configuration启动容器+@Component注册Bean
1.4、使用 AnnotationConfigApplicationContext 注册 AppContext 类的两种方法
1.5、配置Web应用程序(web.xml中配置AnnotationConfigApplicationContext)
二、组合多个配置类
2.1、在@configuration中引入spring的xml配置文件
2.2、在@configuration中引入其它注解配置
2.3、@configuration嵌套(嵌套的Configuration必须是静态类)
三、@EnableXXX注解
四、@Profile逻辑组配置
五、使用外部变量
一、@Configuation加载Spring方法
1.1、@Configuration配置spring并启动spring容器
@Configuration标注在类上,相当于把该类作为spring的xml配置文件中的<beans>,作用为:配置spring容器(应用上下文)
package com.dxz.demo.configuration;

import org.springframework.context.annotation.Configuration;

@Configuration

public class TestConfiguration {

    public TestConfiguration() {

        System.out.println("TestConfiguration容器启动初始化。。。");

    }

}
相当于:
<?xml version="1.0" encoding="UTF-8"?>

<beans xmlns="http://www.springframework.org/schema/beans" xmlns:xsi="http://www.w3.org/2001/XMLSchema-instance"

    xmlns:context="http://www.springframework.org/schema/context" xmlns:jdbc="http://www.springframework.org/schema/jdbc"

    xmlns:jee="http://www.springframework.org/schema/jee" xmlns:tx="http://www.springframework.org/schema/tx"

    xmlns:util="http://www.springframework.org/schema/util" xmlns:task="http://www.springframework.org/schema/task" xsi:schemaLocation="

        http://www.springframework.org/schema/beans http://www.springframework.org/schema/beans/spring-beans-4.0.xsd

        http://www.springframework.org/schema/context http://www.springframework.org/schema/context/spring-context-4.0.xsd

        http://www.springframework.org/schema/jdbc http://www.springframework.org/schema/jdbc/spring-jdbc-4.0.xsd

        http://www.springframework.org/schema/jee http://www.springframework.org/schema/jee/spring-jee-4.0.xsd

        http://www.springframework.org/schema/tx http://www.springframework.org/schema/tx/spring-tx-4.0.xsd

        http://www.springframework.org/schema/util http://www.springframework.org/schema/util/spring-util-4.0.xsd

        http://www.springframework.org/schema/task http://www.springframework.org/schema/task/spring-task-4.0.xsd" default-lazy-init="false">

</beans>
主方法进行测试:
package com.dxz.demo.configuration;

import org.springframework.context.ApplicationContext;

import org.springframework.context.annotation.AnnotationConfigApplicationContext;

public class TestMain {

    public static void main(String[] args) {

        // @Configuration注解的spring容器加载方式,用AnnotationConfigApplicationContext替换ClassPathXmlApplicationContext

        ApplicationContext context = new AnnotationConfigApplicationContext(TestConfiguration.class);

        // 如果加载spring-context.xml文件:

        // ApplicationContext context = new

        // ClassPathXmlApplicationContext("spring-context.xml");

    }

}
从运行主方法结果可以看出,spring容器已经启动了:

1.2、@Configuration启动容器+@Bean注册Bean,@Bean下管理bean的生命周期
@Bean标注在方法上(返回某个实例的方法),等价于spring的xml配置文件中的<bean>,作用为:注册bean对象
bean类:
package com.dxz.demo.configuration;

public class TestBean {

    private String username;

    private String url;

    private String password;

    public void sayHello() {

        System.out.println("TestBean sayHello...");

    }

    public String toString() {

        return "username:" + this.username + ",url:" + this.url + ",password:" + this.password;

    }

    public void start() {

        System.out.println("TestBean 初始化。。。");

    }

    public void cleanUp() {

        System.out.println("TestBean 销毁。。。");

    }

}
配置类:
package com.dxz.demo.configuration;

import org.springframework.context.annotation.Bean;

import org.springframework.context.annotation.Configuration;

import org.springframework.context.annotation.Scope;

@Configuration

public class TestConfiguration {

    public TestConfiguration() {

        System.out.println("TestConfiguration容器启动初始化。。。");

    }

    // @Bean注解注册bean,同时可以指定初始化和销毁方法

    // @Bean(name="testBean",initMethod="start",destroyMethod="cleanUp")

    @Bean

    @Scope("prototype")

    public TestBean testBean() {

        return new TestBean();

    }

}
主方法测试类:
package com.dxz.demo.configuration;

import org.springframework.context.ApplicationContext;

import org.springframework.context.annotation.AnnotationConfigApplicationContext;

public class TestMain {

    public static void main(String[] args) {

        // @Configuration注解的spring容器加载方式,用AnnotationConfigApplicationContext替换ClassPathXmlApplicationContext

        ApplicationContext context = new AnnotationConfigApplicationContext(TestConfiguration.class);

        // 如果加载spring-context.xml文件:

        // ApplicationContext context = new

        // ClassPathXmlApplicationContext("spring-context.xml");

         //获取bean

        TestBean tb = (TestBean) context.getBean("testBean");

        tb.sayHello();

    }

}
结果:

注:
(1)、@Bean注解在返回实例的方法上,如果未通过@Bean指定bean的名称,则默认与标注的方法名相同;
(2)、@Bean注解默认作用域为单例singleton作用域,可通过@Scope(“prototype”)设置为原型作用域;
(3)、既然@Bean的作用是注册bean对象,那么完全可以使用@Component、@Controller、@Service、@Ripository等注解注册bean,当然需要配置@ComponentScan注解进行自动扫描。
@Bean下管理bean的生命周期
可以使用基于 Java 的配置来管理 bean 的生命周期。@Bean 支持两种属性,即 initMethod 和destroyMethod,这些属性可用于定义生命周期方法。在实例化 bean 或即将销毁它时,容器便可调用生命周期方法。生命周期方法也称为回调方法,因为它将由容器调用。使用 @Bean 注释注册的 bean 也支持 JSR-250 规定的标准 @PostConstruct 和 @PreDestroy 注释。如果您正在使用 XML 方法来定义 bean,那么就应该使用 bean 元素来定义生命周期回调方法。以下代码显示了在 XML 配置中通常使用 bean 元素定义回调的方法。
@Configuration

@ComponentScan(basePackages = "com.dxz.demo.configuration")

public class TestConfiguration {

    public TestConfiguration() {

        System.out.println("TestConfiguration容器启动初始化。。。");

    }

    //@Bean注解注册bean,同时可以指定初始化和销毁方法

    @Bean(name="testBean",initMethod="start",destroyMethod="cleanUp")

    @Scope("prototype")

    public TestBean testBean() {

        return new TestBean();

    }

}
启动类:
public class TestMain {

    public static void main(String[] args) {

        ApplicationContext context = new AnnotationConfigApplicationContext(TestConfiguration.class);

        TestBean tb = (TestBean) context.getBean("testBean");

        tb.sayHello();

        System.out.println(tb);

        TestBean tb2 = (TestBean) context.getBean("testBean");

        tb2.sayHello();

        System.out.println(tb2);

    }

}
结果:

分析:
结果中的1:表明initMethod生效
结果中的2:表明@Scope("prototype")生效
1.3、@Configuration启动容器+@Component注册Bean
bean类:
package com.dxz.demo.configuration;

import org.springframework.stereotype.Component;

//添加注册bean的注解

@Component

public class TestBean {

    private String username;

    private String url;

    private String password;

    public void sayHello() {

        System.out.println("TestBean sayHello...");

    }

    public String toString() {

        return "username:" + this.username + ",url:" + this.url + ",password:" + this.password;

    }

    public void start() {

        System.out.println("TestBean 初始化。。。");

    }

    public void cleanUp() {

        System.out.println("TestBean 销毁。。。");

    }

}
配置类:
package com.dxz.demo.configuration;

import org.springframework.context.annotation.Bean;

import org.springframework.context.annotation.ComponentScan;

import org.springframework.context.annotation.Configuration;

import org.springframework.context.annotation.Scope;

@Configuration

//添加自动扫描注解,basePackages为TestBean包路径

@ComponentScan(basePackages = "com.dxz.demo.configuration")

public class TestConfiguration {

    public TestConfiguration() {

        System.out.println("TestConfiguration容器启动初始化。。。");

    }

    /*// @Bean注解注册bean,同时可以指定初始化和销毁方法

    // @Bean(name="testNean",initMethod="start",destroyMethod="cleanUp")

    @Bean

    @Scope("prototype")

    public TestBean testBean() {

        return new TestBean();

    }*/

}
主方法测试获取bean对象:
package com.dxz.demo.configuration;

import org.springframework.context.ApplicationContext;

import org.springframework.context.annotation.AnnotationConfigApplicationContext;

public class TestMain {

    public static void main(String[] args) {

        // @Configuration注解的spring容器加载方式,用AnnotationConfigApplicationContext替换ClassPathXmlApplicationContext

        ApplicationContext context = new AnnotationConfigApplicationContext(TestConfiguration.class);

        // 如果加载spring-context.xml文件:

        // ApplicationContext context = new

        // ClassPathXmlApplicationContext("spring-context.xml");

         //获取bean

        TestBean tb = (TestBean) context.getBean("testBean");

        tb.sayHello();

    }

}
sayHello()方法都被正常调用。

1.4、使用 AnnotationConfigApplicationContext 注册 AppContext 类的两种方法
1.4.1、 配置类的注册方式是将其传递给 AnnotationConfigApplicationContext 构造函数
public static void main(String[] args) {

        // @Configuration注解的spring容器加载方式,用AnnotationConfigApplicationContext替换ClassPathXmlApplicationContext

        ApplicationContext context = new AnnotationConfigApplicationContext(TestConfiguration.class);

        //获取bean

        TestBean tb = (TestBean) context.getBean("testBean");

        tb.sayHello();

    }
1.4.2、 AnnotationConfigApplicationContext 的register 方法传入配置类来注册配置类
public static void main(String[] args) {

  ApplicationContext ctx = new AnnotationConfigApplicationContext();

  ctx.register(AppContext.class)

}
1.5、配置Web应用程序(web.xml中配置AnnotationConfigApplicationContext)
过去,您通常要利用 XmlWebApplicationContext 上下文来配置 Spring Web 应用程序,即在 Web 部署描述符文件 web.xml 中指定外部 XML 上下文文件的路径。XMLWebApplicationContext 是 Web 应用程序使用的默认上下文类。以下代码描述了 web.xml 中指向将由 ContextLoaderListener 监听器类载入的外部 XML 上下文文件的元素。
<web-app>

    <context-param>

        <param-name>contextConfigLocation</param-name>

        <param-value>/WEB-INF/applicationContext.xml</param-value>

    </context-param>

    <listener>

        <listener-class>

            org.springframework.web.context.ContextLoaderListener

        </listener-class>

    </listener>

    <servlet>

    <servlet-name>sampleServlet</servlet-name>

    <servlet-class>

        org.springframework.web.servlet.DispatcherServlet

    </servlet-class>

    </servlet>

...

</web-app>
现在,您要将 web.xml 中的上述代码更改为使用 AnnotationConfigApplicationContext 类。切记,XmlWebApplicationContext 是 Spring 为 Web 应用程序使用的默认上下文实现,因此您永远不必在您的web.xml 文件中显式指定这个上下文类。现在,您将使用基于 Java 的配置,因此在配置 Web 应用程序时,需要在web.xml 文件中指定 AnnotationConfigApplicationContext 类。上述代码将修改如下:
<web-app>

    <context-param>

        <param-name>contextClass</param-name>

        <param-value>

            org.springframework.web.context.

            support.AnnotationConfigWebApplicationContext

        </param-value>

    </context-param>

    <context-param>

        <param-name>contextConfigLocation</param-name>

        <param-value>

            demo.AppContext

        </param-value>

    </context-param>

    <listener>

        <listener-class>

            org.springframework.web.context.ContextLoaderListener

        </listener-class>

    </listener>

    <servlet>

    <servlet-name>sampleServlet</servlet-name>

    <servlet-class>

        org.springframework.web.servlet.DispatcherServlet

    </servlet-class>

    <init-param>

        <param-name>contextClass</param-name>

        <param-value>

            org.springframework.web.context.

            support.AnnotationConfigWebApplicationContext

        </param-value>

    </init-param>

    </servlet>

...

</web-app>
以上修改后的 web.xml 现在定义了 AnnotationConfigWebApplicationContext 上下文类,并将其作为上下文参数和 servlet 元素的一部分。上下文配置位置现在指向 AppContext 配置类。这非常简单。下一节将演示 bean 的生命周期回调和范围的实现。
1.6、@Configuation总结
@Configuation等价于<Beans></Beans>
@Bean等价于<Bean></Bean>
@ComponentScan等价于<context:component-scan base-package="com.dxz.demo"/>
二、组合多个配置类
2.1、在@configuration中引入spring的xml配置文件
package com.dxz.demo.configuration2;

import org.springframework.context.annotation.Configuration;

import org.springframework.context.annotation.ImportResource;

@Configuration

@ImportResource("classpath:applicationContext-configuration.xml")

public class WebConfig {

}
bean类:
package com.dxz.demo.configuration2;

public class TestBean2 {

    private String username;

    private String url;

    private String password;

    public void sayHello() {

        System.out.println("TestBean2 sayHello...");

    }

    public String toString() {

        return "TestBean2 username:" + this.username + ",url:" + this.url + ",password:" + this.password;

    }

    public void start() {

        System.out.println("TestBean2 初始化。。。");

    }

    public void cleanUp() {

        System.out.println("TestBean2 销毁。。。");

    }

}
测试类:
package com.dxz.demo.configuration2;

import org.springframework.context.ApplicationContext;

import org.springframework.context.annotation.AnnotationConfigApplicationContext;

public class TestMain2 {

    public static void main(String[] args) {

        // @Configuration注解的spring容器加载方式,用AnnotationConfigApplicationContext替换ClassPathXmlApplicationContext

        ApplicationContext context = new AnnotationConfigApplicationContext(WebConfig.class);

        // 如果加载spring-context.xml文件:

        // ApplicationContext context = new

        // ClassPathXmlApplicationContext("spring-context.xml");

        // 获取bean

        TestBean2 tb = (TestBean2) context.getBean("testBean2");

        tb.sayHello();

    }

}
结果:

2.2、在@configuration中引入其它注解配置
package com.dxz.demo.configuration2;

import org.springframework.context.annotation.Configuration;

import org.springframework.context.annotation.Import;

import org.springframework.context.annotation.ImportResource;

import com.dxz.demo.configuration.TestConfiguration;

@Configuration

@ImportResource("classpath:applicationContext-configuration.xml")

@Import(TestConfiguration.class)

public class WebConfig {

}
测试类:
package com.dxz.demo.configuration2;

import org.springframework.context.ApplicationContext;

import org.springframework.context.annotation.AnnotationConfigApplicationContext;

import com.dxz.demo.configuration.TestBean;

public class TestMain2 {

    public static void main(String[] args) {

        // @Configuration注解的spring容器加载方式,用AnnotationConfigApplicationContext替换ClassPathXmlApplicationContext

        ApplicationContext context = new AnnotationConfigApplicationContext(WebConfig.class);

        // 如果加载spring-context.xml文件:

        // ApplicationContext context = new

        // ClassPathXmlApplicationContext("spring-context.xml");

        // 获取bean

        TestBean2 tb2 = (TestBean2) context.getBean("testBean2");

        tb2.sayHello();

        TestBean tb = (TestBean) context.getBean("testBean");

        tb.sayHello();

    }

}
结果:
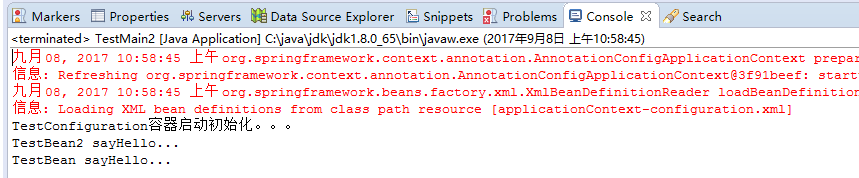
2.3、@configuration嵌套(嵌套的Configuration必须是静态类)
通过配置类嵌套的配置类,达到组合多个配置类的目的。但注意内部类必须是静态类。
上代码:
package com.dxz.demo.configuration3;

import org.springframework.stereotype.Component;

@Component

public class TestBean {

    private String username;

    private String url;

    private String password;

    public void sayHello() {

        System.out.println("TestBean sayHello...");

    }

    public String toString() {

        return "username:" + this.username + ",url:" + this.url + ",password:" + this.password;

    }

    public void start() {

        System.out.println("TestBean start");

    }

    public void cleanUp() {

        System.out.println("TestBean destory");

    }

}
package com.dxz.demo.configuration3;

public class DataSource {

    private String dbUser;

    private String dbPass;

    public String getDbUser() {

        return dbUser;

    }

    public void setDbUser(String dbUser) {

        this.dbUser = dbUser;

    }

    public String getDbPass() {

        return dbPass;

    }

    public void setDbPass(String dbPass) {

        this.dbPass = dbPass;

    }

    @Override

    public String toString() {

        return "DataSource [dbUser=" + dbUser + ", dbPass=" + dbPass + "]";

    }

}
配置类:
package com.dxz.demo.configuration3;

import org.springframework.context.annotation.Bean;

import org.springframework.context.annotation.ComponentScan;

import org.springframework.context.annotation.Configuration;

@Configuration

@ComponentScan(basePackages = "com.dxz.demo.configuration3")

public class TestConfiguration {

    public TestConfiguration() {

        System.out.println("TestConfiguration容器启动初始化。。。");

    }

    @Configuration

    static class DatabaseConfig {

        @Bean

        DataSource dataSource() {

            return new DataSource();

        }

    }

}
启动类:
package com.dxz.demo.configuration3;

import org.springframework.context.ApplicationContext;

import org.springframework.context.annotation.AnnotationConfigApplicationContext;

public class TestMain {

    public static void main(String[] args) {

        // @Configuration注解的spring容器加载方式,用AnnotationConfigApplicationContext替换ClassPathXmlApplicationContexts

        ApplicationContext context = new AnnotationConfigApplicationContext(TestConfiguration.class);

         //bean

        TestBean tb = (TestBean) context.getBean("testBean");

        tb.sayHello();

        DataSource ds = (DataSource) context.getBean("dataSource");

        System.out.println(ds);

    }

}
结果:
TestConfiguration容器启动初始化。。。

TestBean sayHello...

DataSource [dbUser=null, dbPass=null]
3、@EnableXXX注解
配合@Configuration使用,包括 @EnableAsync, @EnableScheduling, @EnableTransactionManagement, @EnableAspectJAutoProxy, @EnableWebMvc。
@EnableAspectJAutoProxy---《spring AOP 之:@Aspect注解》
@EnableScheduling--《Spring 3.1新特性之二:@Enable*注解的源码,spring源码分析之定时任务Scheduled注解》
4、@Profile逻辑组配置
5、使用外部变量
1、@PropertySource + Environment,通过@PropertySource注解将properties配置文件中的值存储到Spring的 Environment中,Environment接口提供方法去读取配置文件中的值,参数是properties文件中定义的key值。
2、@PropertySource(PropertySourcesPlaceholderConfigurer)+@Value
spring4.0之二:@Configuration的使用的更多相关文章
- 转:spring4.0之二:@Configuration的使用
从Spring3.0,@Configuration用于定义配置类,可替换xml配置文件,被注解的类内部包含有一个或多个被@Bean注解的方法,这些方法将会被AnnotationConfigApplic ...
- [CXF REST标准实战系列] 二、Spring4.0 整合 CXF3.0,实现测试接口(转)
转自:[CXF REST标准实战系列] 二.Spring4.0 整合 CXF3.0,实现测试接口 文章Points: 1.介绍RESTful架构风格 2.Spring配置CXF 3.三层初设计,实现W ...
- [CXF REST标准实战系列] 二、Spring4.0 整合 CXF3.0,实现测试接口
Writer:BYSocket(泥沙砖瓦浆木匠) 微博:BYSocket 豆瓣:BYSocket Reprint it anywhere u want. 文章Points: 1.介绍RESTful架构 ...
- [转]Struts2.3.16.1+Hibernate4.3.4+Spring4.0.2 框架整合
原文地址:http://blog.csdn.net/ycb1689/article/details/22928519 最新版Struts2+Hibernate+Spring整合 目前为止三大框架最新版 ...
- Spring4.0编程式定时任务配置
看过很多定时调度的配置,大多使用XML配置,觉得比较麻烦,也比较老套.这里介绍一种基于spring4.0注解编程式配置定时任务,简单清晰,使用方便.. 至于引入spring相关jar这里不多说,直接切 ...
- Spring4.0支持Groovy配置
介绍 前一段时间观注了一下Spring4.0的一些特性,当中就有对Groovy配置的支持.因为临时还没有很深入的研究.所以举个小样例来说明一下怎样支持Groovy配置. package shuai.s ...
- 项目ITP(五) spring4.0 整合 Quartz 实现任务调度
前言 系列文章:[传送门] 项目需求: 二维码推送到一体机上,给学生签到扫描用.然后需要的是 上课前20分钟 ,幸好在帮带我的学长做 p2p 的时候,接触过.自然 quartz 是首选.所以我就配置了 ...
- Spring4.0系列9-websocket简单应用
http://wiselyman.iteye.com/blog/2003336 ******************************************* Spring4.0系列1-新特性 ...
- Struts2.3.16.1+Hibernate4.3.4+Spring4.0.2 框架整合(转)
原文 http://blog.csdn.net/songanling/article/details/22454973 最新版Struts2+Hibernate+Spring整合 目前为止三 ...
随机推荐
- vue的组件之间传值方法
父组件 <template> <div> 这是父组件 <children v-bind:parentToChild="toChild" v-on:sh ...
- 如何设置在html中保留超链接格式但不实现跳转
---恢复内容开始--- 老师布置了一个任务,要求用户登录或者不登录都会有一个主页(home.jsp),如果登录的话就会跳转至登录界面(login.jsp),在登录界面中有个验证码,还要求有个和很多登 ...
- react-thunk的使用流程
react-thunk作用:使我们可以在action中返回函数,而不是只能返回一个对象.然后我们可以在函数中做很多事情,比如发送异步的ajax请求. 这就是react-thunk的使用方法.接受一个d ...
- 快速高效实现微信小程序图片上传与腾讯免费5G存储空间的使用
本文介绍了如何在微信小程序开发中使用腾讯官方提供的云开发功能快速实现图片的上传与存储,以及介绍云开发的 5G 存储空间的基本使用方法,这将大大提高微信小程序的开发效率 对于一般的图片上传功能开发,我们 ...
- 跨域iframe如何通信
1. 使用document.domain设置相同主域(同主域不同子域): 2. 使用window.name添加空网页: 3. 使用postmessage监听:
- mysql sql文件批量处理
简单动作复杂化,导致处理文件误入坑, 数据库拷贝,备份还原是每个面向对象的开发人员避免不了的动作,在数据库使用中,习惯性的使用第三方数据库管理软件,最近需要做数据库迁移,导出的批量sql文件不知如何区 ...
- Cookie中的sessionid与JSONP原理
一.首先说明一下cookie中的sessionid的作用. 1.cookie只是一些文本内容,多是键值对的形式,是请求头中的一部分 2.http是无连接的 知道这两点,就可以很容易的理解session ...
- C# 语句中的各种单例模式代码
1.非线程安全(经典模式),但没有考虑线程安全,在多线程时可能会出问题,不过还从没看过出错的现象. /// <summary> /// 单例模式的实现 /// </summary&g ...
- 一个简易的allocator
#include <vector> #include <iostream> #include <algorithm> using namespace::std; t ...
- websocket随笔
https://github.com/littlechaser/push-service 我们在浏览器调服务器的时候使用http连接通常就能实现,但是如果要服务器数据发生变化,需要主动推送给客户端(如 ...