ssm整合(方案一 引入jar)
最近为了研究redis整合,基本都是ssm+redis 好吧 我是老古董了,以前都是ssi,那就折腾一下ssm先,具体方案:
方案一:基本引入jar版、方案二:maven版(后续继续整)
这篇主要是通过方案一,反正折腾jar折腾了好久。
jar可以在我的百度云下载http://pan.baidu.com/s/1eRG5kky
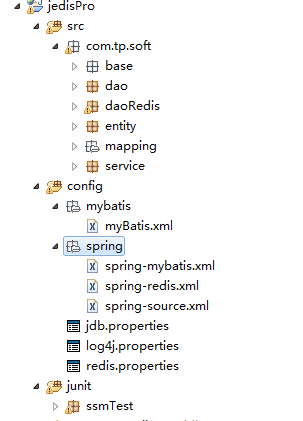
项目目录
步骤如下:
一:
jdb.properties
#JDBCdriver

jdbc.driverClassName=oracle.jdbc.driver.OracleDriver

#JDBC

jdbc.url=数据库服务器链接

jdbc.username=数据库账号

jdbc.password=数据库密码

jdbc.publickey=公钥解密

jdbc.dbcp.initialSize=

jdbc.dbcp.maxActive=

jdbc.dbcp.maxIdle=

jdbc.dbcp.minIdle=

jdbc.dbcp.maxWait=
redis.properties用于redis的配置文件。ssm中暂时未用到可以忽略
二:
spring-source.xml
<?xml version="1.0" encoding="UTF-8"?>

<beans xmlns="http://www.springframework.org/schema/beans"

    xmlns:xsi="http://www.w3.org/2001/XMLSchema-instance"

    xmlns:aop="http://www.springframework.org/schema/aop"

    xmlns:context="http://www.springframework.org/schema/context"

    xmlns:tx="http://www.springframework.org/schema/tx"

    xmlns:jee="http://www.springframework.org/schema/jee"

    xmlns:jdbc="http://www.springframework.org/schema/jdbc"

    xmlns:cache="http://www.springframework.org/schema/cache"

    xmlns:jaxws="http://cxf.apache.org/jaxws"

    xmlns:jaxrs="http://cxf.apache.org/jaxrs"

    xsi:schemaLocation="http://www.springframework.org/schema/beans

                     http://www.springframework.org/schema/beans/spring-beans.xsd

                     http://www.springframework.org/schema/tx

                     http://www.springframework.org/schema/tx/spring-tx.xsd

                     http://www.springframework.org/schema/context

                     http://www.springframework.org/schema/context/spring-context.xsd

                     http://www.springframework.org/schema/aop

                     http://www.springframework.org/schema/aop/spring-aop.xsd

                     http://www.springframework.org/schema/jee

                     http://www.springframework.org/schema/jee/spring-jee-3.1.xsd

                     http://www.springframework.org/schema/jdbc

                     http://www.springframework.org/schema/jdbc/spring-jdbc-3.1.xsd

                     http://www.springframework.org/schema/cache http://www.springframework.org/schema/cache/spring-cache-3.2.xsd

                     http://cxf.apache.org/jaxws

                     http://cxf.apache.org/schemas/jaxws.xsd

                     http://cxf.apache.org/jaxrs

                     http://cxf.apache.org/schemas/jaxrs.xsd"  default-autowire="byName" >

    <context:annotation-config />

    <!-- 扫描注解web整合时用 -->

    <context:component-scan base-package="com.tp.soft" />

    <context:property-placeholder location="classpath:*.properties"/>

    <!-- <bean id="jsonSerializer" class="com.tp.soft.base.redis.JsonRedisSeriaziler"/>

    <bean id="userDao" class="com.tp.soft.daoRedis.impl.UserDaoImpl" />  -->

    <bean id="userSvc" class="com.tp.soft.service.impl.UserSvcImpl" />

</beans>
三:
spring-mybatis.xml
<?xml version="1.0" encoding="UTF-8"?>

<beans xmlns="http://www.springframework.org/schema/beans"

    xmlns:xsi="http://www.w3.org/2001/XMLSchema-instance"

    xmlns:aop="http://www.springframework.org/schema/aop"

    xmlns:context="http://www.springframework.org/schema/context"

    xmlns:tx="http://www.springframework.org/schema/tx"

    xmlns:jee="http://www.springframework.org/schema/jee"

    xmlns:jdbc="http://www.springframework.org/schema/jdbc"

    xmlns:cache="http://www.springframework.org/schema/cache"

    xmlns:jaxws="http://cxf.apache.org/jaxws"

    xmlns:jaxrs="http://cxf.apache.org/jaxrs"

    xsi:schemaLocation="http://www.springframework.org/schema/beans

                     http://www.springframework.org/schema/beans/spring-beans.xsd

                     http://www.springframework.org/schema/tx

                     http://www.springframework.org/schema/tx/spring-tx.xsd

                     http://www.springframework.org/schema/context

                     http://www.springframework.org/schema/context/spring-context.xsd

                     http://www.springframework.org/schema/aop

                     http://www.springframework.org/schema/aop/spring-aop.xsd

                     http://www.springframework.org/schema/jee

                     http://www.springframework.org/schema/jee/spring-jee-3.1.xsd

                     http://www.springframework.org/schema/jdbc

                     http://www.springframework.org/schema/jdbc/spring-jdbc-3.1.xsd

                     http://www.springframework.org/schema/cache http://www.springframework.org/schema/cache/spring-cache-3.2.xsd

                     http://cxf.apache.org/jaxws

                     http://cxf.apache.org/schemas/jaxws.xsd

                     http://cxf.apache.org/jaxrs

                     http://cxf.apache.org/schemas/jaxrs.xsd"  default-autowire="byName" >

    <!--Druid 连接池配置-->

    <bean id="dataSource" class="com.alibaba.druid.pool.DruidDataSource" init-method="init" destroy-method="close">

        <!-- 基本属性 url、user、password -->

        <property name="url" value="${jdbc.url}" />

        <property name="username" value="${jdbc.username}" />

        <property name="password" value="${jdbc.password}" />

        <property name="filters" value="stat,config" />

         <property name="connectionProperties" value="config.decrypt=true;config.decrypt.key=${jdbc.publickey}" />

        <!-- 配置初始化大小、最小、最大 -->

        <property name="initialSize" value="1" />

        <property name="minIdle" value="1" />

        <property name="maxActive" value="40" />

        <!-- 配置获取连接等待超时的时间 -->

        <property name="maxWait" value="60000" />

        <!-- 配置间隔多久才进行一次检测,检测需要关闭的空闲连接,单位是毫秒 -->

        <property name="timeBetweenEvictionRunsMillis" value="60000" />

        <!-- 配置一个连接在池中最小生存的时间,单位是毫秒 -->

        <property name="minEvictableIdleTimeMillis" value="300000" />

        <property name="validationQuery" value="SELECT 'x' FROM DUAL" />

        <property name="testWhileIdle" value="true" />

        <property name="testOnBorrow" value="false" />

        <property name="testOnReturn" value="false" />

        <!-- 打开PSCache,并且指定每个连接上PSCache的大小 -->

        <property name="poolPreparedStatements" value="true" />

        <property name="maxPoolPreparedStatementPerConnectionSize" value="20" />

        <!-- 配置监控统计拦截的filters,去掉后监控界面sql无法统计 -->

        <!-- property name="filters" value="stat" /-->

    </bean>

    <!-- 配置sqlSessionFactory -->

    <bean id="sqlSessionFactory" class="org.mybatis.spring.SqlSessionFactoryBean">

        <property name="dataSource" ref="dataSource"/>

        <property name="configLocation" value="classpath:mybatis/mybatis.xml"/>

    </bean>

    <!-- 扫描mapper -->

    <bean class="org.mybatis.spring.mapper.MapperScannerConfigurer">

        <property name="basePackage" value="com.tp.soft.dao"/>

        <!-- <property name="sqlSessionFactoryBeanName" ref="sqlSessionFactory" />   -->

        <property name="sqlSessionFactory" ref="sqlSessionFactory" />

    </bean>

</beans>
四:
spring-mybatis.xml
<?xml version="1.0" encoding="UTF-8"?>

<!DOCTYPE configuration PUBLIC "-//mybatis.org//DTD Config 3.0//EN"

"http://mybatis.org/dtd/mybatis-3-config.dtd">

<configuration>

   <!-- 配置映射类的别名 -->

    <typeAliases>

     <!-- 配置entity下的所有别名 别名首字母小写 -->

     <!-- <package name="com.tp.soft.entity"/> -->

     <typeAlias alias="User" type="com.tp.soft.entity.AuUser"/>

   </typeAliases>

   <mappers>

       <mapper resource="com/tp/soft/mapping/UserMapper.xml"/>

   </mappers>

</configuration>
五、
UserMapper.xml
<?xml version="1.0" encoding="UTF-8" ?>

<!DOCTYPE mapper PUBLIC "-//mybatis.org//DTD Mapper 3.0//EN" "http://mybatis.org/dtd/mybatis-3-mapper.dtd" >

<mapper namespace="com.tp.soft.dao.UserMapper" >

   <select id="getUser" parameterType="int" resultType="User">

        select * from AU_USER where userid = #{id}

   </select>

</mapper>
六、
实体类AuUser.java
package com.tp.soft.entity;

import java.io.Serializable;

public class AuUser implements Serializable{

    /**

     *

     */

    private static final long serialVersionUID = -1695973853274402680L;

    private int userid;

    private String login_name;

    private String login_pwd;

    public AuUser() {

    }

    public AuUser(int userid, String login_name, String login_pwd) {

        super();

        this.userid = userid;

        this.login_name = login_name;

        this.login_pwd = login_pwd;

    }

    public int getUserid() {

        return userid;

    }

    public void setUserid(int userid) {

        this.userid = userid;

    }

    public String getLogin_name() {

        return login_name;

    }

    public void setLogin_name(String login_name) {

        this.login_name = login_name;

    }

    public String getLogin_pwd() {

        return login_pwd;

    }

    public void setLogin_pwd(String login_pwd) {

        this.login_pwd = login_pwd;

    }

}
七:
dao层
UserMapper.java
package com.tp.soft.dao;

import com.tp.soft.entity.AuUser;

public interface UserMapper {

    public AuUser getUser(int id);

}
八:
业务层
UserSvc.java
package com.tp.soft.service;

import com.tp.soft.entity.AuUser;

public interface UserSvc {

    public AuUser getUser(int id);

}
UserSvcImpl.java
package com.tp.soft.service.impl;

import javax.annotation.Resource;

import org.springframework.dao.DataAccessException;

import org.springframework.stereotype.Service;

import com.tp.soft.dao.UserMapper;

import com.tp.soft.entity.AuUser;

import com.tp.soft.service.UserSvc;

@Service("userSvc")

public class UserSvcImpl implements UserSvc{

    @Resource

    private UserMapper userMapper;

    @Override

    public AuUser getUser(int id) {

        AuUser user = null;

        try{

            user = userMapper.getUser(id);

        }catch (DataAccessException e) {

            System.out.println(e.getLocalizedMessage());

        }

        return user;

    }

}
九:
junit测试
package ssmTest;

import javax.annotation.Resource;

import org.apache.log4j.PropertyConfigurator;

import org.junit.Before;

import org.junit.Test;

import org.springframework.test.context.ContextConfiguration;

import org.springframework.test.context.junit4.AbstractJUnit4SpringContextTests;

import com.tp.soft.entity.AuUser;

import com.tp.soft.service.UserSvc;

@ContextConfiguration(locations = {"classpath:/spring/spring-*.xml"})

public class RedisZhTest extends AbstractJUnit4SpringContextTests{

    @Resource

    private UserSvc userSvc;

    @Before

    public void loadLog(){

        PropertyConfigurator.configure("config/log4j.properties");//加载.properties文件

    }

    @Test

    public void test01(){

        AuUser user = userSvc.getUser(21);

        System.out.println(user.getLogin_name());

    }

}

到此配置全部结束
提别注意:
UserMapper.xml必须与UserMapper.java dao接口名字一样 以及和<mapper namespace="com.tp.soft.dao.UserMapper" >匹配
ssm整合(方案一 引入jar)的更多相关文章
- SSM整合文档
SSM整合文档 v2 一. 文件说明 文件名 描述 spring-servlet.xml 配置SpringMvc框架相关 applicationContext.xml 配置Spring容器 sprin ...
- ssm 整合(方案二 maven)
通过maven来整合ssm方便很多,至少不用去找jar包 具体架构如下: 1.配置pom.xml <project xmlns="http://maven.apache.org/POM ...
- Eclipse中的工程引入jar包后没有整合到一个文件夹而是全部在根目录下显示
Eclipse中的工程引入jar包后没有整合到一个文件夹而是全部在根目录下显示 解决方案: 1,在Eclipse中,点击window-->Preferences-->Java-->B ...
- 08 SSM整合案例(企业权限管理系统):06.产品操作
04.AdminLTE的基本介绍 05.SSM整合案例的基本介绍 06.产品操作 07.订单操作 08.用户操作 09.权限控制 10.权限关联与控制 11.AOP日志 06.产品操作 SSM 环境搭 ...
- Maven + 最新SSM整合
. 1. 开发环境搭建 参考博文:Eclipse4.6(Neon) + Tomcat8 + MAVEN3.3.9 + SVN项目完整环境搭建 2. Maven Web项目创建 2.1. 2.2. 2. ...
- SSM整合配置
SSM三大框架整合详细教程(Spring+SpringMVC+MyBatis) 使用SSM(Spring.SpringMVC和Mybatis)已经有三个多月了,项目在技术上已经没有什么难点了,基于现有 ...
- ssm整合说明与模板-Spring Spring MVC Mybatis整合开发
ssm整合说明 spring+spring mvc+mybatis 说明 源码下载 由于之前存在ssh框架,spring+struts+hibernate,其中spring负责aop与ioc,所以一般 ...
- spring MVC框架入门(外加SSM整合)
spring MVC框架 一.什么是sping MVC Spring MVC属于SpringFrameWork的后续产品,已经融合在Spring Web Flow里面.Spring 框架提供了构建 W ...
- Maven+SSM整合.doc
Maven + SSM整合 1开发环境搭建 1.1Eclipse4.7(Oxygen) + Tomcat8 + Maven3.5.2 2Maven Web项目创建 2.1新建maven项目 2.2 选 ...
随机推荐
- windows MYSQL 安装及修改root密码
官网下载zip包,我下载的是64位的: 下载地址:https://dev.mysql.com/downloads/mysql/ 下载zip的包: 下载后解压:(解压在哪个盘都可以的) 我放在了这里 E ...
- Python学习之旅(一)
Python的简介 Python是一种面向对象的.动态的脚本语言,可用来设计网页和开发后台功能.其创始人Guido van Rossum于1989年圣诞节期间创造了这门语言. (图片来自百度) Pyt ...
- UI常用接口使用规范
//////////////////////////////////////////////////////////////////////////////////////////////// /// ...
- 项目实战02:LNMP的搭建、nginx的ssl加密、身份验证的实现
目录 实战一:搭建lnmp及类小米等商业网站的实现 1.安装包,开启服务 2.修改nginx的配置文件 3.修改php-fpm的配置文件 4.运行mysql ,创建一会网页需要的库 5.把事先找好的小 ...
- Linux之cat的使用
基本介绍 工作原理 从标准输入读入要 cat 的文件列表,然后逐个打开,读入文件内容,再将内容输出到标准输出上. 使用场景 一次显示整个文件 从键盘创建一个文件 将几个文件合并为一个文件 将一个或多个 ...
- Linux下一台服务器Redis主从复制(master-slave)配置
主从概念 ⼀个master可以拥有多个slave,⼀个slave⼜可以拥有多个slave,如此下去,形成了强⼤的多级服务器集群架构 master用来写数据,slave用来读数据,经统计:网站的读写比率 ...
- ES6 对象
对象字面量 属性的简洁表示法 ES6允许对象的属性直接写变量,这时候属性名是变量名,属性值是变量值. const age = 12; const name = "Amy"; con ...
- win10系统安装了多个版本的JDK如何切换
本人这台笔记本前面装了jdk8,现在准备用jdk7,我安装好了jdk7:把系统变量中的JAVA_HOME 改为 D:\java\jdk\jdk7\jdk1.7.0_67,Path下添加如下变量,记得加 ...
- mysql创建表时符号``的作用
新建表语句如下: CREATE TABLE `course` ( `id` bigint(20) NOT NULL AUTO_INCREMENT, `name` varchar(200) NOT NU ...
- 【托业】【新东方托业全真模拟】TEST05~06-----P5~6
credit A with B 把A归功于B present A with B 给A赠送B proofread thoroughly 彻底地校对:exclusively 专门地:独占地:apparen ...