框架源码系列九:依赖注入DI、三种Bean配置方式的注册和实例化过程
一、依赖注入DI
学习目标
1)搞清楚构造参数依赖注入的过程及类
2)搞清楚注解方式的属性依赖注入在哪里完成的。
学习思路
1)思考我们手写时是如何做的
2)读 spring 源码对比看它的实现
3)Spring 源码解读
1. 构造参数依赖注入
org.springframework.beans.factory.support.ConstructorResolver.autowireConstructor(String, RootBeanDefinition, Constructor<?>[], Object[])
->
org.springframework.beans.factory.support.ConstructorResolver.resolveConstructorArguments(String, RootBeanDefinition, BeanWrapper, ConstructorArgumentValues, ConstructorArgumentValues)
 、、
、、
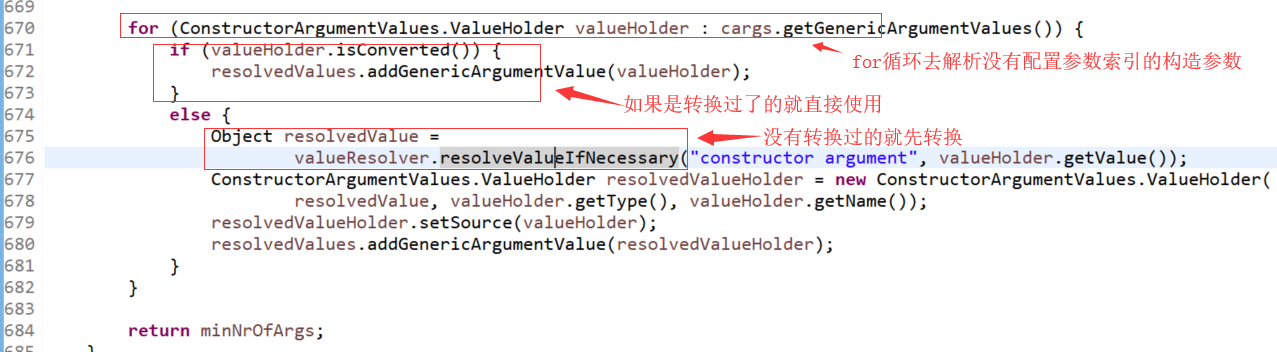
->
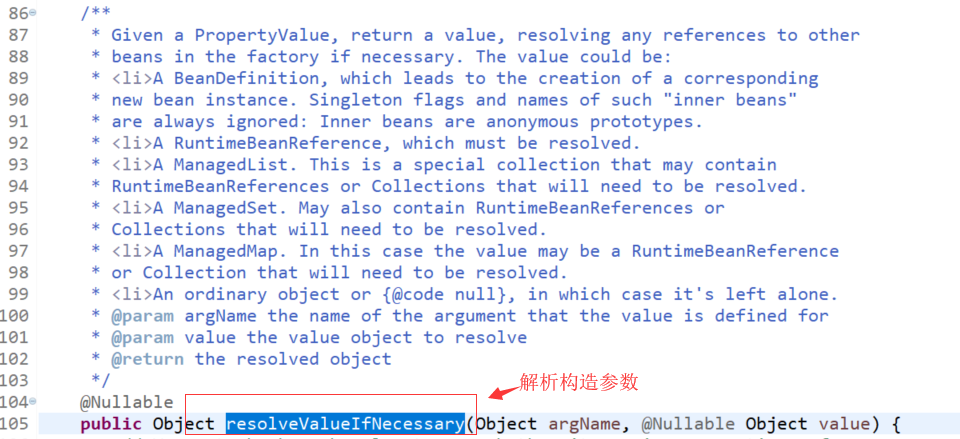
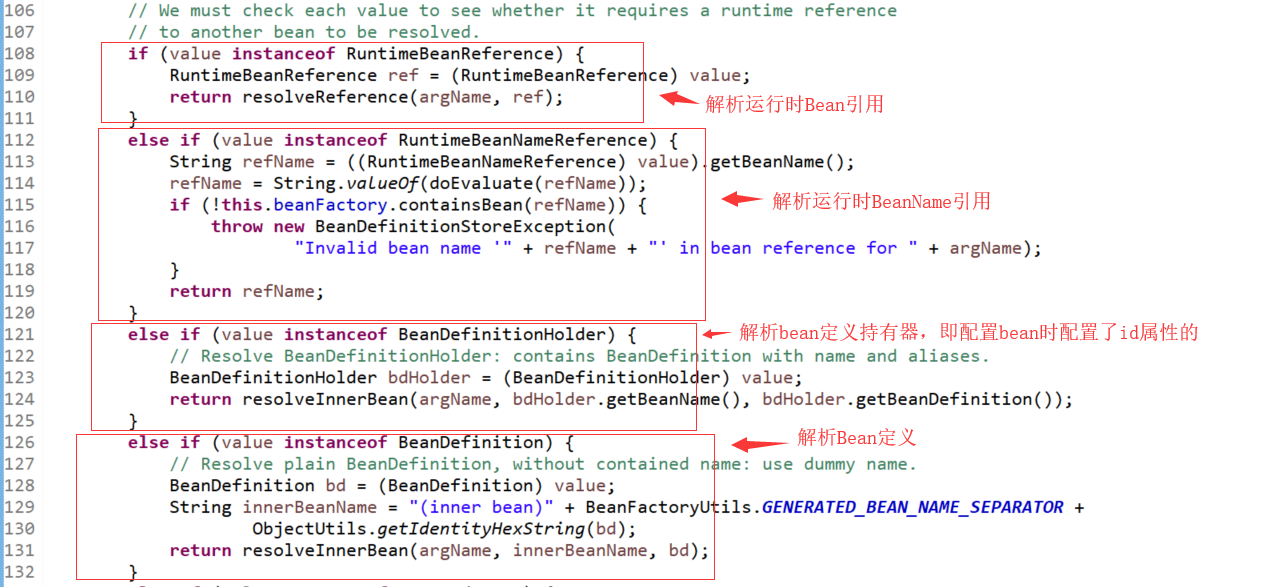
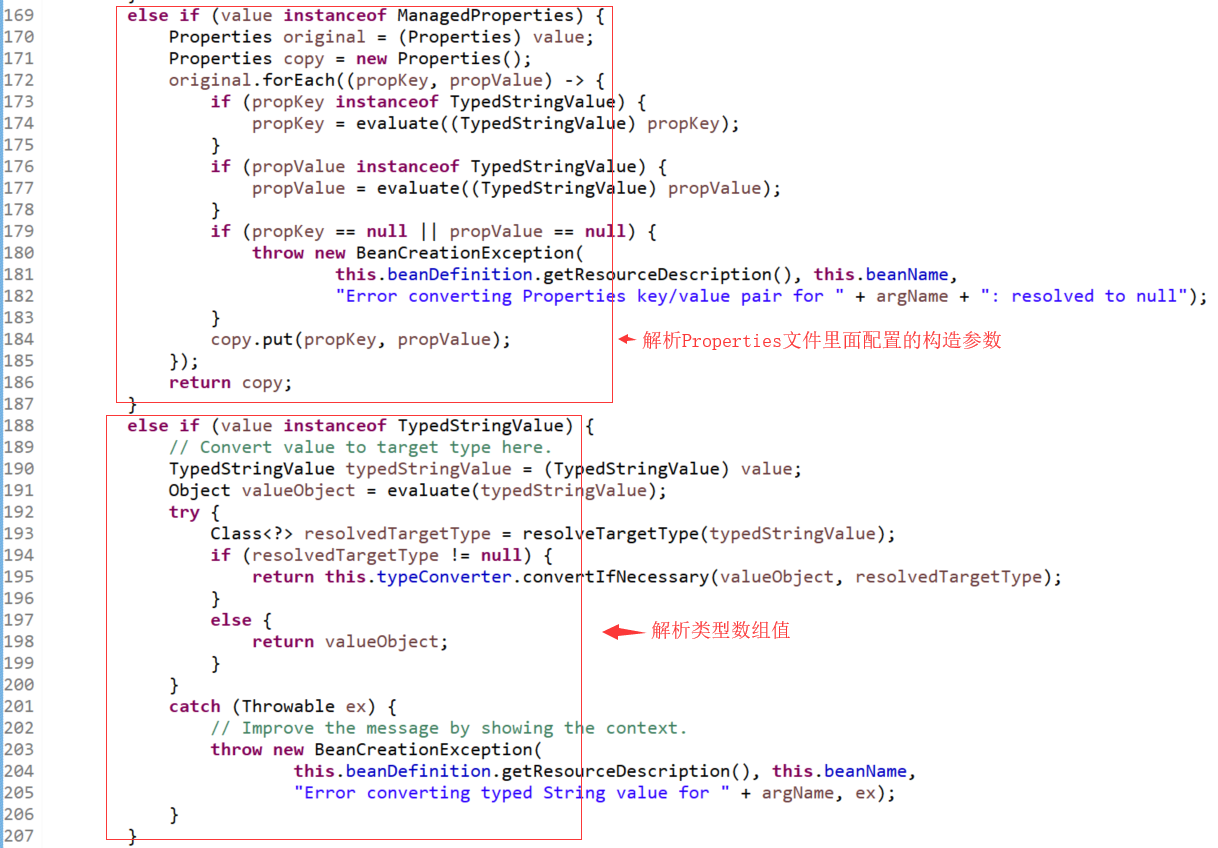
org.springframework.beans.factory.support.BeanDefinitionValueResolver.resolveValueIfNecessary(Object, Object)


解析构造参数源代码的使用示例:
    <bean id="combatService" factory-bean="loveServiceFactory"

        factory-method="getCombatServiceFromMemberFactoryMethod" >

        <constructor-arg type="int" value="120" />

        <constructor-arg ref="beanA"></constructor-arg>

        <constructor-arg><bean id="ssss" class="cccc"></bean></constructor-arg>

        <constructor-arg><bean class="cccc"></bean></constructor-arg>

        <constructor-arg><map></map></constructor-arg>

        <constructor-arg><list></list></constructor-arg>

    </bean>
拓展:初始化前初始化后处理
实现BeanPostProcessor,然后在里面的初始化前和初始化后的方法里面打断点看调用栈就可以找到初始化前和初始化后在哪里处理的了
实现BeanPostProcessor:
package com.study.leesmall.spring.ext;

import org.springframework.beans.BeansException;

import org.springframework.beans.factory.config.BeanPostProcessor;

import org.springframework.stereotype.Component;

@Component

public class MyBeanPostProcessor implements BeanPostProcessor {

    public Object postProcessBeforeInitialization(Object bean, String beanName) throws BeansException {

        System.out.println("------MyBeanPostProcessor.postProcessBeforeInitialization for " + beanName);

        return bean;

    }

    public Object postProcessAfterInitialization(Object bean, String beanName) throws BeansException {

        System.out.println("------MyBeanPostProcessor.postProcessAfterInitialization for " + beanName);

        return bean;

    }

}
在初始化前方法MyBeanPostProcessor.postProcessBeforeInitialization和MyBeanPostProcessor.postProcessAfterInitialization里面打断点拿到调用栈:
初始化前调用栈:
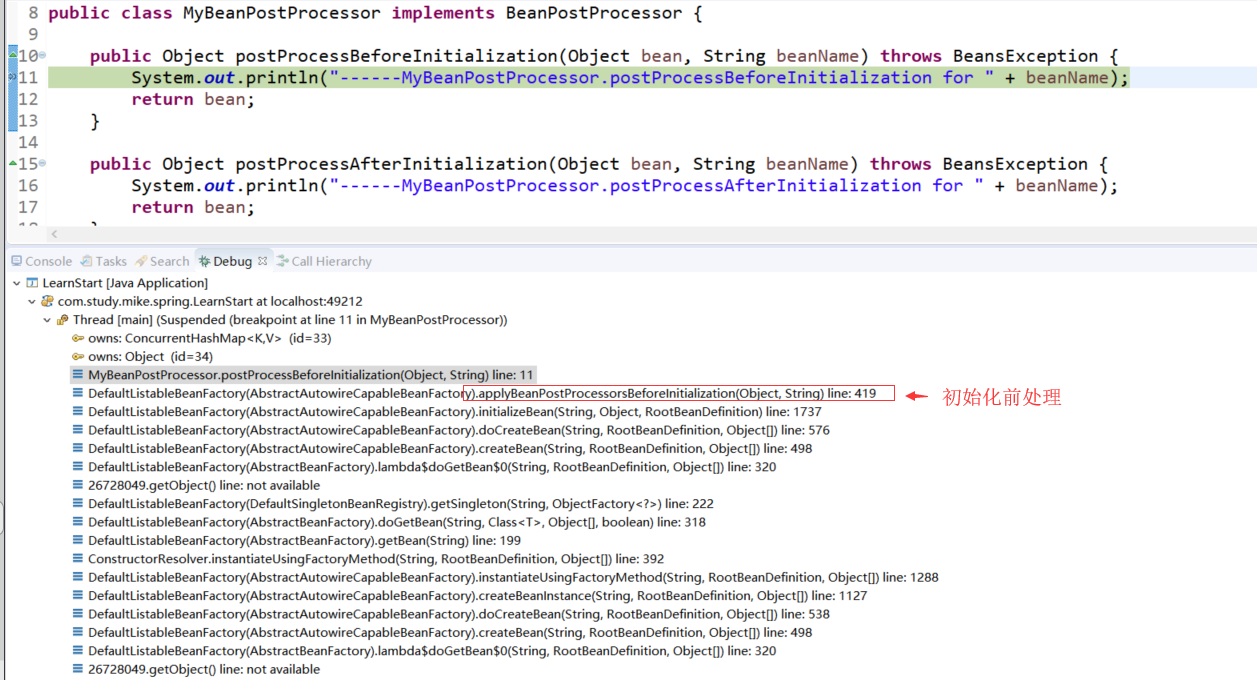
具体的初始化前处理:

初始化后调用栈:
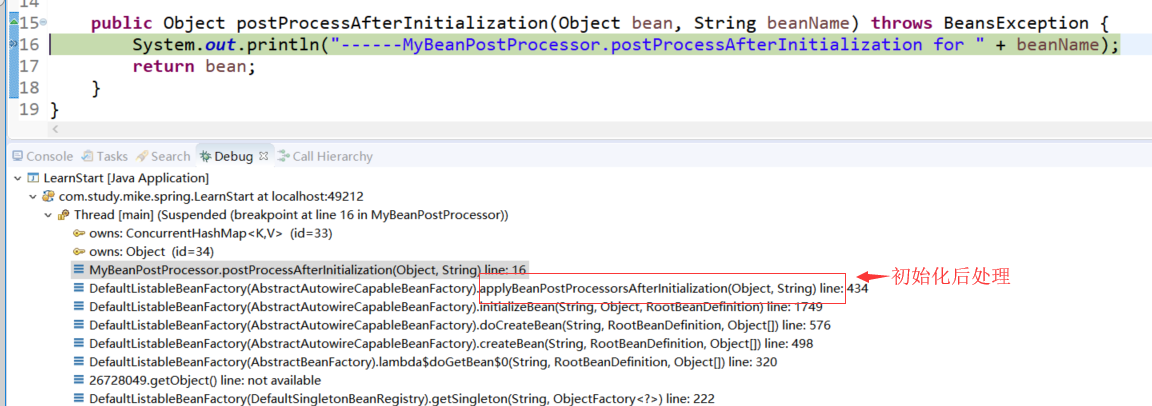
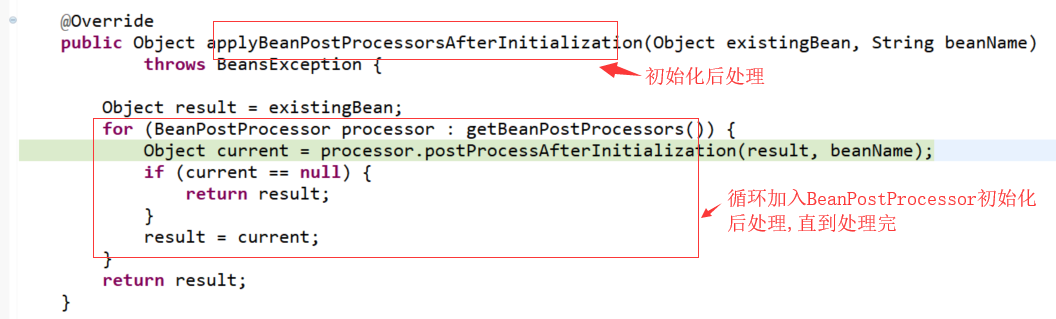
具体的初始化后处理:
2、属性依赖注入
写个测试类里面含有get和set方法,然后在set方法里面打个断点拿到调用栈去分析
测试类:
import org.springframework.stereotype.Component;

@Component

public class Bean3 {

    private String value;

    public String getValue() {

        return value;

    }

    public void setValue(String value) {

        this.value = value;

    }

}
在xml里面的配置:
    <bean id="bean3" class="com.study.leesmall.spring.sample.di.Bean3" scope="prototype" >

        <property name="value" value="10"></property>

    </bean>
测试入口:
package com.study.leesmall.spring.sample.di;

import org.springframework.context.ApplicationContext;

import org.springframework.context.support.GenericXmlApplicationContext;

public class DiMain {

    public static void main(String[] args) {

        ApplicationContext context = new GenericXmlApplicationContext(

                "classpath:com/study/leesmall/spring/sample/di/application.xml");

        Bean3 b3 = context.getBean(Bean3.class);

    }

}
在set方法里面打个断点拿到调用栈:
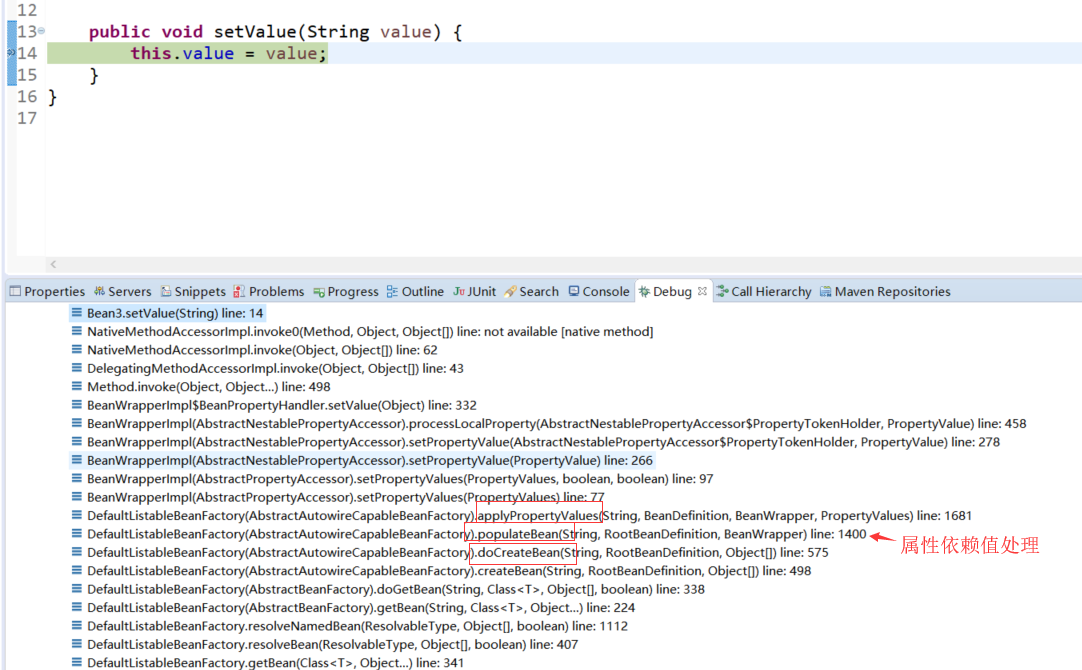
属性依赖值处理源码分析:
org.springframework.beans.factory.support.AbstractAutowireCapableBeanFactory.populateBean(String, RootBeanDefinition, BeanWrapper)

3. 属性循环依赖怎么处理
构成参数是不允许循环依赖的,属性是允许循环依赖的
1)示例代码
Bean1:
package com.study.leesmall.spring.sample.di;

import org.springframework.beans.factory.annotation.Autowired;

import org.springframework.stereotype.Component;

public class Bean1 {

    @Autowired

    private Bean2 b2;

    public void do1() {

        System.out.println("------------------do1");

    }

    public Bean2 getB2() {

        return b2;

    }

    public void setB2(Bean2 b2) {

        this.b2 = b2;

    }

}
Bean2:
package com.study.leesmall.spring.sample.di;

import org.springframework.stereotype.Component;

public class Bean2 {

    @Autowired

    private Bean1 b1;

    public void do2() {

        b1.do1();

    }

    public Bean1 getB1() {

        return b1;

    }

    public void setB1(Bean1 b1) {

        this.b1 = b1;

    }

}
/spring-source-study/src/main/java/com/study/leesmall/spring/sample/di/application.xml配置:
<?xml version="1.0" encoding="UTF-8"?>

<beans xmlns="http://www.springframework.org/schema/beans"

    xmlns:xsi="http://www.w3.org/2001/XMLSchema-instance"

    xsi:schemaLocation="http://www.springframework.org/schema/beans

        http://www.springframework.org/schema/beans/spring-beans.xsd">

    <bean id="bean1" class="com.study.leesmall.spring.sample.di.Bean1" >

        <property name="b2" ref="bean2"></property>

    </bean>

    <bean id="bean2" class="com.study.leesmall.spring.sample.di.Bean2" >

        <property name="b1" ref="bean1"></property>

    </bean>

</beans>
测试类DiMain:
package com.study.leesmall.spring.sample.di;

import org.springframework.context.ApplicationContext;

import org.springframework.context.support.GenericXmlApplicationContext;

public class DiMain {

    public static void main(String[] args) {

        ApplicationContext context = new GenericXmlApplicationContext(

                "classpath:com/study/leesmall/spring/sample/di/application.xml");

        Bean2 b2 = context.getBean(Bean2.class);

        b2.do2();

    }

}
2)请分别尝试在xml配置中配置如下三种情况,看是否可以循环依赖成功
a)Bean1和Bean2都是单例bean。
循环依赖成功
b)Bean1和Bean2一个是单例的,一个是原型的。
循环依赖成功
c)Bean1和Bean2都是原型的
循环依赖不成功
3)思考:为什么两个是原型时不能循环依赖,而单例时可以?
一个Bean的属性依赖另一个bean实例,注入的过程是否就是从BeanFactory中getBean(),再赋值给属性?
是,首先从Bean工厂里面获取依赖的bean,没有就创建
那为什么单例可以,原型不可以?
依据上面的逻辑,那就单例时可以getBean()获得依赖的bean实例,原型时不能,为什么?
再来回想一下单例bean和原型bean在BeanFactory中的区别:
单例Bean是缓存在BeanFactory中的,而原型Bean是不缓存的。
缓存和不缓存对于循环依赖的处理有什么不同呢?
思考一下创建Bean实例的过程:
先Bean1,创建Bean1的实例——>然后对其属性进行依赖注入处理——>依赖Bean2,从BeanFactorygetBean("bean2")——>创建Bean2的实例——>对Bean2实例的属性进行依赖注入处理——>依赖Bean1,从BeanFactory中获取Bean1的实例
缓存的就可以通过beanFactory的getBean()获得前一个Bean的实例。而如果不缓存的,则bean2实例依赖注入Bean1时,从BeanFactorygetBean()就会又创建一个Bean1的实例,如此会无限循环依赖创建下去。
再仔细想一下,对于单例bean的缓存有时机的要求吗?
有,一定要在进行属性依赖注入处理前缓存(暴露)到BeanFactory中。
4)看源码找到单例Bean暴露(缓存)到BeanFactory中的代码,它应在创建Bean实例后,进行属性依赖注入前
在AbstractAutowireCapableBeanFactory.doCreateBean()方法中
        // 为循环引用依赖提前缓存单例 bean

        // Eagerly cache singletons to be able to resolve circular references

        // even when triggered by lifecycle interfaces like BeanFactoryAware.

        // 是否提早暴露单例 Bean 实例

        boolean earlySingletonExposure = (mbd.isSingleton() && this.allowCircularReferences

                && isSingletonCurrentlyInCreation(beanName));

        if (earlySingletonExposure) {

            if (logger.isTraceEnabled()) {

                logger.trace(

                        "Eagerly caching bean '" + beanName + "' to allow for resolving potential circular references");

            }

            addSingletonFactory(beanName, () -> getEarlyBeanReference(beanName, mbd, bean));

        }
5)看一遍属性注入的代码逻辑验证getBean(),单例的获取
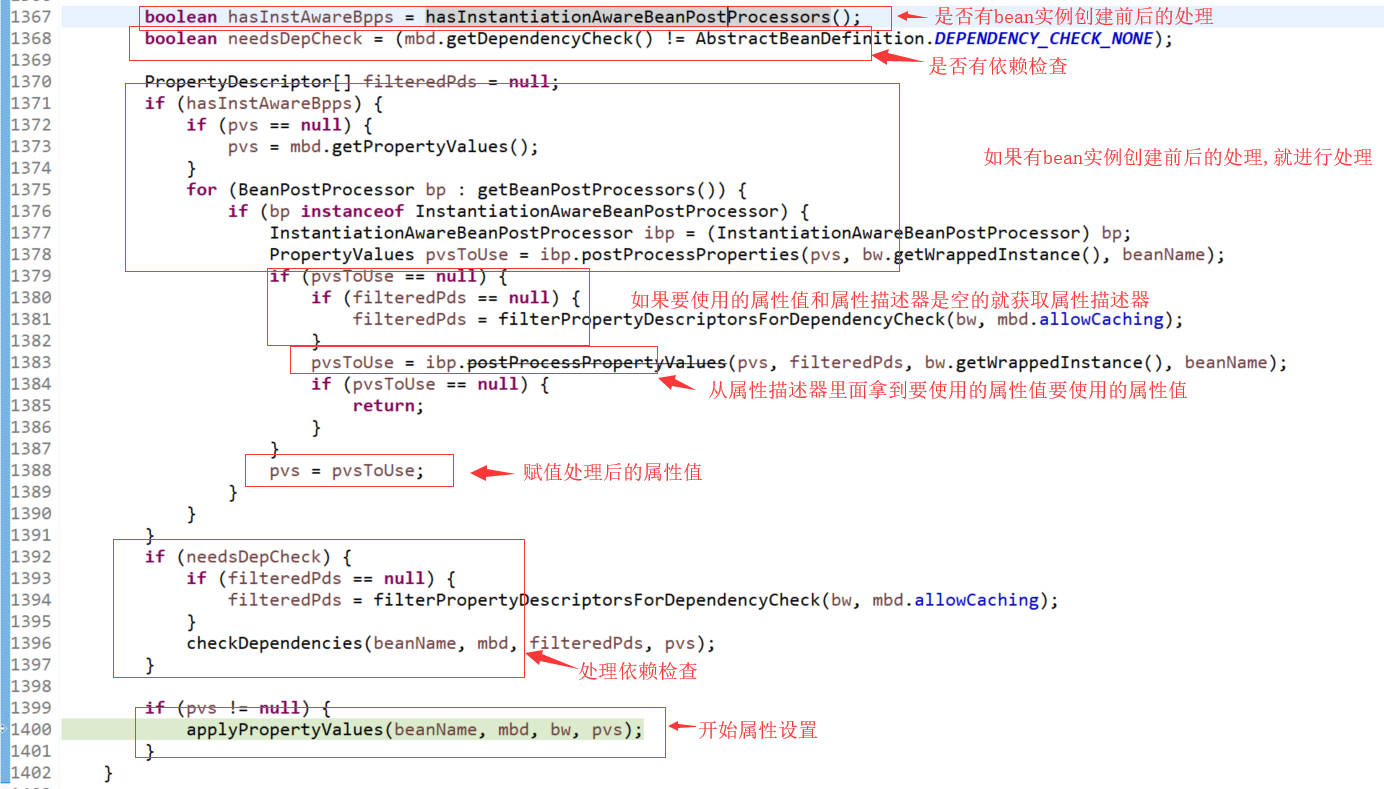
代码在AbstractAutowireCapableBeanFactory.populateBean()中。
Xml配置方式的处理逻辑在方法最后的applyPropertyValues(beanName,mbd,bw,pvs);方法中。
注解的方式则在之上的InstantiationAwareBeanPostProcessor执行中:
        if (hasInstAwareBpps) {

            if (pvs == null) {

                pvs = mbd.getPropertyValues();

            }

            for (BeanPostProcessor bp : getBeanPostProcessors()) {

                if (bp instanceof InstantiationAwareBeanPostProcessor) {

                    InstantiationAwareBeanPostProcessor ibp = (InstantiationAwareBeanPostProcessor) bp;

                    PropertyValues pvsToUse = ibp.postProcessProperties(pvs, bw.getWrappedInstance(), beanName);

                    if (pvsToUse == null) {

                        if (filteredPds == null) {

                            filteredPds = filterPropertyDescriptorsForDependencyCheck(bw, mbd.allowCaching);

                        }

                        pvsToUse = ibp.postProcessPropertyValues(pvs, filteredPds, bw.getWrappedInstance(), beanName);

                        if (pvsToUse == null) {

                            return;

                        }

                    }

                    pvs = pvsToUse;

                }

            }

        }
二、三种 Bean 配置方式的注册、实例化过程
1. Xml
BeanF:
package com.study.leesmall.spring.sample.config;

import org.springframework.beans.factory.annotation.Autowired;

public class BeanF {

    @Autowired

    private BeanE be;

    public void do1() {

        System.out.println("----------" + this + " do1");

        this.be.doSomething();

    }

}
BeanE:
package com.study.leesmall.spring.sample.config;

public class BeanE {

    public void doSomething() {

        System.out.println("-----" + this + " doSomething ");

    }

}
xml配置:
<?xml version="1.0" encoding="UTF-8"?>

<beans xmlns="http://www.springframework.org/schema/beans"

    xmlns:xsi="http://www.w3.org/2001/XMLSchema-instance"

    xmlns:context="http://www.springframework.org/schema/context"

    xmlns:aop="http://www.springframework.org/schema/aop"

    xsi:schemaLocation="http://www.springframework.org/schema/beans

        http://www.springframework.org/schema/beans/spring-beans.xsd

        http://www.springframework.org/schema/context

        http://www.springframework.org/schema/context/spring-context.xsd

        http://www.springframework.org/schema/aop

        http://www.springframework.org/schema/aop/spring-aop.xsd">

    <bean id="beanE" class="com.study.leesmall.spring.sample.config.BeanE" />

    <bean id="beanF" class="com.study.leesmall.spring.sample.config.BeanF" ></bean>

    <context:annotation-config/>

    <context:component-scan base-package="com.study.leesmall.spring.sample.config" ></context:component-scan>

</beans>
测试类:
XMLConfigMain
package com.study.leesmall.spring.sample.config;

import org.springframework.context.ApplicationContext;

import org.springframework.context.support.GenericXmlApplicationContext;

public class XMLConfigMain {

    public static void main(String[] args) {

        ApplicationContext context = new GenericXmlApplicationContext(

                "classpath:com/study/leesmall/spring/sample/config/application.xml");

        BeanF bf = context.getBean(BeanF.class);

        bf.do1();

    }

}
测试类运行结果:
----------com.study.leesmall.spring.sample.config.BeanF@19d37183 do1

-----com.study.leesmall.spring.sample.config.BeanE@1a0dcaa doSomething
2. Annotation 注解
BeanG
package com.study.leesmall.spring.sample.config;

import org.springframework.beans.factory.annotation.Autowired;

import org.springframework.context.annotation.ImportResource;

import org.springframework.stereotype.Component;

@Component

@ImportResource("classpath:com/study/leesmall/spring/sample/config/application.xml")

public class BeanG {

    @Autowired

    private BeanF beanf;

    public void dog() {

        System.out.println("----------------------------------------");

        this.beanf.do1();

    }

}
在xml里面开启注解扫描:
    <context:annotation-config/>

    <context:component-scan base-package="com.study.leesmall.spring.sample.config" ></context:component-scan>
测试类:
AnnotationMain
package com.study.leesmall.spring.sample.config;

import org.springframework.context.ApplicationContext;

import org.springframework.context.annotation.AnnotationConfigApplicationContext;

public class AnnotationMain {

    public static void main(String[] args) {

        ApplicationContext context = new AnnotationConfigApplicationContext("com.study.leesmall.spring.sample.config");

        BeanG bg = context.getBean(BeanG.class);

        bg.dog();

    }

}
测试结果:
----------------------------------------

----------com.study.leesmall.spring.sample.config.BeanF@6f204a1a do1

-----com.study.leesmall.spring.sample.config.BeanE@2de56eb2 doSomething
3. Java based
BeanH:
package com.study.leesmall.spring.sample.config;

import org.springframework.beans.factory.annotation.Autowired;

public class BeanH {

    @Autowired

    private BeanE be;

    public void doH() {

        System.out.println("-----------" + this + " doH");

        be.doSomething();

    }

}
测试类:
JavaBasedMain
package com.study.leesmall.spring.sample.config;

import org.springframework.context.ApplicationContext;

import org.springframework.context.annotation.AnnotationConfigApplicationContext;

import org.springframework.context.annotation.Bean;

import org.springframework.context.annotation.ComponentScan;

import org.springframework.context.annotation.Configuration;

@Configuration

@ComponentScan("com.study.leesmall.spring.sample.config")

public class JavaBasedMain {

    @Bean

    public BeanH getBeanH() {

        return new BeanH();

    }

    public static void main(String[] args) {

        ApplicationContext context = new AnnotationConfigApplicationContext(JavaBasedMain.class);

        BeanH bh = context.getBean(BeanH.class);

        bh.doH();

    }

}
测试结果:
-----------com.study.leesmall.spring.sample.config.BeanH@475e586c doH

-----com.study.leesmall.spring.sample.config.BeanE@657c8ad9 doSomething
问题:
1、 xml 方式中怎么开启注解支持?
在application.xml里面加入如下配置:
    <context:annotation-config/>

    <context:component-scan base-package="com.study.leesmall.spring.sample.config" ></context:component-scan>
2、xml方式中开启注解支持,是如何实现的?该怎么去看?你会怎么实现?
入口在Spring的E:\repository\org\springframework\spring-context\5.1.3.RELEASE\spring-context-5.1.3.RELEASE.jar /META-INF/spring.handlers里面
http\://www.springframework.org/schema/context=org.springframework.context.config.ContextNamespaceHandler

http\://www.springframework.org/schema/jee=org.springframework.ejb.config.JeeNamespaceHandler

http\://www.springframework.org/schema/lang=org.springframework.scripting.config.LangNamespaceHandler

http\://www.springframework.org/schema/task=org.springframework.scheduling.config.TaskNamespaceHandler

http\://www.springframework.org/schema/cache=org.springframework.cache.config.CacheNamespaceHandler
ContextNamespaceHandler就是入口:
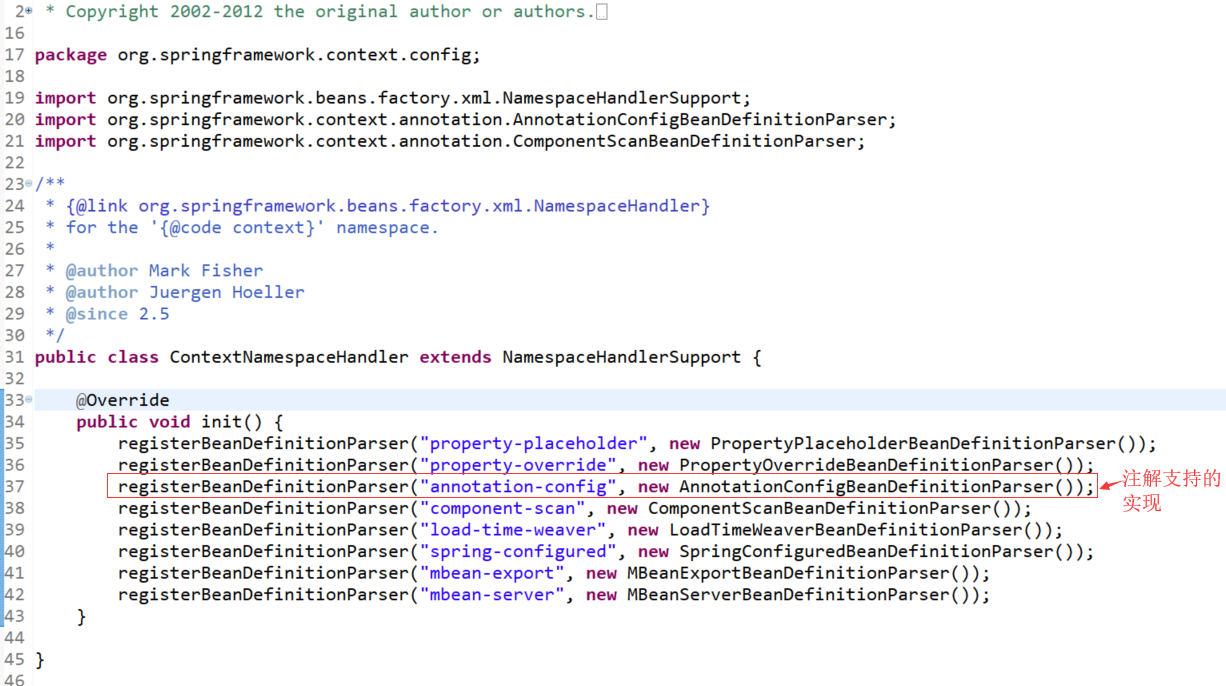
类org.springframework.context.annotation.AnnotationConfigBeanDefinitionParser就是用来解析下面的配置的:
<context:annotation-config/>

注册注解配置处理器的方法org.springframework.context.annotation.AnnotationConfigUtils.registerAnnotationConfigProcessors(BeanDefinitionRegistry, Object)

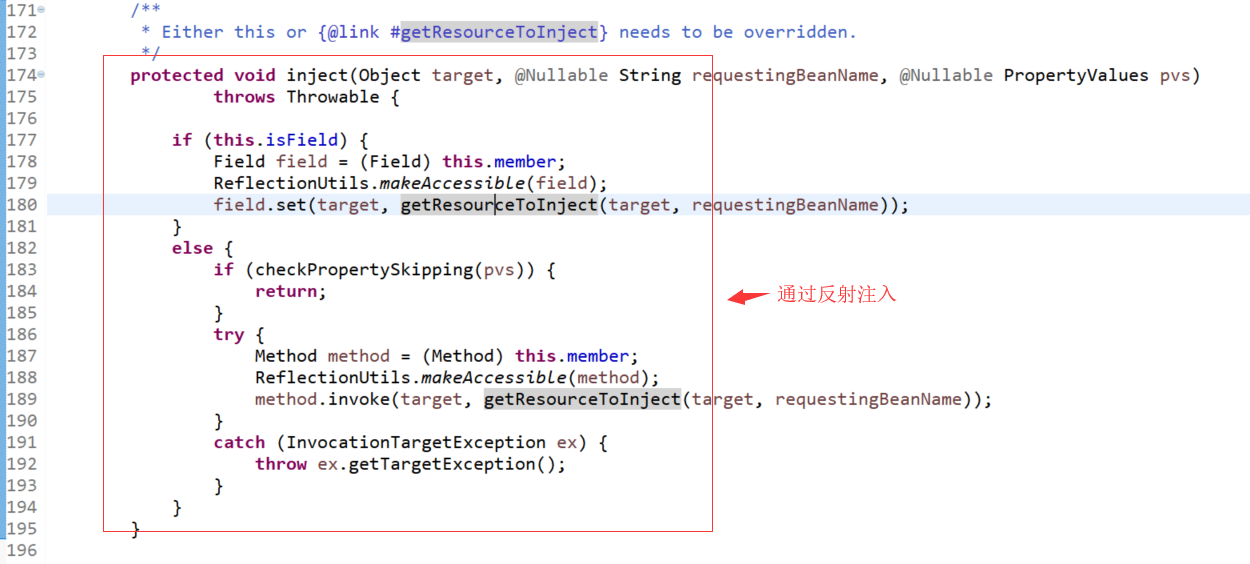
Autowired注解的处理属性注入的方法:
org.springframework.beans.factory.annotation.AutowiredAnnotationBeanPostProcessor.postProcessProperties(PropertyValues, Object, String)
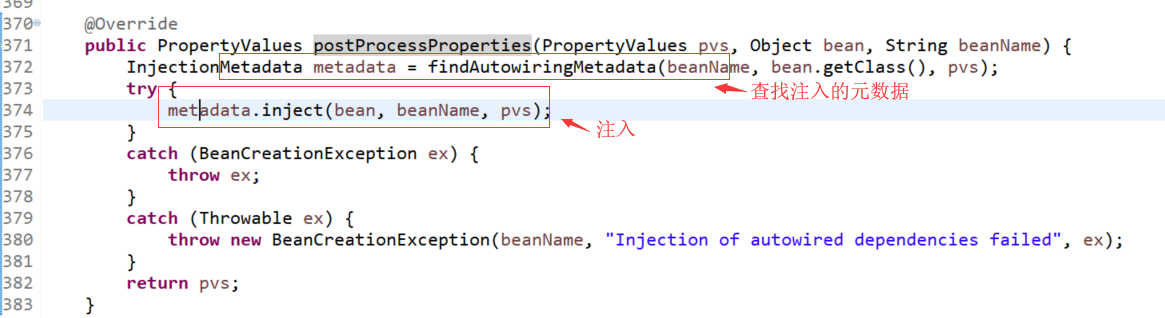
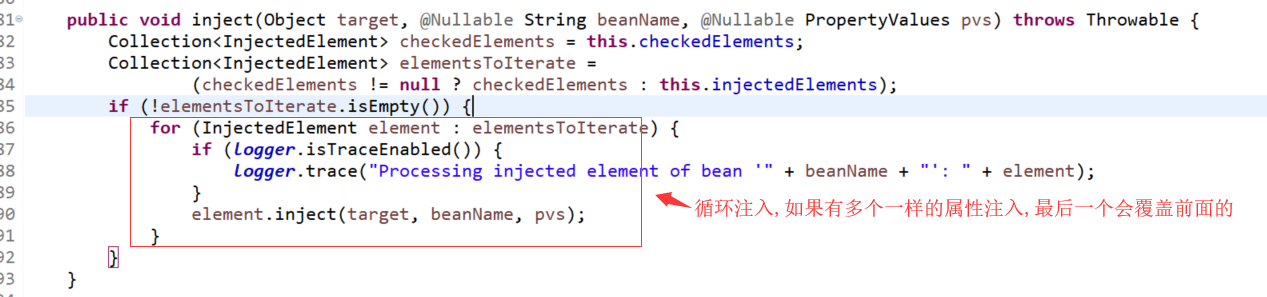
org.springframework.beans.factory.annotation.InjectionMetadata.InjectedElement.inject(Object, String, PropertyValues):
3、Xml中的<context:component-scan>是如何实现的?
4、注解方式可以嵌入xml吗?
5、Javabase方式各注解的解析发生在哪
框架源码系列九:依赖注入DI、三种Bean配置方式的注册和实例化过程的更多相关文章
- 小白都能看懂的 Spring 源码揭秘之依赖注入(DI)源码分析
目录 前言 依赖注入的入口方法 依赖注入流程分析 AbstractBeanFactory#getBean AbstractBeanFactory#doGetBean AbstractAutowireC ...
- spring的ioc依赖注入的三种方法(xml方式)
常见的依赖注入方法有三种:构造函数注入.set方法注入.使用P名称空间注入数据.另外说明下注入集合属性 先来说下最常用的那个注入方法吧. 一.set方法注入 顾名思义,就是在类中提供需要注入成员的 s ...
- 3.2spring源码系列----循环依赖源码分析
首先,我们在3.1 spring5源码系列--循环依赖 之 手写代码模拟spring循环依赖 中手写了循环依赖的实现. 这个实现就是模拟的spring的循环依赖. 目的是为了更容易理解spring源码 ...
- 3.4 spring5源码系列--循环依赖的设计思想
前面已经写了关于三篇循环依赖的文章, 这是一个总结篇 第一篇: 3.1 spring5源码系列--循环依赖 之 手写代码模拟spring循环依赖 第二篇: 3.2spring源码系列----循环依赖源 ...
- ASP.NET MVC中使用Unity进行依赖注入的三种方式
在ASP.NET MVC中使用Unity进行依赖注入的三种方式 2013-12-15 21:07 by 小白哥哥, 146 阅读, 0 评论, 收藏, 编辑 在ASP.NET MVC4中,为了在解开C ...
- React 源码中的依赖注入方法
一.前言 依赖注入(Dependency Injection)这个概念的兴起已经有很长时间了,把这个概念融入到框架中达到出神入化境地的,非Spring莫属.然而在前端领域,似乎很少会提到这个概念,难道 ...
- 【Spring源码解析】—— 依赖注入结合SpringMVC Demo-xml配置理解
在IOC容器初始化的梳理之后,对依赖注入做一个总结,就是bean实例化的过程,bean的定义有两种方式,一种是xml文件配置,一种是注解,这里是对xml配置文件的依赖注入的介绍,后续对bean与该部分 ...
- Spring注解依赖注入的三种方式的优缺点以及优先选择
当我们在使用依赖注入的时候,通常有三种方式: 1.通过构造器来注入: 2.通过setter方法来注入: 3.通过filed变量来注入: 那么他们有什么区别吗?应该选择哪种方式更好? 三种方式的区别小结 ...
- 框架源码系列二:手写Spring-IOC和Spring-DI(IOC分析、IOC设计实现、DI分析、DI实现)
一.IOC分析 1. IOC是什么? IOC:Inversion of Control控制反转,也称依赖倒置(反转) 问题:如何理解控制反转? 反转:依赖对象的获得被反转了.由自己创建,反转为从IOC ...
随机推荐
- fetch添加超时时间
fetch添加超时时间 其实为fetch添加超时时间很简单,需要用到Promise.race()方法. Promise.race() 方法将多个Promise包装成一个新的Promise实例. var ...
- [P1034][NOIP2001]一元三次方程求解 (二分)
二分 #include<bits/stdc++.h> using namespace std; double a,b,c,d; double fc(double x) { )+b*pow( ...
- Perfect Service [POJ 3398]
Perfect Service 描述 网络由N个通过N-1个通信链路连接的计算机组成,使得任何两台计算机可以通过独特的路由进行通信.如果两台计算机之间存在通信链路,则称这两台计算机是相邻的.计算机的邻 ...
- HBase 查询导致RegionServer OOM故障复盘
背景:我司作为某运营商公司的技术咨询公司,发现有第三方开发公司在使用HBase 1.1.2 (HDP 2.4.2.258版本)一段时间使用正常后,从某一天开始报OOM,从而导致RegionServer ...
- css冲刺
CSS知识点及面试题 1.一般与文本相关的属性都可以继承text-/font-/line- 2.background属性1)background-repeat:repeat/repeat-x/repe ...
- splash
function main(splash, args) splash.images_enabled = false //不加载图片 assert(splash:go(args.url)) assert ...
- React组件间的通信
1.子组件调用父组件,采用props的方式进行调用和赋值,在父组件中设置相关属性值或者方法,子组件通过props的方式进行属性赋值或者方法调用: 2.父组件调用子组件,采用refs的方式进行调用,需要 ...
- grid - 隐式命名网格线名称
1.隐式的指定网格线反向指定了隐式的网格区域名称,命名的网格区域隐式的命名了网格线名称. 指定网格区域会给网格区域边线添加隐式的网格线名称.这些网格线的命名是基于网格区域来命名,只是在网格区域名称的后 ...
- 使用Nodpad++正则替换
例如有以下格式数据: 现在需要将每一行的10位长度的数字串后面增加等号“=”
- 一步步教你轻松学支持向量机SVM算法之理论篇1
一步步教你轻松学支持向量机SVM算法之理论篇1 (白宁超 2018年10月22日10:03:35) 摘要:支持向量机即SVM(Support Vector Machine) ,是一种监督学习算法,属于 ...