从零开始学android开发-布局中 layout_gravity、gravity、orientation、layout_weight
线性布局中,有 4 个及其重要的参数,直接决定元素的布局和位置,这四个参数是
android:layout_gravity ( 是本元素相对于父元素的重力方向 )
android:gravity (是本元素所有子元素的重力方向)
android:orientation (线性布局以列或行来显示内部子元素)
android:layout_weight (线性布局内子元素对未占用空间【水平或垂直】分配权重值,其值越小,权重越大。
前提是子元素 设置了 android:layout_width = "fill_parent" 属性(水平方向)
或 android:layout_height = "fill_parent" 属性(垂直方向)
如果某个子元素的 android:layout_width = "wrap_content"
或 android:layout_height =" wrap_content” ,
则 android:layout_weight 的设置值 对该方向上空间的分配刚好相反。
下面以一个简单例子来说明这 4个参数
<? xml version = "1.0" encoding = "utf-8" ?>
< LinearLayout xmlns:android = "http://schemas.android.com/apk/res/android"
android:layout_height = "200dp"
android:layout_width = "200dp"
android:background = "#AABBCC"
android:orientation= "horizontal"
android:layout_gravity= "center" >
< TextView android:text = "ONE"
android:background = "#aa0000"
android:layout_height = "wrap_content"
android:layout_width = "wrap_content"
android:layout_margin = "1dp" />
< TextView android:text = "TWO"
android:background = "#aa0000"
android:layout_height = "wrap_content"
android:layout_width = "wrap_content"
android:layout_margin = "1dp" />
</ LinearLayout >
说明:在上面的例子中,根布局是LinearLayout, 其包含有2 个TextView 视图,为了对参数 android:layout_gravity有直观的了解,对根布局 LinearLayout 特意加了 3 个参数
android:layout_height = "200dp"
android:layout_width = "200dp"
android:background = "#AABBCC"
为布局指定了固定的宽度和高度,以及背景颜色,上面的例子运行后效果如下图:
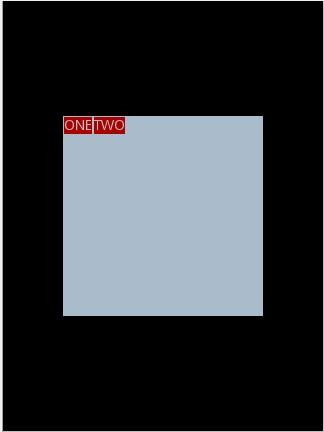
说明:对LinearLayout 中的参数android:layout_gravity 来说,其意义是指定本布局相对于父布局的重力方向,由于该布局的已经是根布局,其父布局是整个屏幕,那么该参数设置的是相对于屏幕的位置,可以换不同的参数top|bottom|left|right 等等参数来试验。
现在增加参数 android:gravity = "bottom|right" 完整 XML 如下,看看效果
<? xml version = "1.0" encoding = "utf-8" ?>
< LinearLayout xmlns:android = "http://schemas.android.com/apk/res/android"
android:layout_height = "200dp"
android:layout_width = "200dp"
android:background = "#AABBCC"
android:orientation="horizontal"
android:layout_gravity= "center"
android:gravity = "bottom|right " >
< TextView android:text = "ONE"
android:background = "#aa0000"
android:layout_height = "wrap_content"
android:layout_width = "wrap_content"
android:layout_margin = "1dp" />
< TextView android:text = "TWO"
android:background = "#aa0000"
android:layout_height = "wrap_content"
android:layout_width = "wrap_content"
android:layout_margin = "1dp" />
</ LinearLayout >
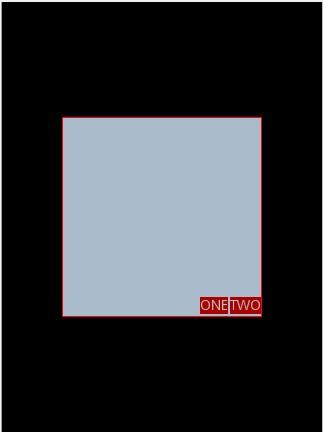
通过改变android:gravity 参数的值可以看到实际效果。
参数 android:orientation= " horizontal " 决定了每个子元素各占一列,如果
参数 android:orientation= " vertical " , 则每个子元素各占一行,也就是从上到下排列了。
对于 LinearLayout 布局的子元素,给每个子元素加上参数 android:layout_weight
看看效果
<? xml version = "1.0" encoding = "utf-8" ?>
< LinearLayout xmlns:android = "http://schemas.android.com/apk/res/android"
android:layout_height = "200dp"
android:layout_width = "200dp"
android:background = "#AABBCC"
android:layout_gravity = "center"
android:gravity = "bottom|right"
android:orientation = "horizontal" >
< TextView android:text = "ONE"
android:background = "#aa0000"
android:layout_height = "wrap_content"
android:layout_width = "wrap_content"
android:layout_margin = "1dp"
android:layout_weight = "1" />
< TextView android:text = "TWO"
android:background = "#aa0000"
android:layout_height = "wrap_content"
android:layout_width = "wrap_content"
android:layout_margin = "1dp"
android:layout_weight = "2" />
</ LinearLayout >
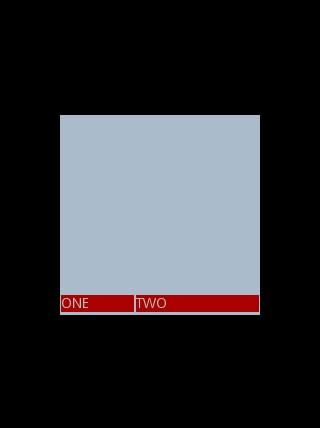
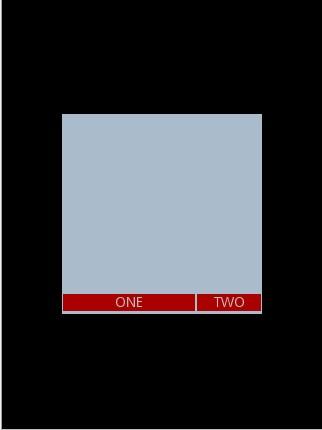
Text 为ONE 的权重为1 ,但明显占的宽度比TWO 的小,百思不得其解,后来得知,如果把TextView 的参数android:layout_width = "wrap_content" 全部修改为 android:layout_width = "fill_parent", 则 ok ,代码如下
<? xml version = "1.0" encoding = "utf-8" ?>
< LinearLayout xmlns:android = "http://schemas.android.com/apk/res/android"
android:layout_height = "200dp"
android:layout_width = "200dp"
android:background = "#AABBCC"
android:layout_gravity = "center"
android:gravity = "bottom|right"
android:orientation = "horizontal" >
< TextView android:text = "ONE"
android:background = "#aa0000"
android:layout_height = "wrap_content"
android:layout_width = " fill_parent "
android:layout_margin = "1dp"
android:layout_weight = "1" />
< TextView android:text = "TWO"
android:background = "#aa0000"
android:layout_height = "wrap_content"
android:layout_width = " fill_parent "
android:layout_margin = "1dp"
android:layout_weight = "2" />
</ LinearLayout >
从零开始学android开发-布局中 layout_gravity、gravity、orientation、layout_weight的更多相关文章
- 从零开始学android开发- 应用程序窗体显示状态操作requestWindowFeature
我们在开发程序是经常会需要软件全屏显示.自定义标题(使用按钮等控件)和其他的需求,今天这一讲就是如何控制Android应用程序的窗体显示. 首先介绍一个重要方法那就是requestWindowFeat ...
- 从零开始学android开发- layout属性介绍
android:id 为控件指定相应的ID android:text 指定控件当中显示的文字,需要注意的是,这里尽量使用strings.xml文件当中的字符串 android:gravity 指定Vi ...
- 从零开始学android开发-通过WebService进行网络编程,使用工具类轻松实现
相信大家在平常的开发中,对网络的操作用到HTTP协议比较多,通过我们使用Get或者Post的方法调用一个数据接口,然后服务器给我们返回JSON格式的数据,我们解析JSON数据然后展现给用户,相信很多人 ...
- 从零开始学android开发-创建第一个android项目
打开ADT开发工具
- 从零开始学android开发-adt-bundle-eclipse下的修改android app名称
eclipse中,打开项目根目录中的AndoirManifest.xml文件,找到如下内容 <application android:allowBackup="true" a ...
- 从零开始学android开发-通过WebService获取今日天气情况
因为本身是在搞.NET方面的东东,现在在学习Android,所以想实现Android通过WebService接口来获取数据,网上很多例子还有有问题的.参考:Android 通过WebService进行 ...
- 从零开始学android开发-View的setOnClickListener的添加方法
1)第一种,也是最长见的添加方法(一下都以Button为例) Button btn = (Button) findViewById(R.id.myButton); btn .setOnClickLis ...
- 从零开始学android开发-Json转换利器Gson之实例
Gson 是 Google 提供的用来在 Java 对象和 JSON 数据之间进行映射的 Java 类库.可以将一个 JSON 字符串转成一个 Java 对象,或者反过来. jar和源码下载地址: h ...
- 从零开始学android开发-获取TextView的值
昨日写一个Android Demo,逻辑大概是从TextView获取其中的值,然后处理后再放回TextView中.整个处理过程是由一个Button的OnClick触发的. 可是在调试的过程中,一点击B ...
随机推荐
- Oracle 课程五之优化器和执行计划
课程目标 完成本课程的学习后,您应该能够: •优化器的作用 •优化器的类型 •优化器的优化步骤 •扫描的基本类型 •表连接的执行计划 •其他运算方式的执行计划 •如何看执行计划顺序 •如何获取执行计划 ...
- [Papers]NSE, $\p_3u$, Lebesgue space [Kukavica-Ziane, JMP, 2007]
$$\bex \p_3\bbu\in L^p(0,T;L^q(\bbR^3)),\quad \frac{2}{p}+\frac{3}{q}=2,\quad \frac{9}{4}\leq q\leq ...
- Launcher2编译
Android的源码包,压缩文件大概有3个G左右,要使用其中自带的一些源码需要很多技巧,否则会提示找不到一些库,大量的报错让人心神不定,不知所从. 我拿桌面代码举个例子吧. 桌面代码在源码包的pack ...
- [OFBiz]开发 二
1.svn中check出的apache-ofbiz-10.04(svn_2010-04-01代码备分)由于它的所有文件都不含有中文,所以Eclipse使用什么编码方式都可以(ISO, GBK, UTF ...
- js控制不同的时间段显示不同的css样式
js控制不同的时间段显示不同的css样式 js函数,可以放到单独的js文件中也可以放到当前页的<head>标记之内 function getCSS(){ datetoday ...
- memcpy、memmove、memset及strcpy函数实现和理解
memcpy.memmove.memset及strcpy函数实现和理解 关于memcpy memcpy是C和C++ 中的内存拷贝函数,在C中所需的头文件是#include<string.h> ...
- 博客测试:博客系统i94web beta1.0 请求测试
最近博客没怎么更新了,因为一直在撸代码,自己写了一个小小的博客系统:i94web,匆忙发布beta1.0,请求各位测试各种漏洞. 先看几张截图. 首页: 边栏: 文章页: 后台发布: 测试地址:htt ...
- 多校7 HDU5816 Hearthstone 状压DP+全排列
多校7 HDU5816 Hearthstone 状压DP+全排列 题意:boss的PH为p,n张A牌,m张B牌.抽取一张牌,能胜利的概率是多少? 如果抽到的是A牌,当剩余牌的数目不少于2张,再从剩余牌 ...
- mvc bundle功能(1)
现如今都提倡敏捷开发,快速开发,但是再要求速度的同时,还得保证质量!前端我是没办法,毕竟是直接要面向用户的,但是后台,解决方案那就多了,诸如extjs,bootstrap,kendoui,都可以解决. ...
- 配置youcompleteme碰到的问题
Q1: 进入vim里面后,可以使用ycm的相关命令来看到底出现啦什么问题? :Ycm YcmCompleter YcmForceCompileAndDiagnostics YcmToggleLogs ...