CentOS7:配置SVN服务器
1. 安装
CentOS通过yum安装subversion。
$ sudo yum install subversion
subversion安装在/bin目录:
$ which svnserve

/bin/svnserve
检查一下subversion是否安装成功。
$ svnserve --version

svnserve, version 1.7. (r1542130)

   compiled Nov  , ::

Copyright (C)  The Apache Software Foundation.

This software consists of contributions made by many people; see the NOTICE

file for more information.

Subversion is open source software, see http://subversion.apache.org/

The following repository back-end (FS) modules are available:

* fs_base : Module for working with a Berkeley DB repository.

* fs_fs : Module for working with a plain file (FSFS) repository.

Cyrus SASL authentication is available.
2. 建立版本库
subversion默认以/var/svn作为数据根目录,可以通过/etc/sysconfig/svnserve修改这个默认位置。
$ systemctl cat svnserve.service

# /usr/lib/systemd/system/svnserve.service

[Unit]

Description=Subversion protocol daemon

After=syslog.target network.target

[Service]

Type=forking

EnvironmentFile=/etc/sysconfig/svnserve

ExecStart=/usr/bin/svnserve --daemon --pid-file=/run/svnserve/svnserve.pid $OPTIONS

[Install]

WantedBy=multi-user.target

$ cat /etc/sysconfig/svnserve

# OPTIONS is used to pass command-line arguments to svnserve.

#

# Specify the repository location in -r parameter:

OPTIONS="-r /var/svn"
我们修改/etc/sysconfig/svnserver将默认目录指定到/opt/svn。
$ cat /etc/sysconfig/svnserve

OPTIONS="-r /opt/svn"
使用svnadmin建立版本库spring-hello-world。
$ sudo mkdir -p /opt/svn

$ sudo svnadmin create /opt/svn/spring-hello-world

$ ll /opt/svn/

drwxr-xr-x.  root root  Nov  : spring-hello-world

$ ll /opt/svn/spring-hello-world/

drwxr-xr-x.  root root    Nov  : conf

drwxr-sr-x.  root root  Nov  : db

-r--r--r--.  root root     Nov  : format

drwxr-xr-x.  root root  Nov  : hooks

drwxr-xr-x.  root root    Nov  : locks

-rw-r--r--.  root root   Nov  : README.txt
3. 配置
编辑用户文件passwd,新增两个用户:admin和guest。
$ cat /opt/svn/spring-hello-world/conf/passwd

[users]

admin = admin

guest = guest
编辑权限文件authz,用户admin设置可读写权限,guest设置只读权限。
$ cat /opt/svn/spring-hello-world/conf/authz

[/]

admin = rw

guest = r
编辑svnserve.conf:
$ cat /opt/svn/spring-hello-world/conf/svnserve.conf

[general]

anon-access = none                     #控制非鉴权用户访问版本库的权限

auth-access = write                    #控制鉴权用户访问版本库的权限

password-db = passwd                   #指定用户名口令文件名

authz-db = authz                       #指定权限配置文件名

realm = spring-hello-world             #指定版本库的认证域,即在登录时提示的认证域名称
4. SVN服务
启动SVN服务。
$ sudo systemctl start svnserve.service
检查服务是否启动成功。
$ ps aux | grep svn

root        0.0  0.1     ?        Ss   :   : /usr/bin/svnserve --daemon --pid-file=/run/svnserve/svnserve.pid -r /opt/svn
通过netstat可以看到SVN打开了3690端口。
$ sudo netstat -tnlp

Proto Recv-Q Send-Q Local Address           Foreign Address         State       PID/Program name

tcp               0.0.0.0:            0.0.0.0:*               LISTEN      /svnserve
设置成开机启动。
$ sudo systemctl enable svnserve.service
5. 客户端测试
客户端可以通过TortoriseSVN测试。
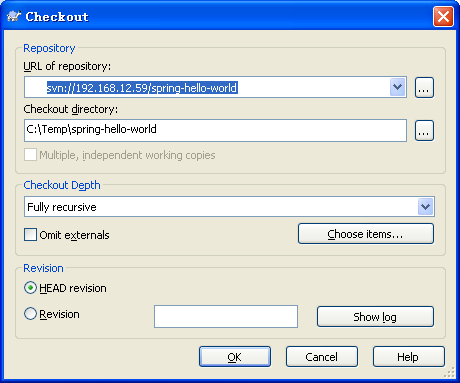
这时候可能会防火墙问题。如果是防火墙问题,会提示无法连接。
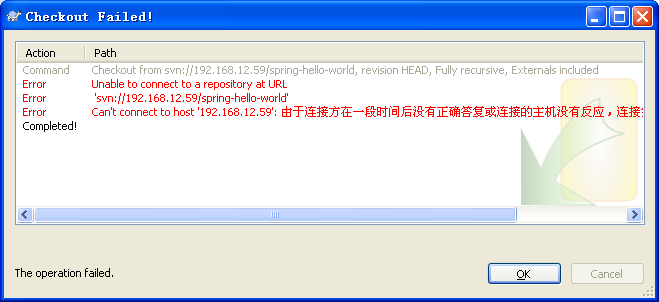
客户端用telnet无法连接。
C:\Temp>telnet 192.168.12.59
用systemctl检查服务器的防火墙配置:
$ firewall-cmd --list-all

public (default, active)

  interfaces: eno16777736 eno33554984

  sources:

  services: dhcpv6-client ssh

  ports:

  masquerade: no

  forward-ports:

  icmp-blocks:

  rich rules:
可以看到,没有telnet服务和3690端口。增加telnet服务器和3690端口:
$ sudo firewall-cmd --permanent --add-service=telnet

$ sudo firewall-cmd --permanent --add-port=/tcp

$ sudo firewall-cmd --reload
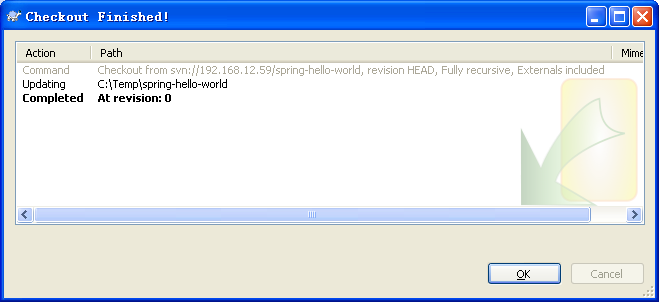
客户端再用telnet,应该就可以了。
CentOS7:配置SVN服务器的更多相关文章
- CentOS7 配置SVN服务器
也可以参考这里:https://jingyan.baidu.com/article/148a1921d84be34d71c3b18f.html 1.安装svn yum install -y subve ...
- CentOS7 搭建 SVN 服务器
CentOS7 搭建 SVN 服务器 介绍SVN: SVN是Subversion的简称,是一个开放源代码的版本控制系统,相较于RCS.CVS,它采用了分支管理系统,它的设计目标就是取代CVS.互联网上 ...
- centos7 搭建svn服务器
1.安装svn服务器: yum install subversion 2.配置svn服务器: 建立svn版本库根目录及相关目录即svndata及密码权限命令svnpasswd: mkdir -p /a ...
- centos7下SVN服务器如何搭建
Centos7 搭建svn服务器 linux(centos)下SVN服务器如何搭建?说到SVN服务器,想必大家都知道,可以是在LINUX下如何搭建SVN服务器呢?那么今天给大家分享一下linux(ce ...
- centos7 搭建svn服务器&客户端的访问&备份迁移
当今用于版本控制的软件程序主要的有svn和git,其它软件咱不熟悉,今天记录下搭建svn服务器和svn客户端使用: 使用环境:虚拟机为centos7系统,svn服务器安装在centos7系统平台上,s ...
- centos7搭建svn服务器及客户端设置
centos7搭建svn服务器及客户端设置 centos7貌似预装了svn服务(有待确认),因此我们直接启动该服务即可 一.svn服务端配置(服务器IP假设为192.168.100.1) 步骤1:创建 ...
- 如何配置svn服务器
如果你已经安装好了VisualServer服务器,现在让我们一起来配置svn服务器吧. 工具/原料 VisualServer 配置VisualServer 找到VisualServer Manager ...
- 如何配置svn服务器(通过VisualServer服务器)
如果你已经安装好了VisualServer服务器,现在让我们一起来配置svn服务器吧
- CentOS 7下搭建配置SVN服务器
CentOS 7下搭建配置SVN服务器 1. 安装 CentOS通过yum安装subversion. $ sudo yum install subversion subversion安装在/bin目录 ...
- linux 配置svn服务器+使用+注意事项
本文以ubuntu系统进行安装. 1.安装svn服务器 apt-get install subversion 输入 y 回车确认安装. 安装完毕后可以用 下边的命令查看是否安装完成,如果现实出版本号和 ...
随机推荐
- 《一个 Go 程序系统线程暴涨的问题》结论
原文地址:https://zhuanlan.zhihu.com/p/22474724 作者的结论没写好,我来说两句.. 结论: Docker swarm自己有个函数,叫setTcpUserTimeou ...
- Android之AlertDialog应用
Android 中的对话框 dialog 对话框对于应用是必不可少的一个组件,在Android中也不例外,用于提示重要信息... Android提供了丰富的对话框支持,它提供了4种常用的对话框形式: ...
- 几个linux终端的有趣玩法
1.sl 还可以给别人搞恶作剧: alias ls=sl 这样别人使用 ls 列出目录和文件的时候,却出现一个小火车,那滋味一定很酸爽哈哈哈哈! 2. fortune 这个命令会随机输出有趣的话,比如 ...
- web安全之ssrf
ssrf(服务器端请求伪造)原理: 攻击者构造形成由服务端发起请求的一个漏洞.把服务端当作跳板来攻击其他服务,SSRF的攻击目标一般是外网无法访问到的内网 当服务端提供了从其他服务器获取数据的功能(如 ...
- 自己瞎捣腾的Win7下Linux安装之路-----图例篇
写在前面 网上很多这方面的教程,我也是参考他们的文章和一些书籍才弄成功.没啥创新性,只为记录下来,以供自已理解和以后复习. 所谓工欲善其事,必先利其器.俺想学习Linux,当然是要先装一个Linux( ...
- 『U3D学习』破坏神回忆图<二>技能系统
- textarea光标处插入文字
(function($) { $.fn.extend({ //myField 对象元素 myValue 插入值 insertAtCursor: function(myField,myValue) { ...
- mybatis——延迟加载
------------------------------------------------SqlMapConfig.xml------------------------------------ ...
- PostgreSQL的权限查询
查看哪些用户对表sns_log_member_b_aciton有哪些权限: sns_log=> \z sns_log_member_b_aciton Access privileges Sche ...
- ubuntu下sublime中文无法输入的问题
感谢- http://www.cnblogs.com/ningvsban/p/4346766.html