React-Native实战项目-导航器篇(一)
前言:官方文档已经看了一遍,但印象不是很深,于是在mooc上找了个实战学习项目做一做。
本篇目录:
基础导航练习√
1.ReactNavigation之createStackNavigator导航器案例练习
相关资料:
练习链接:http://www.devio.org/2018/12/24/createStackNavigator/
React Navigationan官网:https://reactnavigation.org/docs/zh-Hans/getting-started.html
1. 初始化react native项目
react-native init react_navigation_demo
2. 在项目目录下安装reactnavigation这个包
yarn add react-navigation
3. 安装依赖
yarn add react-native-reanimated react-native-gesture-handler react-native-screens
4. 版本更新后,此步骤忽略。
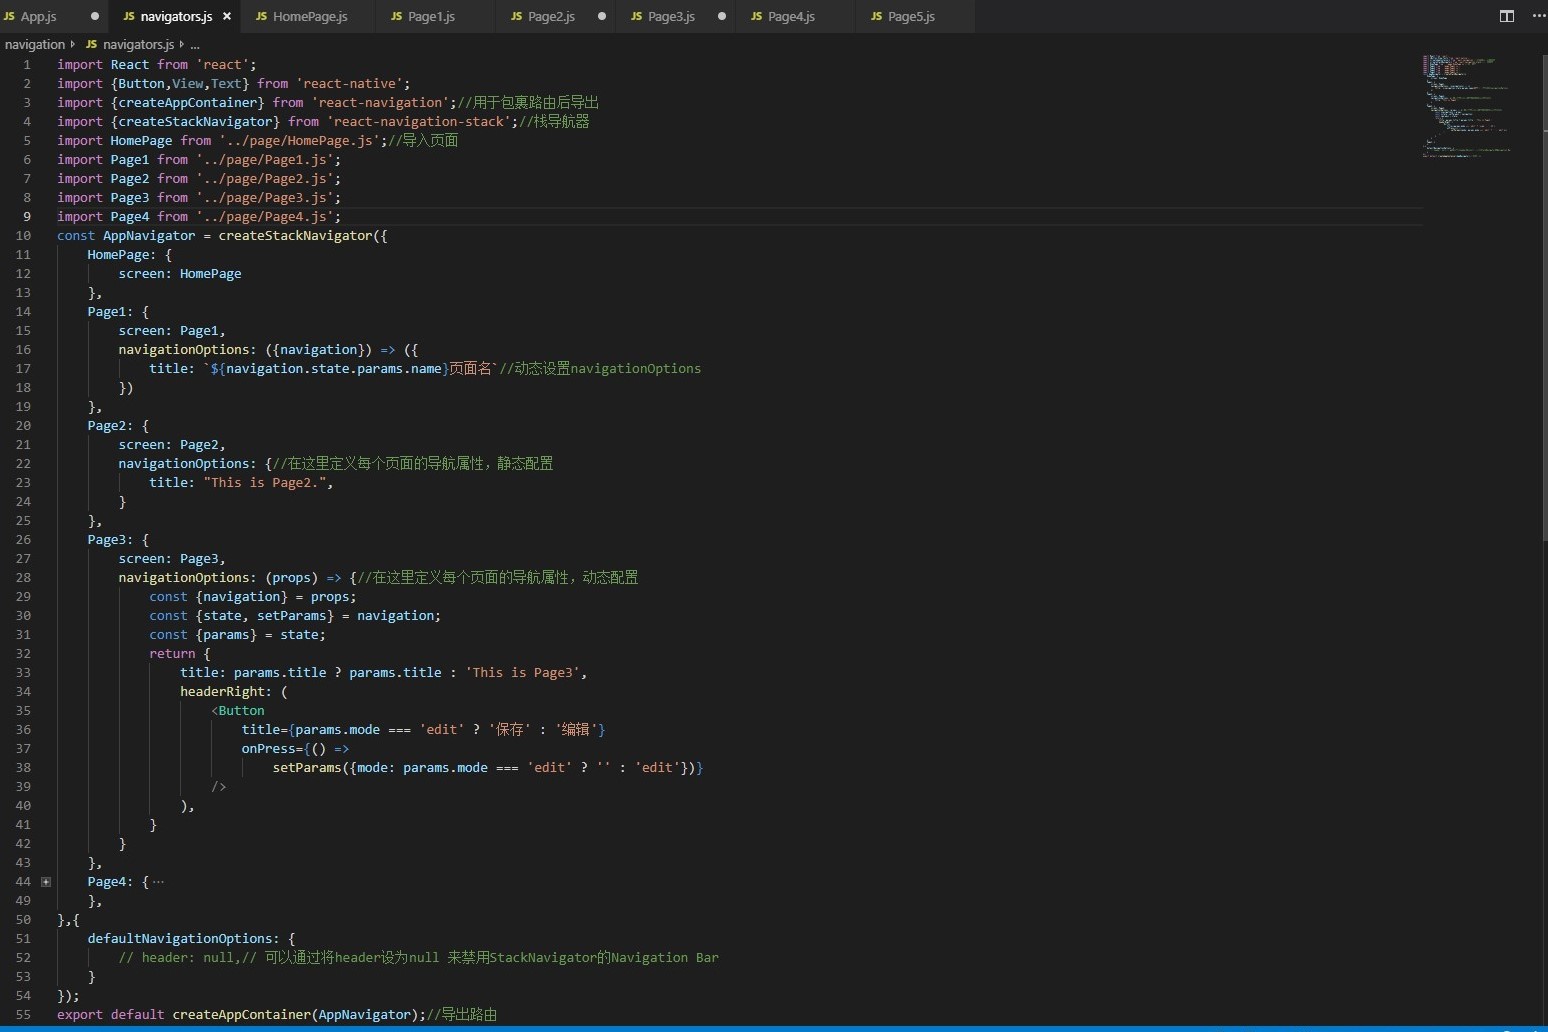
5. 新建并配置路由文件navigator/navigators.js
6. 新建页面文件夹Page,构建HomePage.js,Page1.js,Page2.js,Page3.js,Page4.js,Page5.js等页面
HomePage.js
import React,{Component} from 'react';

import {Button ,View,Text,StyleSheet} from 'react-native';

export default class HomePage extends Component{

    render(){

        const {navigation}=this.props; //获取navigation

        return(

            <View style={styles.container}>

                <Text style={styles.welcome}>Welcome To HomePage</Text>

                <Button title={'Go to Page1'} onPress={()=>{

                    navigation.navigate('Page1',{name:'动态的'});//跳转页面,并且允许传递参数

                }} />

                <Button title={'Go to Page2'} onPress={()=>{

                    navigation.navigate('Page2');

                }} />

                <Button title={'Go to Page3'} onPress={()=>{

                    navigation.navigate('Page3',{name:'动态的'});

                }} />

            </View>

        )

    }

}

const styles=StyleSheet.create({

    container:{

        flex:1,

    },

    welcome:{

        fontSize:20,

        textAlign:'center',

        margin:10,

    }

});
Page1.js
import React from 'react';

import {Button,View,Text,StyleSheet} from 'react-native';

export default class Page1 extends React.Component{

    render(){

        const {navigation}=this.props;

        return(

            <View style={styles.container}>

                <Text style={styles.welcome}>Welcome To Page1</Text>

                <Button

                    title={'Go Back'}

                    onPress={()=>{

                        navigation.goBack();

                    }}

                />

                <Button

                    title={'Go TO Page4'}

                    onPress={()=>{

                        navigation.navigate('Page4');

                    }}

                />

            </View>

        )

    }

}

const styles=StyleSheet.create({

    container:{

        flex:1,

    },

    welcome:{

        fontSize:20,

        textAlign:'center',

        margin:10,

    }

});
Page2.js
import React from 'react';

import {View,Text,StyleSheet} from 'react-native';

export default class Page2 extends React.Component{

    render(){

        const {navigation}=this.props;

        return(

            <View style={styles.container}>

                <Text style={styles.welcome}>Welcome To Page2</Text>

            </View>

        )

    }

}

const styles=StyleSheet.create({

    container:{

        flex:1,

    },

    welcome:{

        fontSize:20,

        textAlign:'center',

        margin:10,

    }

});
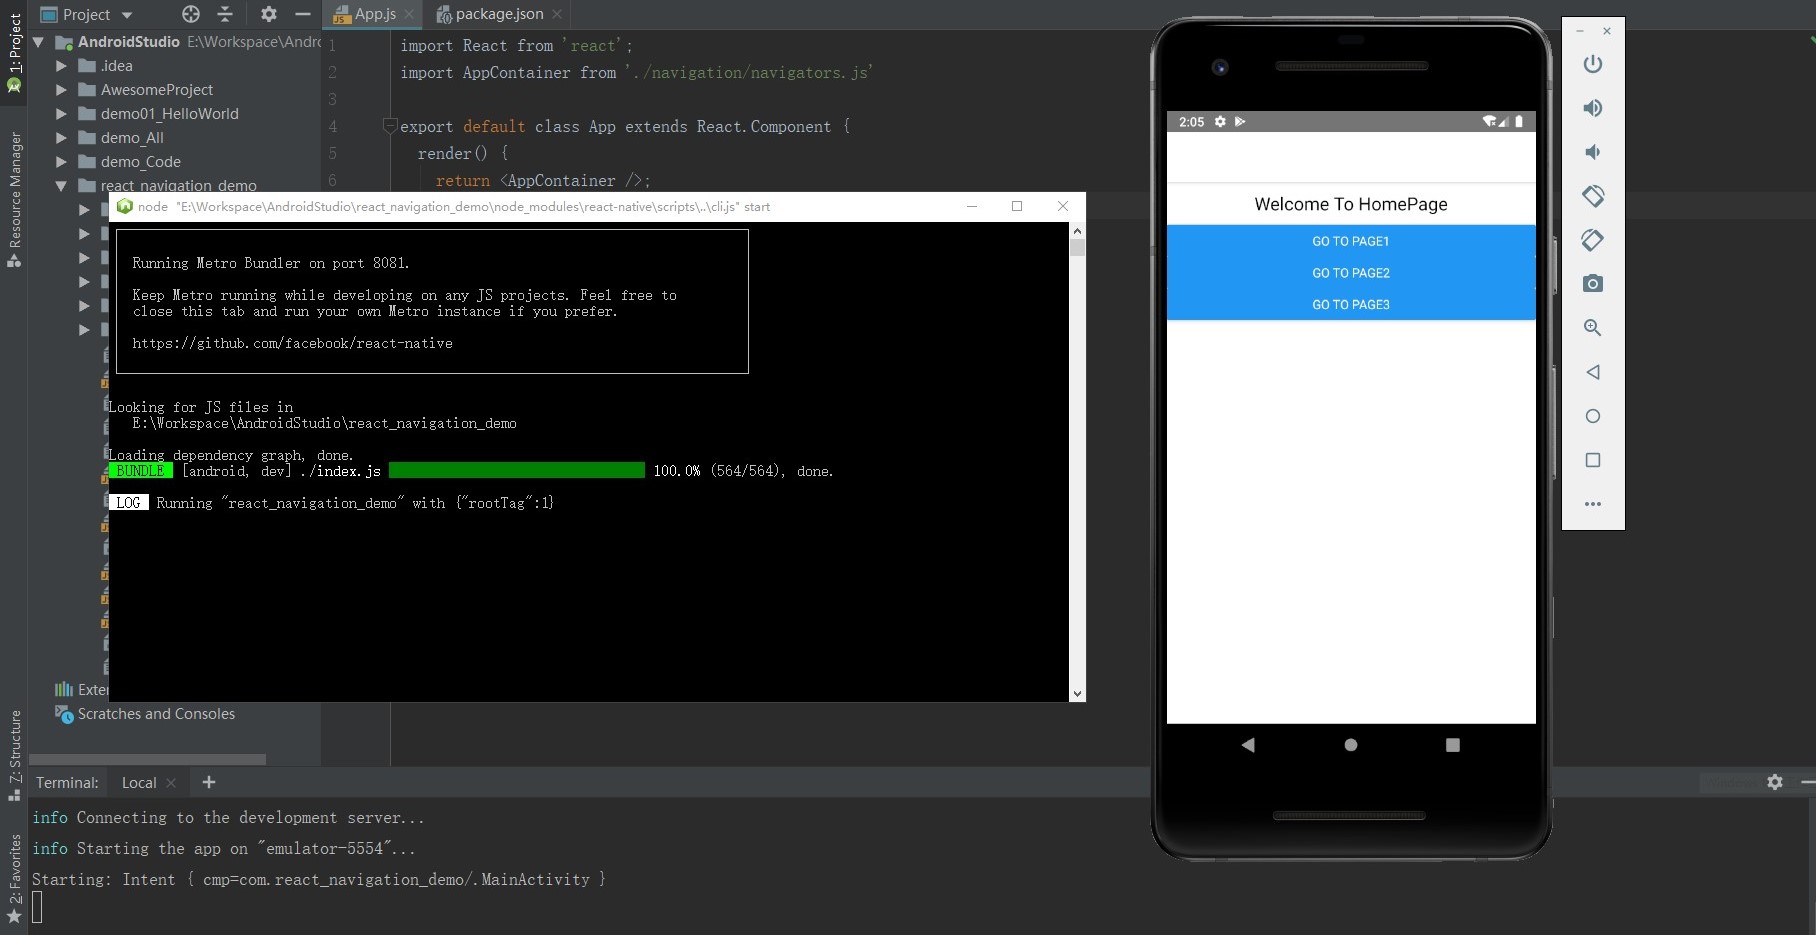
7. 修改根目录下的APP.js,将路由导入
import React from 'react';

import AppContainer from './navigation/navigators.js'//导入路由文件

export default class App extends React.Component {

  render() {

    return <AppContainer />;

  }

}
8. 启动连接虚拟手机,用react-native run-android编译运行代码
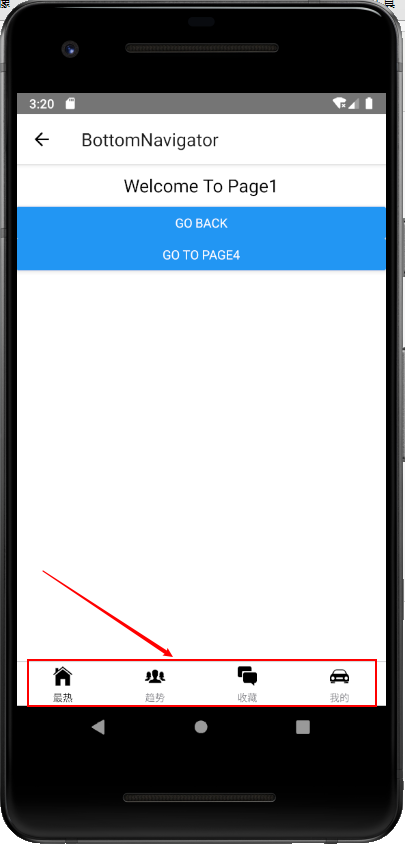
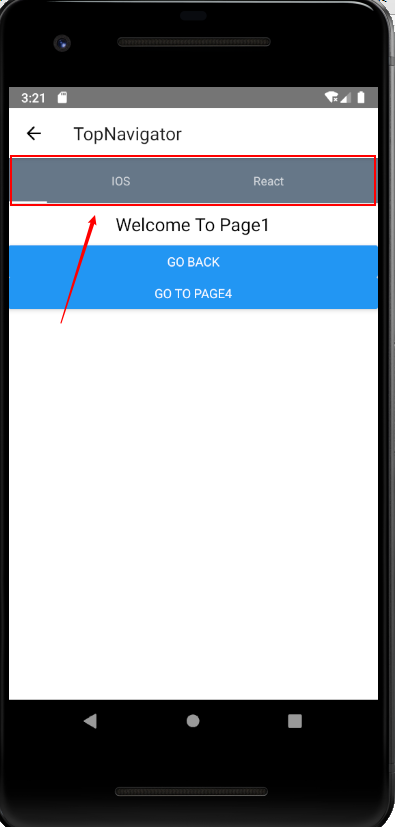
2.ReactNavigation之createBottomTabNavigator和createMaterialTopTabNavigator导航器案例练习
·导入createBottomTabNavigator和createMaterialTopTabNavigator导航器及矢量图标库
import {createBottomTabNavigator,createMaterialTopTabNavigator} from 'react-navigation-tabs';//底部导航及头部导航器

import Ionicons from 'react-native-vector-icons/Ionicons';//矢量图标库

import MaterialIcons from 'react-native-vector-icons/MaterialIcons';//矢量图标库

·编写代码
const AppBottomNavigator =createBottomTabNavigator({

    Page1:{

        screen:Page1,

        navigationOptions:{

            tabBarLabel:'最热',

            tabBarIcon:({tinColor,focused})=>(

                <Ionicons

                    name={"ios-home"}

                    size={26}

                    style={{color:tinColor}}

                />

            )

        }

    },

    Page2:{

        screen:Page2,

        navigationOptions:{

            tabBarLabel:'趋势',

            tabBarIcon:({tinColor,focused})=>(

                <Ionicons

                    name={"ios-people"}

                    size={26}

                    style={{color:tinColor}}

                />

            )

        }

    },

    Page3:{

        screen:Page3,

        navigationOptions:{

            tabBarLabel:'收藏',

            tabBarIcon:({tinColor,focused})=>(

                <Ionicons

                    name={"ios-chatboxes"}

                    size={26}

                    style={{color:tinColor}}

                />

            )

        }

    },

    Page4:{

        screen:Page4,

        navigationOptions:{

            tabBarLabel:'我的',

            tabBarIcon:({tinColor,focused})=>(

                <Ionicons

                    name={"ios-car"}

                    size={26}

                    style={{color:tinColor}}

                />

            )

        }

    },

},{

    tabBarOptions:{

       activeTintColor:Platform.OS==='ios'?'#e91e63':'fff',

    }

});

const AppTopNavigator =createMaterialTopTabNavigator({

    Page1:{

        screen:Page1,

        navigationOptions:{

            tabBarLabel:'ALL'//顶部导航项

        }

    },

    Page2:{

        screen:Page2,

        navigationOptions:{

            tabBarLabel:'IOS'//顶部导航项

        }

    },

    Page3:{

        screen:Page3,

        navigationOptions:{

            tabBarLabel:'React'//顶部导航项

        }

    },

    Page4:{

        screen:Page4,

        navigationOptions:{

            tabBarLabel:'React Native'//顶部导航项

        }

    },

    Page5:{

        screen:Page5,

        navigationOptions:{

            tabBarLabel:'TI实验室'//顶部导航项

        }

    },

},{

    tabBarOptions:{

        tabStyle:{minWidth:50,},//顶部导航项的最小宽

        upperCaseLabel:false,//是否使标签大写,默认为true

        scrollEnabled:true,//允许滑动切换标签

        style:{

            backgroundColor:"#678" //TabBar的背景色

        },

        indicatorStyle:{

            height:2,

            backgroundColor:"white",

        },//标签指示器样式

        labelStyle:{

            fontSize:13,

            marginTop:6,

            marginBottom:6,

        },//文字样式

    }

});
演示效果:
3.ReactNavigation之createDrawerNavigator导航器案例练习(!存在bug)
·导入createDrawerNavigator导航器

编写代码
const AppDrawerNavigator=createDrawerNavigator({

    Page4:{

        screen:Page4,

        navigationOptions:{

            drawerLabel:"Page4",

            drawerIcon:({tintColor})=>(

                <MaterialIcons

                    name={'drafts'}

                    size={24}

                    style={tintColor}

                />

            )

        }

    },

    Page5:{

        screen:Page5,

        navigationOptions:{

            drawerLabel:"Page5",

            drawerIcon:({tintColor})=>(

                <MaterialIcons

                    name={'move-to-inbox'}

                    size={24}

                    style={tintColor}

                />

            )

        }

    },

},{

    initialRouteName:'Page4',

    contentOptions:{

        activeTintColor:'#e91e63'

    },

    contentComponent:(props)=>(

        <ScrollView

            style={{backgroundColor:'#789',flex:1}}

        >

            <SafeAreaView

                forceInset={{top:'always',horizontal:'never'}}

            >

                <DrawerItems {...props}/>

            </SafeAreaView>

        </ScrollView>

    )

});//存在问题,需要后期调整
4.ReactNavigation之createSwitchNavigator导航器案例练习
·该导航器主要与登录验证有关,在后面的章节会具体介绍。
React-Native实战项目-导航器篇(一)的更多相关文章
- 0、手把手教React Native实战之开山篇
##作者简介 东方耀 Android开发 RN技术 facebook github android ios 原生开发 react reactjs nodejs 前端 ...
- 手把手教你React Native 实战之开山篇《一》
先说一下我为什么学习RN 18年3月29号,随着自己内心的欲望和冲动,任务交接了一下,正式离开一家医疗公司.第二天就入职了这之前已经找好的公司,由于自己对代码浓厚的热情,自己终于也不再带团队.正好有充 ...
- React Native实战系列教程之自定义原生UI组件和VideoView视频播放器开发
React Native实战系列教程之自定义原生UI组件和VideoView视频播放器开发 2016/09/23 | React Native技术文章 | Sky丶清| 4 条评论 | 1 ...
- RN 实战 & React Native 实战
RN 实战 & React Native 实战 https://abc.xgqfrms.xyz/react-native-docs/ 0.59 https://github.com/xgqfr ...
- React Native开源项目案例
(六).React Native开源项目: 1.Pober Wong_17童鞋为gank.io做的纯React Native项目,开源地址:https://github.com/Bob1993/Rea ...
- React Native 开源项目汇总
最近闲来无事,学习了React Native开发Android APP,自我感觉RN APP的效果和Native APP比还是蛮不错,以下是找到的一些优秀源码,仅供学习参考... React Nati ...
- React Native 之 项目实战(一)
前言 本文有配套视频,可以酌情观看. 文中内容因各人理解不同,可能会有所偏差,欢迎朋友们联系我. 文中所有内容仅供学习交流之用,不可用于商业用途,如因此引起的相关法律法规责任,与我无关. 如文中内容对 ...
- React Native之使用导航器跳转页面(react-navigation)
react-navigation是一个导航库,要使用react-navigation来实现跳转页面,首先得在项目中安装此库,由于Yarn是Facebook提供的替代npm的工具,可以加速node模块的 ...
- 【React Native 实战】商品分类
1.前言 商品分类是各种app常见的一种操作,一般都是左右两栏构成,左边栏是商品的分类,右边栏是商品的展示,同时左右两栏都可以滑动.今天我们就用React Native来实现这种效果. 实现内容:1) ...
随机推荐
- linux设置python虚拟环境的环境变量
针对 linux系统中 python虚拟环境 设置环境变量 2种方法: 1.在建好的虚拟环境的 venv/bin/active 文件中,写入需要的环境变量,再进入虚拟环境: 如 配置文件路径 JERR ...
- quotacheck - 扫描文件系统,创建,检测并修补配额文件
总览(SYNOPSIS) quotacheck [ -agucfinvdFR ] filesystem 描述(DESCRIPTION) quotacheck 察看每一个文件系统,建立当前磁盘使用情况表 ...
- poj 1845 Sumdiv (等比求和+逆元)
题目链接:http://poj.org/problem?id=1845 题目大意:给出两个自然数a,b,求a^b的所有自然数因子的和模上9901 (0 <= a,b <= 50000000 ...
- CSAW CTF Qualification Round 2018 - shell->code
原题 Linked lists are great! They let you chain pieces of data together. nc pwn.chal.csaw.io 9005 链接:h ...
- springboot中MongoDB的使用
转载参考:http://www.ityouknow.com/springboot/2017/05/08/spring-boot-mongodb.html MongoDB 是一个高性能,开源,无模式的文 ...
- 2025年VR虚拟现实技术将渗透人们日常生活
2025年VR虚拟现实技术将给人们带来什么好处?今年早些时候,虚拟现实VR游戏制造商Survios在广州一个非常大的购物中心内的一个小型灰色墙壁店面,通过AMC中心植入了其位置游戏市场上的第一面旗帜. ...
- centos6.8安装tomcat多容器的处理办法,及安装zk、dubbo
系统环境: Linux-centosOS6.8-bit64 JDK1.8 1.Tomcat多容器的处理方案 首先,不论tomcat的版本是否有多个,路径是否相同,肯定的是可以运行多个容器. 处理以下两 ...
- 英语单词escapes
escapes 来源 [root@centos7 ~]# help echo echo: echo [-neE] [arg ...] Write arguments to the standard o ...
- 怎么修改Xcode新项目或新文件最上面的Creat By XXX
说明:这个名字是从当前电脑的管理员信息获取的,所以要去修改管理员个人信息. 呵呵 如果改了不行的话,就重启Xcode或者电脑试试吧.
- 【HDU5306】【DTOJ2481】Gorgeous Sequence【线段树】
题目大意:给你一个序列a,你有三个操作,0: x y t将a[x,y]和t取min:1:x y求a[x,y]的最大值:2:x y求a[x,y]的sum 题解:首先很明显就是线段树裸题,那么考虑如何维护 ...