dnsmasq+Stunnel+sniproxy加密代理
一、环境介绍
[root@kimissVPN ~]# cat /etc/redhat-release

CentOS release 6.8 (Final)

[root@kimissVPN ~]# uname -r

4.10.-.el6.elrepo.i686

[root@kimissVPN ~]# uname -m

i686
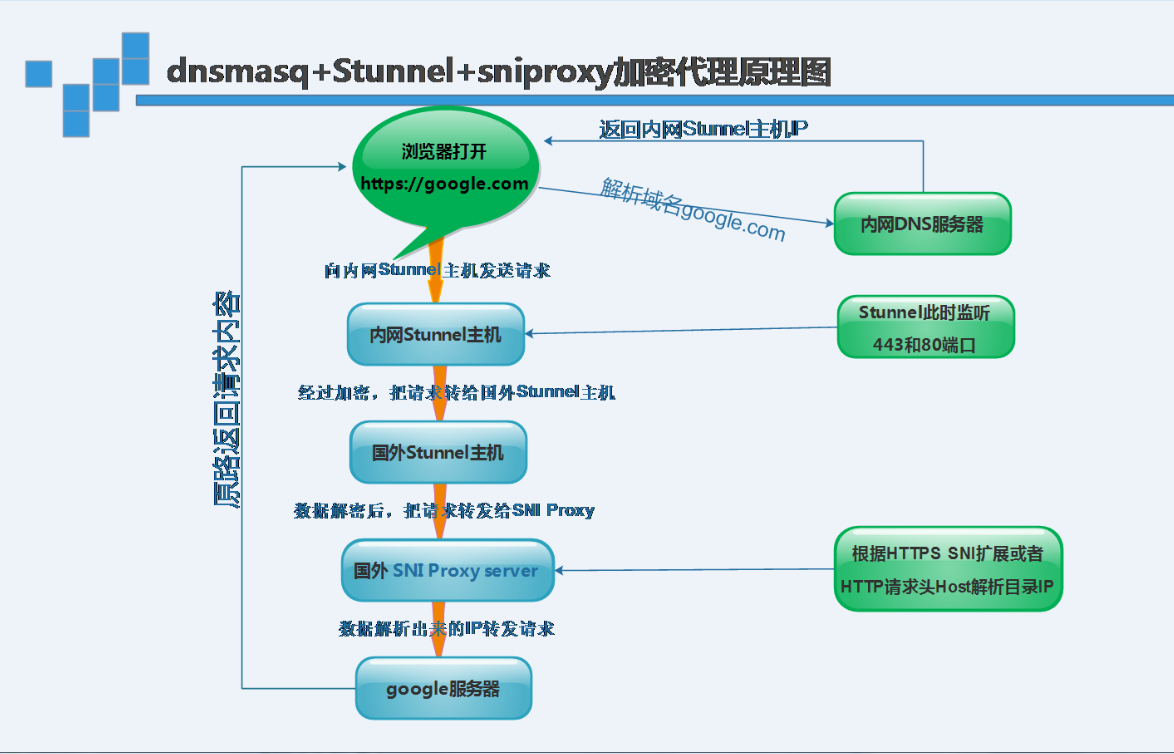
原理图:
二、安装Dnsmasq域名解析系统
Dnsmasq使用上比bind要简便得多,可以做正向、反向dns解析,支持DHCP服务。也可以做内部dns服务器用。默认下dnsmasq使用系统的/etc/resolv.conf,并读取/etc/hosts文件
①软件安装
yum install dnsmasq -y
②编辑配置文件/etc/dnsmasq.conf
resolv-file=/etc/dnsresolv.conf #上一级DNS,dnsmasq会从这个文件寻找上级dns服务器

strict-order

##################################################

address=/pinterest.com/108.3.139.110

address=/qiye.aliyun.com/56.110.55.136

listen-address=108.3.139.106,127.0.0.1

###########################################

no-hosts

cache-size=1500                  #缓存数目

local-ttl=1000                   #DHCP租约时间

neg-ttl=

log-queries

log-facility=/var/log/dns.log    #日志文件
③编辑上级DNS配置文件/etc/dns_resolv.conf
/etc/dns_resolv.conf             #设置的是真正的nameserver,可以用电信、联通等公共的DNS

nameserver 114.114.114.114

nameserver 223.5.5.5

nameserver 114.114.114.114
④启动dnsmasq服务
/etc/init.d/dnsmasq start

lsof -i:

COMMAND PID USER FD TYPE DEVICE SIZE/OFF NODE NAME

dnsmasq  nobody 4u IPv4  0t0 UDP *:domain

dnsmasq  nobody 5u IPv4  0t0 TCP *:domain (LISTEN)

dnsmasq  nobody 6u IPv6  0t0 UDP *:domain

dnsmasq  nobody 7u IPv6  0t0 TCP *:domain (LISTEN)
三、安装Stunnel
使用TLS对tcp协议进行加密,也就是对tcp建立一条加密线路
①在内网dns服务器和国外服务器都安装stunnel
yum install stunnel -y
②生成ssl证书stunnel.pem文件
openssl genrsa -out key.pem

openssl req -new -x509 -key key.pem -out cert.pem -days

cat key.pem cert.pem >> /etc/stunnel/stunnel.pem
③编辑/etc/stunnel/stunnel.conf
cat > /etc/stunnel/stunnel.conf <<EOF

client = no

[http]

accept = 1.2.3.4:8082     #此处地址为国外服务器ip

connect = 127.0.0.1:

cert = /etc/stunnel/stunnel.pem

[https]

accept = 1.2.3.4:

connect = 127.0.0.1:

cert = /etc/stunnel/stunnel.pem

EOF
说明:此配置文件表示,监听了1.2.3.4:8082,并转发此地址流量到127.0.0.1:8082,监听了1.2.3.4:4433,并转发给地址流量到127.0.0.1:4433
④启动启动stunnel
stunnel
四、安装sniproxy
代理软件,对于HTTP协议,它可以根据Host请求头解析得出目标站IP;对于HTTPS协议,它可以根据SNI扩展中的域名解析得出目标站IP
①安装epel源
wget -O /etc/yum.repos.d/epel.repo http://mirrors.aliyun.com/repo/epel-6.repo
②安装依赖软件
yum install autoconf automake curl gettext-devel libev-devel pcre-devel perl pkgconfig rpm-build udns-devel gcc-c++ cc -y
③喜欢高版本的依赖包也可以选择编译安装
cd /server/tools

wget http://dist.schmorp.de/libev/Attic/libev-4.22.tar.gz

tar xzf libev-4.22.tar.gz

cd libev-4.22

./configure

make

make install

echo -e '/usr/local/lib\n/usr/local/lib64' > /etc/ld.so.conf.d/local.conf

ldconfig

cd /opt

wget http://www.corpit.ru/mjt/udns/udns-0.4.tar.gz

tar xzf udns-0.4.tar.gz

cd udns-0.4

./configure

make

cd ..

mv udns-0.4 /usr/local/udns

echo -e '/usr/local/udns' > /etc/ld.so.conf.d/udns.conf

ldconfig
④创建存放软件目录
mkdir /server/tools -p && cd /server/tools/

wget -O sniproxy-0.4..tar.gz https://github.com/dlundquist/sniproxy/archive/0.4.0.tar.gz

tar xf sniproxy-0.4..tar.gz

cd sniproxy-0.4.

./autogen.sh && ./configure && make install
⑤编辑/etc/sniproxy.conf
# sniproxy example configuration file

user nobody

pidfile /var/tmp/sniproxy.pid

error_log {

    syslog daemon

    priority notice

}

access_log {

    filename /tmp/sniproxy-access.log

}

listen 127.0.0.1: {

    proto http

    table http_hosts

    access_log {

        filename /tmp/sniproxy.log

    }

}

table http_hosts {

    .*\.google\.com  *:

    .*\.google\.com\$ 172.217.0.228

    google\.com\$ 172.217.0.228

}

listen 127.0.0.1: {

    proto tls

    table https_hosts

    access_log {

        filename /tmp/sniproxy.log

    }

}

 table https_hosts {

    .*\.google\.com *

    .*\.google\.com\$ 172.217.0.228

    google\.com\$ 172.217.0.228

}
说明:此配置文件表示,监听了127.0.0.1:8082地址,并解析http协议中的Host请求头为IP,然后转发请求到此IP;监听了127.0.0.1:4433地址,
并解析TLS中SNI扩展中的域名为IP,并转发请求到此IP
⑥启动sniproxy服务
sniproxy
方案中的HTTP明文协议,利用stunnel使用了TLS加密,变成了HTTPS协议,使得数据包无法被解析出明文。方案中的HTTPS协议,本身是加密的,但为了防止SNI扩展的中域名被嗅探,还是走了stunnel的加密通道
dnsmasq+Stunnel+sniproxy加密代理的更多相关文章
- 用ccproxy + stunnel做个加密代理
https://www.stunnel.org/downloads.html ccproxy + stunnel做个加密http代理和socks5代理 目前国内用户无法访问某些国外网站,如http:/ ...
- 使用加密的squid配合stunnel实现HTTP代理
现在大部分人都是用ssh tunnel来搭建socks5代理,其实这种方式效率并不高,ssh tunnel并不是为了做代理而存在的.一个比较好的方法是加密squid配合stunnel实现http代理. ...
- 利用Putty/Plink通过ssh tunnel端口转发实现FireFox和Chrome的加密代理访问
如果需要使用远端服务器的DNS:在Firefox中about:config设置 network.proxy.socks_remote_dns ==> true 参考原文:http://think ...
- stunnel+CCProxy,搭建加密代理
总所周知,不可抗拒的特别有用心的原因,我们无法访问youtube,picasa,Twitter……国外优秀网站,很多人采用了代理服务器的方法访问. 如果您有一台放在海外的服务器,这个就好办了.下载一个 ...
- 【python爬虫】加密代理IP的使用与设置一套session请求头
1:代理ip请求,存于redis: # 请求ip代理连接,更新redis的代理ip def proxy_redis(): sr = redis.Redis(connection_pool=Pool) ...
- Stunnel使用
建立加密隧道 使用 Stunnel 建立加密隧道 附件中的 Server 和 Clinet 都是已经配置好了的,只需修改 Server 的 stunnel.conf 的 connect 为实际的ip ...
- 安装Stunnel来实现正向代理邮件
文:铁乐与猫 2017年8月 一开始我是使用yum install来安装stunnel的 感觉版本低点也无所谓,毕竟只是拿来加密代理一下邮件收发. 可是后来发现之前下载的最新官网版本的tar包里有很多 ...
- 香港主机Squid+Stunnel代理搭建
1.说明 Squid,代理软件 Stunnel,数据包加密(貌似如果数据不加密,客户端的数据流无法传到squid服务端,原因你懂的!) 2.Squid安装略 3.安装完squid后需要以下操作 a.生 ...
- HTTP/HTTPS自动加密上网方案
方案介绍 涉及到的软件 BIND: 一个流行的域名解析服务器,我们可以设置哪些域名需要走加密线路. Stunnel: 使用TLS对tcp协议进行加密,也就是对tcp建立一条加密线路. SNI Prox ...
随机推荐
- Unity—Compoent类
官方API->Componment 新引入成员 作用 字段 gameobject 该组件所在的游戏对象 tag 游戏对象的标签 Transform 添加在游戏对象上的transform组件 ...
- node.js ffmpeg-concat 命令行形式处理多个视频的过度效果
ffmpeg-concat 是利用 gl-transitions 处理多个视频的过度效果.详细说明参见 https://github.com/transitive-bullshit/ffmpeg-co ...
- 几家大的券商的PB系统以及算法交易概况大致是怎样的?
PB的定位是托管-清算-交易.目前的PB系统方面的竞争点主要放在了交易环节(毕竟托管和清算没有多大的差异).目前的pb交易环节的技术提供有恒生.讯投.金证.同花顺等,以满足私募及高净值个人多样化交易和 ...
- unittest单元测试1
一个简单的单元测试例子#coding:utf-8from selenium import webdriverimport unittestclass Baidu(unittest.TestCase): ...
- Pager
jQuery var Pager = function (ops) { this._ops = { count: ops.count || 0, selectedIndex: ops.selected ...
- 数据结构系列之2-3-4树的插入、查找、删除和遍历完整版源代码实现与分析(dart语言实现)
本文属于原创,转载请注明来源. 在上一篇博文中,详细介绍了2-3树的操作(具体地址:https://www.cnblogs.com/outerspace/p/10861488.html),那么对于更多 ...
- tensorflow学习之搭建最简单的神经网络
这几天在B站看莫烦的视频,学习一波,给出视频地址:https://www.bilibili.com/video/av16001891/?p=22 先放出代码 #####搭建神经网络测试 def add ...
- opencv.js小项目demo
1.博客连接 https://blog.csdn.net/weixin_38361925/article/details/82528529 2.demo连接 https://github.com/mt ...
- 【Linux开发】Linux动态链接库搜索路径问题
说明:下列内容是从网上获取的,未经验证,仅作参考之用 动态库的搜索路径搜索的先后顺序是: (1).编译目标代码时指定的动态库搜索路径:(2).环境变量LD_LIBRARY_PATH指定的动态库搜索路径 ...
- Canvas入门04-绘制矩形
使用的API: ctx.strokeRect(x, y, width, height) 给一个矩形描边 ctx.fillRect(x, y, width, height) 填充一个矩形 ctx.cle ...