【高可用HA】Apache (4) —— Mac下配置Apache Httpd负载均衡(Load Balancer)之mod_jk
Mac下配置Apache Httpd负载均衡(Load Balancer)之mod_jk
httpd版本: httpd-2.4.17
jk版本: tomcat-connectors-1.2.41
参考来源:
Apache (1) —— Mac下安装Apache Httpd到自定义路径(非/etc/apache2)
Apache (2) —— Mac 下安装多个Apache Tomcat实例
How to Compile Tomcat mod_jk connector on Mac OS X Mavericks
Installing mod_jk for Apache 2.2 on Mac OS X 10.5 Leopard
Apache配置反向代理、负载均衡和集群(mod_proxy方式)
准备
首先我们参照下面两篇文章配置好httpd和两个Tomcat实例
其中Tomcat的两个实例node-a和node-b分别存放与"./servers/cluster/tomcat/node-a"和"/servers/cluster/tomcat/node-b"下
对应的配置分别为:
- Server Port: 8015 与 8025
- Connector: 8081 与 8082
- AJP: 8019 与 8029
另分别为连个实例添加jvmRoute的配置
node-a
<Engine name="Catalina" defaultHost="localhost" jvmRoute="tomcat1">
node-b
<Engine name="Catalina" defaultHost="localhost" jvmRoute="tomcat2">
注意:不要忘记修改供测试的页面特征
配置httpd负载均衡(Load Balancer)
httpd负载均衡Tomcat的方式主要可以分为两类
- httpd自带的mod_proxy
- Tomcat提供了专门的JK插件来负责Tomcat和HTTP服务器的通信mod_jk
*注意 本篇文章主要关注第二类配置
首先编译
在Apache的网站上下载tomcat-connectors-1.2.41,然后解压。
运行命令编译
$ cd native

$ ./configure CFLAGS='-arch x86_64' APXSLDFLAGS='-arch x86_64' --with-apxs=/usr/sbin/apxs

$ make

$ sudo make install
*注意 --with-apxs需要指向目标节点的apxs
此处我本地的路径为
/Users/Richard/Documents/Dev/servers/cluster/httpd/node-a/bin/apxs
如果执行正常不出错,末尾几行的输出为
...

config.status: creating common/list.mk

config.status: creating common/jk_types.h

config.status: creating common/config.h

config.status: executing depfiles commands

config.status: executing libtool commands
然后"./native"下运行make
期间会出现warning,可以暂时忽略不影响
jk_lb_worker.c:1397:36: warning: address of array

  'p->worker->session_cookie_path' will always evaluate to 'true'

  [-Wpointer-bool-conversion]

                if (p->worker->session_cookie_path && *p->worker->se...

                    ~~~~~~~~~~~^~~~~~~~~~~~~~~~~~~ ~~
make执行正常的最后几行输出为
...

Making all in common

make[1]: Nothing to be done for `all'.

Making all in apache-2.0

make[1]: Nothing to be done for `all'.
make install如果在非sudo状态下,最后会出现错误
...

install: /Users/Richard/Documents/Dev/servers/cluster/httpd/node-a/modules/mod_jk.so: Permission denied

apxs:Error: Command failed with rc=4653056

.

make[1]: *** [install_dynamic] Error 1

make: *** [install-recursive] Error 1
sudo运行make install
...

libtool: install: ranlib /Users/Richard/Documents/Dev/servers/cluster/httpd/node-a/modules/mod_jk.a

chmod 755 /Users/Richard/Documents/Dev/servers/cluster/httpd/node-a/modules/mod_jk.so

Please be sure to arrange /Users/Richard/Documents/Dev/servers/cluster/httpd/node-a/conf/httpd.conf...

make[2]: Nothing to be done for `install-exec-am'.

make[2]: Nothing to be done for `install-data-am'.
配置mod_jk
在node-a下新建文件夹"other",并创建文件workers.properties
# Define two status worker:

# - jk-status for read-only use

# - jk-manager for read/write use

worker.list=jk-status

worker.jk-status.type=status

worker.jk-status.read_only=true

worker.list=jk-manager

worker.jk-manager.type=status

# We define a load balancer worker

# with name "balancer"

worker.list=balancer

worker.balancer.type=lb

worker.balancer.error_escalation_time=0

worker.balancer.max_reply_timeouts=10

worker.balancer.sticky_session=true

worker.balancer.sticky_session_force=true

# Now we add members to the load balancer First member is "tomcat1", most attributes are inherited from the template "worker.template".

worker.balancer.balance_workers=tomcat1

worker.tomcat1.reference=worker.template

worker.tomcat1.host=127.0.0.1

worker.tomcat1.port=8019

worker.tomcat1.activation=A

# Second member is "tomcat2", most attributes are inherited from the template "worker.template".

worker.balancer.balance_workers=tomcat2

worker.tomcat2.reference=worker.template

worker.tomcat2.host=127.0.0.1

worker.tomcat2.port=8029

worker.tomcat2.activation=A

# Finally we put the parameters

worker.template.type=ajp13

worker.template.socket_connect_timeout=5000

worker.template.socket_keepalive=true

worker.template.ping_mode=A

worker.template.ping_timeout=10000

worker.template.connection_pool_minsize=0

worker.template.connection_pool_timeout=600

worker.template.reply_timeout=300000

worker.template.recovery_options=3
*注意上面的host配置都是127.0.0.1,会影响我们下面的测试
并同时在"./node-a/other/"下创建文件uriworkermap.properties
/*.do=balancer

/*.jsp=balancer

#/*.gif=balancer

#/*.jpg=balancer

#/*.png=balancer

#/*.css=balancer

#/*.js=balancer

#/*.htm=balancer

#/*.html=balancer

#/*.txt=balancer

# Optionally filter out all .jpeg files inside that context

# For no mapping the url has to start with exclamation (!)

!/servlets-examples/*.jpeg=lb

#

# Mount jkstatus to /jkmanager

# For production servers you will need to

# secure the access to the /jkmanager url

#

/jk-manager=jk-manager

/jk-status=jk-status
最后
为httpd.conf,添加配置
# 加载jk配置文件

Include conf/mod_jk.conf
测试
重新启动httpd,并用浏览器访问"localhost:81",提示"Service Unavailable"错误
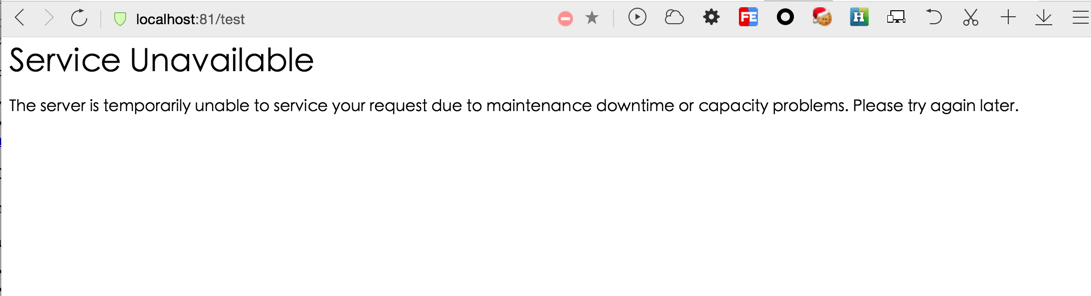
查看"./node-a/log"目录下"mod_jk.log"文件
[Wed Dec 09 15:00:31.403 2015] [13735:4417540096] [info] get_most_suitable_worker::jk_lb_worker.c (1119): all workers are in error state for session QUMQZVRPS1-4MX593EAOD71Y6YAFXUP1-U734UPHI-1

[Wed Dec 09 15:00:31.403 2015] [13735:4417540096] [info] service::jk_lb_worker.c (1664): All tomcat instances failed, no more workers left (attempt=1, retry=1)

[Wed Dec 09 15:00:31.403 2015] [13735:4417540096] [info] service::jk_lb_worker.c (1675): All tomcat instances are busy or in error state

[Wed Dec 09 15:00:31.403 2015] [13735:4417540096] [error] service::jk_lb_worker.c (1680): All tomcat instances failed, no more workers left

[Wed Dec 09 15:00:31.403 2015] [13735:4417540096] [info] jk_handler::mod_jk.c (2991): Service error=0 for worker=balancer
尝试访问
127.0.0.1:81
得到正常结果
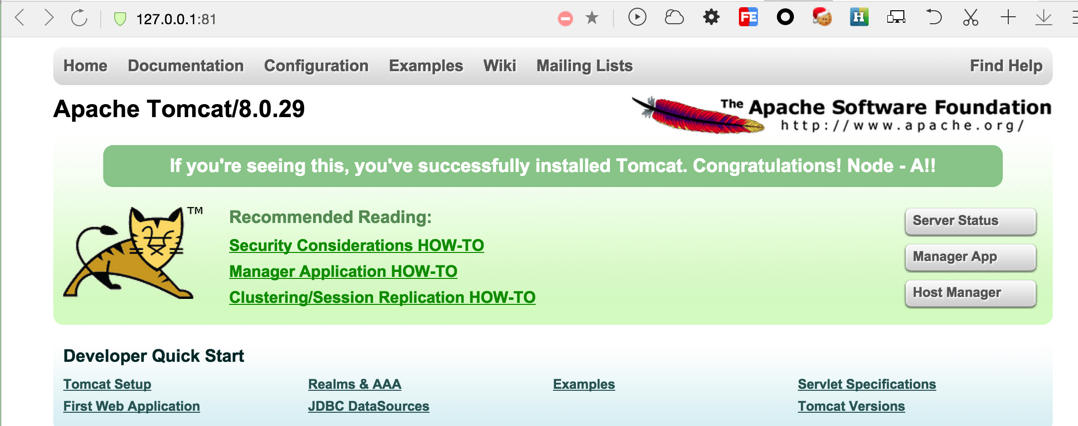
这样就完成一个以httpd单节点为负载均衡器分发到不同Tomcat的简单架构。
*扩展
- 如果将host改为"localhost"是否能正常访问?
- 与另一篇中用httpd自带lb的方式不同映射的路径("./test"),这里是根目录,需要如何配置达到相同效果?
- 这里测试结果可以正常显示样式和图片,是什么配置起的作用?
【高可用HA】Apache (4) —— Mac下配置Apache Httpd负载均衡(Load Balancer)之mod_jk的更多相关文章
- 【高可用HA】Nginx (1) —— Mac下配置Nginx Http负载均衡(Load Balancer)之101实例
[高可用HA]Nginx (1) -- Mac下配置Nginx Http负载均衡(Load Balancer)之101实例 nginx版本: nginx-1.9.8 参考来源: nginx.org [ ...
- 【高可用HA】Apache (3) —— Mac下配置Apache Httpd负载均衡(Load Balancer)之mod_proxy
Mac下配置Apache Httpd负载均衡(Load Balancer)之mod_proxy httpd版本: httpd-2.4.17 参考来源: Apache (1) -- Mac下安装Apac ...
- Hadoop 高可用(HA)的自动容灾配置
参考链接 Hadoop 完全分布式安装 ZooKeeper 集群的安装部署 0. 说明 在 Hadoop 完全分布式安装 & ZooKeeper 集群的安装部署的基础之上进行 Hadoop 高 ...
- Mac下配置Apache Httpd的Https/SSL
Mac下配置Apache Httpd的Https/SSL httpd版本: httpd-2.4.17 jdk版本: jdk1.8.0_65 参考来源: Mac下安装Apache Httpd Mac O ...
- 【高可用HA】Apache (1) —— Mac下安装Apache Httpd到自定义路径(非/etc/apache2)
Mac下安装Apache Httpd httpd版本: httpd-2.4.17 参考来源: Tomcat Clustering - A Step By Step Guide Apache HTTP ...
- Mac下配置Apache,PHP
注:如果觉得终端下编辑太麻烦,也可以直接将文件拖出来手动编辑后在放回原文件夹替换即可 1.启用Apache: 在Mac下打开终端,输入“sudo apachectl start”(不包含引号,下同) ...
- Mac下配置Apache服务
这篇文章主要是针对Mac用户,第一次搭建本地开发环境的同学,已经搭建过的同学可以忽略. Mac自带的Apache还是XAMPP? That is a question. 其实自带的apache也够用了 ...
- Mac下配置apache
一.前言 今天遇到问题,怎么配置apache在Mac上,原来Mac自带apache,只需要自己开启配置一下就行了. 二.步骤: 1.修改apache的http_conf文件 打开finder前往/pr ...
- Mac下配置Apache服务器
有的时候,我们需要在内网工作组中分享一些文件或是后台接口没有及时给出,你又想要模拟真实数据,直接在项目里创建plist也可以做到这种需求,但难免让工程变得冗余且看起来比较Low.这个时候就看出配置本地 ...
随机推荐
- www.pythonchanlleges.com
0. 2**38 1. 字符串映射 s = """ g fmnc wms bgblr rpylqjyrc gr zw fylb. rfyrq ufyr amknsrcpq ...
- C# 获取当前打开的文件夹
最近做一个项目,有一个功能点需要获取当前打开的文件夹,网上查资料+自己摸索,整理出如下代码,鉴于网上完整的代码比较少,顾贴出来,以供参考.如有更好的建议,欢迎留言. 因demo,故没有完整的异 ...
- Asp.Net Core 轻松学-一行代码搞定文件上传 JSONHelper
Asp.Net Core 轻松学-一行代码搞定文件上传 前言 在 Web 应用程序开发过程中,总是无法避免涉及到文件上传,这次我们来聊一聊怎么去实现一个简单方便可复用文件上传功能:通过创建 ...
- 在rhel6上安装Python 2.7和Python 3.3
安装前,操作系统软件包准备编译python要安装development tools.此外,还要安装一些其他的libs,没有这些libs,python的interpreter可能会无法正常工作 # yu ...
- AP_应付模组在月结的处理
2014-06-04 Created By BaoXinjian 1. 完成所有交易及检查Interface (1). Invoice and Credits (2). Prepa ...
- android检测网络连接状态示例讲解
网络的时候,并不是每次都能连接到网络,因此在程序启动中需要对网络的状态进行判断,如果没有网络则提醒用户进行设置 Android连接首先,要判断网络状态,需要有相应的权限,下面为权限代码(Andro ...
- Linux中断 - IRQ Domain介绍
一.概述 在linux kernel中,我们使用下面两个ID来标识一个来自外设的中断: 1.IRQ number.CPU需要为每一个外设中断编号,我们称之IRQ Number.这个IRQ number ...
- Template Method - 模板方法模式
1.概述 在面向对象开发过程中,通常我们会遇到这样的一个问题:我们知道一个算法所需的关键步骤,并确定了这些步骤的执行顺序.但是某些步骤的具体实现是未知的,或者说某些步骤的实现与具体的环境相关.例子1: ...
- 安装R语言的包的方法
安装R语言的包的方法: 1. 在线安装 在R的控制台,输入类似install.packages("TSA") # 安装 TSA install.packages("TS ...
- VS2010中遇到_WIN32_WINNT not defined
VS2010中编程时遇到这个问题 _WIN32_WINNT not defined. Defaulting to _WIN32_WINNT_MAXVER (see WinSDKVer.h) 解决办法: ...