
Zabbix3.4.5部署安装(二)
[root@Node3 ~]# cat /etc/redhat-release      //查看系统版本

CentOS Linux release 7.4. (Core)

[root@Node3 ~]# ip - addr | grep 172.17      //查看IP地址

  inet 172.17.21.208/ brd 172.17.21.255 scope global ens192
二)软件下载:
[root@Node3 ~]# cd /usr/src/zabbix3.4.5/    //软件包下载目录

[root@Node3 zabbix3.4.5]# ls

zabbix-agent-3.4.-.el7.x86_64.rpm         zabbix-proxy-sqlite3-3.4.-.el7.x86_64.rpm  zabbix-web-japanese-3.4.-.el7.noarch.rpm

zabbix-get-3.4.-.el7.x86_64.rpm           zabbix-sender-3.4.-.el7.x86_64.rpm         zabbix-web-mysql-3.4.-.el7.noarch.rpm

zabbix-java-gateway-3.4.-.el7.x86_64.rpm  zabbix-server-mysql-3.4.-.el7.x86_64.rpm   zabbix-web-pgsql-3.4.-.el7.noarch.rpm

zabbix-proxy-mysql-3.4.-.el7.x86_64.rpm   zabbix-server-pgsql-3.4.-.el7.x86_64.rpm

zabbix-proxy-pgsql-3.4.-.el7.x86_64.rpm   zabbix-web-3.4.-.el7.noarch.rpm
[root@Node3 ~]# systemctl stop firewalld.service    //停掉防火墙

[root@Node3 ~]# systemctl disable firewalld.service     //禁止防火墙开机自启动

Removed symlink /etc/systemd/system/multi-user.target.wants/firewalld.service.

Removed symlink /etc/systemd/system/dbus-org.fedoraproject.FirewallD1.service.

[root@Node3 ~]# iptables -X

[root@Node3 ~]# iptables -Z

[root@Node3 ~]# iptables -F

[root@Node3 ~]# iptables -vnL

Chain INPUT (policy ACCEPT  packets,  bytes)

 pkts bytes target     prot opt in     out     source               destination

Chain FORWARD (policy ACCEPT  packets,  bytes)

 pkts bytes target     prot opt in     out     source               destination

Chain OUTPUT (policy ACCEPT  packets,  bytes)

 pkts bytes target     prot opt in     out     source               destination
[root@Node3 ~]# sed -i 's/SELINUX=enforcing/SELINUX=disabled/g' /etc/selinux/config   //在/etc/selinux/config 把SELNUX=enforcing换成SELINUX=disabled

[root@Node3 ~]# setenforce

setenforce: SELinux is disabled

[root@Node3 ~]# getenforce

Disabled

[root@Node3 ~]# systemctl reboot
注:部署官方文档
rpm包安装3.4手册:https://www.zabbix.com/documentation/3.4/zh/manual/installation/getting_zabbix
从源代码安装zabbix 3.4: https://www.zabbix.com/documentation/3.4/zh/manual/installation/install#installation_from_sources
二、数据库的安装及配置
MariaDB数据库管理系统是MySQL的一个分支,主要由开源社区在维护,采用GPL授权许可。
开发这个分支的原因是:甲骨文公司收购了MySQL后,有将MySQL闭源的潜在风险,因此社区采用分支的方式来避开这个风险。
MariaDB的目的是完全兼容MySQL,包括API和命令行,使之能轻松成为MySQL的代替品
一)安装MariaDB:
[root@Node3 ~]# yum install mariadb-server mariadb –y    //yum安装mariadb

[root@Node3 ~]# rpm -qa | grep mariadb

mariadb-5.5.-.el7.x86_64

mariadb-server-5.5.-.el7.x86_64

mariadb-libs-5.5.-.el7.x86_64
二)设置MariaDB并启动:
1、编辑my.cnf文件,增加以下内容:
[root@Node3 ~]# vim /etc/my.cnf    //编辑my.cnf文件
[mysqld]

datadir=/var/lib/mysql

socket=/var/lib/mysql/mysql.sock

innodb_file_per_table = on  //每个表使用一张单独的表

skip_name_resolve =  on  //跳过名称反解

# Disabling symbolic-links is recommended to prevent assorted security risks

symbolic-links=

# Settings user and group are ignored when systemd is used.

# If you need to run mysqld under a different user or group,

# customize your systemd unit file for mariadb according to the

# instructions in http://fedoraproject.org/wiki/Systemd

[mysqld_safe]

log-error=/var/log/mariadb/mariadb.log

pid-file=/var/run/mariadb/mariadb.pid

#

# include all files from the config directory

#

!includedir /etc/my.cnf.d
2、启动数据库,并设置开机自启动
[root@Node3 ~]# systemctl start mariadb.service       //启动数据库

[root@Node3 ~]# systemctl enable mariadb.service      //设置开机自启动

Created symlink from /etc/systemd/system/multi-user.target.wants/mariadb.service to /usr/lib/systemd/system/mariadb.service.

[root@Node3 ~]# systemctl status mariadb.service      //查看状态

● mariadb.service - MariaDB database server

   Loaded: loaded (/usr/lib/systemd/system/mariadb.service; enabled; vendor preset: disabled)

   Active: active (running) since Tue -- :: CST; 17s ago

 Main PID:  (mysqld_safe)

   CGroup: /system.slice/mariadb.service

           ├─ /bin/sh /usr/bin/mysqld_safe --basedir=/usr

           └─ /usr/libexec/mysqld --basedir=/usr --datadir=/var/lib/mysql --plugin-dir=/usr/lib64/mysql/plugin --log-error=/var/log/mariadb/ma...

Jan  :: Node3.contoso.com mariadb-prepare-db-dir[]: MySQL manual for more instructions.

Jan  :: Node3.contoso.com mariadb-prepare-db-dir[]: Please report any problems at http://mariadb.org/jira

Jan  :: Node3.contoso.com mariadb-prepare-db-dir[]: The latest information about MariaDB is available at http://mariadb.org/.

Jan  :: Node3.contoso.com mariadb-prepare-db-dir[]: You can find additional information about the MySQL part at:

Jan  :: Node3.contoso.com mariadb-prepare-db-dir[]: http://dev.mysql.com

Jan  :: Node3.contoso.com mariadb-prepare-db-dir[]: Consider joining MariaDB's strong and vibrant community:

Jan  :: Node3.contoso.com mariadb-prepare-db-dir[]: https://mariadb.org/get-involved/

Jan  :: Node3.contoso.com mysqld_safe[]:  :: mysqld_safe Logging to '/var/log/mariadb/mariadb.log'.

Jan  :: Node3.contoso.com mysqld_safe[]:  :: mysqld_safe Starting mysqld daemon with databases from /var/lib/mysql

Jan  :: Node3.contoso.com systemd[]: Started MariaDB database server.

[root@Node3 ~]# ss -tnl | grep 3306   //查看3306端口是否正常

LISTEN                      *:                     *:*
三) 创建数据库:
[root@Node3 ~]# mysql

Welcome to the MariaDB monitor.  Commands end with ; or \g.

Your MariaDB connection id is

Server version: 5.5.-MariaDB MariaDB Server

Copyright (c) , , Oracle, MariaDB Corporation Ab and others.

Type 'help;' or '\h' for help. Type '\c' to clear the current input statement.

MariaDB [(none)]> CREATE DATABASE zabbix CHARSET 'utf8' COLLATE 'utf8_bin';    //创建数据库,并设置字符集

Query OK,  row affected (0.00 sec)

MariaDB [(none)]> GRANT ALL ON zabbix.* TO 'zbxuser'@'172.17.21.%' IDENTIFIED BY 'zbxpass';      //授权用户对其数据库的权限

Query OK,  rows affected (0.00 sec)

MariaDB [(none)]> FLUSH PRIVILEGES;

Query OK,  rows affected (0.00 sec)

MariaDB [(none)]> exit

Bye

[root@Node3 ~]# mysql -uzbxuser -pzbxpass -h 172.17.21.208    //测试数据库是否登录正常

Welcome to the MariaDB monitor.  Commands end with ; or \g.

Your MariaDB connection id is

Server version: 5.5.-MariaDB MariaDB Server

Copyright (c) , , Oracle, MariaDB Corporation Ab and others.

Type 'help;' or '\h' for help. Type '\c' to clear the current input statement.

MariaDB [(none)]>
1、设置zabbix yum源仓库
[root@Node3 ~]# rpm -Uvh http://repo.zabbix.com/zabbix/3.4/rhel/7/x86_64/zabbix-release-3.4-1.el7.centos.noarch.rpm  //连接外网可以安装yum源的rpm包,让其自动生成zabbix仓库

Retrieving http://repo.zabbix.com/zabbix/3.4/rhel/7/x86_64/zabbix-release-3.4-1.el7.centos.noarch.rpm

Preparing...                          ################################# [%]

Updating / installing...

   :zabbix-release-3.4-.el7.centos  ################################# [%]

[root@Node3 ~]# ls  /etc/yum.repos.d/   //查看仓库是否自动生成

cdrom.repo  repo  zabbix.repo  CentOS-Base.repo

[root@Node3 ~]#
2、安装 zabbix3.4.5
[root@Node3 zabbix3.4.5]# yum -y install zabbix-server-mysql-3.4.-.el7.x86_64.rpm zabbix-web-mysql-3.4.-.el7.noarch.rpm zabbix-get-3.4.-.el7.x86_64.rpm  //安装zabbix服务端
Loaded plugins: fastestmirror, langpacks
Examining zabbix-server-mysql-3.4.5-1.el7.x86_64.rpm: zabbix-server-mysql-3.4.5-1.el7.x86_64
Marking zabbix-server-mysql-3.4.5-1.el7.x86_64.rpm to be installed
Examining zabbix-web-mysql-3.4.5-1.el7.noarch.rpm: zabbix-web-mysql-3.4.5-1.el7.noarch
Marking zabbix-web-mysql-3.4.5-1.el7.noarch.rpm to be installed
Examining zabbix-get-3.4.5-1.el7.x86_64.rpm: zabbix-get-3.4.5-1.el7.x86_64
Marking zabbix-get-3.4.5-1.el7.x86_64.rpm to be installed
Resolving Dependencies
--> Running transaction check
---> Package zabbix-get.x86_64 0:3.4.5-1.el7 will be installed
---> Package zabbix-server-mysql.x86_64 0:3.4.5-1.el7 will be installed
--> Processing Dependency: fping for package: zabbix-server-mysql-3.4.5-1.el7.x86_64
base                                                                                                                          | 3.6 kB  00:00:00
extras                                                                                                                        | 3.4 kB  00:00:00
updates                                                                                                                       | 3.4 kB  00:00:00
(1/4): base/7/x86_64/group_gz                                                                                                 | 156 kB  00:00:00
(2/4): extras/7/x86_64/primary_db                                                                                             | 145 kB  00:00:01
(3/4): base/7/x86_64/primary_db                                                                                               | 5.7 MB  00:00:12
(4/4): updates/7/x86_64/primary_db                                                                                            | 5.2 MB  00:00:55
Loading mirror speeds from cached hostfile
 * base: mirrors.aliyun.com
 * extras: mirrors.cn99.com
 * updates: mirrors.aliyun.com

...........................安装过程省略............................

Installed:

  zabbix-get.x86_64 :3.4.-.el7             zabbix-server-mysql.x86_64 :3.4.-.el7             zabbix-web-mysql.noarch :3.4.-.el7

Dependency Installed:   //安装所需的依赖包

  OpenIPMI-libs.x86_64 :2.0.-.el7           OpenIPMI-modalias.x86_64 :2.0.-.el7             fping.x86_64 :3.10-.el7

  httpd.x86_64 :2.4.-.el7.centos.           httpd-tools.x86_64 :2.4.-.el7.centos.           iksemel.x86_64 :1.4-.el7.centos

  libzip.x86_64 :0.10.-.el7                   mailcap.noarch :2.1.-.el7                        php.x86_64 :5.4.-.el7_4

  php-bcmath.x86_64 :5.4.-.el7_4            php-cli.x86_64 :5.4.-.el7_4                     php-common.x86_64 :5.4.-.el7_4

  php-gd.x86_64 :5.4.-.el7_4                php-ldap.x86_64 :5.4.-.el7_4                    php-mbstring.x86_64 :5.4.-.el7_4

  php-mysql.x86_64 :5.4.-.el7_4             php-pdo.x86_64 :5.4.-.el7_4                     php-xml.x86_64 :5.4.-.el7_4

  t1lib.x86_64 :5.1.-.el7                    unixODBC.x86_64 :2.3.-.el7                       zabbix-web.noarch :3.4.-.el7

Complete!
3、导入zabbix数据库
[root@Node3 zabbix3.4.5]# zcat /usr/share/doc/zabbix-server-mysql-3.4./create.sql.gz |mysql -uzbxuser -pzbxpass -h172.17.21.208 zabbix //导入数据库
4、配置数据库用户及密码
[root@Node3 ~]# vim /etc/zabbix/zabbix_server.conf //修改zabbix_server.conf配置文件红色部分

[root@Node3 ~]# grep -n '^[a-Z]' /etc/zabbix/zabbix_server.conf //查看修改部分

:LogFile=/var/log/zabbix/zabbix_server.log

:LogFileSize=

:PidFile=/var/run/zabbix/zabbix_server.pid

:SocketDir=/var/run/zabbix
91:DBHost=172.17.21.208       //修改数据库地址

:DBName=zabbix             //修改数据库名

:DBUser=zbxuser            //修改数据库账号

:DBPassword=zbxpass       //修改数据库密码

:SNMPTrapperFile=/var/log/snmptrap/snmptrap.log

:Timeout=

:AlertScriptsPath=/usr/lib/zabbix/alertscripts    //Zabbix运行脚本存放目录

:ExternalScripts=/usr/lib/zabbix/externalscripts

:LogSlowQueries=

[root@Node3 ~]#
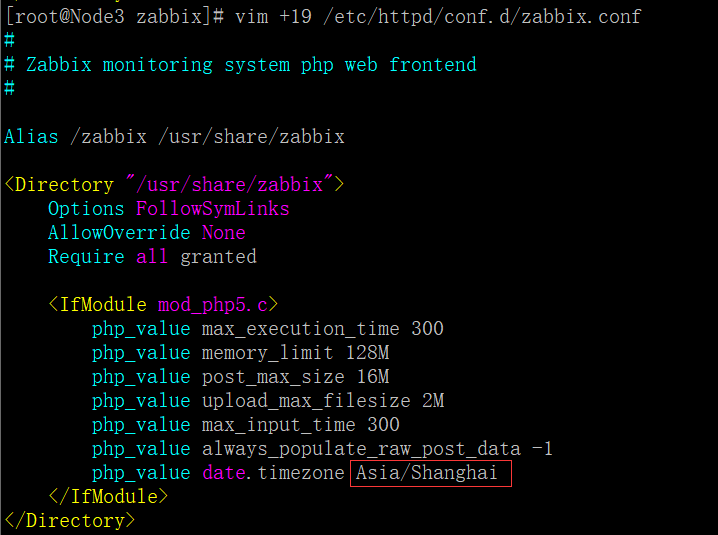
5、编辑Zabbix前端PHP配置,更改时区
[root@Node3 zabbix]# vim + /etc/httpd/conf.d/zabbix.conf //将#去掉,修改为Asia/Shanghai
6、SELinux配置
[root@Node3 zabbix]# setsebool -P httpd_can_connect_zabbix on

setsebool:  SELinux is disabled.

[root@Node3 zabbix]# setsebool -P httpd_can_cetwork_connect_db on

setsebool:  SELinux is disabled.

[root@Node3 zabbix]#
7、开启httpd服务,并设置开机自启动
[root@Node3 zabbix]# systemctl start httpd.service

[root@Node3 zabbix]# systemctl enable httpd.service

Created symlink from /etc/systemd/system/multi-user.target.wants/httpd.service to /usr/lib/systemd/system/httpd.service.

[root@Node3 zabbix]# ss -tnl | grep 80

LISTEN     0      128         :::                      :::*
8、开启zabbix- server服务,并设置为开机自启动
[root@Node3 zabbix]# systemctl start zabbix-server.service

[root@Node3 zabbix]# systemctl enable zabbix-server.service

Created symlink from /etc/systemd/system/multi-user.target.wants/zabbix-server.service to /usr/lib/systemd/system/zabbix-server.service.

[root@Node3 zabbix]# ss -tnl | grep

LISTEN                     *:                    *:*

LISTEN                    :::                   :::*

[root@Node3 zabbix]#
四、安装Zabbix Web
1、浏览器访问,并进行安装http://172.17.21.178/zabbix/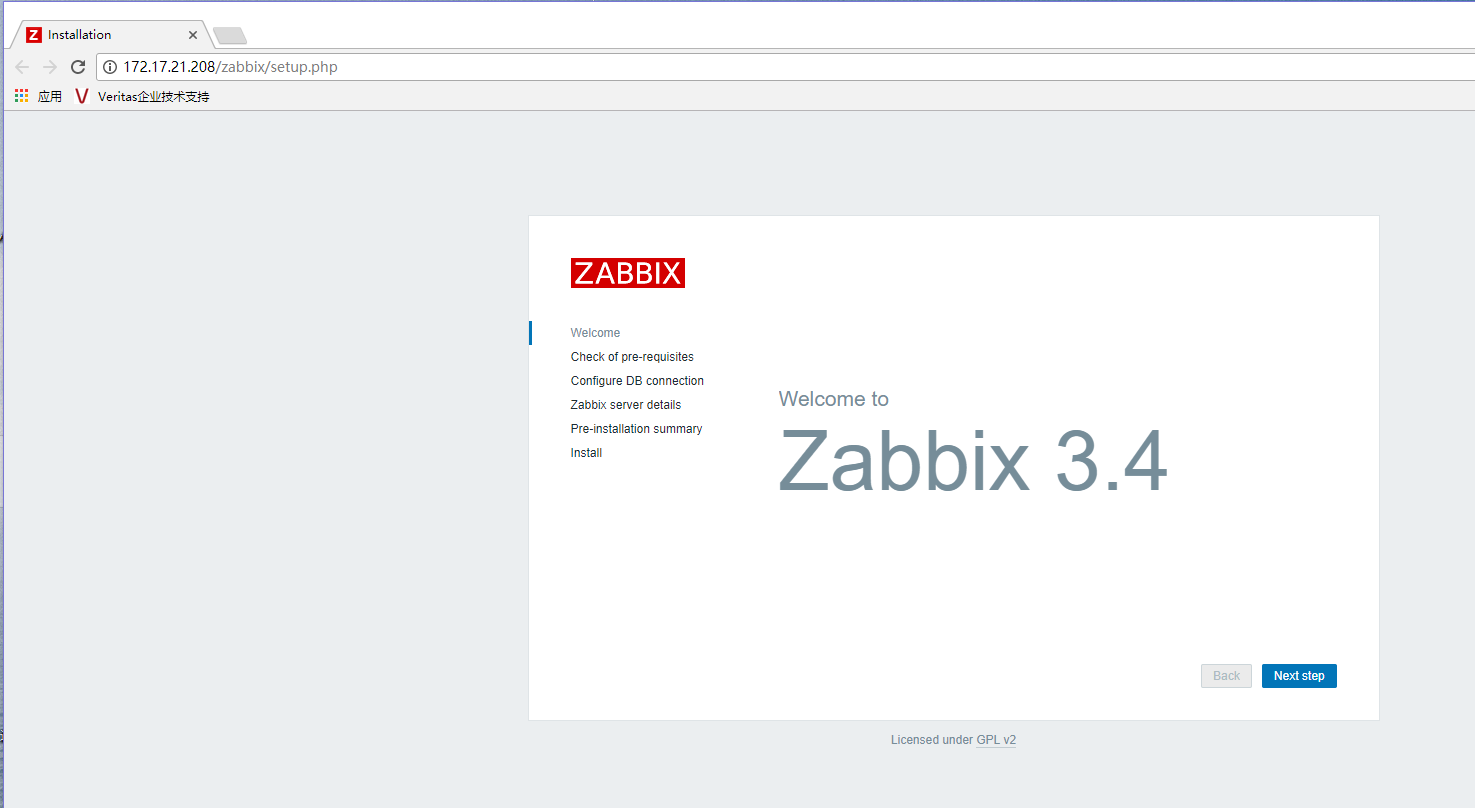
2、点击Next setp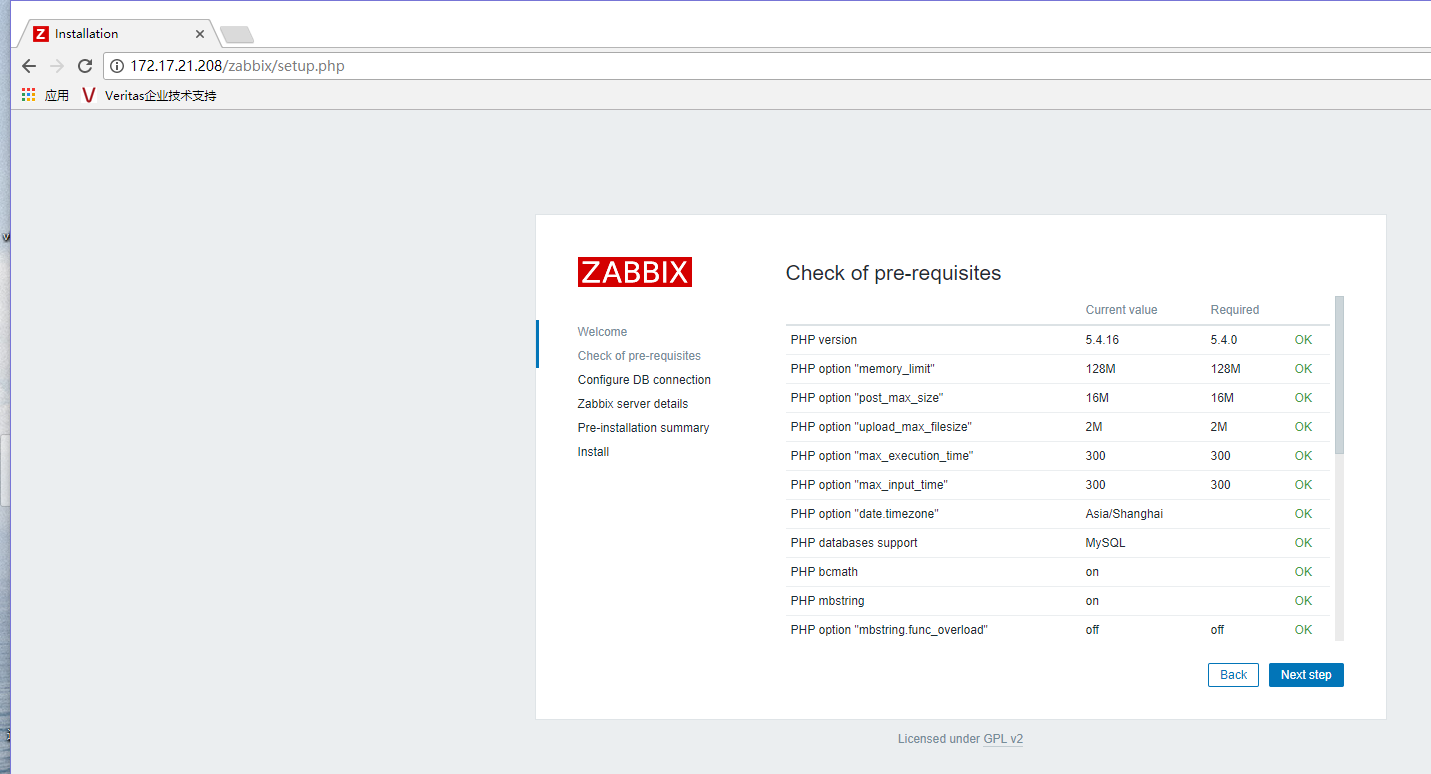
3、查看没有相关的报错信息,然后再点击Next step
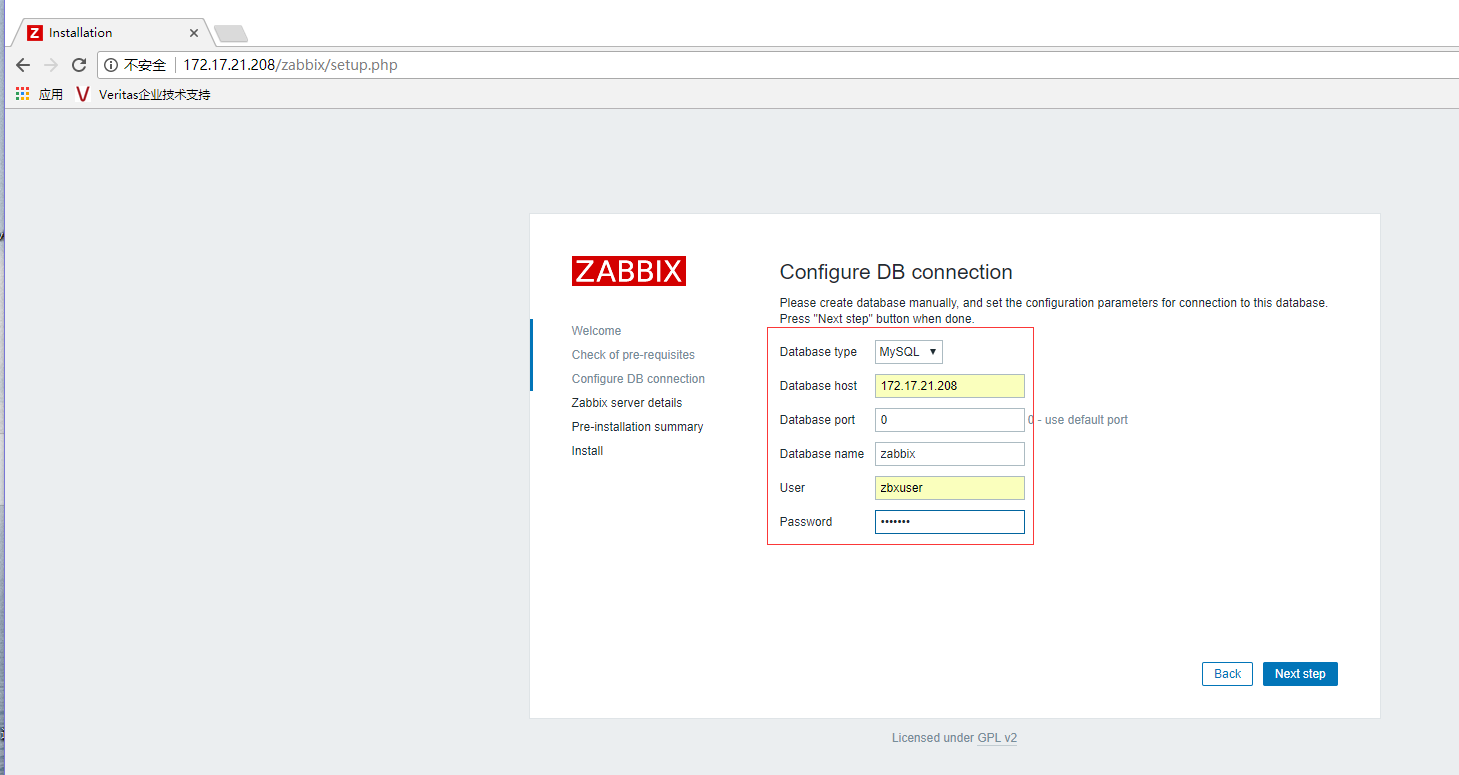
4、设置数据库地址,数据库,数据用户及密码、端口号等(端口号0代表默认端口)
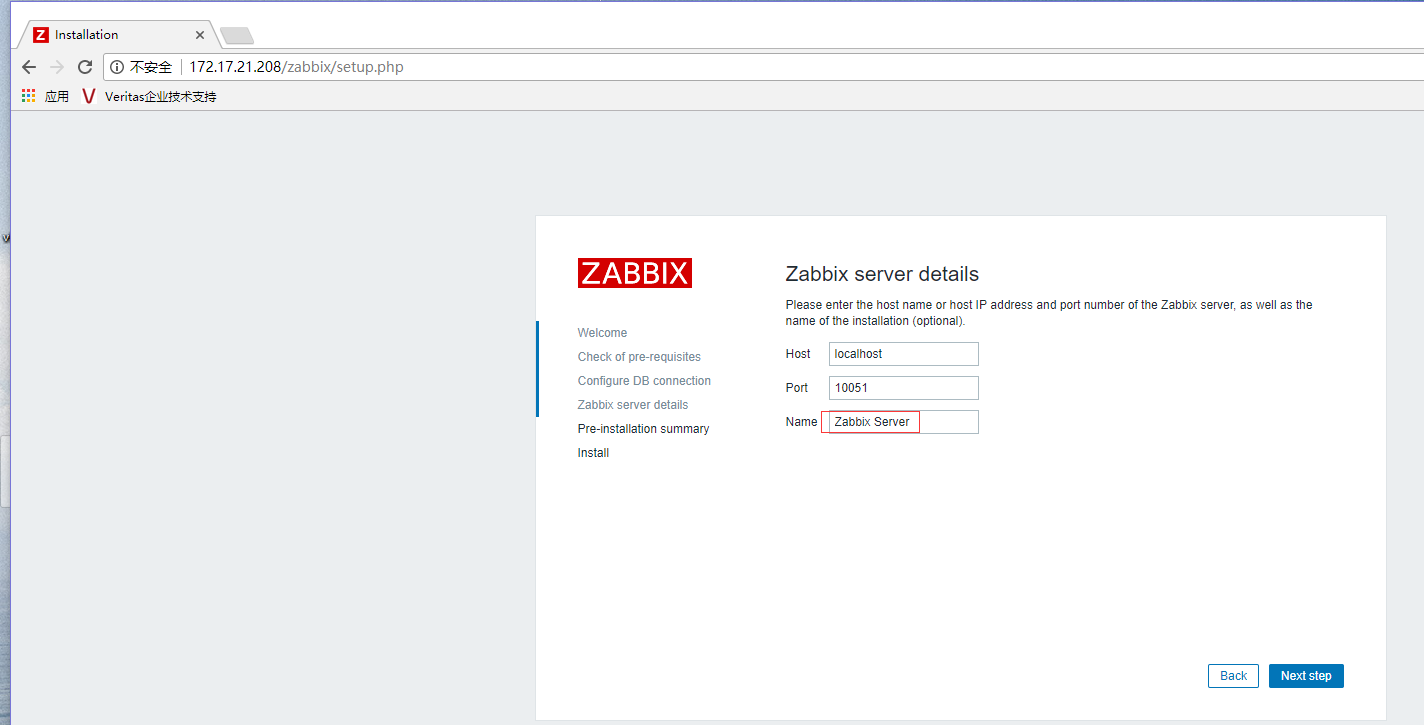
5、设置Zabbix平台名称,点击Next step
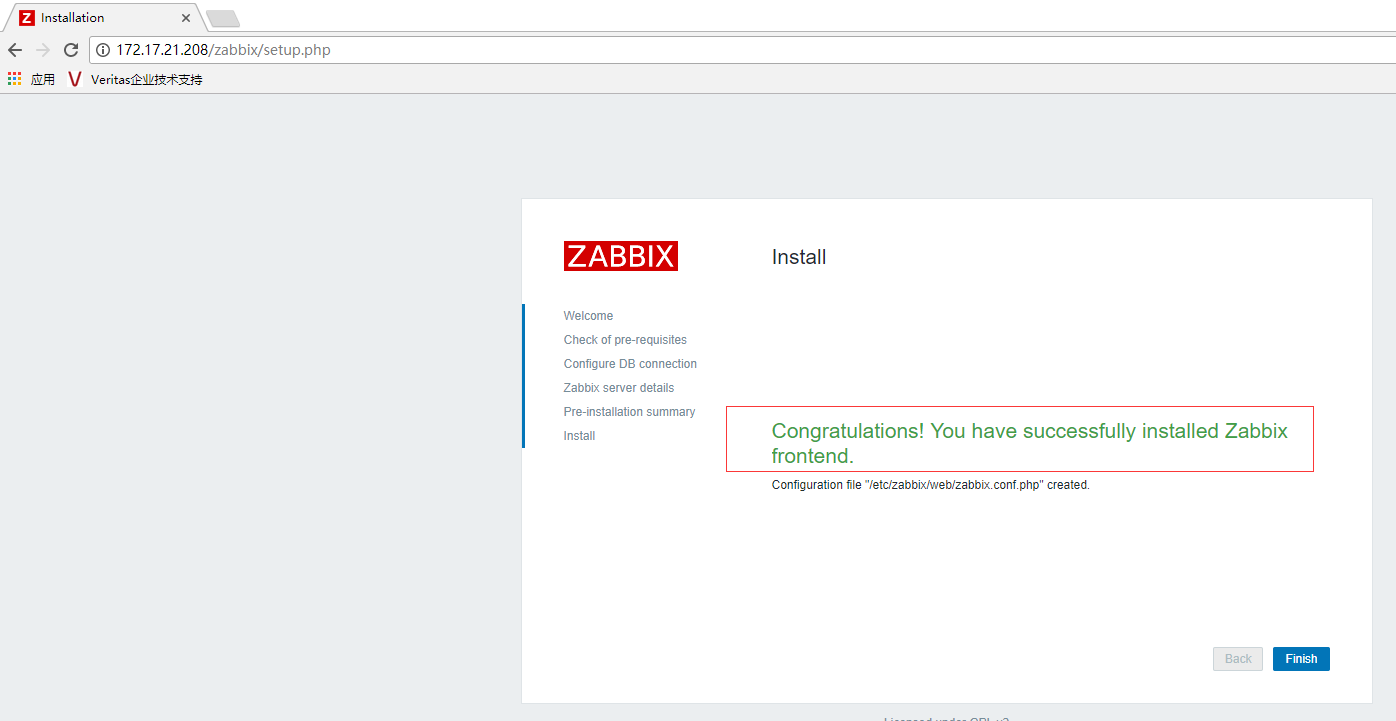
完成安装,会将在/etc/zabbix/web/zabbix.conf.php生成配置文件
Congratulations! You have successfully installed Zabbix frontend.
Configuration file "/etc/zabbix/web/zabbix.conf.php" created.
6、看到以上安装 成功的字样,代表安装成功,点击Finish结束安装,打开登录界面,默认账号为:Admin 密码为:zabbix,点击Sign in

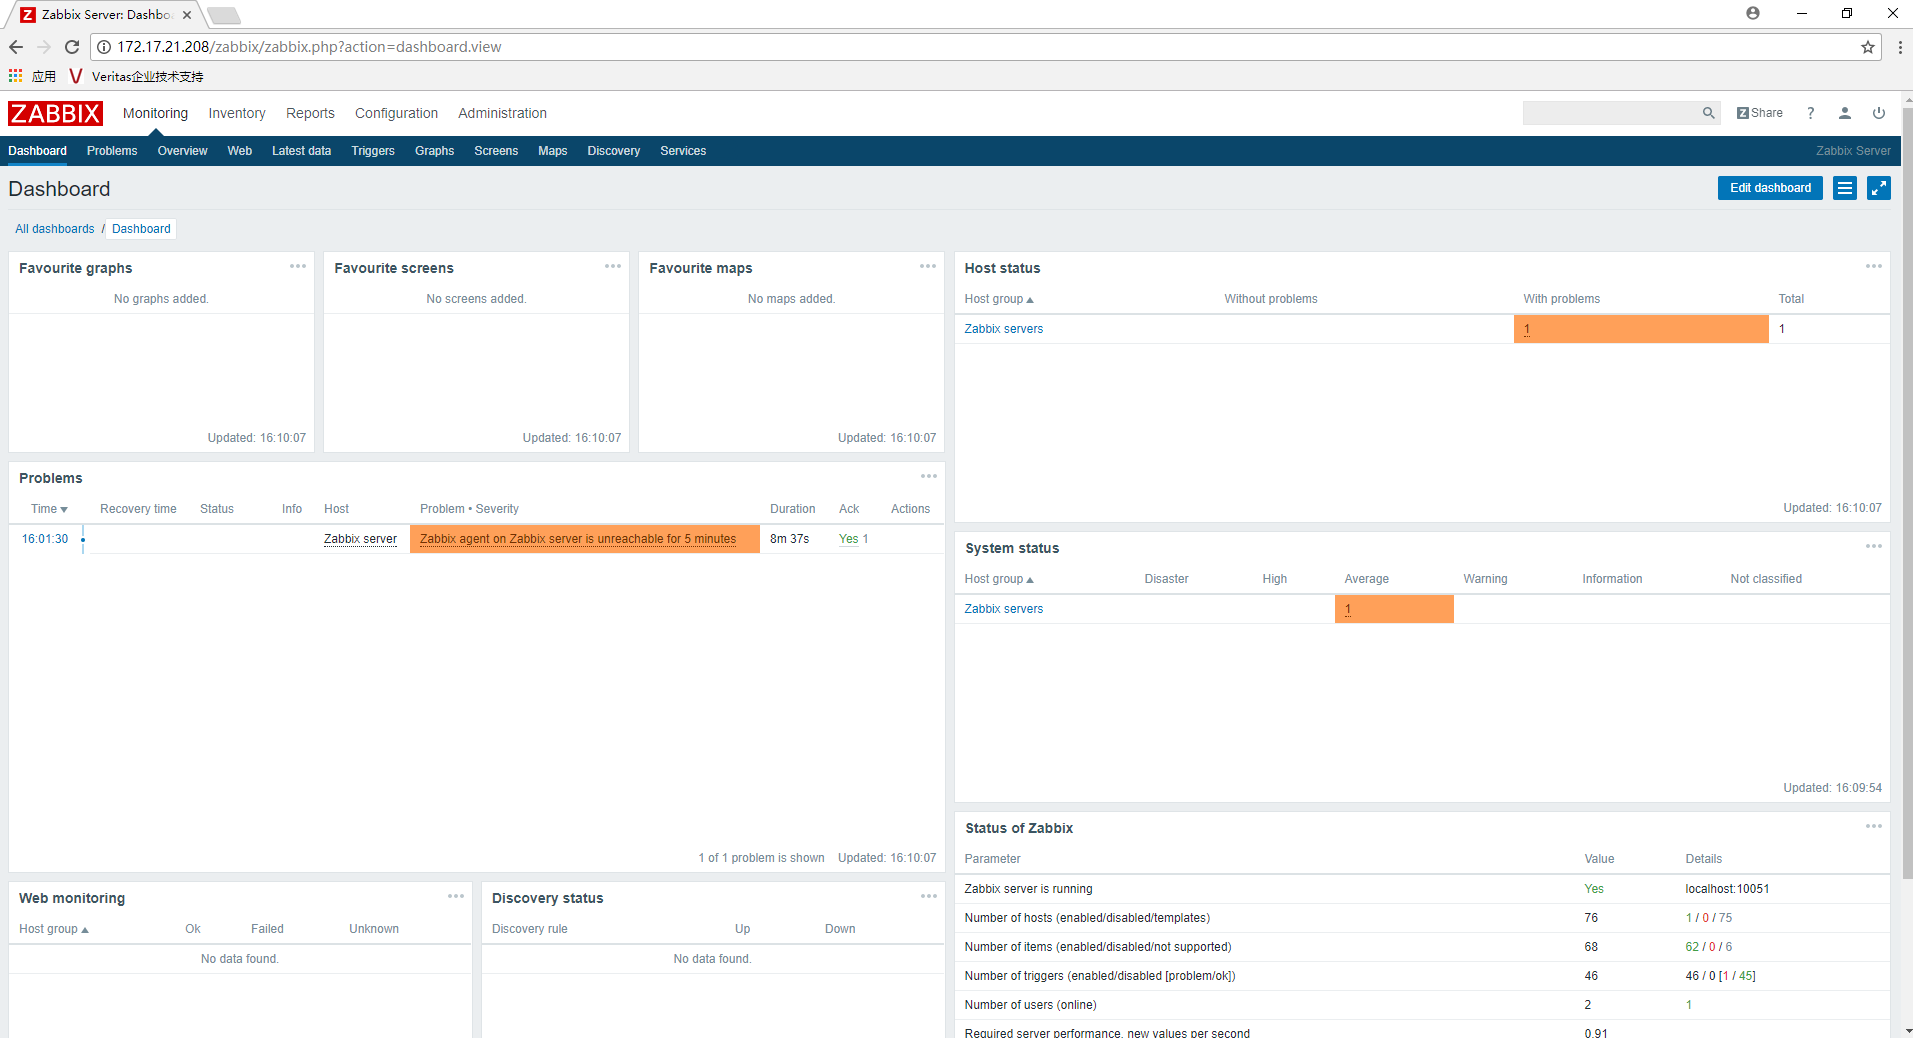
7、登录成功之后,看到以下界面,代表安装结束
Zabbix3.4.5部署安装(二)的更多相关文章
- zabbix3.0.4 部署之二 (Centos6.5系统准备)
1.安装Centos6.5 2.6.32-642.4.2.el6.x86_64 升级所有软件至最新: yum update 2.同步时间.安装ntpd yum install ntpddate n ...
- [原]CentOS7安装Rancher2.1并部署kubernetes (二)---部署kubernetes
################## Rancher v2.1.7 + Kubernetes 1.13.4 ################ ##################### ...
- (二)docker的部署安装,配置,基础命令
一.docker 的安装部署 这里不过多介绍,下面这两个linux发型版 安装可以参考 ubuntu的 docker-ce安装 centos7的 docker-ce安装 二.docker配置文件 重要 ...
- 【Docker学习之二】Docker部署安装
环境 docker-ce-19.03.1-3.el7.x86_64 一.Docker的部署安装 Docker采用Linux(内核)技术,所以只能运行在Linux上,官方说Linux kernel至少3 ...
- 分布式监控系统Zabbix-3.0.3-完整安装记录(1)
分布式监控系统Zabbix-3.0.3的安装记录 环境说明zabbix-server:192.168.1.30 #zabbix的服务端(若要监控本机,则需要配置本机的Zabbix agent, ...
- Ubuntu16.04 部署安装Docker容器 & 注意事项
一.部署安装Docker容器 1.1 Ubuntu下安装 crul sudo apt install curl curl是利用URL语法在命令行方式下工作的开源文件传输工具.它被广泛应用在Unix.多 ...
- Docker+Redis镜像的原理以及部署安装(超详解附截图)
文章来源:公众号-智能化IT系统. 一. DOCKER介绍 Docker简介 (1)Docker 是一个开源的应用容器引擎,基于 Go 语言,并遵从Apache2.0协议开源. (2)Docker 可 ...
- 单机多实例mysq 8.0l部署安装
单机多实例mysql部署安装 目的需求 在单台虚拟机部署部署多实例mysql,用于配置mysql replication,MHA等. 思路 多实例安装mysql可以参考<源编译MySQL8.0的 ...
- zabbix3.0通过yum安装笔记
zabbix3.0通过yum安装笔记 一.通过yum安装zabbix rpm -Uvh https://repo.zabbix.com/zabbix/3.0/rhel/7/x86_64/zabbix- ...
随机推荐
- mongod 安装
mongod --logpath F:\mongo\db\logs\logs.log --logappend --dbpath F:\mongo\db\data --directoryperdb -- ...
- 列出连通集(mooc)
给定一个有N个顶点和E条边的无向图,请用DFS和BFS分别列出其所有的连通集.假设顶点从0到N−1编号.进行搜索时,假设我们总是从编号最小的顶点出发,按编号递增的顺序访问邻接点. 输入格式: 输入第1 ...
- 001 -js对时间日期的排序
001-JS对时间日期的排序 最近在做公司的项目时间,产品给了一个很简单的页面,让帮忙写一下.首先看一下产品的需求: 需要对该列表进行排序 思路:(1)可以在数据库写sql语句的时间直接一个DESC按 ...
- Linux环境下Java应用性能分析定位-CPU使用篇
1 CPU热点分析定位背景 CPU资源还是很昂贵的,为了深刻感受到这种昂贵,间下图当前CPU的资源售价: 所以对于程序猿们来说,需要让程序合理高效的使用CPU资源.利用有限的CPU资源来解决完 ...
- linux 命令自动补全包
linux 其他知识目录 rhel7如果使用最小化安装后,tab键默认是不能自动补全命令的 执行yum install bash-completion之后重启系统正常.
- 用 Python 构建一个极小的区块链
虽然有些人认为区块链是一个早晚会出现问题的解决方案,但是毫无疑问,这个创新技术是一个计算机技术上的奇迹.那么,究竟什么是区块链呢? 区块链 以比特币(Bitcoin)或其它加密货币按时间顺序公开地记录 ...
- npm 常用指令
npm install <name>安装nodejs的依赖包 例如npm install express 就会默认安装express的最新版本,也可以通过在后面加版本号的方式安装指定版本, ...
- 基于spec探路者团队贪吃蛇作品的评论
1 运动功能 由以上两图贪吃蛇的位置不同可知,运动功能实现.并且我能够通过使用键盘上的上下左右方位键控制蛇的移动方向,蛇在控制的方向上进行直线前进. 2 吃食物功能 以上两图可知吃食物功能实现.当界面 ...
- 机器学习笔记(4)Logistic回归
模型介绍 对于分类问题,其得到的结果值是离散的,所以通常情况下,不适合使用线性回归方法进行模拟. 所以提出Logistic回归模型. 其假设函数如下: \[ h_θ(x)=g(θ^Tx) \] 函数g ...
- CocoaPods 创建私有仓库
这里有个坑首先需要注意,创建私有cocoapods仓库需要两个git仓库,即代码仓库,Specs文件仓库. 一.创建私有库 1.创建自己源码仓库,假设是A.git; 2.对A仓库: git add . ...