C# 添加Windows服务,定时任务。
源码下载地址:http://files.cnblogs.com/files/lanyubaicl/20160830Windows%E6%9C%8D%E5%8A%A1.zip
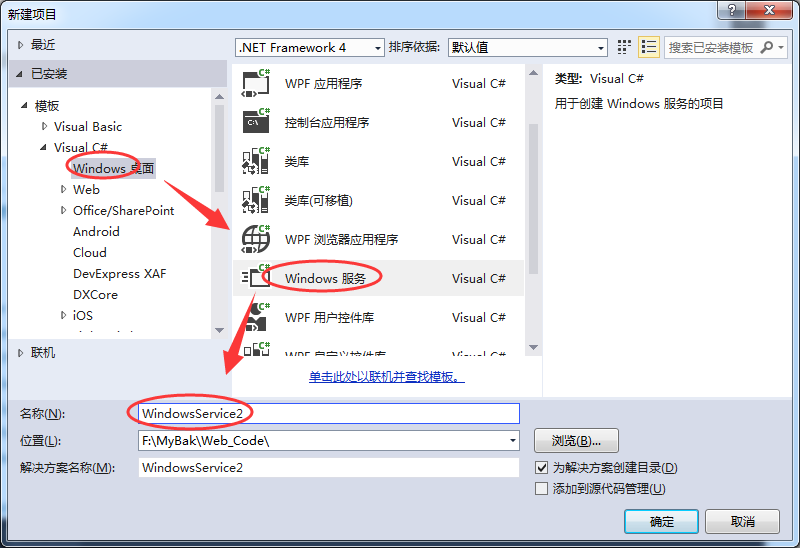
步骤 一 、 创建服务项目。
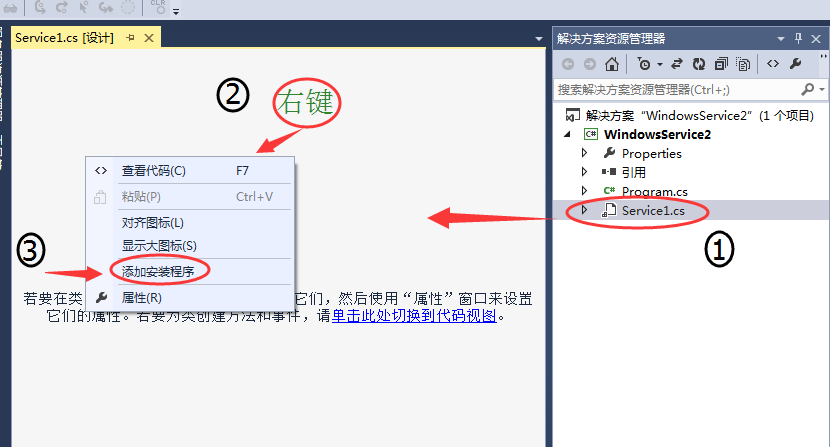
步骤二 、添加安装程序。
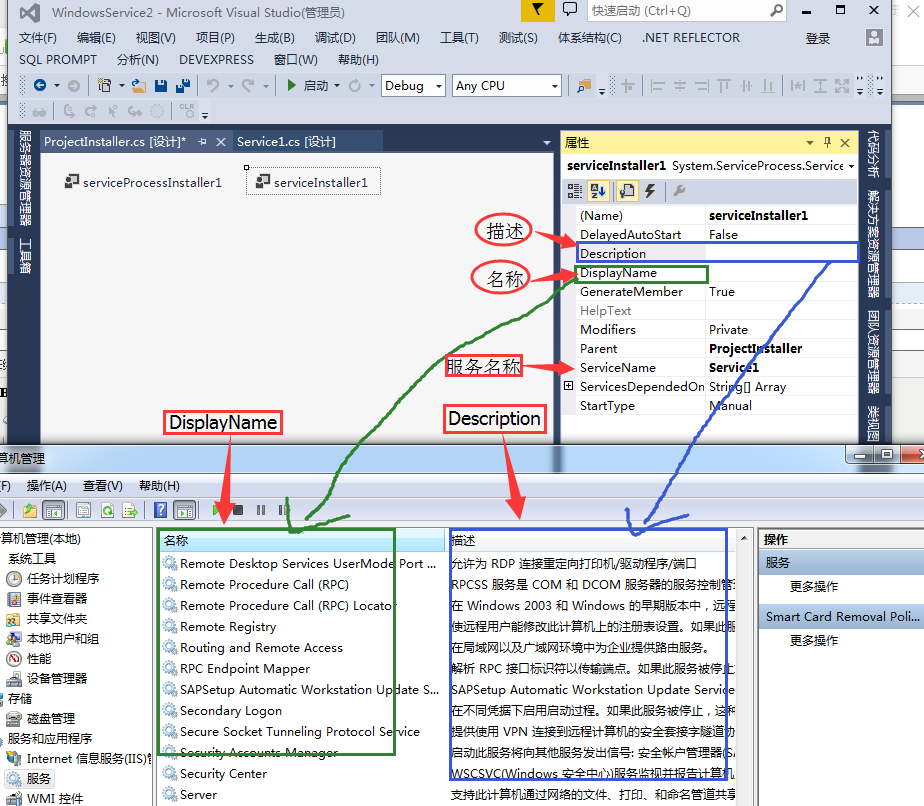
步骤三 、服务属性设置 【serviceInstaller1】。
4.1 添加定时任务
 public partial class SapSyn : ServiceBase

    {

        System.Timers.Timer timer1;  //计时器

        System.Timers.Timer timer2;  //计时器

        System.Timers.Timer timer3;  //计时器

        System.Timers.Timer timer4;  //计时器

        public SapSyn()

        {

            InitializeComponent();

        }

        protected override void OnStart(string[] args)

        {

            timer1 = new System.Timers.Timer();

            timer1.Interval = ;  //设置计时器事件间隔执行时间

            timer1.Elapsed += new System.Timers.ElapsedEventHandler(TMStart1_Elapsed);

            timer1.Enabled = true;

            timer2 = new System.Timers.Timer();

            timer2.Interval = ;  //设置计时器事件间隔执行时间

            timer2.Elapsed += new System.Timers.ElapsedEventHandler(TMStart2_Elapsed);

            timer2.Enabled = true;

            timer3 = new System.Timers.Timer();

            timer3.Interval = ;  //设置计时器事件间隔执行时间

            timer3.Elapsed += new System.Timers.ElapsedEventHandler(TMStart3_Elapsed);

            timer3.Enabled = true;

            timer4 = new System.Timers.Timer();

            timer4.Interval = ;  //设置计时器事件间隔执行时间

            timer4.Elapsed += new System.Timers.ElapsedEventHandler(TMStart4_Elapsed);

            timer4.Enabled = true;

        }

        protected override void OnStop()  //服务停止执行

        {

            using (System.IO.StreamWriter sw = new System.IO.StreamWriter("C:\\log.txt", true))

            {

                sw.WriteLine(DateTime.Now.ToString("yyyy-MM-dd HH:mm:ss ") + "Stop.");

            }

            this.timer1.Enabled = false;

            this.timer2.Enabled = false;

            this.timer3.Enabled = false;

            this.timer4.Enabled = false;

        }

        protected override void OnPause()

        {

            //服务暂停执行代码

            base.OnPause();

        }

        protected override void OnContinue()

        {

            //服务恢复执行代码

            base.OnContinue();

        }

        protected override void OnShutdown()

        {

            //系统即将关闭执行代码

            base.OnShutdown();

        }

        private void TMStart1_Elapsed(object sender, System.Timers.ElapsedEventArgs e)

        {

            //执行SQL语句或其他操作

            using (System.IO.StreamWriter sw = new System.IO.StreamWriter("C:\\" +  + "log.txt", true))

            {

                sw.WriteLine(DateTime.Now.ToString("yyyy-MM-dd HH:mm:ss ") + "Start.");

            }

        }

        private void TMStart2_Elapsed(object sender, System.Timers.ElapsedEventArgs e)

        {

            //执行SQL语句或其他操作

            using (System.IO.StreamWriter sw = new System.IO.StreamWriter("C:\\" +  + "log.txt", true))

            {

                sw.WriteLine(DateTime.Now.ToString("yyyy-MM-dd HH:mm:ss ") + "Start.");

            }

        }

        private void TMStart3_Elapsed(object sender, System.Timers.ElapsedEventArgs e)

        {

            //执行SQL语句或其他操作

            using (System.IO.StreamWriter sw = new System.IO.StreamWriter("C:\\" +  + "log.txt", true))

            {

                sw.WriteLine(DateTime.Now.ToString("yyyy-MM-dd HH:mm:ss ") + "Start.");

            }

        }

        private void TMStart4_Elapsed(object sender, System.Timers.ElapsedEventArgs e)

        {

            //执行SQL语句或其他操作

            using (System.IO.StreamWriter sw = new System.IO.StreamWriter("C:\\" +  + "log.txt", true))

            {

                sw.WriteLine(DateTime.Now.ToString("yyyy-MM-dd HH:mm:ss ") + "Start.");

            }

        }

    }
4.2 设置服务启动方式为自动启动
    [RunInstaller(true)]

    public partial class ProjectInstaller : System.Configuration.Install.Installer

    {

        public ProjectInstaller()

        {

            InitializeComponent();

            this.Committed += new InstallEventHandler(ProjectInstaller_Committed);

        }

        private void ProjectInstaller_Committed(object sender, InstallEventArgs e)

        {

            //参数为服务的名字

            System.ServiceProcess.ServiceController controller = new System.ServiceProcess.ServiceController("ServiceSapSyn");

            controller.Start();

        }

        private void serviceInstaller1_AfterInstall(object sender, InstallEventArgs e)

        {

        }

    }
步骤五、脚本配置。
安装服务脚本
%SystemRoot%\Microsoft.NET\Framework\v4.0.30319\installutil.exe WindowsServiceTest.exe

Net Start ServiceTest

sc config ServiceTest start= auto
卸载服务脚本
%SystemRoot%\Microsoft.NET\Framework\v4.0.30319\installutil.exe /u WindowsServiceTest.exe
5.1 停止或启动服务的代码
    public partial class Form1 : Form

    {

        public Form1()

        {

            InitializeComponent();

        }

        public string thispath = Application.StartupPath;

        public string Propath = "";

        private void Form1_Load(object sender, EventArgs e)

        {

            this.Text = "启动服务";

        }

        /// <summary>

        /// 启动服务

        /// </summary>

        /// <param name="sender"></param>

        /// <param name="e"></param>

        private void button1_Click(object sender, EventArgs e)

        {

            Cursor = Cursors.WaitCursor;

            string StarPath = @"%SystemRoot%\Microsoft.NET\Framework\v4.0.30319\installutil.exe " + Propath;

            FileStream fs = new FileStream(thispath + "\\Install.bat", FileMode.Create);

            StreamWriter sw = new StreamWriter(fs);

            try

            {

                sw.WriteLine(StarPath);

                sw.WriteLine("Net Start ServiceTest");

                sw.WriteLine("sc config ServiceTest start= auto");

            }

            catch (Exception ex)

            {

                MessageBox.Show(ex.Message.ToString());

            }

            finally

            {

                sw.Close();

                fs.Close();

            }

            System.Diagnostics.Process.Start(thispath + "\\Install.bat");

            this.Text = "启动服务:你选择的服务已经启动。";

            Cursor = Cursors.Default;

        }

        /// <summary>

        /// 停止服务

        /// </summary>

        /// <param name="sender"></param>

        /// <param name="e"></param>

        private void button2_Click(object sender, EventArgs e)

        {

            Cursor = Cursors.WaitCursor;

            string StarPath = @"%SystemRoot%\Microsoft.NET\Framework\v4.0.30319\installutil.exe /u " + Propath;

            FileStream fs = new FileStream(thispath + "\\Uninstall.bat", FileMode.Create);

            StreamWriter sw = new StreamWriter(fs);

            try

            {

                sw.WriteLine(StarPath);

            }

            catch (Exception ex)

            {

                MessageBox.Show(ex.Message.ToString());

            }

            finally

            {

                sw.Close();

                fs.Close();

            }

            System.Diagnostics.Process.Start(thispath + "\\Uninstall.bat");

            this.Text = "启动服务:你选择的服务已经卸载。";

            Cursor = Cursors.Default;

        }

        private void button3_Click(object sender, EventArgs e)

        {

            ///选择文件框 对象

            OpenFileDialog ofd = new OpenFileDialog();

            //打开时指定默认路径

            ofd.InitialDirectory = @"C:\Documents and Settings\Administrator.ICBCOA-6E96E6BE\桌面";

            //如果用户点击确定

            if (ofd.ShowDialog() == DialogResult.OK)

            {

                //将用户选择的文件路径 显示 在文本框中

                textBox1.Text = ofd.FileName;

                Propath = textBox1.Text;

            }

            if (File.Exists(thispath + "\\Uninstall.bat"))

            {

                File.Delete(thispath + "\\Uninstall.bat");

            }

            File.Create(thispath + "\\Uninstall.bat").Close();

            if (File.Exists(thispath + "\\Install.bat"))

            {

                File.Delete(thispath + "\\Install.bat");

            }

            File.Create(thispath + "\\Install.bat").Close();

        }

        //读写文本 - 写入数据按钮

        private void buttonWrite_Click(string filePath)

        {

        }

        /// <summary>

        /// 运行CMD命令

        /// </summary>

        /// <param name="cmd">命令</param>

        /// <returns></returns>

        public static string Cmd(string[] cmd)

        {

            Process p = new Process();

            p.StartInfo.FileName = "cmd.exe";

            p.StartInfo.UseShellExecute = false;

            p.StartInfo.RedirectStandardInput = true;

            p.StartInfo.RedirectStandardOutput = true;

            p.StartInfo.RedirectStandardError = true;

            p.StartInfo.CreateNoWindow = true;

            p.Start();

            p.StandardInput.AutoFlush = true;

            for (int i = ; i < cmd.Length; i++)

            {

                p.StandardInput.WriteLine(cmd[i].ToString());

            }

            p.StandardInput.WriteLine("exit");

            string strRst = p.StandardOutput.ReadToEnd();

            p.WaitForExit();

            p.Close();

            return strRst;

        }

        /// <summary>

        /// 关闭进程

        /// </summary>

        /// <param name="ProcName">进程名称</param>

        /// <returns></returns>

        public static bool CloseProcess(string ProcName)

        {

            bool result = false;

            System.Collections.ArrayList procList = new System.Collections.ArrayList();

            string tempName = "";

            int begpos;

            int endpos;

            foreach (System.Diagnostics.Process thisProc in System.Diagnostics.Process.GetProcesses())

            {

                tempName = thisProc.ToString();

                begpos = tempName.IndexOf("(") + ;

                endpos = tempName.IndexOf(")");

                tempName = tempName.Substring(begpos, endpos - begpos);

                procList.Add(tempName);

                if (tempName == ProcName)

                {

                    if (!thisProc.CloseMainWindow())

                        thisProc.Kill(); // 当发送关闭窗口命令无效时强行结束进程

                    result = true;

                }

            }

            return result;

        }

    }
5.2 Form1.Designer.cs 代码
partial class Form1
{
/// <summary>
/// 必需的设计器变量。 Form1.Designer.cs
/// </summary>
private System.ComponentModel.IContainer components = null; /// <summary>
/// 清理所有正在使用的资源。
/// </summary>
/// <param name="disposing">如果应释放托管资源,为 true;否则为 false。</param>
protected override void Dispose(bool disposing)
{
if (disposing && (components != null))
{
components.Dispose();
}
base.Dispose(disposing);
} #region Windows 窗体设计器生成的代码 /// <summary>
/// 设计器支持所需的方法 - 不要
/// 使用代码编辑器修改此方法的内容。
/// </summary>
private void InitializeComponent()
{
System.ComponentModel.ComponentResourceManager resources = new System.ComponentModel.ComponentResourceManager(typeof(Form1));
this.button1 = new System.Windows.Forms.Button();
this.button2 = new System.Windows.Forms.Button();
this.textBox1 = new System.Windows.Forms.TextBox();
this.button3 = new System.Windows.Forms.Button();
this.SuspendLayout();
//
// button1
//
this.button1.Font = new System.Drawing.Font("微软雅黑", 12F, System.Drawing.FontStyle.Regular, System.Drawing.GraphicsUnit.Point, ((byte)()));
this.button1.Location = new System.Drawing.Point(, );
this.button1.Name = "button1";
this.button1.Size = new System.Drawing.Size(, );
this.button1.TabIndex = ;
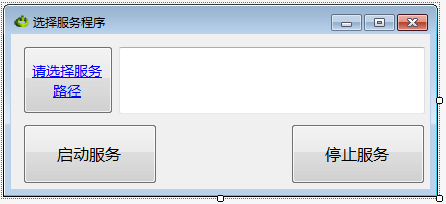
this.button1.Text = "启动服务";
this.button1.UseVisualStyleBackColor = true;
this.button1.Click += new System.EventHandler(this.button1_Click);
//
// button2
//
this.button2.Font = new System.Drawing.Font("微软雅黑", 12F, System.Drawing.FontStyle.Regular, System.Drawing.GraphicsUnit.Point, ((byte)()));
this.button2.Location = new System.Drawing.Point(, );
this.button2.Name = "button2";
this.button2.Size = new System.Drawing.Size(, );
this.button2.TabIndex = ;
this.button2.Text = "停止服务";
this.button2.UseVisualStyleBackColor = true;
this.button2.Click += new System.EventHandler(this.button2_Click);
//
// textBox1
//
this.textBox1.Font = new System.Drawing.Font("微软雅黑", 10.5F, System.Drawing.FontStyle.Regular, System.Drawing.GraphicsUnit.Point, ((byte)()));
this.textBox1.ForeColor = System.Drawing.Color.Maroon;
this.textBox1.Location = new System.Drawing.Point(, );
this.textBox1.Multiline = true;
this.textBox1.Name = "textBox1";
this.textBox1.Size = new System.Drawing.Size(, );
this.textBox1.TabIndex = ;
//
// button3
//
this.button3.Font = new System.Drawing.Font("微软雅黑", 10.5F, System.Drawing.FontStyle.Underline, System.Drawing.GraphicsUnit.Point, ((byte)()));
this.button3.ForeColor = System.Drawing.Color.Blue;
this.button3.Location = new System.Drawing.Point(, );
this.button3.Name = "button3";
this.button3.Size = new System.Drawing.Size(, );
this.button3.TabIndex = ;
this.button3.Text = "请选择服务路径";
this.button3.UseVisualStyleBackColor = true;
this.button3.Click += new System.EventHandler(this.button3_Click);
//
// Form1
//
this.AutoScaleDimensions = new System.Drawing.SizeF(6F, 12F);
this.AutoScaleMode = System.Windows.Forms.AutoScaleMode.Font;
this.ClientSize = new System.Drawing.Size(, );
this.Controls.Add(this.button3);
this.Controls.Add(this.textBox1);
this.Controls.Add(this.button2);
this.Controls.Add(this.button1);
this.Icon = ((System.Drawing.Icon)(resources.GetObject("$this.Icon")));
this.Name = "Form1";
this.Text = "选择服务程序";
this.Load += new System.EventHandler(this.Form1_Load);
this.ResumeLayout(false);
this.PerformLayout(); } #endregion private System.Windows.Forms.Button button1;
private System.Windows.Forms.Button button2;
private System.Windows.Forms.TextBox textBox1;
private System.Windows.Forms.Button button3;
}
源码下载地址:http://files.cnblogs.com/files/lanyubaicl/20160830Windows%E6%9C%8D%E5%8A%A1.zip
C# 添加Windows服务,定时任务。的更多相关文章
- VS2015 项目中 添加windows服务
1. 在项目中添加winows服务 今天刚刚为自己的项目添加了windows服务,以服务的形式运行后台系统,为前端提供接口服务,下面说一下具体怎么为vs项目添加windows服务 2. 添加Windo ...
- windows服务定时任务
其实定时任务时不时会碰到,只不过解决方案也不是只有一个,网上也有很多文章,但是没有一篇说得很清楚,尤其是安装环节,今天就着重说一下安装, 其他步骤带过,C#开发windows服务,开发,安装,调试 1 ...
- c#之添加window服务(定时任务)
本文讲述使用window服务创建定时任务 1.如图,新建项目,windows桌面->windows服务 2.如图,右键,添加安装程序 3.在下图安装程序 serviceInstaller1 上右 ...
- windows服务 定时任务
1.c#程序做成windows服务 若用cmd安装: var path = Process.GetCurrentProcess().MainModule.FileName + " s&quo ...
- 如何手动添加Windows服务和如何把一个服务删除
windows 手动添加服务方法一:修改注册表 在注册表编辑器,展开分支"HKEY_LOCAL_MACHINE\SYSTEM\CurrentControlSet\Services" ...
- 可视化Windows服务定时任务
思路:1.新建一个<Windows服务项目>,在里面建服务文件(可以多个),用来做要执行的任务. 2.新建一个<Windows窗体应用程序>,在这个程序里管理服务.如:安装.卸 ...
- Jboss添加Windows服务,同时定期重启
一.添加成Windows服务 进入目录 \wildfly-9.0.2s - All\bin\service\ 编辑 service.bat,修改一下参数 set SHORTNAME=SAMEXAppS ...
- wix在使用heat自动生成wxs时添加windows服务组件
最近需要给安装包增加一个windows服务组件,按照我的理解,我以为只需要Product.wxs加一段如下的标签就可以了 <Componet Id="myservice"&g ...
- C# 添加Windows服务,定时任务
源码下载地址:http://files.cnblogs.com/files/lanyubaicl/20160830Windows%E6%9C%8D%E5%8A%A1.zip 步骤 一 . 创建服务项目 ...
随机推荐
- FFmpeg命令行工具学习(二):播放媒体文件的工具ffplay
一.简述 ffplay是以FFmpeg框架为基础,外加渲染音视频的库libSDL构建的媒体文件播放器. 在使用ffplay之前必须要安装到系统中,MAC的安装教程为:http://www.cnblog ...
- 《http权威指南》读书笔记9
概述 最近对http很感兴趣,于是开始看<http权威指南>.别人都说这本书有点老了,而且内容太多.我个人觉得这本书写的太好了,非常长知识,让你知道关于http的很多概念,不仅告诉你怎么做 ...
- 图片格式PGM缩写
PGM是Portable Gray Map的缩写.它是灰度图像格式中一种最简单的格式标准.另外两种与之相近的图片格式是PBM和PPM.它们分别相应着黑白图像和彩色图像. PGM的数据存放方式相比于JP ...
- Java异常处理 10 个最佳实践
异常处理是Java 开发中的一个重要部分.它是关乎每个应用的一个非功能性需求,是为了处理任何错误状况,比如资源不可访问,非法输入,空输入等等.Java提供了几个异常处理特性,以try,catch 和 ...
- git push 到github时,报错:ERROR: Permission to xxx.git denied to user
之前我电脑的本地git已经登录了一个github账号,今天想换另外一个新的github账户来提交项目,相当于同一台电脑使用两个github账户. 于是我先修改用户名和邮箱. git config -- ...
- 【ABP框架系列学习】启动配置(5)
ABP提供了在启动时配置模块的基础设施和模型. 1.配置ABP 配置ABP是在模块的PreInitialize方法中完成的,例如: public class SimpleTaskSystemModul ...
- nginx介绍(三) 配置篇
3. nginx配置 nginx配置系统受益于Igor Sysoev(nginx创始人)在Apache(阿帕奇软件基金会)的经历.Igor Sysoev洞察出可扩展的配置系统对于一个web服务器来说是 ...
- Spring框架(2)---IOC装配Bean(xml配置方式)
IOC装配Bean (1)Spring框架Bean实例化的方式提供了三种方式实例化Bean 构造方法实例化(默认无参数,用的最多) 静态工厂实例化 实例工厂实例化 下面先写这三种方法的applicat ...
- logstash收集TCP端口日志
logstash收集TCP端口日志官方地址:https://www.elastic.co/guide/en/logstash-versioned-plugins/current/index.html ...
- sql server 备份与恢复系列五 完整模式下的备份与还原
一.概述 前面介绍了简单恢复模式和大容量恢复模式,这篇继续写完整恢复模式下的备份与还原.在完整恢复模式里最大的优点是只要能成功备份尾日志,就可以还原到日志备份内包含的任何时点("时点恢复&q ...