3、Qt Project之Socket网络编程
Socket网络编程
Step1:首先完成整个界面的设计
<?xml version="1.0" encoding="UTF-8"?>

<ui version="4.0">

 <class>MainWindow</class>

 <widget class="QMainWindow" name="MainWindow">

  <property name="geometry">

   <rect>

    <x>0</x>

    <y>0</y>

    <width>421</width>

    <height>533</height>

   </rect>

  </property>

  <property name="windowTitle">

   <string>MainWindow</string>

  </property>

  <widget class="QWidget" name="centralWidget">

   <widget class="QLineEdit" name="IP_Address">

    <property name="geometry">

     <rect>

      <x>30</x>

      <y>140</y>

      <width>113</width>

      <height>27</height>

     </rect>

    </property>

   </widget>

   <widget class="QLabel" name="label_4">

    <property name="geometry">

     <rect>

      <x>20</x>

      <y>100</y>

      <width>171</width>

      <height>21</height>

     </rect>

    </property>

    <property name="font">

     <font>

      <pointsize>10</pointsize>

      <italic>true</italic>

      <underline>false</underline>

      <strikeout>false</strikeout>

     </font>

    </property>

    <property name="cursor">

     <cursorShape>BlankCursor</cursorShape>

    </property>

    <property name="text">

     <string>Designed by : mm1994uestc</string>

    </property>

    <property name="alignment">

     <set>Qt::AlignCenter</set>

    </property>

   </widget>

   <widget class="QLabel" name="label_6">

    <property name="geometry">

     <rect>

      <x>0</x>

      <y>-10</y>

      <width>321</width>

      <height>51</height>

     </rect>

    </property>

    <property name="font">

     <font>

      <pointsize>28</pointsize>

      <italic>true</italic>

      <underline>false</underline>

      <strikeout>false</strikeout>

     </font>

    </property>

    <property name="cursor">

     <cursorShape>BlankCursor</cursorShape>

    </property>

    <property name="text">

     <string>Qt interface Demo!</string>

    </property>

    <property name="alignment">

     <set>Qt::AlignCenter</set>

    </property>

   </widget>

   <widget class="QLabel" name="label_5">

    <property name="geometry">

     <rect>

      <x>0</x>

      <y>40</y>

      <width>171</width>

      <height>51</height>

     </rect>

    </property>

    <property name="font">

     <font>

      <pointsize>16</pointsize>

      <italic>true</italic>

      <underline>false</underline>

      <strikeout>false</strikeout>

     </font>

    </property>

    <property name="cursor">

     <cursorShape>BlankCursor</cursorShape>

    </property>

    <property name="text">

     <string>Socket Control</string>

    </property>

    <property name="alignment">

     <set>Qt::AlignCenter</set>

    </property>

   </widget>

   <widget class="QLineEdit" name="Client_Port">

    <property name="geometry">

     <rect>

      <x>200</x>

      <y>140</y>

      <width>51</width>

      <height>27</height>

     </rect>

    </property>

   </widget>

   <widget class="QPushButton" name="Client_Button">

    <property name="geometry">

     <rect>

      <x>260</x>

      <y>140</y>

      <width>151</width>

      <height>27</height>

     </rect>

    </property>

    <property name="text">

     <string>TCP-Client-Connect</string>

    </property>

   </widget>

   <widget class="QLabel" name="label">

    <property name="geometry">

     <rect>

      <x>10</x>

      <y>130</y>

      <width>21</width>

      <height>41</height>

     </rect>

    </property>

    <property name="text">

     <string>IP:</string>

    </property>

   </widget>

   <widget class="QLabel" name="label_2">

    <property name="geometry">

     <rect>

      <x>150</x>

      <y>130</y>

      <width>51</width>

      <height>41</height>

     </rect>

    </property>

    <property name="text">

     <string>PORT:</string>

    </property>

   </widget>

   <widget class="QLineEdit" name="Server_Port">

    <property name="geometry">

     <rect>

      <x>60</x>

      <y>320</y>

      <width>51</width>

      <height>27</height>

     </rect>

    </property>

   </widget>

   <widget class="QLabel" name="label_3">

    <property name="geometry">

     <rect>

      <x>10</x>

      <y>310</y>

      <width>51</width>

      <height>41</height>

     </rect>

    </property>

    <property name="text">

     <string>PORT:</string>

    </property>

   </widget>

   <widget class="QPushButton" name="Server_Button">

    <property name="geometry">

     <rect>

      <x>120</x>

      <y>320</y>

      <width>161</width>

      <height>27</height>

     </rect>

    </property>

    <property name="text">

     <string>TCP-Server-Monitor</string>

    </property>

   </widget>

   <widget class="QLabel" name="label_7">

    <property name="geometry">

     <rect>

      <x>10</x>

      <y>170</y>

      <width>151</width>

      <height>41</height>

     </rect>

    </property>

    <property name="text">

     <string>Data Ricieve Frame:</string>

    </property>

   </widget>

   <widget class="QLabel" name="label_8">

    <property name="geometry">

     <rect>

      <x>230</x>

      <y>170</y>

      <width>151</width>

      <height>41</height>

     </rect>

    </property>

    <property name="text">

     <string>Data Send Frame:</string>

    </property>

   </widget>

   <widget class="QLabel" name="label_9">

    <property name="geometry">

     <rect>

      <x>10</x>

      <y>350</y>

      <width>151</width>

      <height>41</height>

     </rect>

    </property>

    <property name="text">

     <string>Data Ricieve Frame:</string>

    </property>

   </widget>

   <widget class="QLabel" name="label_10">

    <property name="geometry">

     <rect>

      <x>230</x>

      <y>350</y>

      <width>151</width>

      <height>41</height>

     </rect>

    </property>

    <property name="text">

     <string>Data Send Frame:</string>

    </property>

   </widget>

   <widget class="QLabel" name="Corver">

    <property name="geometry">

     <rect>

      <x>220</x>

      <y>40</y>

      <width>171</width>

      <height>91</height>

     </rect>

    </property>

    <property name="text">

     <string>                     Corver</string>

    </property>

   </widget>

   <widget class="QPushButton" name="pushButton">

    <property name="geometry">

     <rect>

      <x>350</x>

      <y>180</y>

      <width>51</width>

      <height>27</height>

     </rect>

    </property>

    <property name="text">

     <string>Send</string>

    </property>

   </widget>

   <widget class="QPushButton" name="ServerSend">

    <property name="geometry">

     <rect>

      <x>350</x>

      <y>360</y>

      <width>51</width>

      <height>27</height>

     </rect>

    </property>

    <property name="text">

     <string>Send</string>

    </property>

   </widget>

   <widget class="QPlainTextEdit" name="Client_Recieve">

    <property name="geometry">

     <rect>

      <x>10</x>

      <y>210</y>

      <width>171</width>

      <height>101</height>

     </rect>

    </property>

   </widget>

   <widget class="QPlainTextEdit" name="Client_Send">

    <property name="geometry">

     <rect>

      <x>230</x>

      <y>210</y>

      <width>171</width>

      <height>101</height>

     </rect>

    </property>

   </widget>

   <widget class="QPlainTextEdit" name="Server_Recieve">

    <property name="geometry">

     <rect>

      <x>10</x>

      <y>390</y>

      <width>171</width>

      <height>101</height>

     </rect>

    </property>

   </widget>

   <widget class="QPlainTextEdit" name="Server_Send">

    <property name="geometry">

     <rect>

      <x>230</x>

      <y>390</y>

      <width>171</width>

      <height>101</height>

     </rect>

    </property>

   </widget>

   <widget class="QPushButton" name="Client_Clear">

    <property name="geometry">

     <rect>

      <x>150</x>

      <y>180</y>

      <width>51</width>

      <height>27</height>

     </rect>

    </property>

    <property name="text">

     <string>Clear</string>

    </property>

   </widget>

   <widget class="QPushButton" name="Server_Clear">

    <property name="geometry">

     <rect>

      <x>150</x>

      <y>360</y>

      <width>51</width>

      <height>27</height>

     </rect>

    </property>

    <property name="text">

     <string>Clear</string>

    </property>

   </widget>

  </widget>

  <widget class="QMenuBar" name="menuBar">

   <property name="geometry">

    <rect>

     <x>0</x>

     <y>0</y>

     <width>421</width>

     <height>25</height>

    </rect>

   </property>

  </widget>

  <widget class="QToolBar" name="mainToolBar">

   <attribute name="toolBarArea">

    <enum>TopToolBarArea</enum>

   </attribute>

   <attribute name="toolBarBreak">

    <bool>false</bool>

   </attribute>

  </widget>

  <widget class="QStatusBar" name="statusBar"/>

 </widget>

 <layoutdefault spacing="6" margin="11"/>

 <resources/>

 <connections/>

</ui>
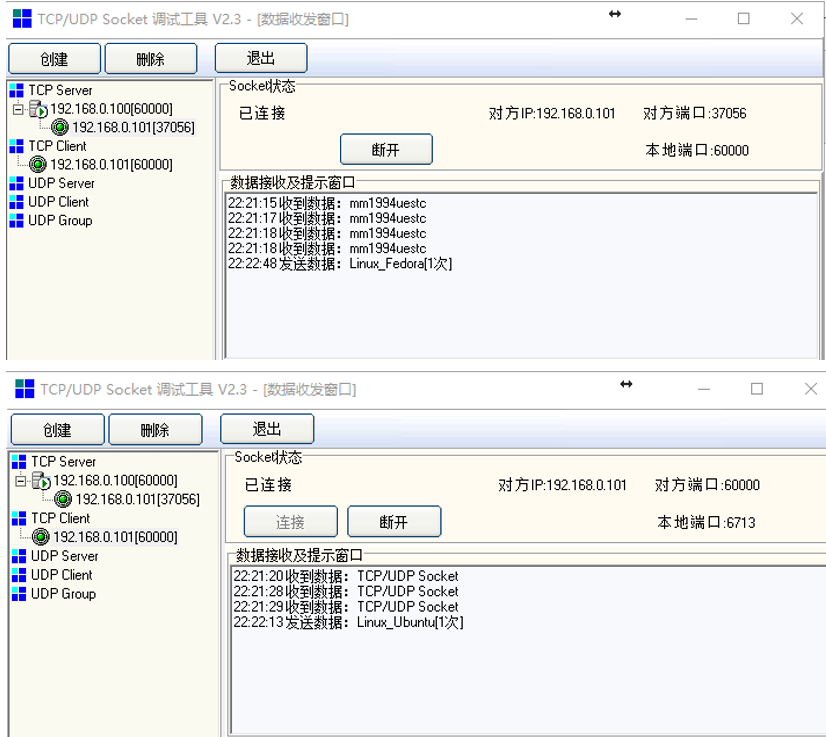
Ubuntu 16.04 Edition Qt Socket Project Windows 10 端的Socket Tool
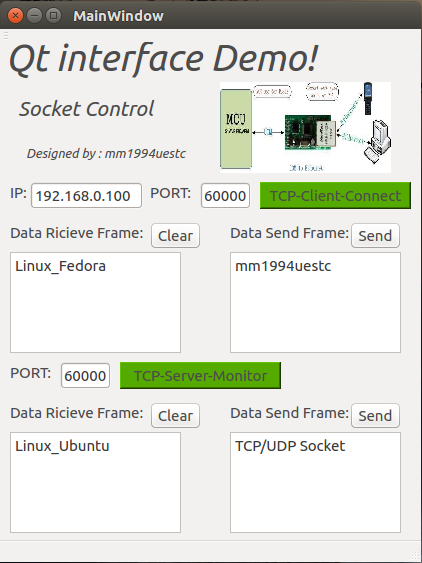
整个界面的样式如图所示,包括了TCP Client以及TCP Server端。
IP表示客户端将要连接的TCP Server的服务器ip地址,PORT填入的是对应的TCP Server的地址开放的监听的端口号
Clear按钮是用来清楚Server或者Client的接收空间,Send是用来发送发送栏当中的数据的。其他按钮用来开启对应的服务。
Step2:相关槽函数已经接收读取函数的实现
void MainWindow::Client_Recieve_Data(void)

{

    QByteArray buf;

    buf = client->readAll();

    if(!buf.isEmpty())

    {

        QString str = this->ui->Client_Recieve->toPlainText();

        str += tr(buf);

        this->ui->Client_Recieve->clear();

        this->ui->Client_Recieve->appendPlainText(str);

    }

    buf.clear();

}

void MainWindow::on_Client_Button_clicked(bool checked)

{

    if(!ClientFlag)

    {

        QString IP,PORT;

        IP = this->ui->IP_Address->text();

        PORT = this->ui->Client_Port->text();

        qDebug() << IP;

        qDebug() << PORT;

        client->connectToHost(QHostAddress(IP),PORT.toInt(),QTcpSocket::ReadWrite);

        qDebug() << "Client is Started!";

        QObject::connect(client,&QTcpSocket::readyRead,this,&MainWindow::Client_Recieve_Data);

        this->ui->Client_Button->setStyleSheet("background-color: rgb(85,170,0);");

    }

    else

    {

        this->ui->Client_Button->setStyleSheet("background-color: rgb(0,0,0);");

        client->close();

        qDebug() << "Client is Closed!";

    }

    ClientFlag = !ClientFlag;

}

void MainWindow::on_pushButton_clicked(bool checked)

{

    if(ClientFlag)

    {

        QString Send_data;

        Send_data = this->ui->Client_Send->toPlainText();

        qDebug() << Send_data;

        client->write(Send_data.toLatin1());

        qDebug() << "Data sended!";

    }

}

void MainWindow::on_Client_Clear_clicked(bool checked)

{

    this->ui->Client_Recieve->clear();

    qDebug() << "Client_Recieve_CLear!";

}

/************************************************************

 * Server Side Programming!

 * The Qt Socket Programming have ever finished binding the port!

 * The accept func is trigger by a new connection signal!

 ***********************************************************/

void MainWindow::readClient(void)

{

    QByteArray buf;

    buf = client_connect->readAll();

    if(!buf.isEmpty())

    {

        QString str = this->ui->Server_Recieve->toPlainText();

        str += tr(buf);

        this->ui->Server_Recieve->clear();

        this->ui->Server_Recieve->appendPlainText(str);

    }

    buf.clear();

}

void MainWindow::accepConnection(void)

{

    client_connect = server->nextPendingConnection();

    QObject::connect(client_connect,&QTcpSocket::readyRead,this,&MainWindow::readClient);

}

void MainWindow::on_Server_Clear_clicked(bool checked)

{

    this->ui->Server_Recieve->clear();

    qDebug() << "Server_Recieve_Clear!";

}

void MainWindow::on_ServerSend_clicked(bool checked)

{

    if(ServerFlag)

    {

        QString SendData;

        SendData = this->ui->Server_Send->toPlainText();

        client_connect->write(SendData.toLatin1());

        qDebug() << SendData;

        qDebug() << "ServerData send!";

    }

}

void MainWindow::on_Server_Button_clicked(bool checked)

{

    if(!ServerFlag)

    {

        QString MonitorPort;

        MonitorPort = this->ui->Server_Port->text();

        int PortNum;

        PortNum = MonitorPort.toInt();

        server->listen(QHostAddress::Any,PortNum);

        QObject::connect(server,&QTcpServer::newConnection,this,&MainWindow::accepConnection);

        qDebug() << "Server Started!";

        qDebug() << "PortNum:" << PortNum;

        this->ui->Server_Button->setStyleSheet("background-color: rgb(85,170,0);");

    }

    else

    {

        this->ui->Server_Button->setStyleSheet("background-color: rgb(0,0,0);");

        client_connect->close();

        server->close();

        qDebug() << "Server Closed!";

    }

    ServerFlag = !ServerFlag;

}
Step3:槽函数的声明&Socket对象定义
private slots:

    void on_Client_Button_clicked(bool checked);

    void on_pushButton_clicked(bool checked);

    void Client_Recieve_Data(void);

    void accepConnection(void);

    void readClient(void);

    void on_Client_Clear_clicked(bool checked);

    void on_Server_Clear_clicked(bool checked);

    void on_ServerSend_clicked(bool checked);

    void on_Server_Button_clicked(bool checked);

    void TimeOutProcess(void);

private:

    Ui::MainWindow *ui;

    QTcpSocket *client;

    QTcpServer *server;

    QTcpSocket *client_connect;

    QTimer *TimeMonitor;

    bool ClientFlag = false;

    bool ServerFlag = false;
Step4:信号和槽的连接
connect(this->ui->Client_Button,SIGNAL(clicked(bool)),this,SLOT(on_Client_Button_clicked()));
connect(this->ui->pushButton,SIGNAL(clicked(bool)),this,SLOT(on_pushButton_clicked()));
connect(this->ui->Client_Clear,SIGNAL(clicked(bool)),this,SLOT(on_Client_Clear_clicked()));
connect(this->ui->Server_Clear,SIGNAL(clicked(bool)),this,SLOT(on_Server_Clear_clicked()));
connect(this->ui->ServerSend,SIGNAL(clicked(bool)),this,SLOT(on_ServerSend_clicked()));
connect(this->ui->Server_Button,SIGNAL(clicked(bool)),this,SLOT(on_Server_Button_clicked()));
connect(TimeMonitor,&QTimer::timeout,this,&MainWindow::TimeOutProcess);
完成上述操作,基本就完成了Qt Socket程序的功能。
3、Qt Project之Socket网络编程的更多相关文章
- windows socket 网络编程
样例代码就在我的博客中,包含六个UDP和TCP发送接受的cpp文件,一个基于MFC的局域网聊天小工具project,和此小工具的全部执行时库.资源和执行程序.代码的压缩包位置是http://www.b ...
- Linux Socket 网络编程
Linux下的网络编程指的是socket套接字编程,入门比较简单.在学校里学过一些皮毛,平时就是自学玩,没有见识过真正的socket编程大程序,比较遗憾.总感觉每次看的时候都有收获,但是每次看完了之后 ...
- Python Socket 网络编程
Socket 是进程间通信的一种方式,它与其他进程间通信的一个主要不同是:它能实现不同主机间的进程间通信,我们网络上各种各样的服务大多都是基于 Socket 来完成通信的,例如我们每天浏览网页.QQ ...
- Python全栈【Socket网络编程】
Python全栈[socket网络编程] 本章内容: Socket 基于TCP的套接字 基于UDP的套接字 TCP粘包 SocketServer 模块(ThreadingTCPServer源码剖析) ...
- python之Socket网络编程
什么是网络? 网络是由节点和连线构成,表示诸多对象及其相互联系.在数学上,网络是一种图,一般认为专指加权图.网络除了数学定义外,还有具体的物理含义,即网络是从某种相同类型的实际问题中抽象出来的模型.在 ...
- Python之路【第七篇】python基础 之socket网络编程
本篇文章大部分借鉴 http://www.cnblogs.com/nulige/p/6235531.html python socket 网络编程 一.服务端和客户端 BS架构 (腾讯通软件:ser ...
- Socket网络编程-基础篇
Socket网络编程 网络通讯三要素: IP地址[主机名] 网络中设备的标识 本地回环地址:127.0.0.1 主机名:localhost 端口号 用于标识进程的逻辑地址 有效端口:0~65535 其 ...
- Socket网络编程--FTP客户端
Socket网络编程--FTP客户端(1)(Windows) 已经好久没有写过博客进行分享了.具体原因,在以后说. 这几天在了解FTP协议,准备任务是写一个FTP客户端程序.直接上干货了. 0.了解F ...
- windows下的socket网络编程
windows下的socket网络编程 windows下的socket网络编程 clinet.c 客户端 server.c 服务器端 UDP通信的实现 代码如下 已经很久没有在windows下编程了, ...
随机推荐
- Codeforces 576E Painting Edges [分治,并查集]
洛谷 Codeforces 建议阅读这篇博客作为预备.无耻地打广告 思路 与bzoj4025很相似,思路也差不多,可以看上面那篇博客. 仍然是用二分图的充要条件:没有奇环. 然而这题难在每条边的存在时 ...
- 12c rac On redhat 7
1 准备工作 1.1 关于GRID的一些变化 1.1.1 简化的基于映像的Oracle Grid Infrastructure安装 从Oracle Grid Infrastructure 12 ...
- linux与window互传文件
首先我们的目标是把一个很大的文件传到linux中,所以我们先要让linux节点开启ftp服务 FTP 10.1.61.212 如果对方没有开启FTP服务,那么这个命令就不会有效果. 1.开启xftp ...
- 来,了解一下Java内存模型(JMM)
网上有很多关于Java内存模型的文章,在<深入理解Java虚拟机>和<Java并发编程的艺术>等书中也都有关于这个知识点的介绍.但是,很多人读完之后还是搞不清楚,甚至有的人说自 ...
- jenkins自动发布java代码
注:本文来源于<KaliArch> jenkins笔记 一.相关概念 1.1 Jenkins概念: Jenkins是一个功能强大的应用程序,允许持续集成和持续交付项目,无论用的是什么平台. ...
- Oracle 中 nvl、nvl2、nullif、coalesce、decode 函数的用法详解
NVL(EXPR1,EXPR2) NVL2(EXPR1,EXPR2,EXPR3) NULLIF(EXPR1,EXPR2) COALESCE(EXPR1,,..,EXPRn) decode ------ ...
- Centos下安装软件的常用方法
1.源码安装: 需要手动编译.这种软件安装包通常是用gzip压缩过的tar包(后缀为.tar.gz). tar -zxvf filename.tar.gz 通常在解压缩后产生的文件中,有名为" ...
- jsp 监听器
Servlet API提供了一系列的事件和事件监听接口. 上层的servlet/JSP应用能够通过调用这些API进行事件 驱动的开发.这里监听的所有事件都继承自 java.util.Event对象.监 ...
- 小学生都看得懂的C语言入门(3): 数组与函数
#include <stdio.h> int main() { int x; ; ; scanf("%d",&x){ sum+=x; cnt++; scanf( ...
- Linux基础三:linux目录结构和目录文件的浏览、管理及维护
目录文件的浏览.管理及维护(一) 1.Linux文件系统的层次结构 1)Linux文件系统的树状结构:在Linux或UNIX操作系统中,所有的文件和目录都被组织成一个以根节点开始的倒置的树状结构. 2 ...